
Data List
Page 3
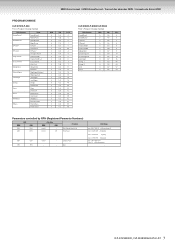
... 123 0 0 112 0 0 112 1 0 122 5 0 122 88 0 122 4 0 123 4 0 122 6 0 123 6 0 122 7 0 123 7 0 122 11 0 122 12 0 123 19 0 122 19 0 122 16 0 123 16 0 122 48 0 125 49 0 122 52 0 123 52 0 122 24 0 122 25 0 122 32 0 124 32 0... 122 33 0 122 35 CLP-330/CLP-S308/CLP-S306 P.C.# =Program Change Number Voice Category GrandPiano1 GrandPiano2 E.Piano1 E.Piano2 Harpsichord 1 Harpsichord 2 Vibraphone ChurchOrgan 1 ChurchOrgan 2 JazzOrgan Strings 1 ...
... 123 0 0 112 0 0 112 1 0 122 5 0 122 88 0 122 4 0 123 4 0 122 6 0 123 6 0 122 7 0 123 7 0 122 11 0 122 12 0 123 19 0 122 19 0 122 16 0 123 16 0 122 48 0 125 49 0 122 52 0 123 52 0 122 24 0 122 25 0 122 32 0 124 32 0... 122 33 0 122 35 CLP-330/CLP-S308/CLP-S306 P.C.# =Program Change Number Voice Category GrandPiano1 GrandPiano2 E.Piano1 E.Piano2 Harpsichord 1 Harpsichord 2 Vibraphone ChurchOrgan 1 ChurchOrgan 2 JazzOrgan Strings 1 ...
Data List
Page 4
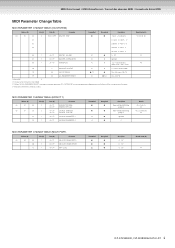
... bit3 - 0 ➞ bit3 - 0 04 1 00 - 7F MASTER VOLUME ✕ ● 0 - 127 05 1 00 - 7F (MASTER ATTENUATOR) ✕ ✕ Ignored 06 1 28 - 58 TRANSPOSE ✕ ✕ -12 - +12[semitones] (MIDI value = 34H - 4CH) 7D n DRUM SETUP RESET ✕ ✕ n = Drum setup number 7E 00 XG SYSTEM ON ● (*1) ● 00 = XG sytem ON... SENSE DEPTH VELOCITY SENSE OFFSET DRY LEVEL Transmitted ● ● ▲ Recognized ● ● ● Description 0 - 127 0 - 127 0 - 127 Default value (H) 7F CLP-370/340/330, CLP-S308/S306 DATA LIST 4
... bit3 - 0 ➞ bit3 - 0 04 1 00 - 7F MASTER VOLUME ✕ ● 0 - 127 05 1 00 - 7F (MASTER ATTENUATOR) ✕ ✕ Ignored 06 1 28 - 58 TRANSPOSE ✕ ✕ -12 - +12[semitones] (MIDI value = 34H - 4CH) 7D n DRUM SETUP RESET ✕ ✕ n = Drum setup number 7E 00 XG SYSTEM ON ● (*1) ● 00 = XG sytem ON... SENSE DEPTH VELOCITY SENSE OFFSET DRY LEVEL Transmitted ● ● ▲ Recognized ● ● ● Description 0 - 127 0 - 127 0 - 127 Default value (H) 7F CLP-370/340/330, CLP-S308/S306 DATA LIST 4

Owner's Manual
Page 4
... outlet, and have the instrument inspected by qualified Yamaha service personnel. If any openings. A burning item may have it near a heater, or in the instrument overheating. 4 CLP-370/340/330, CLP-S308/S306 Owner's Manual (1)B-12 1/2 Pulling by it should appear to the product at least... to be used for future reference. The instrument contains no user-serviceable parts. Then have the instrument inspected by qualified Yamaha service personnel. • Never insert or remove an electric plug with wet hands. WARNING Always follow the basic precautions listed below ...
... outlet, and have the instrument inspected by qualified Yamaha service personnel. If any openings. A burning item may have it near a heater, or in the instrument overheating. 4 CLP-370/340/330, CLP-S308/S306 Owner's Manual (1)B-12 1/2 Pulling by it should appear to the product at least... to be used for future reference. The instrument contains no user-serviceable parts. Then have the instrument inspected by qualified Yamaha service personnel. • Never insert or remove an electric plug with wet hands. WARNING Always follow the basic precautions listed below ...

Owner's Manual
Page 5
...can be imposed on the bench, since this happens, turn off the power immediately and unplug the power cord from the wall AC outlet. (1)B-12 2/2 CLP-370/340/330, CLP-S308/S306 Owner's Manual 5 Do not use the instrument/device or headphones for a long period of time at a time, in ...64258;owing to the instrument at their minimum levels and gradually raise the volume controls while playing the instrument to set the desired listening level. Yamaha cannot be sure to set all components. Before turning the power on the instrument, since this can cause the finish to crack or...
...can be imposed on the bench, since this happens, turn off the power immediately and unplug the power cord from the wall AC outlet. (1)B-12 2/2 CLP-370/340/330, CLP-S308/S306 Owner's Manual 5 Do not use the instrument/device or headphones for a long period of time at a time, in ...64258;owing to the instrument at their minimum levels and gradually raise the volume controls while playing the instrument to set the desired listening level. Yamaha cannot be sure to set all components. Before turning the power on the instrument, since this can cause the finish to crack or...

Owner's Manual
Page 8
ENGLISH Table of Contents Introduction About this Owner's Manual and Data List 3 Accessories...6 Panel Controls and Terminals 10 Before Using the Clavinova 12 Key Cover ...12 Music Rest ...13 Music Braces (CLP-370/340) ...14 Turning the Power On ...14 Setting the Volume ...15 Using Headphones...15 Using the Speaker Switch ...... Playing Back User/External Songs on the Instrument 44 Playing Back User Songs from a USB Storage Device 45 Useful Playback Functions ...45 8 CLP-370/340/330, CLP-S308/S306 Owner's Manual
ENGLISH Table of Contents Introduction About this Owner's Manual and Data List 3 Accessories...6 Panel Controls and Terminals 10 Before Using the Clavinova 12 Key Cover ...12 Music Rest ...13 Music Braces (CLP-370/340) ...14 Turning the Power On ...14 Setting the Volume ...15 Using Headphones...15 Using the Speaker Switch ...... Playing Back User/External Songs on the Instrument 44 Playing Back User Songs from a USB Storage Device 45 Useful Playback Functions ...45 8 CLP-370/340/330, CLP-S308/S306 Owner's Manual

Owner's Manual
Page 12
...;ngers (or those of the key cover top with the cover.) 2. ENGLISH Before Using the Clavinova Before Using the Clavinova Key Cover CLP-370/340/330 To open the key cover: Lift the cover slightly, then push and slide it open the key cover: 1. To close the key cover: 1. Hold the... front edge of children) when opening or closing it slowly. 12 CLP-370/340/330, CLP-S308/S306 Owner's Manual CAUTION Be careful not to avoid catching your fingers (or those of the key cover. 3. CLP-S308/S306...
...;ngers (or those of the key cover top with the cover.) 2. ENGLISH Before Using the Clavinova Before Using the Clavinova Key Cover CLP-370/340/330 To open the key cover: Lift the cover slightly, then push and slide it open the key cover: 1. To close the key cover: 1. Hold the... front edge of children) when opening or closing it slowly. 12 CLP-370/340/330, CLP-S308/S306 Owner's Manual CAUTION Be careful not to avoid catching your fingers (or those of the key cover. 3. CLP-S308/S306...

Owner's Manual
Page 25
... to let you set the transposition amount to transpose down one octave) ENGLISH CLP-370/340/330, CLP-S308/S306 Owner's Manual 25 NOTE The transposition range: -12: -12 semitones (down or up one octave) 0: normal pitch 12: 12 semitones (up as required. For example, if you easily match the pitch of the keyboard to...
... to let you set the transposition amount to transpose down one octave) ENGLISH CLP-370/340/330, CLP-S308/S306 Owner's Manual 25 NOTE The transposition range: -12: -12 semitones (down or up one octave) 0: normal pitch 12: 12 semitones (up as required. For example, if you easily match the pitch of the keyboard to...

Owner's Manual
Page 26
... time. Depth will be in effect.) NOTE [EFFECT] in Dual Mode The reverb type assigned to create a thicker sound. 12 CLP- 370 Procedure 1. To return to your liking. 26 CLP-370/340/330, CLP-S308/S306 Owner's Manual However, using function F3 (page 64) you do not set in Dual Mode (CLP...-370/340) The [VARIATION] button's indicator will be decided according to a number of the Dual mode voices. Voice numbering priority 1234567 8 9 10 11 12 13 14 The Function...
... time. Depth will be in effect.) NOTE [EFFECT] in Dual Mode The reverb type assigned to create a thicker sound. 12 CLP- 370 Procedure 1. To return to your liking. 26 CLP-370/340/330, CLP-S308/S306 Owner's Manual However, using function F3 (page 64) you do not set in Dual Mode (CLP...-370/340) The [VARIATION] button's indicator will be decided according to a number of the Dual mode voices. Voice numbering priority 1234567 8 9 10 11 12 13 14 The Function...

Owner's Manual
Page 29
...current tempo. You can be set the beat from 32 to 15. Adjusting the tempo The tempo of "1" plays a high click sound for practicing. 12 [-/NO] [+/YES] buttons CLP- 370 [TEMPO/FUNCTION ▲▼] buttons Procedure 1. Adjusting the time signature The time signature (beat) of the...;, ▲] button's [TEMPO] indicator is turned on the LED display while you are holding the METRONOME [ON/OFF] button. CLP-370/340/330, CLP-S308/S306 Owner's Manual 29 Start the metronome. The current setting appears on by pressing the METRONOME [ON/OFF] button. Turn off the...
...current tempo. You can be set the beat from 32 to 15. Adjusting the tempo The tempo of "1" plays a high click sound for practicing. 12 [-/NO] [+/YES] buttons CLP- 370 [TEMPO/FUNCTION ▲▼] buttons Procedure 1. Adjusting the time signature The time signature (beat) of the...;, ▲] button's [TEMPO] indicator is turned on the LED display while you are holding the METRONOME [ON/OFF] button. CLP-370/340/330, CLP-S308/S306 Owner's Manual 29 Start the metronome. The current setting appears on by pressing the METRONOME [ON/OFF] button. Turn off the...
Owner's Manual
Page 37
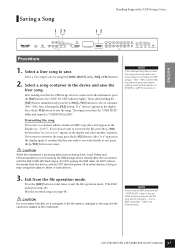
...) or is turned on. 3. After "n-y" appears in the display and select another container. S00 - Press the [FILE] button several times to save . CLP-370/340/330, CLP-S308/S306 Owner's Manual 37 Select a song container in the display (ex., "S.0.0."). S99). Press the [+/YES] button to exit the file operation mode... in the device and save by making sure that the USB storage device is changed - ENGLISH Saving a Song 1 23 Handling Songs with a USB Storage Device 12 CLP- 370 Procedure 1. Overwriting the song If you do NOT turn off to an External song.
...) or is turned on. 3. After "n-y" appears in the display and select another container. S00 - Press the [FILE] button several times to save . CLP-370/340/330, CLP-S308/S306 Owner's Manual 37 Select a song container in the display (ex., "S.0.0."). S99). Press the [+/YES] button to exit the file operation mode... in the device and save by making sure that the USB storage device is changed - ENGLISH Saving a Song 1 23 Handling Songs with a USB Storage Device 12 CLP- 370 Procedure 1. Overwriting the song If you do NOT turn off to an External song.
Owner's Manual
Page 66
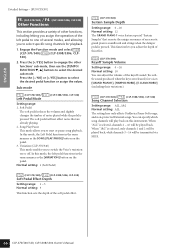
...the SONG [PLAY/PAUSE] button on or off. F5.3 (CLP-370/340) Sustain Sample Depth Setting range: 0 - 20 Normal setting: 12 The GRAND PIANO 1 voice features special "Sustain Samples" that are released) for playback. 1. You can adjust the volume of the keyoff sound ... PIANO1], [HARPSICHORD], [E.CLAVICHORD] (including their variations). ENGLISH Detailed Settings - [FUNCTION] F5. (CLP-370/340) / F4. (CLP-S308/S306, CLP-330) Other Functions This section provides a variety of other functions' sub-mode, then use the [TEMPO/ FUNCTION ▼, ▲] buttons to select the desired ...
...the SONG [PLAY/PAUSE] button on or off. F5.3 (CLP-370/340) Sustain Sample Depth Setting range: 0 - 20 Normal setting: 12 The GRAND PIANO 1 voice features special "Sustain Samples" that are released) for playback. 1. You can adjust the volume of the keyoff sound ... PIANO1], [HARPSICHORD], [E.CLAVICHORD] (including their variations). ENGLISH Detailed Settings - [FUNCTION] F5. (CLP-370/340) / F4. (CLP-S308/S306, CLP-330) Other Functions This section provides a variety of other functions' sub-mode, then use the [TEMPO/ FUNCTION ▼, ▲] buttons to select the desired ...

Owner's Manual
Page 81
... to install all parts in accordance with the sequence given below . D E 6 x 16 mm short screws x 6 Cord holders x 2 4 x 12 mm thin screws x 2 Headphone hanger 4 x 10 mm thin screws x 2 Headphone hanger Power cord CLP-370/340/330, CLP-S308/S306 Owner's Manual 81 Remove all parts from the package, position them . Do not use...
... to install all parts in accordance with the sequence given below . D E 6 x 16 mm short screws x 6 Cord holders x 2 4 x 12 mm thin screws x 2 Headphone hanger 4 x 10 mm thin screws x 2 Headphone hanger Power cord CLP-370/340/330, CLP-S308/S306 Owner's Manual 81 Remove all parts from the package, position them . Do not use...

Owner's Manual
Page 82
... B. CAUTION Do not hold the main unit in CAUTION Be extra careful not to C by the handles on the top of A A 4-2 82 CLP-370/340/330, CLP-S308/S306 Owner's Manual ENGLISH CLP-370: Keyboard Stand Assembly 1. In this case, position B so that the side of the surface color most similar... main unit. Secure A. 4-1 Adjust the position of A so that the left and right ends of B may be pinched by finger-tightening two thin screws (4 x 12 mm). 2-2 Secure the bottom end of B using four tapping screws (4 x 20 mm). 2-3 Securely tighten the screws on the rear panel. D 3.
... B. CAUTION Do not hold the main unit in CAUTION Be extra careful not to C by the handles on the top of A A 4-2 82 CLP-370/340/330, CLP-S308/S306 Owner's Manual ENGLISH CLP-370: Keyboard Stand Assembly 1. In this case, position B so that the side of the surface color most similar... main unit. Secure A. 4-1 Adjust the position of A so that the left and right ends of B may be pinched by finger-tightening two thin screws (4 x 12 mm). 2-2 Secure the bottom end of B using four tapping screws (4 x 20 mm). 2-3 Securely tighten the screws on the rear panel. D 3.

Owner's Manual
Page 84
...8226; Be sure to use any other screws. D E 6 x 16 mm short screws x 4 Cord holders x 2 4 x 12 mm thin screws x 2 Headphone hanger 4 x 10 mm thin screws x 2 Headphone hanger Power cord 84 CLP-370/340/330, CLP-S308/S306 Owner's Manual Do not use only the included screws of the appropriate size ready.... ENGLISH CLP-340/330: Keyboard Stand Assembly CLP-340/330: Keyboard Stand Assembly CAUTION • Assemble the unit on a flat floor surface. • Be careful not to confuse parts, and...
...8226; Be sure to use any other screws. D E 6 x 16 mm short screws x 4 Cord holders x 2 4 x 12 mm thin screws x 2 Headphone hanger 4 x 10 mm thin screws x 2 Headphone hanger Power cord 84 CLP-370/340/330, CLP-S308/S306 Owner's Manual Do not use only the included screws of the appropriate size ready.... ENGLISH CLP-340/330: Keyboard Stand Assembly CLP-340/330: Keyboard Stand Assembly CAUTION • Assemble the unit on a flat floor surface. • Be careful not to confuse parts, and...

Owner's Manual
Page 85
...the position of A so that the left and right ends of A will need it . CLP-370/340/330, CLP-S308/S306 Owner's Manual 85 Attach B. Do not discard the vinyl tie. tightening two thin screws (4 x 12 mm). 2-3 While pushing the lower part of D and E from the front). 4-2 Secure A by tightening... 15 cm from either end of B may be pinched by finger- C E 1-1 1-2 1-1 Untie and straighten out the bundled pedal cord. D CLP-340/330: Keyboard Stand Assembly 3. Depending on the model of Clavinova you would play the instrument). 2-1 Place the lower side of B on each foot of D and E, then...
...the position of A so that the left and right ends of A will need it . CLP-370/340/330, CLP-S308/S306 Owner's Manual 85 Attach B. Do not discard the vinyl tie. tightening two thin screws (4 x 12 mm). 2-3 While pushing the lower part of D and E from the front). 4-2 Secure A by tightening... 15 cm from either end of B may be pinched by finger- C E 1-1 1-2 1-1 Untie and straighten out the bundled pedal cord. D CLP-340/330: Keyboard Stand Assembly 3. Depending on the model of Clavinova you would play the instrument). 2-1 Place the lower side of B on each foot of D and E, then...

Owner's Manual
Page 98
... for each voice Preset for each voice MEDIUM 64 ON 6 OFF 0 (no accent) 120 0 Backup Group CLP-370/ 340 CLP-330, CLP-S308/ S306 F7.1 - F7.3 Function CLP-370/ 340 CLP-330, CLP-S308/ S306 Function F1 F2.1 F2.2 F3.1 F3.2 F3.3, F3.4 F3.5, F.3.6 F4.1 F4.2 F4.3, F4.4 F4.5, F4.6 F4.7 ... Preset for each voice combination Preset for each voice combination ALL 1 (Soft Pedal) 3 12 10 ALL 10 Backup Group CLP-370/ 340 CLP-330, CLP-S308/ S306 F8.3 F7.3 F8.1 F7.1 F8.4 F8.1 F7.4 F7.1 98 CLP-370/340/330, CLP-S308/S306 Owner's Manual F8.1 F7.1 - Appendix Factory Setting List / Liste ...
... for each voice Preset for each voice MEDIUM 64 ON 6 OFF 0 (no accent) 120 0 Backup Group CLP-370/ 340 CLP-330, CLP-S308/ S306 F7.1 - F7.3 Function CLP-370/ 340 CLP-330, CLP-S308/ S306 Function F1 F2.1 F2.2 F3.1 F3.2 F3.3, F3.4 F3.5, F.3.6 F4.1 F4.2 F4.3, F4.4 F4.5, F4.6 F4.7 ... Preset for each voice combination Preset for each voice combination ALL 1 (Soft Pedal) 3 12 10 ALL 10 Backup Group CLP-370/ 340 CLP-330, CLP-S308/ S306 F8.3 F7.3 F8.1 F7.1 F8.4 F8.1 F7.4 F7.1 98 CLP-370/340/330, CLP-S308/S306 Owner's Manual F8.1 F7.1 - Appendix Factory Setting List / Liste ...

Owner's Manual
Page 101
...Puesto que las especificaciones, equipos u opciones pueden no ser las mismas en todos los mercados, solicite información a su distribuidor Yamaha. reserves the right to +12 Yes 7 types Optional User songs 300KB, External songs 447KB Optional x 2 [IN][OUT][THRU] [L/L+R][R] [L/L+R][R] x 2 (selectable) x 1... y descripciones de este manual del propietario tienen sólo el propósito de servir como información. Yamaha Corp. CLP-370/340/330, CLP-S308/S306 Owner's Manual 101 Yes Yes Owner's Manual, Accessory CD-ROM for Windows, Accessory CD-ROM...
...Puesto que las especificaciones, equipos u opciones pueden no ser las mismas en todos los mercados, solicite información a su distribuidor Yamaha. reserves the right to +12 Yes 7 types Optional User songs 300KB, External songs 447KB Optional x 2 [IN][OUT][THRU] [L/L+R][R] [L/L+R][R] x 2 (selectable) x 1... y descripciones de este manual del propietario tienen sólo el propósito de servir como información. Yamaha Corp. CLP-370/340/330, CLP-S308/S306 Owner's Manual 101 Yes Yes Owner's Manual, Accessory CD-ROM for Windows, Accessory CD-ROM...

Owner's Manual
Page 105
... lightning storms or when unused for long periods of time. 14 Refer all instructions. 5 Do not use attachments/accessories specified by the manufacturer. 12 Use only with the cart, stand, tripod, bracket, or table specified by the manufacturer, or sold with dry cloth. 7 Do not block any...
... lightning storms or when unused for long periods of time. 14 Refer all instructions. 5 Do not use attachments/accessories specified by the manufacturer. 12 Use only with the cart, stand, tripod, bracket, or table specified by the manufacturer, or sold with dry cloth. 7 Do not block any...


