
User Guide
Page 9
Rear-Left View Parts of the Printer 1 2 3 4 5 1. Power cord connection Inside View Doors A and C Open 23 4 5 6360-041 Door B Open 12 1 1. Door C 5. Fuser 6360-043 Phaser® 6360 Color Laser Printer 1-3 Ethernet 10/100 Base-Tx connection 5. Imaging unit 4. USB connection 4. Front Door A 2. Transfer roller 3. Toner cartridges (high capacity) 3. Top cover 2. Door C latch 6360-042 1. Front Door B 2.
Rear-Left View Parts of the Printer 1 2 3 4 5 1. Power cord connection Inside View Doors A and C Open 23 4 5 6360-041 Door B Open 12 1 1. Door C 5. Fuser 6360-043 Phaser® 6360 Color Laser Printer 1-3 Ethernet 10/100 Base-Tx connection 5. Imaging unit 4. USB connection 4. Front Door A 2. Transfer roller 3. Toner cartridges (high capacity) 3. Top cover 2. Door C latch 6360-042 1. Front Door B 2.
User Guide
Page 94
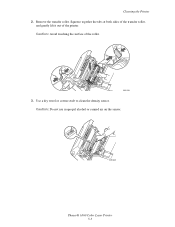
Caution: Avoid touching the surface of the printer. Use a dry towel or cotton swab to clean the density sensor. Squeeze together the tabs at both sides of the transfer roller, and gently lift it out of the roller. 6360-035 3. Remove the transfer roller. Cleaning the Printer 2. Caution: Do not use isopropyl alcohol or canned air on the sensor. 6360-038 Phaser® 6360 Color Laser Printer 5-3
Caution: Avoid touching the surface of the printer. Use a dry towel or cotton swab to clean the density sensor. Squeeze together the tabs at both sides of the transfer roller, and gently lift it out of the roller. 6360-035 3. Remove the transfer roller. Cleaning the Printer 2. Caution: Do not use isopropyl alcohol or canned air on the sensor. 6360-038 Phaser® 6360 Color Laser Printer 5-3
User Guide
Page 95
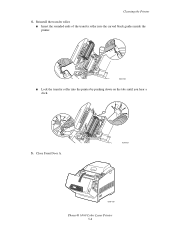
Close Front Door A. 6360-037 6360-059 Phaser® 6360 Color Laser Printer 5-4 Cleaning the Printer 4. Reinstall the transfer roller. ■ Insert the rounded ends of the transfer roller into the curved black guides inside the printer. 6360-036 ■ Lock the transfer roller into the printer by pushing down on the tabs until you hear a click. 5.
Close Front Door A. 6360-037 6360-059 Phaser® 6360 Color Laser Printer 5-4 Cleaning the Printer 4. Reinstall the transfer roller. ■ Insert the rounded ends of the transfer roller into the curved black guides inside the printer. 6360-036 ■ Lock the transfer roller into the printer by pushing down on the tabs until you hear a click. 5.
User Guide
Page 96
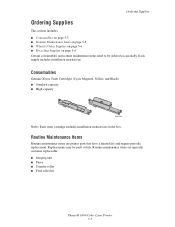
... items are printer parts that have a limited life and require periodic replacement. Ordering Supplies Ordering Supplies This section includes: ■ Consumables on page 5-5 ■ Routine Maintenance Items on page 5-5 ■ When to be parts or kits. Each supply includes installation instructions. Consumables Genuine Xerox Toner Cartridges ... Supplies on the box. Routine Maintenance Items Routine maintenance items are typically customer replaceable. ■ Imaging unit ■ Fuser ■ Transfer roller ■ Feed roller kit Phaser® 6360 Color Laser Printer 5-5
... items are printer parts that have a limited life and require periodic replacement. Ordering Supplies Ordering Supplies This section includes: ■ Consumables on page 5-5 ■ Routine Maintenance Items on page 5-5 ■ When to be parts or kits. Each supply includes installation instructions. Consumables Genuine Xerox Toner Cartridges ... Supplies on the box. Routine Maintenance Items Routine maintenance items are typically customer replaceable. ■ Imaging unit ■ Fuser ■ Transfer roller ■ Feed roller kit Phaser® 6360 Color Laser Printer 5-5


