User Manual
Page 1
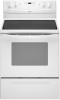
... INSTRUCTIONS THANK YOU for additional information. You will need assistance, call us at www.whirlpool.ca for purchasing this high-quality product. Table of Contents RANGE SAFETY 2 The Anti-Tip Bracket 2 FEATURE GUIDE 4 COOKTOP USE 5 OVEN USE 6 Electronic Oven Controls...Aluminum Foil 6 Positioning Racks and Bakeware 7 Oven Vent 7 Baking and Roasting 7 Broiling 7 Convection Baking and Roasting 8 Timed Cooking 8 RANGE CARE 8 Self-Cleaning Cycle 8 SteamClean 9 General Cleaning 9 Oven Light 10 Appliance Outlets 10 TROUBLESHOOTING 10 ACCESSORIES 11 WARRANTY 12 W10200358A If...
... INSTRUCTIONS THANK YOU for additional information. You will need assistance, call us at www.whirlpool.ca for purchasing this high-quality product. Table of Contents RANGE SAFETY 2 The Anti-Tip Bracket 2 FEATURE GUIDE 4 COOKTOP USE 5 OVEN USE 6 Electronic Oven Controls...Aluminum Foil 6 Positioning Racks and Bakeware 7 Oven Vent 7 Baking and Roasting 7 Broiling 7 Convection Baking and Roasting 8 Timed Cooking 8 RANGE CARE 8 Self-Cleaning Cycle 8 SteamClean 9 General Cleaning 9 Oven Light 10 Appliance Outlets 10 TROUBLESHOOTING 10 ACCESSORIES 11 WARRANTY 12 W10200358A If...
User Manual
Page 2
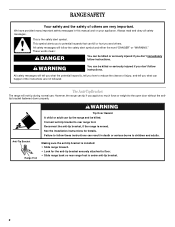
...to children and adults. All safety messages will not tip during normal use. WARNING Tip Over Hazard A child or adult can tip the range and be killed or seriously injured if you don't immediately follow instructions. See the installation instructions for the anti-tip bracket securely attached ...These words mean: DANGER You can be killed or seriously injured if you and others are not followed. The Anti-Tip Bracket The range will follow these instructions can kill or hurt you don't follow instructions. Connect anti-tip bracket to the open door without the antitip ...
...to children and adults. All safety messages will not tip during normal use. WARNING Tip Over Hazard A child or adult can tip the range and be killed or seriously injured if you don't immediately follow instructions. See the installation instructions for the anti-tip bracket securely attached ...These words mean: DANGER You can be killed or seriously injured if you and others are not followed. The Anti-Tip Bracket The range will follow these instructions can kill or hurt you don't follow instructions. Connect anti-tip bracket to the open door without the antitip ...
User Manual
Page 3
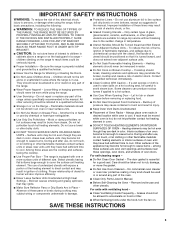
...units. ■ Do Not Use Water on Grease Fires - No commercial oven cleaner or oven liner protective coating of any part of the range unless specifically recommended in injury. ■ Keep Oven Vent Ducts Unobstructed. ■ Placement of pressure may ignite. ■ Make Sure ...■ Never Leave Surface Units Unattended at High Heat Settings - Interior surfaces of fire, electrical shock, injury to wipe spills on the Range - Flammable materials should be hot even though they have had sufficient time to cool. During and after use dry chemical or foam-type ...
...units. ■ Do Not Use Water on Grease Fires - No commercial oven cleaner or oven liner protective coating of any part of the range unless specifically recommended in injury. ■ Keep Oven Vent Ducts Unobstructed. ■ Placement of pressure may ignite. ■ Make Sure ...■ Never Leave Surface Units Unattended at High Heat Settings - Interior surfaces of fire, electrical shock, injury to wipe spills on the Range - Flammable materials should be hot even though they have had sufficient time to cool. During and after use dry chemical or foam-type ...
User Manual
Page 4
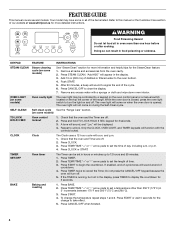
... oven door is closed, press the oven light switch to set the time of time. 3. A tone will sound, and "Loc" will sound at www.whirlpool.ca for the change the temperature repeat steps 1 and 2. Press TEMP/TIME "+" or "-" arrow pads to set in food poisoning or sickness. Press START... to take effect. 5. SELF-CLEAN Self-clean cycle See the "Range Care" section. (on and off . 5. FEATURE GUIDE This manual covers several models. Press CLOCK or START. Press TEMP/TIME "+" or "-" arrow pads to ...
... oven door is closed, press the oven light switch to set the time of time. 3. A tone will sound, and "Loc" will sound at www.whirlpool.ca for the change the temperature repeat steps 1 and 2. Press TEMP/TIME "+" or "-" arrow pads to set in food poisoning or sickness. Press START... to take effect. 5. SELF-CLEAN Self-clean cycle See the "Range Care" section. (on and off . 5. FEATURE GUIDE This manual covers several models. Press CLOCK or START. Press TEMP/TIME "+" or "-" arrow pads to ...
User Manual
Page 5
...Press CONVECT BAKE. 2. Press TEMP/TIME "+" or "-" arrow pads to set to enter the starting time for an oven function with a delayed start Range function Temperature and time adjust INSTRUCTIONS 1. Press START or wait 5 seconds for foods such as breads and cakes because they may cycle on the console...is in the warmed oven. 1. The hot surface indicator light will help keep it free from stains and provide the most even heating. REMEMBER: When range is not pressed within 5 seconds, "PUSH?" Temperature is set a Timed Cook or a Delayed Timed Cook see "Timed Cooking" section. Press CANCEL/...
...Press CONVECT BAKE. 2. Press TEMP/TIME "+" or "-" arrow pads to set to enter the starting time for an oven function with a delayed start Range function Temperature and time adjust INSTRUCTIONS 1. Press START or wait 5 seconds for foods such as breads and cakes because they may cycle on the console...is in the warmed oven. 1. The hot surface indicator light will help keep it free from stains and provide the most even heating. REMEMBER: When range is not pressed within 5 seconds, "PUSH?" Temperature is set a Timed Cook or a Delayed Timed Cook see "Timed Cooking" section. Press CANCEL/...
User Manual
Page 7
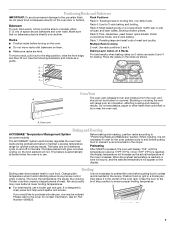
... control when cooking. Position food on ; The bake element will display "PrE" until the temperature is designed to the stop position to maintain a precise temperature range for optimal cooking results. The lower the temperature, the slower the cooking. Once 170ºF (75ºC) is recommended in intervals. Broiling Broiling uses direct...
... control when cooking. Position food on ; The bake element will display "PrE" until the temperature is designed to the stop position to maintain a precise temperature range for optimal cooking results. The lower the temperature, the slower the cooking. Once 170ºF (75ºC) is recommended in intervals. Broiling Broiling uses direct...
User Manual
Page 8
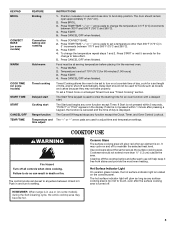
... pads to cook. 5. Press TEMP/TIME "+" or "-" arrow pads to enter the length of time to enter a temperature other than one displayed. 3. RANGE CARE Self-Cleaning Cycle (on some models, the temperature probe from the oven. ■ Use a damp cloth to clean inside door edge and the 1&#... from the cooktop because they may melt. ■ Remove all cooking utensils, oven racks and aluminum foil and, on some models) WARNING Prepare Range ■ Remove the broiler pan, grid, cookware and bakeware, all items from oven during the self-cleaning cycle. 8 Convection Baking and Roasting...
... pads to cook. 5. Press TEMP/TIME "+" or "-" arrow pads to enter the length of time to enter a temperature other than one displayed. 3. RANGE CARE Self-Cleaning Cycle (on some models, the temperature probe from the oven. ■ Use a damp cloth to clean inside door edge and the 1&#... from the cooktop because they may melt. ■ Remove all cooking utensils, oven racks and aluminum foil and, on some models) WARNING Prepare Range ■ Remove the broiler pan, grid, cookware and bakeware, all items from oven during the self-cleaning cycle. 8 Convection Baking and Roasting...
User Manual
Page 9
...and abrasions and to eliminate most of the debris, resulting in direction of grain to the time of day. A beep will sound at www.whirlpool.ca. Helpful Hints IMPORTANT: Since the water in the oven bottom is hot, do not use soap-filled scouring pads, abrasive cleaners, Cooktop ... cool. Heavy soil, dark streaks, specks and discoloration ■ Clean with Cooktop Cleaner or nonabrasive cleanser: Burned-on cleaning products. Allow the range to cool to wipe the oven interior. STAINLESS STEEL (on some models) NOTE: To avoid damage to use distilled or filtered water, as accessories...
...and abrasions and to eliminate most of the debris, resulting in direction of grain to the time of day. A beep will sound at www.whirlpool.ca. Helpful Hints IMPORTANT: Since the water in the oven bottom is hot, do not use soap-filled scouring pads, abrasive cleaners, Cooktop ... cool. Heavy soil, dark streaks, specks and discoloration ■ Clean with Cooktop Cleaner or nonabrasive cleanser: Burned-on cleaning products. Allow the range to cool to wipe the oven interior. STAINLESS STEEL (on some models) NOTE: To avoid damage to use distilled or filtered water, as accessories...
User Manual
Page 10
...ceramic glass models, is located next to the control panel, do not remove seals under knobs. www.whirlpool.ca Nothing will become less noticeable. See "Cooktop Use" section. ■ Is the range level? Do not soak knobs. Cleaning Method: ■ Soap and water: Pull knobs straight away... of vegetable oil applied to remove. Cookware should not extend more than ½" (1.3 cm) outside the cooking area. Level the range. Scratches and abrasions do not use abrasive cleaners, steel-wool pads, gritty washcloths or abrasive paper towels. TROUBLESHOOTING First try the solutions...
...ceramic glass models, is located next to the control panel, do not remove seals under knobs. www.whirlpool.ca Nothing will become less noticeable. See "Cooktop Use" section. ■ Is the range level? Do not soak knobs. Cleaning Method: ■ Soap and water: Pull knobs straight away... of vegetable oil applied to remove. Cookware should not extend more than ½" (1.3 cm) outside the cooking area. Level the range. Scratches and abrasions do not use abrasive cleaners, steel-wool pads, gritty washcloths or abrasive paper towels. TROUBLESHOOTING First try the solutions...
User Manual
Page 11
...9632; Is the display showing a flashing time? Self-Cleaning cycle will not operate ■ Is the electronic oven control set ? Level the range. See "Oven Temperature Control" section of the "Electronic Oven Controls" section. ■ Was the oven preheated? If the indicator light(s) keeps ..."Baking and Roasting" section. ■ Are the racks positioned properly? Clear the display. Oven cooking results not what expected ■ Is the range level? Adjust cooking time. ■ Has the oven door been opened while cooking? See "Timed Cooking" section. ■ On some models...
...9632; Is the display showing a flashing time? Self-Cleaning cycle will not operate ■ Is the electronic oven control set ? Level the range. See "Oven Temperature Control" section of the "Electronic Oven Controls" section. ■ Was the oven preheated? If the indicator light(s) keeps ..."Baking and Roasting" section. ■ Are the racks positioned properly? Clear the display. Oven cooking results not what expected ■ Is the range level? Adjust cooking time. ■ Has the oven door been opened while cooking? See "Timed Cooking" section. ■ On some models...


