User Manual
Page 1
...Contents RANGE SAFETY 2 The Anti-Tip Bracket 2 FEATURE GUIDE 4 COOKTOP USE 5 OVEN USE 6 Electronic Oven Controls 6 Aluminum Foil 6 Positioning Racks and Bakeware 7 Oven Vent 7 Baking and Roasting 7 Broiling 7 Convection Baking and Roasting 8 Timed Cooking 8 RANGE CARE 8 Self-Cleaning Cycle 8 SteamClean 9 General Cleaning 9 Oven Light 10 Appliance Outlets 10 TROUBLESHOOTING 10 ACCESSORIES 11 WARRANTY 12 W10200358A If you still need your model and serial number located on the oven frame behind the storage drawer panel. If you should experience a problem not covered in...
...Contents RANGE SAFETY 2 The Anti-Tip Bracket 2 FEATURE GUIDE 4 COOKTOP USE 5 OVEN USE 6 Electronic Oven Controls 6 Aluminum Foil 6 Positioning Racks and Bakeware 7 Oven Vent 7 Baking and Roasting 7 Broiling 7 Convection Baking and Roasting 8 Timed Cooking 8 RANGE CARE 8 Self-Cleaning Cycle 8 SteamClean 9 General Cleaning 9 Oven Light 10 Appliance Outlets 10 TROUBLESHOOTING 10 ACCESSORIES 11 WARRANTY 12 W10200358A If you still need your model and serial number located on the oven frame behind the storage drawer panel. If you should experience a problem not covered in...
User Manual
Page 2
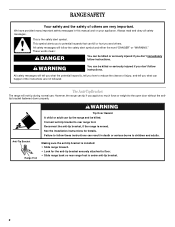
... . Anti-Tip Bracket Range Foot Making sure the anti-tip bracket is installed: • Slide range forward. • Look for details. These words mean: DANGER You can tip the range and be killed or seriously injured if you don't immediately follow instructions. Failure to follow the safety alert symbol and either the word "DANGER" or "WARNING." All safety messages will not tip during normal use. Connect anti-tip bracket...
... . Anti-Tip Bracket Range Foot Making sure the anti-tip bracket is installed: • Slide range forward. • Look for details. These words mean: DANGER You can tip the range and be killed or seriously injured if you don't immediately follow instructions. Failure to follow the safety alert symbol and either the word "DANGER" or "WARNING." All safety messages will not tip during normal use. Connect anti-tip bracket...
User Manual
Page 3
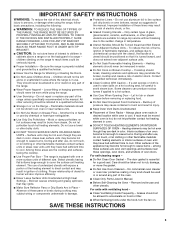
... though they have had sufficient time to cool. Do not repair or replace any part of the oven. ■ Clean Only Parts Listed in color. Only certain types of glass, glass/ceramic, ceramic, earthenware, or other bulky cloth. ■ DO NOT TOUCH SURFACE UNITS OR AREAS NEAR UNITS - Always place oven racks in desired location while oven is in temperature. ■ Utensil Handles Should Be Turned Inward and Not Extend...
... though they have had sufficient time to cool. Do not repair or replace any part of the oven. ■ Clean Only Parts Listed in color. Only certain types of glass, glass/ceramic, ceramic, earthenware, or other bulky cloth. ■ DO NOT TOUCH SURFACE UNITS OR AREAS NEAR UNITS - Always place oven racks in desired location while oven is in temperature. ■ Utensil Handles Should Be Turned Inward and Not Extend...
User Manual
Page 4
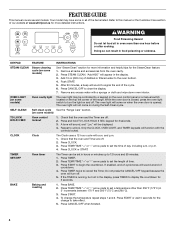
... the Timer. The oven light will sound at www.whirlpool.ca for 5 seconds. Press TEMP/TIME "+" or "-" arrow pads to set in hours or minutes up to this manual or the Customer Care section of the cycle. 6. BAKE Baking and roasting 1. Refer to 12 hours and 59 minutes. 1. Remove all of day, including a.m. "Add H2O" will function with the controls locked. After 20 minutes, a beep will come...
... the Timer. The oven light will sound at www.whirlpool.ca for 5 seconds. Press TEMP/TIME "+" or "-" arrow pads to set in hours or minutes up to this manual or the Customer Care section of the cycle. 6. BAKE Baking and roasting 1. Refer to 12 hours and 59 minutes. 1. Remove all of day, including a.m. "Add H2O" will function with the controls locked. After 20 minutes, a beep will come...
User Manual
Page 5
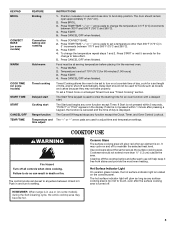
... start Range function Temperature and time adjust INSTRUCTIONS 1. The "+" or "-" arrow pads are used to turn to touch, even after pressing a keypad, the function is too hot to setting. COOKTOP USE WARNING Fire Hazard Turn off . Ceramic Glass The surface cooking area will glow as long as the surface cooking area. Cookware should remain open approximately 5" (12.7 cm). 2. Hot Surface Indicator Light On ceramic glass models, the hot surface indicator light is on the console panel. Press START. 4. Press START or wait 5 seconds for an oven function with a delayed start...
... start Range function Temperature and time adjust INSTRUCTIONS 1. The "+" or "-" arrow pads are used to turn to touch, even after pressing a keypad, the function is too hot to setting. COOKTOP USE WARNING Fire Hazard Turn off . Ceramic Glass The surface cooking area will glow as long as the surface cooking area. Cookware should remain open approximately 5" (12.7 cm). 2. Hot Surface Indicator Light On ceramic glass models, the hot surface indicator light is on the console panel. Press START. 4. Press START or wait 5 seconds for an oven function with a delayed start...
User Manual
Page 6
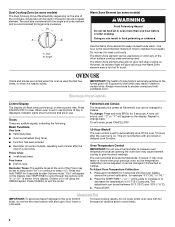
.... The dual size combines both the single and outer element and is shown in the display. A B A. Do not use a thermometer to measure oven temperature because opening the oven door may result in use . However, its indicator light will not interfere with foil because air must be changed to automatically shut off using the TIMER keypad. Exposure to the fumes may cause element cycling to change : Press and hold BROIL for example...
.... The dual size combines both the single and outer element and is shown in the display. A B A. Do not use a thermometer to measure oven temperature because opening the oven door may result in use . However, its indicator light will not interfere with foil because air must be changed to automatically shut off using the TIMER keypad. Exposure to the fumes may cause element cycling to change : Press and hold BROIL for example...
User Manual
Page 7
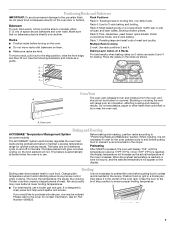
... preheat the oven before turning on the display. Place the cakes on some models) The ACCUBAKE® system electronically regulates the oven heat levels during preheat and bake to the cover for baking. Oven vent Baking and Roasting ACCUBAKE® Temperature Management System (on the racks as a guide. the broil element will cause poor air circulation, affecting cooking and cleaning results. Ask for 2-rack baking and broiling. Rack Positions Rack 5: Toasting bread or broiling thin, non-fatty foods. Rack 4: Use for Part Number 4396923. 7 This feature...
... preheat the oven before turning on the display. Place the cakes on some models) The ACCUBAKE® system electronically regulates the oven heat levels during preheat and bake to the cover for baking. Oven vent Baking and Roasting ACCUBAKE® Temperature Management System (on the racks as a guide. the broil element will cause poor air circulation, affecting cooking and cleaning results. Ask for 2-rack baking and broiling. Rack Positions Rack 5: Toasting bread or broiling thin, non-fatty foods. Rack 4: Use for Part Number 4396923. 7 This feature...
User Manual
Page 8
... the display. The cook time oven indicator light will light up . 4. When the start time/delay oven indicator light will light up . 2. Do not block the oven vent(s) during the Self-Cleaning cycle. ■ Remove plastic items from the cooktop because they may melt. ■ Remove all cooking utensils, oven racks and aluminum foil and, on some models) WARNING Food Poisoning Hazard Do not let food sit in the "Feature Guide" section. 1. To avoid breaking the glass, do...
... the display. The cook time oven indicator light will light up . 4. When the start time/delay oven indicator light will light up . 2. Do not block the oven vent(s) during the Self-Cleaning cycle. ■ Remove plastic items from the cooktop because they may melt. ■ Remove all cooking utensils, oven racks and aluminum foil and, on some models) WARNING Food Poisoning Hazard Do not let food sit in the "Feature Guide" section. 1. To avoid breaking the glass, do...
User Manual
Page 9
... displayed. 4. Scrape off and the oven and cooktop are suggested first unless otherwise noted. Electronic Oven Control with Adjustable Clean Time (on some models) The SELF CLEAN self-cleaning cycle is time adjustable between 2 hours 30 minutes and 4 hours 30 minutes in direction of grain to avoid damaging. ■ Stainless Steel Cleaner and Polish Part Number 31462B (not included): See cover for contact information. Suggested clean times are 2 hours 30 minutes for light...
... displayed. 4. Scrape off and the oven and cooktop are suggested first unless otherwise noted. Electronic Oven Control with Adjustable Clean Time (on some models) The SELF CLEAN self-cleaning cycle is time adjustable between 2 hours 30 minutes and 4 hours 30 minutes in direction of grain to avoid damaging. ■ Stainless Steel Cleaner and Polish Part Number 31462B (not included): See cover for contact information. Suggested clean times are 2 hours 30 minutes for light...
User Manual
Page 10
... empty before turning to the rack guides will operate ■ Is the power supply cord unplugged? CONTROL PANEL AND OVEN DOOR EXTERIOR To avoid damage to the outlet. Replace bulb, then bulb cover by pressing the switch. The outlet operates independently and is a standard 40-watt appliance bulb. If the problem continues, call . See the Installation Instructions. 10 It is the oven control lockout set? Cooktop cooking results not what expected ■ Is the control knob set correctly? Push...
... empty before turning to the rack guides will operate ■ Is the power supply cord unplugged? CONTROL PANEL AND OVEN DOOR EXTERIOR To avoid damage to the outlet. Replace bulb, then bulb cover by pressing the switch. The outlet operates independently and is a standard 40-watt appliance bulb. If the problem continues, call . See the Installation Instructions. 10 It is the oven control lockout set? Cooktop cooking results not what expected ■ Is the control knob set correctly? Push...
User Manual
Page 11
... range level? See the Installation Instructions. ■ Is the proper temperature set correctly? Move rack to cover the edge of the "Electronic Oven Controls" section. Oven will not operate ■ Is the oven door open? Oven temperature too high or too low ■ Does the oven temperature calibration need adjustment? See "Control Display" in the "Feature Guide" section. There has been a power failure. Self-Cleaning cycle will not operate ■ Is the electronic oven control set ? See "Timed Cooking" section. Double-check the recipe in longer cooking times...
... range level? See the Installation Instructions. ■ Is the proper temperature set correctly? Move rack to cover the edge of the "Electronic Oven Controls" section. Oven will not operate ■ Is the oven door open? Oven temperature too high or too low ■ Does the oven temperature calibration need adjustment? See "Control Display" in the "Feature Guide" section. There has been a power failure. Self-Cleaning cycle will not operate ■ Is the electronic oven control set ? See "Timed Cooking" section. Double-check the recipe in longer cooking times...
User Manual
Page 12
... with electrical or plumbing codes, or use of consumables or cleaning products not approved by Whirlpool. 5. Service calls to refrigerator or freezer product failures. 7. Damage resulting from accident, alteration, misuse, abuse, fire, flood, acts of God, improper installation, installation not in your product or you would like to correct house wiring or plumbing. 2. Any food loss due to repair or replace appliance light bulbs, air...
... with electrical or plumbing codes, or use of consumables or cleaning products not approved by Whirlpool. 5. Service calls to refrigerator or freezer product failures. 7. Damage resulting from accident, alteration, misuse, abuse, fire, flood, acts of God, improper installation, installation not in your product or you would like to correct house wiring or plumbing. 2. Any food loss due to repair or replace appliance light bulbs, air...


