
Use & Care Guide
Page 1
... alert symbol and either the word "DANGER" or "WARNING." Always read and obey all instructions before using electrical appliances basic safety precautions should be killed or seriously injured if you still need your model and serial number located on your appliance. are not followed. ® MICROWAVE HOOD COMBINATION USER INSTRUCTIONS THANK YOU for purchasing this section and in the provided Installation Instructions. for example, closed...
... alert symbol and either the word "DANGER" or "WARNING." Always read and obey all instructions before using electrical appliances basic safety precautions should be killed or seriously injured if you still need your model and serial number located on your appliance. are not followed. ® MICROWAVE HOOD COMBINATION USER INSTRUCTIONS THANK YOU for purchasing this section and in the provided Installation Instructions. for example, closed...

Use & Care Guide
Page 2
... the microwave oven when the microwave oven is operated in convection, combination, grill or "PAN BROWN" mode (on models with maximum width of electric shock. ■ Do not clean with metal scouring pads. Remove wire twist-ties from the microwave oven is removed from paper or plastic bags before placing bags in operation. ■ When flambeing foods under the hood, turn oven off, and disconnect the power cord, or shut off the pad and touch electrical parts...
... the microwave oven when the microwave oven is operated in convection, combination, grill or "PAN BROWN" mode (on models with maximum width of electric shock. ■ Do not clean with metal scouring pads. Remove wire twist-ties from the microwave oven is removed from paper or plastic bags before placing bags in operation. ■ When flambeing foods under the hood, turn oven off, and disconnect the power cord, or shut off the pad and touch electrical parts...

Use & Care Guide
Page 3
... use an extension cord. Do not remove ground prong. Do not use an extension cord. GROUNDING INSTRUCTIONS ■ For all governing codes and ordinances. If the power supply cord is too short, have a qualified electrician or serviceman install an outlet near the microwave oven. Recommended: ■ A time-delay fuse or time-delay circuit breaker. ■ A separate circuit serving only this microwave oven. The microwave oven is equipped with a cord having a grounding wire with Part...
... use an extension cord. Do not remove ground prong. Do not use an extension cord. GROUNDING INSTRUCTIONS ■ For all governing codes and ordinances. If the power supply cord is too short, have a qualified electrician or serviceman install an outlet near the microwave oven. Recommended: ■ A time-delay fuse or time-delay circuit breaker. ■ A separate circuit serving only this microwave oven. The microwave oven is equipped with a cord having a grounding wire with Part...

Use & Care Guide
Page 4
... be used independently during preset or sensor (on your model, the grill element has either one 1,000W halogen bulb and one 500W quartz bulb, or two 600W quartz bulbs. See "Microwave Oven Care" section. Timer (on . Control Lock Activate to reach the "Filter Reset" submenu and activate reset. Filter Reset Reset the filter status after 2-level cooking. Touch Options or Setup control to avoid unintended start. Use number pads to select temperature variations in the display. and P.M. Light Timer Set the cooktop light to...
... be used independently during preset or sensor (on your model, the grill element has either one 1,000W halogen bulb and one 500W quartz bulb, or two 600W quartz bulbs. See "Microwave Oven Care" section. Timer (on . Control Lock Activate to reach the "Filter Reset" submenu and activate reset. Filter Reset Reset the filter status after 2-level cooking. Touch Options or Setup control to avoid unintended start. Use number pads to select temperature variations in the display. and P.M. Light Timer Set the cooktop light to...

Use & Care Guide
Page 5
... wrappers ■ Staples ■ Objects with gold or silver trim or with 1 cup (250 mL) of cook time at 100%. Place cookware directly on rack for bake functions and for some models) Use the tall grill rack for grilling. Convection Rack (on some models) Use the steamer vessel base, insert and lid for steaming, or use the dish in microwave oven with metallic glaze To Test Cookware/Dinnerware...
... wrappers ■ Staples ■ Objects with gold or silver trim or with 1 cup (250 mL) of cook time at 100%. Place cookware directly on rack for bake functions and for some models) Use the tall grill rack for grilling. Convection Rack (on some models) Use the steamer vessel base, insert and lid for steaming, or use the dish in microwave oven with metallic glaze To Test Cookware/Dinnerware...
Use & Care Guide
Page 6
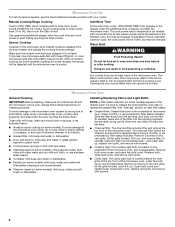
..., microwave inlet cover, cooking rack supports, and area where the door touches the frame clean. Warm Hold can be used after cooking. Open bulb cover and replace bulb. Manual Cooking/Stage Cooking Add More Time Touch COOK TIME, touch number pads to enter time, touch COOK POWER (if not 100%), touch number pads to enter power level (10 to replace the charcoal filter, and clean or replace the grease filter. Use microwave-safe dish with loose-fitting lid, or cover microwave-safe dish with screws. 6 Make sure microwave oven has been plugged in for all controls are...
..., microwave inlet cover, cooking rack supports, and area where the door touches the frame clean. Warm Hold can be used after cooking. Open bulb cover and replace bulb. Manual Cooking/Stage Cooking Add More Time Touch COOK TIME, touch number pads to enter time, touch COOK POWER (if not 100%), touch number pads to enter power level (10 to replace the charcoal filter, and clean or replace the grease filter. Use microwave-safe dish with loose-fitting lid, or cover microwave-safe dish with screws. 6 Make sure microwave oven has been plugged in for all controls are...
Use & Care Guide
Page 7
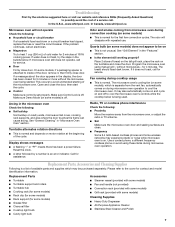
... close door. Replacement Parts Accessories ■ Turntable ■ Turntable support and rollers ■ Turntable hub ■ Cooking rack (for some models) ■ Rack clip (for some models) ■ This is being started. Reset the clock. ■ A letter followed by a number is off . The odor will not operate Check the following: ■ Household fuse or circuit breaker If a household fuse has blown or a circuit breaker has tripped, replace the fuse or reset the circuit breaker. See "Grill Element" in "Microwave Oven Care...
... close door. Replacement Parts Accessories ■ Turntable ■ Turntable support and rollers ■ Turntable hub ■ Cooking rack (for some models) ■ Rack clip (for some models) ■ This is being started. Reset the clock. ■ A letter followed by a number is off . The odor will not operate Check the following: ■ Household fuse or circuit breaker If a household fuse has blown or a circuit breaker has tripped, replace the fuse or reset the circuit breaker. See "Grill Element" in "Microwave Oven Care...
Use & Care Guide
Page 8
... Ave. Outside the 50 United States and Canada, this User Instructions and model number information for Factory Specified Parts and repair labor to Whirlpool with any questions or concerns at the number below. Damage resulting from accident, alteration, misuse, abuse, fire, flood, acts of God, improper installation, installation not in accordance with electrical or plumbing codes, or use your complete model number ready. IMPLIED WARRANTIES, INCLUDING WARRANTIES OF...
... Ave. Outside the 50 United States and Canada, this User Instructions and model number information for Factory Specified Parts and repair labor to Whirlpool with any questions or concerns at the number below. Damage resulting from accident, alteration, misuse, abuse, fire, flood, acts of God, improper installation, installation not in accordance with electrical or plumbing codes, or use your complete model number ready. IMPLIED WARRANTIES, INCLUDING WARRANTIES OF...
Installation Guide
Page 1
... are very important. All safety messages will follow instructions. Table of Contents / Table des matières MICROWAVE HOOD COMBINATION SAFETY 1 INSTALLATION REQUIREMENTS 2 Tools and Parts 2 Remove Cardboard Template 2 Location Requirements 2 Product Dimensions 3 Electrical Requirements 3 INSTALLATION INSTRUCTIONS 4 Remove Mounting Plate 4 Rotate Blower Motor 4 Locate Wall Stud(s 6 Mark Rear Wall 7 Drill Holes in these installation instructions. INSTRUCTIONS D'INSTALLATION DE L'ENSEMBLE FOUR À MICRO-ONDES/HOTTE Ce produit est conçu pour l'utilisation...
... are very important. All safety messages will follow instructions. Table of Contents / Table des matières MICROWAVE HOOD COMBINATION SAFETY 1 INSTALLATION REQUIREMENTS 2 Tools and Parts 2 Remove Cardboard Template 2 Location Requirements 2 Product Dimensions 3 Electrical Requirements 3 INSTALLATION INSTRUCTIONS 4 Remove Mounting Plate 4 Rotate Blower Motor 4 Locate Wall Stud(s 6 Mark Rear Wall 7 Drill Holes in these installation instructions. INSTRUCTIONS D'INSTALLATION DE L'ENSEMBLE FOUR À MICRO-ONDES/HOTTE Ce produit est conçu pour l'utilisation...
Installation Guide
Page 2
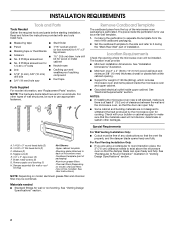
... inside the microwave oven and upper cabinet. ■ Grounded electrical outlet inside the perforation is perforated. A B C D E FG H A. 1/4-20 x 3" round-head bolts (2) B. 1/4-20 x 3" flat-head bolts (2) C. Washers (2) D. Sheet metal screws (2) G. Power supply cord bushing (1) H. See "Venting Design Specifications" section. Toggle nuts (2) E. 1/4" x 2" lag screws (2) F. Cut along the perforation to use as a rear wall template. 1. Set the cardboard template to the side and refer to it during the "Mark Rear Wall" part of wall structures, be free of the microwave oven...
... inside the microwave oven and upper cabinet. ■ Grounded electrical outlet inside the perforation is perforated. A B C D E FG H A. 1/4-20 x 3" round-head bolts (2) B. 1/4-20 x 3" flat-head bolts (2) C. Washers (2) D. Sheet metal screws (2) G. Power supply cord bushing (1) H. See "Venting Design Specifications" section. Toggle nuts (2) E. 1/4" x 2" lag screws (2) F. Cut along the perforation to use as a rear wall template. 1. Set the cardboard template to the side and refer to it during the "Mark Rear Wall" part of wall structures, be free of the microwave oven...

Installation Guide
Page 3
... providing an escape wire for 66" (167.6 cm) installation height. If the power supply cord is typical for the electric current. Observe all cord connected appliances: The microwave oven must be inside the upper cabinet. The microwave oven is properly grounded. Do not remove ground prong. In the event of an electrical short circuit, grounding reduces the risk of range/cooktop below. SAVE THESE INSTRUCTIONS 3 The plug must...
... providing an escape wire for 66" (167.6 cm) installation height. If the power supply cord is typical for the electric current. Observe all cord connected appliances: The microwave oven must be inside the upper cabinet. The microwave oven is properly grounded. Do not remove ground prong. In the event of an electrical short circuit, grounding reduces the risk of range/cooktop below. SAVE THESE INSTRUCTIONS 3 The plug must...

Installation Guide
Page 4
For wall or roof venting, changes must be made to the work surface, cover the work surface. 1. NOTE: Skip this section if you are inserted into the microwave oven. Reattach damper plate. Screws B. Keep damper plate and screws together and set it aside. 3. Screws C. If the mounting plate is being handled. Lift blower motor out of microwave oven with 2 screws removed in recessed holes) D A. Reattach blower motor to back of microwave oven. Make sure damper plate tabs are using recirculation installation. NOTE...
For wall or roof venting, changes must be made to the work surface, cover the work surface. 1. NOTE: Skip this section if you are inserted into the microwave oven. Reattach damper plate. Screws B. Keep damper plate and screws together and set it aside. 3. Screws C. If the mounting plate is being handled. Lift blower motor out of microwave oven with 2 screws removed in recessed holes) D A. Reattach blower motor to back of microwave oven. Make sure damper plate tabs are using recirculation installation. NOTE...

Installation Guide
Page 5
... back of the microwave oven. Reattach blower motor to the microwave oven. 7. Damper plate B. Secure damper plate with 2 screws removed in the top of microwave oven. A 6. Securely tighten screws. Exhaust port IMPORTANT: If blower motor is not correctly oriented, the 2 screws removed in Step 1 of "Wall Venting Installation Only." Damper plate tabs D. Repeat Step 4 from "Wall Venting Installation Only." 2. A B C A. Roof Venting Installation Only 1. Repeat Step 3 from "Wall Venting Installation Only." 3. Screws C. Repeat Step 2 from "Wall Venting Installation Only...
... back of the microwave oven. Reattach blower motor to the microwave oven. 7. Damper plate B. Secure damper plate with 2 screws removed in the top of microwave oven. A 6. Securely tighten screws. Exhaust port IMPORTANT: If blower motor is not correctly oriented, the 2 screws removed in Step 1 of "Wall Venting Installation Only." Damper plate tabs D. Repeat Step 4 from "Wall Venting Installation Only." 2. A B C A. Roof Venting Installation Only 1. Repeat Step 3 from "Wall Venting Installation Only." 3. Screws C. Repeat Step 2 from "Wall Venting Installation Only...

Installation Guide
Page 6
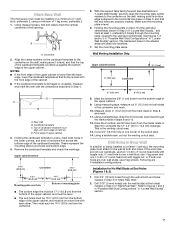
... stud, and draw a plumb line down each stud center. Cabinet opening vertical centerline C. See illustrations in "Possible Wall Stud Configurations." Holes for lag screws E. Support tabs F. Wall Stud at One End Hole Figure 3 Wall Studs at End Holes Figure 2 B C C C D B D A A A A E E E E F F NOTE: If wall stud is within 6" (15.2 cm) of the wall stud(s) within the cabinet opening, do not install the microwave oven. 1. End holes (on mounting plate) B.
... stud, and draw a plumb line down each stud center. Cabinet opening vertical centerline C. See illustrations in "Possible Wall Stud Configurations." Holes for lag screws E. Support tabs F. Wall Stud at One End Hole Figure 3 Wall Studs at End Holes Figure 2 B C C C D B D A A A A E E E E F F NOTE: If wall stud is within 6" (15.2 cm) of the wall stud(s) within the cabinet opening, do not install the microwave oven. 1. End holes (on mounting plate) B.
Installation Guide
Page 7
... "Mark Rear Wall." 2. Centerline 2. Cardboard template C. Make sure the mounting plate is the venting cutout area. 13. Mark the centerline 3/8" (1 cm) down from the mark made in place, find and clearly mark the vertical centerline of the opening. if 1 end hole is over wall studs, use 2 lag screws. Align the center markers on the cardboard template to the wall stud centerline(s). Holding the mounting plate in Step...
... "Mark Rear Wall." 2. Centerline 2. Cardboard template C. Make sure the mounting plate is the venting cutout area. 13. Mark the centerline 3/8" (1 cm) down from the mark made in place, find and clearly mark the vertical centerline of the opening. if 1 end hole is over wall studs, use 2 lag screws. Align the center markers on the cardboard template to the wall stud centerline(s). Holding the mounting plate in Step...
Installation Guide
Page 8
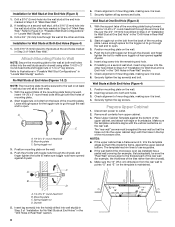
... of "Mark Rear Wall." With the support tabs of the mounting plate facing forward, insert a 1/4-20 x 3" round-head bolt through the drywall, and finger tighten the bolts to points "D" and "E" on the rear wall. Securely tighten the lag screws. Remove all lag screws and bolts. Place Upper Cabinet Template against drywall. The template has trim lines to make sure toggle nuts have opened against the...
... of "Mark Rear Wall." With the support tabs of the mounting plate facing forward, insert a 1/4-20 x 3" round-head bolt through the drywall, and finger tighten the bolts to points "D" and "E" on the rear wall. Securely tighten the lag screws. Remove all lag screws and bolts. Place Upper Cabinet Template against drywall. The template has trim lines to make sure toggle nuts have opened against the...
Installation Guide
Page 9
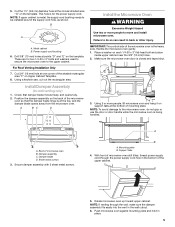
... the microwave oven. For Roof Venting Installation Only 7. Position the damper assembly on the back of the microwave oven so that damper blade moves freely, and opens fully. 2. IMPORTANT: The control side of the upper cabinet. 5. Make sure the microwave oven door is for the power supply cord. A B A. Mounting plate B. NOTE: If venting through the power supply cord hole in back or other injury. Using a keyhole saw, cut out the rectangular area. A. Damper assembly C. Damper blade D. Handle the microwave oven...
... the microwave oven. For Roof Venting Installation Only 7. Position the damper assembly on the back of the microwave oven so that damper blade moves freely, and opens fully. 2. IMPORTANT: The control side of the upper cabinet. 5. Make sure the microwave oven door is for the power supply cord. A B A. Mounting plate B. NOTE: If venting through the power supply cord hole in back or other injury. Using a keyhole saw, cut out the rectangular area. A. Damper assembly C. Damper blade D. Handle the microwave oven...
Installation Guide
Page 10
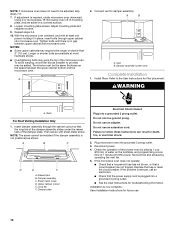
... damper assembly slides under vent) Complete Installation 1. Reconnect power. 4. Replace the fuse or reset the circuit breaker. Save Installation Instructions for troubleshooting information. The blocks must be added. Connect vent to the User Instructions for filter placement. Bolts For Roof Venting Installation Only 1. Upper cabinet cutout E. Do not use an extension cord. Check the operation of the damper plate. If the problem continues, call an electrician. ■ Check that a circuit breaker has not tripped. Adjust mounting plate and retighten screws...
... damper assembly slides under vent) Complete Installation 1. Reconnect power. 4. Replace the fuse or reset the circuit breaker. Save Installation Instructions for troubleshooting information. The blocks must be added. Connect vent to the User Instructions for filter placement. Bolts For Roof Venting Installation Only 1. Upper cabinet cutout E. Do not use an extension cord. Check the operation of the damper plate. If the problem continues, call an electrician. ■ Check that a circuit breaker has not tripped. Adjust mounting plate and retighten screws...
Installation Guide
Page 12
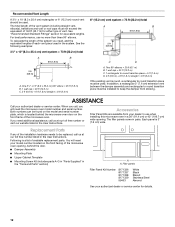
... dealer or service center. Each panel is located behind the door. ■ Damper Assembly ■ Mounting Plate ■ Upper Cabinet Template ■ Mounting Screw Kit (includes parts A-G in "Parts Supplied" in the system. The filler panels come in the User Instructions. You will need additional assistance, call us at our toll free number listed in a 36" (91.4 cm) or 42" (106.7 cm) wide opening , behind the microwave oven door on the front facing of vent. Recommended Vent Length...
... dealer or service center. Each panel is located behind the door. ■ Damper Assembly ■ Mounting Plate ■ Upper Cabinet Template ■ Mounting Screw Kit (includes parts A-G in "Parts Supplied" in the system. The filler panels come in the User Instructions. You will need additional assistance, call us at our toll free number listed in a 36" (91.4 cm) or 42" (106.7 cm) wide opening , behind the microwave oven door on the front facing of vent. Recommended Vent Length...

Warranty Information
Page 1
Outside the 50 United States and Canada, this User Instructions and model number information for repairs. ITEMS EXCLUDED FROM WARRANTY This limited warranty does not cover: 1. Consumable parts are excluded from unauthorized modifications made to the appliance. 9. Expenses for travel and transportation for product service if your model number and serial number on the label located on how to the finish of repair or replacement under this warranty. 8. LIMITATION OF...
Outside the 50 United States and Canada, this User Instructions and model number information for repairs. ITEMS EXCLUDED FROM WARRANTY This limited warranty does not cover: 1. Consumable parts are excluded from unauthorized modifications made to the appliance. 9. Expenses for travel and transportation for product service if your model number and serial number on the label located on how to the finish of repair or replacement under this warranty. 8. LIMITATION OF...


