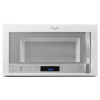
Whirlpool WMH76719CH Support and Manuals
Get Help and Manuals for this Whirlpool item
View All Support Options Below
Free Whirlpool WMH76719CH manuals!
Problems with Whirlpool WMH76719CH?
Ask a Question
Free Whirlpool WMH76719CH manuals!
Problems with Whirlpool WMH76719CH?
Ask a Question
Popular Whirlpool WMH76719CH Manual Pages
Installation Guide - Page 1
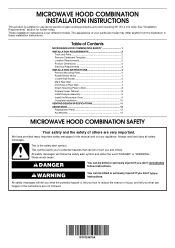
...hazard is, tell you how to Wall 8 Prepare Upper Cabinet 8 Install Damper Assembly 9 Install the Microwave Oven 9 Complete Installation 10 VENTING DESIGN SPECIFICATIONS 11 ASSISTANCE 12 Replacement Parts 12 Accessories 12
MICROWAVE HOOD COMBINATION SAFETY
Your safety and the safety of your particular model may differ slightly from the illustration in this manual and on your appliance.
Installation Guide - Page 2
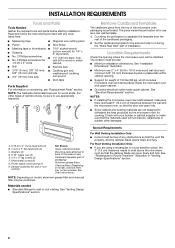
...Supplied
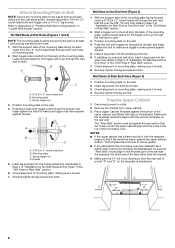
For information on model, aluminum grease filter and charcoal filter may not be installed. Washers (2) D. 3/16" toggle nuts (2) E. 1/4" x 2" lag screws (2) F. See User Instructions.)
NOTE: Depending on reordering, see "Replacement Parts" section.
Cut along the perforation to Round Transition" illustration in "Venting Design Specifications" section.
2 See "Electrical...
Installation Guide - Page 3
... extension cord.
Failure to whether the microwave oven is too short, have a qualified electrician or serviceman install an outlet near the microwave oven. Recommended: ■ A time-delay fuse or time-delay circuit breaker. ■ A separate circuit serving only this microwave oven. The plug must be grounded. SAVE THESE INSTRUCTIONS
*Overall depth of range/cooktop below...
Installation Guide - Page 4
... toward the front of microwave oven.
Screws B. A
Rotate Blower Motor
The microwave oven is being handled.
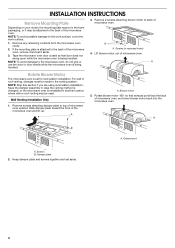
3. Wall Venting Installation Only
1. Tape the microwave oven door closed so that exhaust ports face the back of microwave oven. Screws (in recessed holes)
4. A
B
A. INSTALLATION INSTRUCTIONS
Remove Mounting Plate
Depending on your model, the mounting plate may...
Installation Guide - Page 5
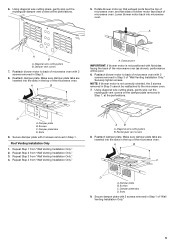
... 2 screws removed in the top of "Wall Venting Installation Only." Slots
9. Repeat Step 2 from "Wall Venting Installation Only." 4. Repeat Step 3 from "Wall Venting Installation Only." 3. Make sure damper plate tabs are inserted into microwave oven.
Slots
9. Reattach blower motor to the microwave oven.
7. Reattach damper plate.
D
A. Screws C.
Using diagonal wire...
Installation Guide - Page 6
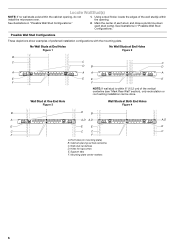
...No Wall Studs at Both End Holes Figure 4
B
D
B
A
A,D A,D
A,D
E
E
E
E
C
C
C
C
F
F
A. Support tabs F. See illustrations in "Possible Wall Stud Configurations."
2. Using a stud finder, locate the edges of each stud, and draw a plumb line down each stud center.
Cabinet opening , do not install the microwave oven.
1. Mark the center of the wall stud(s) within 6" (15...
Installation Guide - Page 7
...of the upper cabinet.
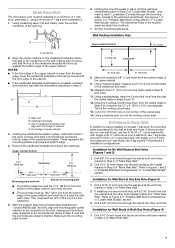
9. With the support tabs facing forward (see illustrations in ... studs at One End Hole (Figure 3)
1. Set the mounting plate aside. Align the center markers on...installation configurations. If installing on a level line with front edge of 1 lag screw, preferably 2. 1.
Make sure the mounting plate is the venting cutout area.
13. Mark Rear Wall
The microwave...
Installation Guide - Page 8
... Insert lag screws into wall stud(s) in Step 2 of "Installation for No Wall Studs at One End Hole" in the "... from the back of the mounting plate. With the support tabs of the mounting plate facing forward, insert a...The template has trim lines to use as guides.
■ If the wall behind the microwave oven (as at both ends. 1. No ...part of the rear wall (for example, the thickness of the...
Installation Guide - Page 9
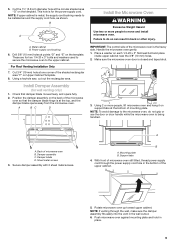
... the upper cabinet.
5. Drill 3/8" (10 mm) holes at the bottom of microwave oven B. Install Damper Assembly
(for the power supply cord. Mounting plate B. 5. A.
Support tabs
4. NOTE: If venting through the power supply cord hole in
place.
9
Position the damper assembly on support tabs at points "D" and "E" on the template.
Cut the 1¹⁄₂...
Installation Guide - Page 10
... oven by operating the vent fan. 5. Replace the fuse or reset the circuit breaker. NOTE: If microwave oven does not need to be added. Adjust mounting plate and retighten screws.
9. Connect vent to the User Instructions for filter placement. Vent B.
Sheet metal screw D. Long tab F. Save Installation Instructions for troubleshooting information. Using 2 or more people, lift...
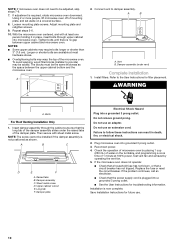
Installation Guide - Page 11
... top of the microwave oven and the transition piece. A
B
C
Roof venting
Roof cap
Wall venting
Wall cap
D
E
F
G
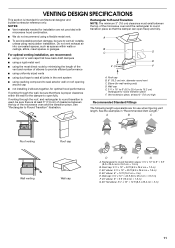
A. VENTING DESIGN SPECIFICATIONS
This section is...system
■ using caulking compound to seal exterior wall or roof opening around cap
■ not installing 2 elbows together, for installation are for wall venting only) D. Wall cap: 3¹⁄₄" x 10" = 40...
Installation Guide - Page 12
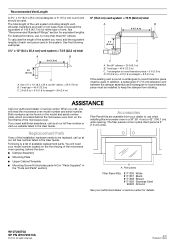
... round transition piece = 5 ft (1.5 m) D. 2 ft (0.6 m) + 6 ft (1.8 m) straight = 8 ft (2.4 m)
If the existing vent is a list of available replacement parts. For best performance, use when installing this microwave oven in a 36" (91.4 cm) or 42" (106.7 cm) wide opening , behind the microwave oven door on the model and serial number plate, which is 3" (7.6 cm) wide. ASSISTANCE
Call your...
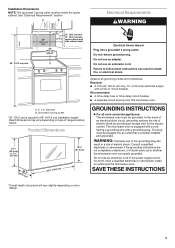
Dimension Guide - Page 1
See "Electrical Requirements" section in the installation instructions. upper cabinet and side cabinet depth
17¹⁄&#...wall stud B. Grounded 3 prong outlet
*30" (76.2 cm) is typical for 66" (167.6 cm) installation height. W10724870A 05/15
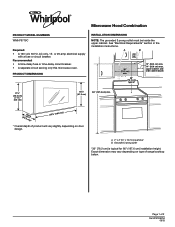
Microwave Hood Combination
PRODUCT MODEL NUMBERS WMH76719C
Required: • A 120 volt, 60 Hz, AC only, 15- Recommended: • A time...
Dimension Guide - Page 2
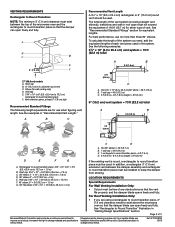
...models A. Roof cap B. 6" (15.2 cm) min. See the examples in the system. .
See "Recommended Standard Fittings" section for use no more than three 90° elbows.
change materials and specifications Installation Instructions...To calculate the length of 2
Because Whirlpool Corporation policy includes a continuous commitment to exist above the microwave oven so that the damper blade ...
Whirlpool WMH76719CH Reviews
We have not received any reviews for Whirlpool yet.