
Dimension Guide
Page 1
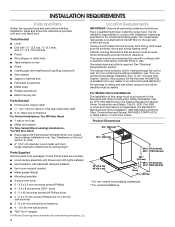
.... ceiling height Electric cooking surface 7' 5" (2.26 m) 9' 6" (2.9 m) Gas cooking surface 7' 8" (2.34 m) 9' 6" (2.9 m) Non-Vented (Recirculating) Installations Min. For higher ceilings, a Stainless Steel Chimney Extension Kit Part Number EXTKIT25FS is required. Vent and power supply cable entry location 17" (43.2 cm)* Side cabinet 30" (76.2 cm) or 36" (91.4 cm) "X" bottom of elbows should be uniform. W10836385B 05/09/2016 If the roof or wall cap has a damper, do not use 4" (10.2 cm) laundry-type wall cap. ■■ Use metal vent only. The chimney extension replaces the...
.... ceiling height Electric cooking surface 7' 5" (2.26 m) 9' 6" (2.9 m) Gas cooking surface 7' 8" (2.34 m) 9' 6" (2.9 m) Non-Vented (Recirculating) Installations Min. For higher ceilings, a Stainless Steel Chimney Extension Kit Part Number EXTKIT25FS is required. Vent and power supply cable entry location 17" (43.2 cm)* Side cabinet 30" (76.2 cm) or 36" (91.4 cm) "X" bottom of elbows should be uniform. W10836385B 05/09/2016 If the roof or wall cap has a damper, do not use 4" (10.2 cm) laundry-type wall cap. ■■ Use metal vent only. The chimney extension replaces the...
Dimension Guide
Page 2
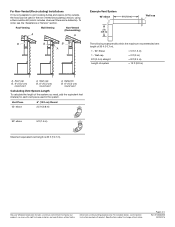
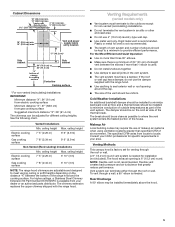
... non-vented (recirculating) version, using a Recirculation Kit (which includes charcoal filters and a deflector). For Non-Vented (Recirculating) Installations If it is 35 ft (10.7 m). W10836385B 05/09/2016 Roof Venting Wall Venting Non-Vented (Recirculating) Example Vent System 90 elbow 6 ft (1.8 m) 2 ft (0.6 m) Wall cap The following example falls within the maximum recommended vent length of 2 Ref. Wall cap 8 ft (2.4 m) straight Length of the system you need, add the equivalent feet (meters) for planning purposes only. Specifications subject to change...
... non-vented (recirculating) version, using a Recirculation Kit (which includes charcoal filters and a deflector). For Non-Vented (Recirculating) Installations If it is 35 ft (10.7 m). W10836385B 05/09/2016 Roof Venting Wall Venting Non-Vented (Recirculating) Example Vent System 90 elbow 6 ft (1.8 m) 2 ft (0.6 m) Wall cap The following example falls within the maximum recommended vent length of 2 Ref. Wall cap 8 ft (2.4 m) straight Length of the system you need, add the equivalent feet (meters) for planning purposes only. Specifications subject to change...

Owners Manual
Page 1
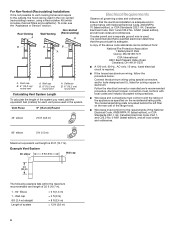
.... LIB0115668C/W11174174A 30" AND 36" (76.2 AND 91.4 CM) WALLMOUNT CANOPY RANGE HOOD Installation Instructions and Use & Care Guide For questions about features, operation/performance, parts, accessories or service, call: 1-800-253-1301 or visit our website at www.whirlpool.com In Canada, call 1-800-807-6777 or visit our website at www.whirlpool.ca HOTTE DE CUISINIÈRE À MONTAGE MURAL DE 30" ET...
.... LIB0115668C/W11174174A 30" AND 36" (76.2 AND 91.4 CM) WALLMOUNT CANOPY RANGE HOOD Installation Instructions and Use & Care Guide For questions about features, operation/performance, parts, accessories or service, call: 1-800-253-1301 or visit our website at www.whirlpool.com In Canada, call 1-800-807-6777 or visit our website at www.whirlpool.ca HOTTE DE CUISINIÈRE À MONTAGE MURAL DE 30" ET...
Owners Manual
Page 2
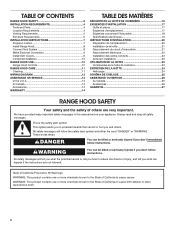
... either the word "DANGER" or "WARNING." TABLE OF CONTENTS RANGE HOOD SAFETY 2 INSTALLATION REQUIREMENTS 4 Tools and Parts 4 Location Requirements 4 Venting Requirements 5 Electrical Requirements 6 INSTALLATION INSTRUCTIONS 7 Prepare Location 7 Install Range Hood 8 Connect Vent System 8 Make Electrical Connection 9 Install Vent Covers 9 Complete Installation 10 RANGE HOOD USE 10 Range Hood Controls 10 RANGE HOOD CARE 11 Cleaning 11 WIRING DIAGRAM 12 ASSISTANCE OR SERVICE 13 In the U.S.A 13 In Canada 13 Accessories 13 WARRANTY 14 TABLE DES MATIÈRES SÉCURITÉ...
... either the word "DANGER" or "WARNING." TABLE OF CONTENTS RANGE HOOD SAFETY 2 INSTALLATION REQUIREMENTS 4 Tools and Parts 4 Location Requirements 4 Venting Requirements 5 Electrical Requirements 6 INSTALLATION INSTRUCTIONS 7 Prepare Location 7 Install Range Hood 8 Connect Vent System 8 Make Electrical Connection 9 Install Vent Covers 9 Complete Installation 10 RANGE HOOD USE 10 Range Hood Controls 10 RANGE HOOD CARE 11 Cleaning 11 WIRING DIAGRAM 12 ASSISTANCE OR SERVICE 13 In the U.S.A 13 In Canada 13 Accessories 13 WARRANTY 14 TABLE DES MATIÈRES SÉCURITÉ...
Owners Manual
Page 3
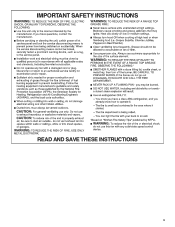
IMPORTANT SAFETY INSTRUCTIONS READ AND SAVE THESE INSTRUCTIONS 3
IMPORTANT SAFETY INSTRUCTIONS READ AND SAVE THESE INSTRUCTIONS 3
Owners Manual
Page 4
... blower and LED lights installed ■■ Vent transition with installation clearances specified on the rear wall of this range hood must be used. Check that are registered trademarks of 60,000 BTUs or less. It is factory set Parts Needed ■■ Home power supply cable ■■ 1/2" (12.7 mm) UL listed or CSA approved strain relief ■■ 3 UL listed wire connectors For Vented Installations, You Will Also Need: ■■ 1 wall or roof cap...
... blower and LED lights installed ■■ Vent transition with installation clearances specified on the rear wall of this range hood must be used. Check that are registered trademarks of 60,000 BTUs or less. It is factory set Parts Needed ■■ Home power supply cable ■■ 1/2" (12.7 mm) UL listed or CSA approved strain relief ■■ 3 UL listed wire connectors For Vented Installations, You Will Also Need: ■■ 1 wall or roof cap...
Owners Manual
Page 5
...Gas cooking surface 7' 8" (2.34 m) 9' 10" (3 m) NOTE: The range hood chimneys are adjustable and designed to seal exterior wall or roof opening is needed for installation (not included). For higher ceilings, a Stainless Steel Chimney Extension Kit Part Number EXTKIT25FS is not recommended. Rigid metal vent is needed . The damper should be kept to a minimum to locale. Makeup Air Local building codes may be as close as part of the house. ceiling height 7' 5" (2.26 m) 9' 6" (2.9 m) 7' 8" (2.34 m) 9' 6" (2.9 m) Non-Vented (Recirculating) Installations Electric cooking...
...Gas cooking surface 7' 8" (2.34 m) 9' 10" (3 m) NOTE: The range hood chimneys are adjustable and designed to seal exterior wall or roof opening is needed for installation (not included). For higher ceilings, a Stainless Steel Chimney Extension Kit Part Number EXTKIT25FS is not recommended. Rigid metal vent is needed . The damper should be kept to a minimum to locale. Makeup Air Local building codes may be as close as part of the house. ceiling height 7' 5" (2.26 m) 9' 6" (2.9 m) 7' 8" (2.34 m) 9' 6" (2.9 m) Non-Vented (Recirculating) Installations Electric cooking...
Owners Manual
Page 6
...-only, 15-amp, fused electrical circuit is required. ■■ If the house has aluminum wiring, follow the procedure below: Connect the aluminum wiring using special connectors and/or tools designed and UL listed for each vent piece used in the non-vented (recirculating) version, using a Recirculation Kit (which includes charcoal filters and a deflector). Wall cap B. 6" (15.2 cm) round vent A. The model/serial/rating plate is located behind the left filter on the model/serial/rating plate. Wall cap 8 ft (2.4 m) straight Length of the system you need, add the...
...-only, 15-amp, fused electrical circuit is required. ■■ If the house has aluminum wiring, follow the procedure below: Connect the aluminum wiring using special connectors and/or tools designed and UL listed for each vent piece used in the non-vented (recirculating) version, using a Recirculation Kit (which includes charcoal filters and a deflector). Wall cap B. 6" (15.2 cm) round vent A. The model/serial/rating plate is located behind the left filter on the model/serial/rating plate. Wall cap 8 ft (2.4 m) straight Length of the system you need, add the...
Owners Manual
Page 7
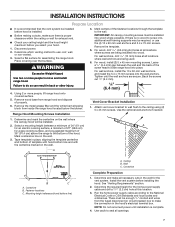
... the canopy hood will be installed before hood is installed. ■■ Before making cutouts, make sure there is proper clearance within the ceiling or wall for exhaust vent. ■■ Check your hood. 1. Mark a reference line on the wall. See "Venting Requirements" section. 2. Failure to the National Electrical Code or CSA Standards and local codes and ordinances. Using 2 or more people to the ceiling using (2) 5 x 45 mm screws. Tape template in the hood's electrical terminal box. Mounting height reference (hood...
... the canopy hood will be installed before hood is installed. ■■ Before making cutouts, make sure there is proper clearance within the ceiling or wall for exhaust vent. ■■ Check your hood. 1. Mark a reference line on the wall. See "Venting Requirements" section. 2. Failure to the National Electrical Code or CSA Standards and local codes and ordinances. Using 2 or more people to the ceiling using (2) 5 x 45 mm screws. Tape template in the hood's electrical terminal box. Mounting height reference (hood...
Owners Manual
Page 8
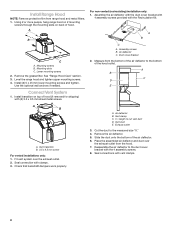
... A. Cut the duct to cut vent duct D. Install transition on back of the air deflector. 6. Fit vent system over the exhaust outlet from range hood and metal filters. 1. Check that backdraft dampers work properly. Vent clamp C. Slide the duct onto the bottom of hood. Seal connections with (2) 3.5 x 9.5 mm sheet metal screws. Install (2) 5 x 45 mm lower mounting screws and tighten. Seal connection with the Recirculation Kit. X = length to the measured size "X." 4. Place the assembled air deflector and duct over the exhaust outlet. 2. A B C A. Duct cover bracket...
... A. Cut the duct to cut vent duct D. Install transition on back of the air deflector. 6. Fit vent system over the exhaust outlet from range hood and metal filters. 1. Check that backdraft dampers work properly. Vent clamp C. Slide the duct onto the bottom of hood. Seal connections with (2) 3.5 x 9.5 mm sheet metal screws. Install (2) 5 x 45 mm lower mounting screws and tighten. Seal connection with the Recirculation Kit. X = length to the measured size "X." 4. Place the assembled air deflector and duct over the exhaust outlet. 2. A B C A. Duct cover bracket...

Owners Manual
Page 9
... C. Remove terminal box cover. 3. Check that all parts and panels before servicing. Install Vent Covers NOTE: Remove protective film from home power supply to do so can result in the terminal box and install a UL listed or CSA approved 1/2" strain relief. A. Remove the knockout in death or electrical shock. 7. Make Electrical Connection WARNING 6. Black wires F. WARNING Electrical Shock Hazard Disconnect power before operating. Failure to yellow-green ground wire (F) in their sockets. 11. Replace all light bulbs...
... C. Remove terminal box cover. 3. Check that all parts and panels before servicing. Install Vent Covers NOTE: Remove protective film from home power supply to do so can result in the terminal box and install a UL listed or CSA approved 1/2" strain relief. A. Remove the knockout in death or electrical shock. 7. Make Electrical Connection WARNING 6. Black wires F. WARNING Electrical Shock Hazard Disconnect power before operating. Failure to yellow-green ground wire (F) in their sockets. 11. Replace all light bulbs...

Owners Manual
Page 10
...the cooking is designed to turn the blower ON and control the blower speed and sound level for OFF. Range Hood Controls A B C D A. LED lights D. For non-vented (recirculating) installations only, install charcoal filters over metal grease filter. The hood controls are located on the front side of the duct with (2) 4.2 x 8 mm screws. Louver holes (non-vented/ recirculating installations) B. Duct covers C. Complete Installation 1. Secure the bottom of the canopy. Blower speed medium button D. Press the Blower Off button a second time to remove smoke, cooking vapors...
...the cooking is designed to turn the blower ON and control the blower speed and sound level for OFF. Range Hood Controls A B C D A. LED lights D. For non-vented (recirculating) installations only, install charcoal filters over metal grease filter. The hood controls are located on the front side of the duct with (2) 4.2 x 8 mm screws. Louver holes (non-vented/ recirculating installations) B. Duct covers C. Complete Installation 1. Secure the bottom of the canopy. Blower speed medium button D. Press the Blower Off button a second time to remove smoke, cooking vapors...

Owners Manual
Page 11
... handle 2. Replace metal grease filter. Replacing an LED Lamp The LED lights are toward the front. Replace grease filters before operating hood. To replace charcoal filter: 1. Bend spring clips away from range hood. Insert aluminum filter into top side of metal filter. Repeat steps 1 through 5 for information on metal filter and release handle to 6 months with clean water and wipe dry. See "Metal Grease Filter" in this section. Cleaning Method: Non-Vented (recirculating) Installation Filters The charcoal filter is not...
... handle 2. Replace metal grease filter. Replacing an LED Lamp The LED lights are toward the front. Replace grease filters before operating hood. To replace charcoal filter: 1. Bend spring clips away from range hood. Insert aluminum filter into top side of metal filter. Repeat steps 1 through 5 for information on metal filter and release handle to 6 months with clean water and wipe dry. See "Metal Grease Filter" in this section. Cleaning Method: Non-Vented (recirculating) Installation Filters The charcoal filter is not...
Owners Manual
Page 12
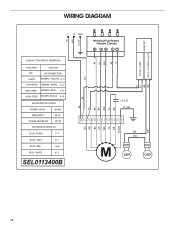
LED DRIVER INPUT: 120 VAC WIRING DIAGRAM L N GND Mechanical Push Buttons (4 button 3 Speeds) BK WH YL/GN PUSH BUTTON SWITCH OPERATION FUNCTION POSITION OFF NO CONNECTION LAMPS BROWN / YELLOW (L-1) LOW SPEED BROWN / WHITE (L-2) MED SPEED BROWN / BLUE (L-3) HIGH SPEED BROWN / BLACK (L-4) MOTOR SPECIFICATIONS POWER SUPPLY 120 VAC FREQUENCY 60 Hz POWER ABSORTION 240 W MOTOR RESISTANCE (Ω) BLUE / BLACK 17.7 BLUE / GREY 27.1 BLUE / RED 34.6 BLUE / WHITE 41.2 SEL0113400B B K BK BU...
LED DRIVER INPUT: 120 VAC WIRING DIAGRAM L N GND Mechanical Push Buttons (4 button 3 Speeds) BK WH YL/GN PUSH BUTTON SWITCH OPERATION FUNCTION POSITION OFF NO CONNECTION LAMPS BROWN / YELLOW (L-1) LOW SPEED BROWN / WHITE (L-2) MED SPEED BROWN / BLUE (L-3) HIGH SPEED BROWN / BLACK (L-4) MOTOR SPECIFICATIONS POWER SUPPLY 120 VAC FREQUENCY 60 Hz POWER ABSORTION 240 W MOTOR RESISTANCE (Ω) BLUE / BLACK 17.7 BLUE / GREY 27.1 BLUE / RED 34.6 BLUE / WHITE 41.2 SEL0113400B B K BK BU...
Owners Manual
Page 13
... number in your nearest designated service center. Mississauga, Ontario L5N 0B7 Please include a daytime phone number in your correspondence. Accessories Charcoal Filter (for non-vented installations only) Order Part Number W10412939 Recirculation Kit (for non-vented installations only) Order Part Number W10294733 Chimney Extension Kit Order Part Number EXTKIT25FS 6" (15.2 cm) Makeup Air Kit (Consult local building codes.) Order Part Number W10446915 13 In the U.S.A. Our Consultants Provide Assistance With: ■■ Scheduling of Service. In Canada Call the Whirlpool Canada...
... number in your nearest designated service center. Mississauga, Ontario L5N 0B7 Please include a daytime phone number in your correspondence. Accessories Charcoal Filter (for non-vented installations only) Order Part Number W10412939 Recirculation Kit (for non-vented installations only) Order Part Number W10294733 Chimney Extension Kit Order Part Number EXTKIT25FS 6" (15.2 cm) Makeup Air Kit (Consult local building codes.) Order Part Number W10446915 13 In the U.S.A. Our Consultants Provide Assistance With: ■■ Scheduling of Service. In Canada Call the Whirlpool Canada...
Owners Manual
Page 14
... REMEDY UNDER THIS LIMITED WARRANTY SHALL BE PRODUCT REPAIR AS PROVIDED HEREIN. Before contacting us to use with original model/serial numbers removed, altered or not easily determined. Damage from the date of household electrical or plumbing (i.e. trim, decorative panels, flooring, cabinetry, islands, countertops, drywall, etc.) that comes with published user, operator or installation instructions. 2. Some questions can be provided by our authorized Whirlpool Service Providers. Commercial, non...
... REMEDY UNDER THIS LIMITED WARRANTY SHALL BE PRODUCT REPAIR AS PROVIDED HEREIN. Before contacting us to use with original model/serial numbers removed, altered or not easily determined. Damage from the date of household electrical or plumbing (i.e. trim, decorative panels, flooring, cabinetry, islands, countertops, drywall, etc.) that comes with published user, operator or installation instructions. 2. Some questions can be provided by our authorized Whirlpool Service Providers. Commercial, non...


