Whirlpool UVL6048JSS Support and Manuals
Get Help and Manuals for this Whirlpool item
View All Support Options Below
Free Whirlpool UVL6048JSS manuals!
Problems with Whirlpool UVL6048JSS?
Ask a Question
Free Whirlpool UVL6048JSS manuals!
Problems with Whirlpool UVL6048JSS?
Ask a Question
Popular Whirlpool UVL6048JSS Manual Pages
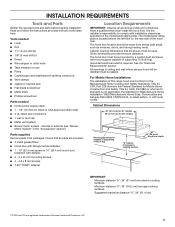
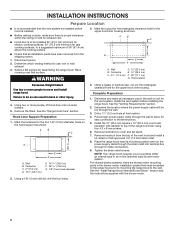
Installation Instructions - Page 5
..." (121.9 cm) for 48" models
Hood support must be away from electric cooking surfaces. Read and follow the instructions provided with installation clearances specified on the rear wall of supporting 75 lb (34 kg). It is not applicable, the standard for Mobile Home Construction and Safety, Title 24, HUD, Part 280) or when such standard is...
Installation Instructions - Page 6

...12.8 cm)
18" (45.7 cm) for 36" models 24" (61.0 cm) for 48" models
27 5/8" (70.1 cm)
2913/16" (75.8 cm)
357/8" (91.1 cm) for 36" models 477/8" (121.6 cm) for 48" models
11" (27.9 cm) 22" (55.9 cm)
... for specific requirements in an attic or other
enclosed area. ■ Do not use of makeup air systems when using ventilation systems greater than one elbow is used. ■ Do not install two ...
Installation Instructions - Page 8

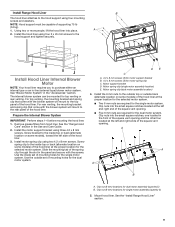
... to make all installation parts have been removed from the top of the range hood liner using four 4.2 x 8 mm screws.
6. Install the vent system before hood is installed.
3. Centerline C. 41/2" (11.4 cm)
D. 13" (33.0 cm) E. 14" (35.5 cm) F. 28" (71.1 cm) G. See the "Install Range Hood Internal Blower Motor" section and the instructions supplied with damper...
Installation Instructions - Page 9

Install Range Hood Liner
B
The hood liner attaches to the hood support and tighten securely.
For top venting, the mounting bracket and spring clip that come with the screws. See the "Range Hood Care" section in the "Accessories" section. Use the inside set of mounting holes for the dual motor system. Motor spring clip...
Installation Instructions - Page 11
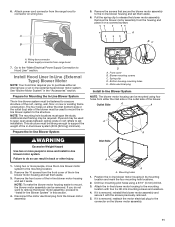
...blower motor assembly.
Failure to a secure structure of the in -line blower housing and set them aside.
6.
Bottom housing mounting holes E. Mounting holes
1. If it with four.... If you to support the weight of the roof, ceiling, wall, floor, or new or existing frame construction. D
A. Blower mounting screws C. Motor electrical plug
Install In-line Blower System...
Installation Instructions - Page 12

... boxes in the in death or electrical shock. Replace all parts and panels before servicing.
Electrical knockout
5. Disconnect power.
2. Connect the...gray wires (G) together.
12 Complete Preparation
1. Determine and make the wiring connections.
8. Install the conduit connectors and conduit to prepare for the vent system. Use UL listed wire ...and set the covers and screws aside.
Installation Instructions - Page 13
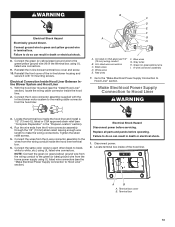
... wires G. Locate the terminal box inside the hood liner and install a 1/2" (13 mm) UL listed or CSA approved strain relief (see the "Install Hood Liner"
section), locate the wiring cable connector inside the hood liner terminal box.
6. Replace all parts and panels before servicing. Go to the "Make Electrical Power Supply Connection to the green...
Installation Instructions - Page 18
... and repair parts sales.
■ Specialized customer assistance (Spanish speaking, hearing impaired, limited vision, etc.). If you need replacement parts If you need further assistance, you use in your appliance. To locate factory specified replacement parts in Canada.
■ Features and specifications on our full line of 65,000 Btus. KitchenAid appliances designated service...
Owners Manual - Page 5

.... Cabinet opening dimensions that all parts are included. ■ 3 metal grease filters ■ Hood liner with halogen lamps installed. ■ 1 - 10" (25.4 cm) square to comply with local codes.
Cabinet Dimensions
36" (91.4 cm) for 36" models 48" (121.9 cm) for Manufactured Home Installation 1982 (Manufactured Home Sites, Communities and Setups) ANSI A225.1/NFPA 501A, or...
Owners Manual - Page 6
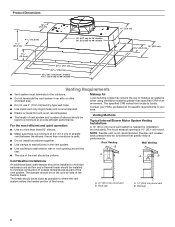
... should be as close as possible to minimize conduction of outside temperatures as part of the house. For the most efficient and quiet operation: ■ Use...codes may require the use 4" (10.2 cm) laundry-type wall caps. ■ Use metal vent only.
Venting Methods
Typical Internal Blower Motor System Venting Installations
A 10" (25.4 cm) round vent system is needed for specific...
Owners Manual - Page 8
... holes.
8 Hood Liner Support Preparation
1. A
B
C
G
D
E F
A.
See the "Venting Requirements" section.
2. Remove knockout from the shipping carton.
1. INSTALLATION INSTRUCTIONS
Prepare Location
■ It is recommended that the vent system be run the power supply cable through the strain relief into terminal box (enough to make all installation parts have been removed from...
Owners Manual - Page 9
... are required for the single motor system. See "Blower Motor System" in the Use and Care Guide.
2. Use the outside back (alternate location on some models), toward the left side of the hood liner. Mount hood liner.
Install the 6 mm nuts to the top panel of the hood liner.
3. Clip nuts into place...
Owners Manual - Page 11

..., move and install in -line...system. Motor electrical plug
Install In-line Blower System
...external type) blower motor system. Install Hood Liner In-Line (External Type...and set it ...line blower motor housing and set them aside.
3. Additional...set them aside.
6. D
A. If it is removed, reattach the motor electrical plug to "Install...strong enough to aid installation. This structure must span...
Owners Manual - Page 12

...and connect the gray wires (G) together.
12
Remove the terminal box covers and set the covers and screws aside. Pull enough 1/2" (13 mm) wiring conduit to...with clamps. B A
A. Electrical terminal box B. Disconnect power.
2. Replace all necessary cuts for the installation of the UL Listed or CSA approved 1/2" (13 mm) wiring ...parts and panels before servicing. Complete Preparation
1.
Owners Manual - Page 18

...and maintenance procedures.
■ Accessory and repair parts sales.
■ Specialized customer assistance (Spanish speaking, hearing impaired, limited vision, etc.).
ASSISTANCE OR SERVICE
When calling for use only factory specified parts.
If you need replacement parts If you need further assistance, you use in Canada.
■ Features and specifications on our full line of 65,000...
Whirlpool UVL6048JSS Reviews
We have not received any reviews for Whirlpool yet.