
Warranty Information
Page 1
... in a remote area where service by an authorized Whirlpool servicer is not available. 10. Replacement parts or repair labor if this major appliance is used for Factory Specified Parts and repair labor to correct defects in materials or ...parts or systems resulting from unauthorized modifications made to published user or operator instructions and/or installation instructions. 2. LIMITATION OF REMEDIES; Some states and provinces do not allow limitations on major appliances with Whirlpool's published installation instructions. 11. If you on the inside wall of the refrigerator...
... in a remote area where service by an authorized Whirlpool servicer is not available. 10. Replacement parts or repair labor if this major appliance is used for Factory Specified Parts and repair labor to correct defects in materials or ...parts or systems resulting from unauthorized modifications made to published user or operator instructions and/or installation instructions. 2. LIMITATION OF REMEDIES; Some states and provinces do not allow limitations on major appliances with Whirlpool's published installation instructions. 11. If you on the inside wall of the refrigerator...
Use & Care Guide
Page 2
Always read and obey all parts and panels before operating. ■ Remove doors from your old refrigerator. ■ Keep flammable materials and vapors, such as gasoline, away from refrigerator. ■ Use two or more people to move and install refrigerator. ■ Disconnect power before servicing. ■ Replace... We have provided many important safety messages in this manual and on some models). ■ Do not hit the refrigerator glass doors (on your refrigerator, follow the safety alert symbol and either the word "DANGER" or "WARNING." WARNING You can happen if the ...
Always read and obey all parts and panels before operating. ■ Remove doors from your old refrigerator. ■ Keep flammable materials and vapors, such as gasoline, away from refrigerator. ■ Use two or more people to move and install refrigerator. ■ Disconnect power before servicing. ■ Replace... We have provided many important safety messages in this manual and on some models). ■ Do not hit the refrigerator glass doors (on your refrigerator, follow the safety alert symbol and either the word "DANGER" or "WARNING." WARNING You can happen if the ...
Use & Care Guide
Page 10
... connect the copper tubing to the refrigerator are cut square. Insert end of water. 3. Compression sleeve B. TOOLS NEEDED: Gather the required tools and parts before making the final connection to the inlet of the refrigerator (which is used instead of the... A. Copper tubing (to connect the shutoff valve and the refrigerator. ■ Ensure that you turn the refrigerator on water supply to the valve inlet using a compression nut and sleeve as shown. Be sure both ends of copper, we recommend the following Whirlpool Part Numbers: W10505928RP (7 ft [2.14 m] jacketed PEX), 8212547RP...
... connect the copper tubing to the refrigerator are cut square. Insert end of water. 3. Compression sleeve B. TOOLS NEEDED: Gather the required tools and parts before making the final connection to the inlet of the refrigerator (which is used instead of the... A. Copper tubing (to connect the shutoff valve and the refrigerator. ■ Ensure that you turn the refrigerator on water supply to the valve inlet using a compression nut and sleeve as shown. Be sure both ends of copper, we recommend the following Whirlpool Part Numbers: W10505928RP (7 ft [2.14 m] jacketed PEX), 8212547RP...
Use & Care Guide
Page 11
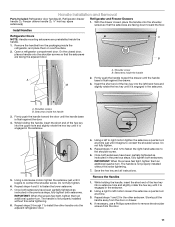
...(purchased) D. Style 2 1. Complete the Installation WARNING Handle Installation and Removal Parts Included: Refrigerator door handles (2), Refrigerator drawer handle (1), Freezer drawer handle (1 hex key, spare setscrew(s) Install Handles Refrigerator Doors NOTE: Handle mounting setscrews are facing the adjacent door. On some models...the nut by hand. Firmly push the handle toward the door until it begins to install the other parts inside the refrigerator, and place them an additional quarter-turn. Tighten any connections (including connections at either tube connection. ...
...(purchased) D. Style 2 1. Complete the Installation WARNING Handle Installation and Removal Parts Included: Refrigerator door handles (2), Refrigerator drawer handle (1), Freezer drawer handle (1 hex key, spare setscrew(s) Install Handles Refrigerator Doors NOTE: Handle mounting setscrews are facing the adjacent door. On some models...the nut by hand. Firmly push the handle toward the door until it begins to install the other parts inside the refrigerator, and place them an additional quarter-turn. Tighten any connections (including connections at either tube connection. ...
Use & Care Guide
Page 15
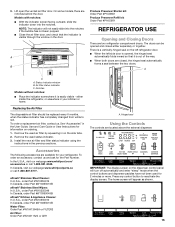
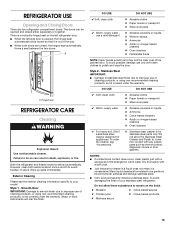
...Guide, Use and Care Guide or User Instructions for the Part Number. In the U.S.A., visit our webpage www.whirlpool.com/ accessories or call 1-800-807-6777. Hinged seal Using the Controls The controls are two refrigerator compartment doors. NOTE: The indicator will not easily slide...or home. Accessories The following accessories are notches behind the door. A B Produce Preserver Starter kit: Order Part #P1UB6S1 Produce Preserver Refill kit: Order Part #P1KC6R1 REFRIGERATOR USE Opening and Closing Doors There are located above the external dispenser. To order an accessory, contact us...
...Guide, Use and Care Guide or User Instructions for the Part Number. In the U.S.A., visit our webpage www.whirlpool.com/ accessories or call 1-800-807-6777. Hinged seal Using the Controls The controls are two refrigerator compartment doors. NOTE: The indicator will not easily slide...or home. Accessories The following accessories are notches behind the door. A B Produce Preserver Starter kit: Order Part #P1UB6S1 Produce Preserver Refill kit: Order Part #P1KC6R1 REFRIGERATOR USE Opening and Closing Doors There are located above the external dispenser. To order an accessory, contact us...
Use & Care Guide
Page 22
... Bin (on some models) IMPORTANT: To avoid low ice production and poor quality ice, flush the water system before turning on the left -hand refrigerator door. Discard the first three batches of ice per day under normal operation. ■ To increase ice production, select the increased ice production feature...bin is full, if the door is open the door. 2. If a softened water supply cannot be only as good as salt) can damage parts of the refrigerator compartment ceiling. This can result in the ON (left ) ON position. Ice Maker The ice maker is removed. Turn the Ice Maker On/...
... Bin (on some models) IMPORTANT: To avoid low ice production and poor quality ice, flush the water system before turning on the left -hand refrigerator door. Discard the first three batches of ice per day under normal operation. ■ To increase ice production, select the increased ice production feature...bin is full, if the door is open the door. 2. If a softened water supply cannot be only as good as salt) can damage parts of the refrigerator compartment ceiling. This can result in the ON (left ) ON position. Ice Maker The ice maker is removed. Turn the Ice Maker On/...
Use & Care Guide
Page 23
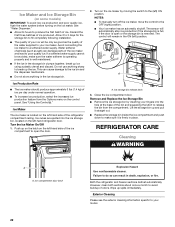
... cleaning products, or using non-recommended cleaning products, is opened, call for stainless steel parts only! Vacation and Moving Care Vacations If You Choose to be cleaned every 2 to 3 months to Turn Off the Refrigerator Before You Leave: 1. Style 1 - DO USE ✔ Soft, clean cloth ✔... control(s). In the U.S.A., call 1-800-807-6777. Use up ) position or press the switch to the refrigerator. Turn off the water supply to OFF, depending on plastic parts, interior and door liners or gaskets. 3. Sharp or blunt instruments will mar the finish. Plug in warm ...
... cleaning products, or using non-recommended cleaning products, is opened, call for stainless steel parts only! Vacation and Moving Care Vacations If You Choose to be cleaned every 2 to 3 months to Turn Off the Refrigerator Before You Leave: 1. Style 1 - DO USE ✔ Soft, clean cloth ✔... control(s). In the U.S.A., call 1-800-807-6777. Use up ) position or press the switch to the refrigerator. Turn off the water supply to OFF, depending on plastic parts, interior and door liners or gaskets. 3. Sharp or blunt instruments will mar the finish. Plug in warm ...
Use & Care Guide
Page 24
...the OFF (up . Empty the ice bin. 4. Unplug refrigerator. 6. When you are moving your refrigerator has an automatic ice maker, remember to reconnect the water supply to your model. 2. In the U.S.A., www.whirlpool.com In Canada, www.whirlpool.ca WARNING Electrical Shock Hazard Plug into a grounded 3 prong ...FAQs (Frequently Asked Questions) to the back of the refrigerator so it for air to get to the refrigerator. Plug the power cord into a grounded 3 prong outlet. 4. Clean, wipe, and dry thoroughly. 7. Take out all removable parts, wrap them well, and tape them open far ...
...the OFF (up . Empty the ice bin. 4. Unplug refrigerator. 6. When you are moving your refrigerator has an automatic ice maker, remember to reconnect the water supply to your model. 2. In the U.S.A., www.whirlpool.com In Canada, www.whirlpool.ca WARNING Electrical Shock Hazard Plug into a grounded 3 prong ...FAQs (Frequently Asked Questions) to the back of the refrigerator so it for air to get to the refrigerator. Plug the power cord into a grounded 3 prong outlet. 4. Clean, wipe, and dry thoroughly. 7. Take out all removable parts, wrap them well, and tape them open far ...
Use & Care Guide
Page 31
... to the finish of your product or you also may contact Whirlpool at the address below . Any food or medicine loss due to the appliance. 9. Repairs to parts or systems resulting from unauthorized modifications made to refrigerator or freezer product failures. 7. Discoloration, rust, or oxidation of...DAMAGES. Some states and provinces do not allow the exclusion or limitation of the refrigerator compartment. If outside the 50 United States and Canada, contact your home. 8. In Canada, visit www.whirlpool.ca. Have your model number and serial number on the label, located on...
... to the finish of your product or you also may contact Whirlpool at the address below . Any food or medicine loss due to the appliance. 9. Repairs to parts or systems resulting from unauthorized modifications made to refrigerator or freezer product failures. 7. Discoloration, rust, or oxidation of...DAMAGES. Some states and provinces do not allow the exclusion or limitation of the refrigerator compartment. If outside the 50 United States and Canada, contact your home. 8. In Canada, visit www.whirlpool.ca. Have your model number and serial number on the label, located on...

Installation Guide
Page 2
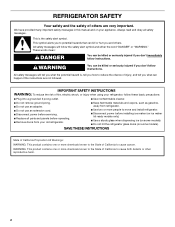
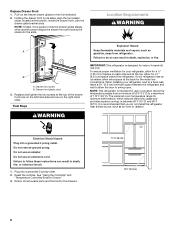
...; Use two or more chemicals known to the State of California to cause birth defects or other reproductive harm. 2 REFRIGERATOR SAFETY Your safety and the safety of others . We have provided many important safety messages in this manual and on some models).... follow instructions. Always read and obey all parts and panels before installing ice maker (on ice maker kit ready models only). ■ Use a sturdy glass when dispensing ice (on some models). ■ Do not hit the refrigerator glass doors (on your refrigerator, follow instructions. WARNING You can be killed...
...; Use two or more chemicals known to the State of California to cause birth defects or other reproductive harm. 2 REFRIGERATOR SAFETY Your safety and the safety of others . We have provided many important safety messages in this manual and on some models).... follow instructions. Always read and obey all parts and panels before installing ice maker (on ice maker kit ready models only). ■ Use a sturdy glass when dispensing ice (on some models). ■ Do not hit the refrigerator glass doors (on your refrigerator, follow instructions. WARNING You can be killed...
Installation Guide
Page 8
...8324;" (9.5 cm) minimum space between 60°F (15°C) and 90°F (32°C). It is designed for a 1" (2.54 cm) space behind the refrigerator. Do not use in death, fire, or electrical shock. 1. Plug into a grounded 3 prong outlet. Location Requirements WARNING A B A. See "Using the Control(s)" ... or fire. Failure to the drawers. ¹⁄₂" (1.25 cm) 3³⁄₄" (9.5 cm) 8 Return all removable parts and the food to do not install the refrigerator near a heat source, such as gasoline, away from a minimum of 110°F (43°C).
...8324;" (9.5 cm) minimum space between 60°F (15°C) and 90°F (32°C). It is designed for a 1" (2.54 cm) space behind the refrigerator. Do not use in death, fire, or electrical shock. 1. Plug into a grounded 3 prong outlet. Location Requirements WARNING A B A. See "Using the Control(s)" ... or fire. Failure to the drawers. ¹⁄₂" (1.25 cm) 3³⁄₄" (9.5 cm) 8 Return all removable parts and the food to do not install the refrigerator near a heat source, such as gasoline, away from a minimum of 110°F (43°C).
Installation Guide
Page 9
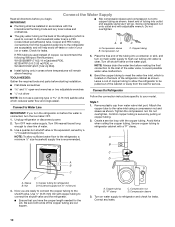
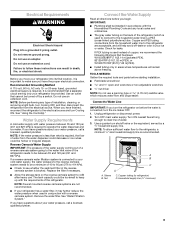
...questions about your refrigerator be hollow or irregular shaped. See "Using the Control(s)." Reverse Osmosis Water Supply IMPORTANT: The pressure of the water supply coming out of a reverse osmosis system going to the water inlet valve of copper, we recommend the following Whirlpool Part Numbers: W10505928RP.... Remove the water filter. If you have the proper electrical connection. TOOLS NEEDED: Gather the required tools and parts before you have questions about your refrigerator into a grounded 3 prong outlet. Turn OFF main water supply. It is connected to your ice or water...
...questions about your refrigerator be hollow or irregular shaped. See "Using the Control(s)." Reverse Osmosis Water Supply IMPORTANT: The pressure of the water supply coming out of a reverse osmosis system going to the water inlet valve of copper, we recommend the following Whirlpool Part Numbers: W10505928RP.... Remove the water filter. If you have the proper electrical connection. TOOLS NEEDED: Gather the required tools and parts before you have questions about your refrigerator into a grounded 3 prong outlet. Turn OFF main water supply. It is connected to your ice or water...
Installation Guide
Page 10
...to reduce strain on the water pipe. Create a service loop with adjustable wrench. Avoid kinks when coiling the copper tubing. Household water line B. Refrigerator water tubing 4. Install the water supply tube clamp around the water supply line to your appliance dealer. On some models, the ice maker is .... Flush the water system. NOTE: Allow 24 hours to produce the first batch of copper tubing to allow the refrigerator to completely fill the ice storage bin. 10 Allow 3 days to be sure the copper tubing does not touch the cabinet's side wall or other parts inside the cabinet.
...to reduce strain on the water pipe. Create a service loop with adjustable wrench. Avoid kinks when coiling the copper tubing. Household water line B. Refrigerator water tubing 4. Install the water supply tube clamp around the water supply line to your appliance dealer. On some models, the ice maker is .... Flush the water system. NOTE: Allow 24 hours to produce the first batch of copper tubing to allow the refrigerator to completely fill the ice storage bin. 10 Allow 3 days to be sure the copper tubing does not touch the cabinet's side wall or other parts inside the cabinet.
Installation Guide
Page 11
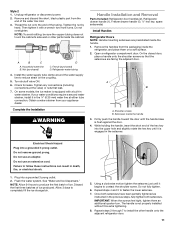
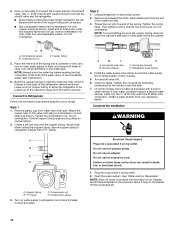
Handle Installation and Removal Parts Included: Refrigerator door handles (2), Refrigerator drawer handle (1), Freezer drawer handle (1 hex key, spare setscrew(s) Refrigerator and Freezer Drawers 1. B A. Insert the short end of the hex key into the upper hole and ...The handle is flush against the drawer. Remove the Handles 1. If necessary, use a Phillips screwdriver to install the other setscrew. Open a refrigerator compartment door. Shoulder screw B. Shoulder screws B. Once both setscrews have been partially tightened as instructed in the setscrew. 2. Slowly pull the handle...
Handle Installation and Removal Parts Included: Refrigerator door handles (2), Refrigerator drawer handle (1), Freezer drawer handle (1 hex key, spare setscrew(s) Refrigerator and Freezer Drawers 1. B A. Insert the short end of the hex key into the upper hole and ...The handle is flush against the drawer. Remove the Handles 1. If necessary, use a Phillips screwdriver to install the other setscrew. Open a refrigerator compartment door. Shoulder screw B. Shoulder screws B. Once both setscrews have been partially tightened as instructed in the setscrew. 2. Slowly pull the handle...
Installation Guide
Page 15
...cleaners ✔ For heavy soil, ONLY a stainless steel cleaner designed for stainless steel parts only! NOTES: ■ If unintentional contact does occur, clean plastic part with any plastic parts such as the trim pieces, dispenser covers or door gaskets. Many liquid cleansers formulated ...; Citrus-based products ✘ Marinara sauce 15 To order the cleaner, see the exterior cleaning information specific to your stainless steel refrigerator: Do not allow the Stainless Steel Cleaner and Polish to avoid buildup of the painted door. Dry thoroughly with a soft cloth....
...cleaners ✔ For heavy soil, ONLY a stainless steel cleaner designed for stainless steel parts only! NOTES: ■ If unintentional contact does occur, clean plastic part with any plastic parts such as the trim pieces, dispenser covers or door gaskets. Many liquid cleansers formulated ...; Citrus-based products ✘ Marinara sauce 15 To order the cleaner, see the exterior cleaning information specific to your stainless steel refrigerator: Do not allow the Stainless Steel Cleaner and Polish to avoid buildup of the painted door. Dry thoroughly with a soft cloth....
Installation Guide
Page 16
...freezer compartments are moving your new home, put everything back and refer to the refrigerator. Remove all food from building up any perishables and freeze other items. 2. Depending on plastic parts, interior and door liners or gaskets. 3. Property damage can occur if the water... in both doors to ensure maximum efficiency. Lights The lights in refrigerator or reconnect power. Remove all removable parts, wrap them well, and tape them open areas behind the grille and the front surface area of the refrigerator. Empty the ice bin. See "Using the Control(s)." 5.
...freezer compartments are moving your new home, put everything back and refer to the refrigerator. Remove all food from building up any perishables and freeze other items. 2. Depending on plastic parts, interior and door liners or gaskets. 3. Property damage can occur if the water... in both doors to ensure maximum efficiency. Lights The lights in refrigerator or reconnect power. Remove all removable parts, wrap them well, and tape them open areas behind the grille and the front surface area of the refrigerator. Empty the ice bin. See "Using the Control(s)." 5.

