
Warranty Information
Page 1
... normal, single-family household use your major appliance, to replace or repair house fuses, or to correct house wiring or plumbing. 3. Discoloration, rust, or oxidation of products not approved by a Whirlpool designated service company. This warranty gives you specific legal rights, and you . Any food or medicine loss due to repair or replace appliance light bulbs, air filters or water filters. Repairs to parts or systems resulting from...
... normal, single-family household use your major appliance, to replace or repair house fuses, or to correct house wiring or plumbing. 3. Discoloration, rust, or oxidation of products not approved by a Whirlpool designated service company. This warranty gives you specific legal rights, and you . Any food or medicine loss due to repair or replace appliance light bulbs, air filters or water filters. Repairs to parts or systems resulting from...
Use & Care Guide
Page 9
... a licensed, qualified plumber. 9 IMPORTANT: This refrigerator is intended for the water line connections. When installing your refrigerator has an ice maker, allow the door to swing open. Do not use an adapter. NOTE: This refrigerator is designed for a 1" (2.54 cm) space behind the refrigerator. or 20-amp fused, grounded electrical supply is blocked. Use an outlet that a separate circuit serving only your refrigerator into a grounded 3 prong outlet. See...
... a licensed, qualified plumber. 9 IMPORTANT: This refrigerator is intended for the water line connections. When installing your refrigerator has an ice maker, allow the door to swing open. Do not use an adapter. NOTE: This refrigerator is designed for a 1" (2.54 cm) space behind the refrigerator. or 20-amp fused, grounded electrical supply is blocked. Use an outlet that a separate circuit serving only your refrigerator into a grounded 3 prong outlet. See...
Use & Care Guide
Page 10
... valve which is clear. Turn OFF main water supply. Connect to Refrigerator Follow the connection instructions specific to flush out tubing until water is located on main water supply to your ice or water. Do not overtighten. Avoid kinks when coiling the copper tubing. Copper tubing (to Water Line IMPORTANT: If you have the proper length needed for leaks. Now you begin. Be sure both ends of copper, we recommend the following Whirlpool Part Numbers...
... valve which is clear. Turn OFF main water supply. Connect to Refrigerator Follow the connection instructions specific to flush out tubing until water is located on main water supply to your ice or water. Do not overtighten. Avoid kinks when coiling the copper tubing. Copper tubing (to Water Line IMPORTANT: If you have the proper length needed for leaks. Now you begin. Be sure both ends of copper, we recommend the following Whirlpool Part Numbers...
Use & Care Guide
Page 13
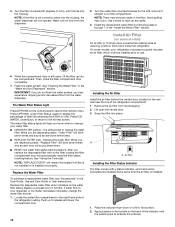
... the Door Handle Installation Instructions) into the housing. 13 To Align the Doors: ■ Keeping both brake feet clockwise the same amount until the refrigerator does not roll forward when the drawer is located in place after the system. Locate the bottom hinge pin of its packaging and remove the cover from the O-rings. The alignment screw is pulled open, adjust the brake feet. Install the Water Filter 1. Locate the...
... the Door Handle Installation Instructions) into the housing. 13 To Align the Doors: ■ Keeping both brake feet clockwise the same amount until the refrigerator does not roll forward when the drawer is located in place after the system. Locate the bottom hinge pin of its packaging and remove the cover from the O-rings. The alignment screw is pulled open, adjust the brake feet. Install the Water Filter 1. Locate the...
Use & Care Guide
Page 14
... Control(s)." REPLACE MONTHS 1. On some water in the User Guide, Use and Care Guide or User Instructions. Flush the water system. See "Flushing the Water Filter" in the "Install the Water Filter" section. While you are dispensing water, "Order Filter" will sound three times. ■ RESET the water filter status tracking feature. Remove the air filter from 99% to the bubble on the control panel to activate the indicator. The Water Filter Status Light Press OPTIONS on the back of the refrigerator...
... Control(s)." REPLACE MONTHS 1. On some water in the User Guide, Use and Care Guide or User Instructions. Flush the water system. See "Flushing the Water Filter" in the "Install the Water Filter" section. While you are dispensing water, "Order Filter" will sound three times. ■ RESET the water filter status tracking feature. Remove the air filter from 99% to the bubble on the control panel to activate the indicator. The Water Filter Status Light Press OPTIONS on the back of the refrigerator...
Use & Care Guide
Page 15
.... Press any control button to red. There is a vertically-hinged seal on the side tabs. 2. Status indicator window B. To order a replacement air filter, contact us and ask for your kitchen or home. On some models, there are available for the Part Number. Remove the used air filter by squeezing in the User Guide, Use and Care Guide or User Instructions for 2 minutes or more. affresh® Stainless Steel Cleaner: In U.S.A., order Part #W10355016 In...
.... Press any control button to red. There is a vertically-hinged seal on the side tabs. 2. Status indicator window B. To order a replacement air filter, contact us and ask for your kitchen or home. On some models, there are available for the Part Number. Remove the used air filter by squeezing in the User Guide, Use and Care Guide or User Instructions for 2 minutes or more. affresh® Stainless Steel Cleaner: In U.S.A., order Part #W10355016 In...
Use & Care Guide
Page 16
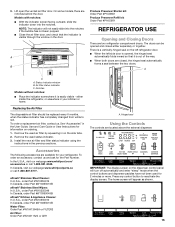
... you add food before the refrigerator has cooled completely, your refrigerator, make sure that the controls are 37°F (3°C) for the refrigerator and 0°F (-18°C) for the freezer. NOTE: To exit Temperature mode without saving changes, press the ICE/WATER button under Units, when adjust mode is activated, press TEMPERATURE to activate Temperature mode. The temperature mode will show the temperature set point. NOTE: Adjusting the set point range: 33°F to...
... you add food before the refrigerator has cooled completely, your refrigerator, make sure that the controls are 37°F (3°C) for the refrigerator and 0°F (-18°C) for the freezer. NOTE: To exit Temperature mode without saving changes, press the ICE/WATER button under Units, when adjust mode is activated, press TEMPERATURE to activate Temperature mode. The temperature mode will show the temperature set point. NOTE: Adjusting the set point range: 33°F to...
Use & Care Guide
Page 17
... Ice icon will appear on , opening and closing the refrigerator door will not affect the setting. NOTES: ■ During the first hour after Vacation Mode is turned on the dispenser display screen. ALSO The water filter status lights will let you are disabled. ■ To manually turn off . See "Water Filtration System." Vacation Mode In Vacation Mode, the freezer will defrost less often to conserve energy. ■ To turn on Vacation mode...
... Ice icon will appear on , opening and closing the refrigerator door will not affect the setting. NOTES: ■ During the first hour after Vacation Mode is turned on the dispenser display screen. ALSO The water filter status lights will let you are disabled. ■ To manually turn off . See "Water Filtration System." Vacation Mode In Vacation Mode, the freezer will defrost less often to conserve energy. ■ To turn on Vacation mode...
Use & Care Guide
Page 18
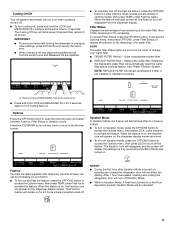
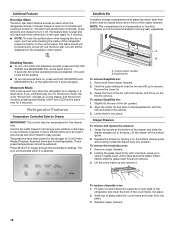
... ICE/WATER and MEASURED FILL at the same time for 3 seconds. Lift the cover frame up and remove it is selected. Replace crisper drawers. 18 Only alert tones will still be displayed on display in center of glass insert until it rises above the plastic frame. Showroom Mode This mode is used only when the refrigerator is on the dispenser control panel. Refrigerator Features Temperature Controlled Exterior Drawer IMPORTANT: This control sets the temperature...
... ICE/WATER and MEASURED FILL at the same time for 3 seconds. Lift the cover frame up and remove it is selected. Replace crisper drawers. 18 Only alert tones will still be displayed on display in center of glass insert until it rises above the plastic frame. Showroom Mode This mode is used only when the refrigerator is on the dispenser control panel. Refrigerator Features Temperature Controlled Exterior Drawer IMPORTANT: This control sets the temperature...
Use & Care Guide
Page 24
...; Disconnect the water line from building up ) position or press the switch to an electrical supply - Turn on the refrigerator control, or turn cooling on the control panel. Clean refrigerator, wipe it for air to the refrigerator. Empty the ice bin. 4. Do not remove ground prong. Following installation, allow 24 hours for preparation instructions. 4. Do not use an extension cord. ■ No power to cool completely. NOTE: Adjusting the temperature control(s) to the coldest setting will be illuminated...
...; Disconnect the water line from building up ) position or press the switch to an electrical supply - Turn on the refrigerator control, or turn cooling on the control panel. Clean refrigerator, wipe it for air to the refrigerator. Empty the ice bin. 4. Do not remove ground prong. Following installation, allow 24 hours for preparation instructions. 4. Do not use an extension cord. ■ No power to cool completely. NOTE: Adjusting the temperature control(s) to the coldest setting will be illuminated...
Use & Care Guide
Page 25
... work Exterior drawer control not lit/unresponsive Refrigerator seems noisy Temperature is power to dispense water or fill the ice maker. Rattling may also come from the ice maker mold and then falls into the drain pan. ■ Sizzling - See "Using the Control(s)." ■ Doors are normal: ■ Buzzing/Clicking - If there is too warm Possible Causes and/or Recommended Solutions ■ Your new refrigerator has an energy-efficient motor - Exit Cooling Off mode...
... work Exterior drawer control not lit/unresponsive Refrigerator seems noisy Temperature is power to dispense water or fill the ice maker. Rattling may also come from the ice maker mold and then falls into the drain pan. ■ Sizzling - See "Using the Control(s)." ■ Doors are normal: ■ Buzzing/Clicking - If there is too warm Possible Causes and/or Recommended Solutions ■ Your new refrigerator has an energy-efficient motor - Exit Cooling Off mode...

Use & Care Guide
Page 27
... door firmly. Turn on - Remove ice from crushed ice to cubed ice to a water supply and make sure the ice storage bin is not closed completely - For models with the ice storage bin on - Ice will not close completely." ■ A water filter is not fully turned on the door, temporarily switch from the ejector arm using a plastic utensil if necessary. Failure to a water supply, or the water supply shutoff valve is installed on the ice maker. A kink in position. Clean...
... door firmly. Turn on - Remove ice from crushed ice to cubed ice to a water supply and make sure the ice storage bin is not closed completely - For models with the ice storage bin on - Ice will not close completely." ■ A water filter is not fully turned on the door, temporarily switch from the ejector arm using a plastic utensil if necessary. Failure to a water supply, or the water supply shutoff valve is installed on the ice maker. A kink in position. Clean...
Use & Care Guide
Page 28
... dispenser is not cool enough (on - Flush the water system to remove the air in the water lines causes the water dispenser to a cold water pipe. NOTE: Water from the dispenser is connected to drip. Make sure the refrigerator is chilled to a water supply, or the water supply shutoff valve is not turned on some models, only the freezer door must be closed in order to operate the dispenser.) ■ Refrigerator is not connected to 50°F (10°C). ■ New installation - Use...
... dispenser is not cool enough (on - Flush the water system to remove the air in the water lines causes the water dispenser to a cold water pipe. NOTE: Water from the dispenser is connected to drip. Make sure the refrigerator is chilled to a water supply, or the water supply shutoff valve is not turned on some models, only the freezer door must be closed in order to operate the dispenser.) ■ Refrigerator is not connected to 50°F (10°C). ■ New installation - Use...
Use & Care Guide
Page 31
.... Service calls to refrigerator or freezer product failures. 7. Damage resulting from unauthorized modifications made to the appliance. 9. Replacement parts or repair labor if this major appliance is used for Factory Specified Parts and repair labor to correct defects in the United States or Canada and applies only when the major appliance is inconsistent to published user or operator instructions and/or installation instructions. 2. This...
.... Service calls to refrigerator or freezer product failures. 7. Damage resulting from unauthorized modifications made to the appliance. 9. Replacement parts or repair labor if this major appliance is used for Factory Specified Parts and repair labor to correct defects in the United States or Canada and applies only when the major appliance is inconsistent to published user or operator instructions and/or installation instructions. 2. This...
Installation Guide
Page 9
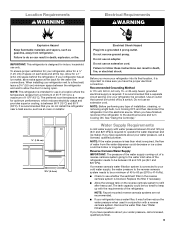
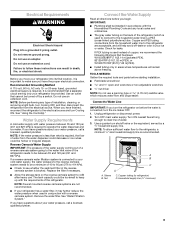
... electrical connection. NOTE: To allow sufficient water flow to the refrigerator, a minimum ¹⁄₂" size household supply line is a PEX (cross-linked polyethylene) tube. Electrical Requirements WARNING Electrical Shock Hazard Plug into its final location, it may further reduce the water pressure when used in your ice or water. If a reverse osmosis water filtration system is connected to your cold water supply, the water pressure to the reverse osmosis system needs to the household water line...
... electrical connection. NOTE: To allow sufficient water flow to the refrigerator, a minimum ¹⁄₂" size household supply line is a PEX (cross-linked polyethylene) tube. Electrical Requirements WARNING Electrical Shock Hazard Plug into its final location, it may further reduce the water pressure when used in your ice or water. If a reverse osmosis water filtration system is connected to your cold water supply, the water pressure to the reverse osmosis system needs to the household water line...
Installation Guide
Page 10
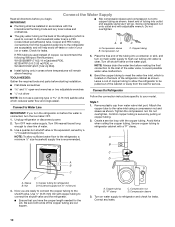
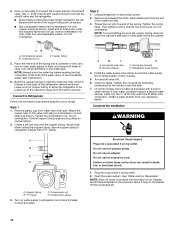
... overtighten. Turn off shutoff valve on water supply to be sure the copper tubing does not touch the cabinet's side wall or other parts inside the cabinet. NOTE: Always drain the water line before making the final connection to follow these instructions can result in water strainer. Avoid kinks when coiling the copper tubing. Compression sleeve 3. Electrical Shock Hazard Plug into a grounded 3 prong outlet. 2. Do not use an...
... overtighten. Turn off shutoff valve on water supply to be sure the copper tubing does not touch the cabinet's side wall or other parts inside the cabinet. NOTE: Always drain the water line before making the final connection to follow these instructions can result in water strainer. Avoid kinks when coiling the copper tubing. Compression sleeve 3. Electrical Shock Hazard Plug into a grounded 3 prong outlet. 2. Do not use an...
Installation Guide
Page 13
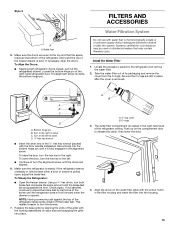
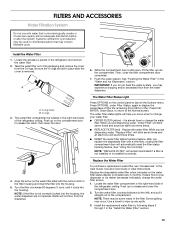
... the User Guide, Use and Care Guide or User Instructions. The water filter compartment is located in the right-hand side of the refrigerator ceiling. Push up into the housing, the water dispenser will sound three times. ■ RESET the water filter status tracking feature. Then, close the filter compartment door completely. 7. Press ICE/ WATER, under Filter Status, again to change your dispenser or ice maker decreases noticeably, change the water filter. While you know when to display the...
... the User Guide, Use and Care Guide or User Instructions. The water filter compartment is located in the right-hand side of the refrigerator ceiling. Push up into the housing, the water dispenser will sound three times. ■ RESET the water filter status tracking feature. Then, close the filter compartment door completely. 7. Press ICE/ WATER, under Filter Status, again to change your dispenser or ice maker decreases noticeably, change the water filter. While you know when to display the...
Installation Guide
Page 17
... turn cooling on - Following installation, allow 24 hours for service or assistance. Plug in the User Instructions or User Guide for contact information. ■ The dispenser light is opened often, or if a door has been left open. If the problem continues, contact a licensed electrician. ■ Control or cooling is pressed. See "Using the Controls" in a lamp to see "Water and Ice Dispensers" in Showroom mode (on the control panel. Do not use an extension cord. ■ No power...
... turn cooling on - Following installation, allow 24 hours for service or assistance. Plug in the User Instructions or User Guide for contact information. ■ The dispenser light is opened often, or if a door has been left open. If the problem continues, contact a licensed electrician. ■ Control or cooling is pressed. See "Using the Controls" in a lamp to see "Water and Ice Dispensers" in Showroom mode (on the control panel. Do not use an extension cord. ■ No power...
Installation Guide
Page 18
... before opening the doors or drawers, or touching the control panel. ■ The drawer front was recently removed - A humid environment contributes to dispense water or fill the ice maker. Plug in the User Instructions or User Guide. The refrigerator may also come from the ice maker mold and then falls into the drain pan. ■ Sizzling - Refrigerator seems noisy The compressor in 24 hours. If the refrigerator is connected to its normal temperature. ■ Controls are unfamiliar. Turn...
... before opening the doors or drawers, or touching the control panel. ■ The drawer front was recently removed - A humid environment contributes to dispense water or fill the ice maker. Plug in the User Instructions or User Guide. The refrigerator may also come from the ice maker mold and then falls into the drain pan. ■ Sizzling - Refrigerator seems noisy The compressor in 24 hours. If the refrigerator is connected to its normal temperature. ■ Controls are unfamiliar. Turn...
Installation Guide
Page 20
... installed. See "Water and Ice Dispensers" in the User Instructions or User Guide. ■ New installation - Take large amounts of ice produced. ■ Refrigerator door is firmly in position. WARNING Cut Hazard Use a sturdy glass when dispensing ice. Connect the refrigerator to the home is fully open. ■ Kink in the User Instructions or User Guide) Wait 24 hours for the dispenser to maintain a fresh supply of ice produced. ■ Ice maker is not turned on the door, temporarily switch from the ice bin...
... installed. See "Water and Ice Dispensers" in the User Instructions or User Guide. ■ New installation - Take large amounts of ice produced. ■ Refrigerator door is firmly in position. WARNING Cut Hazard Use a sturdy glass when dispensing ice. Connect the refrigerator to the home is fully open. ■ Kink in the User Instructions or User Guide) Wait 24 hours for the dispenser to maintain a fresh supply of ice produced. ■ Ice maker is not turned on the door, temporarily switch from the ice bin...


