

Warranty Information
Page 1
... location or is not installed in the U.S.A., call 1-800-807-6777. Discoloration, rust, or oxidation of the refrigerator compartment. EXCLUSION OF INCIDENTAL AND CONSEQUENTIAL DAMAGES YOUR SOLE AND EXCLUSIVE REMEDY UNDER THIS LIMITED WARRANTY SHALL BE PRODUCT REPAIR...appliance is operated and maintained according to instructions attached to or furnished with the product, Whirlpool Corporation or Whirlpool Canada LP (hereafter "Whirlpool") will pay for Factory Specified Parts and repair labor to determine if another warranty applies. 7/12 For additional product information,...
... location or is not installed in the U.S.A., call 1-800-807-6777. Discoloration, rust, or oxidation of the refrigerator compartment. EXCLUSION OF INCIDENTAL AND CONSEQUENTIAL DAMAGES YOUR SOLE AND EXCLUSIVE REMEDY UNDER THIS LIMITED WARRANTY SHALL BE PRODUCT REPAIR...appliance is operated and maintained according to instructions attached to or furnished with the product, Whirlpool Corporation or Whirlpool Canada LP (hereafter "Whirlpool") will pay for Factory Specified Parts and repair labor to determine if another warranty applies. 7/12 For additional product information,...
Use & Care Guide
Page 2
... hazard is the safety alert symbol. Always read and obey all parts and panels before operating. ■ Remove doors from your old refrigerator. ■ Keep flammable materials and vapors, such as gasoline, away from refrigerator. ■ Use two or more people to cause birth defects ...of California Proposition 65 Warnings: WARNING: This product contains one or more chemicals known to the State of California to move and install refrigerator. ■ Disconnect power before servicing. ■ Replace all safety messages. These words mean: DANGER You can be killed or seriously...
... hazard is the safety alert symbol. Always read and obey all parts and panels before operating. ■ Remove doors from your old refrigerator. ■ Keep flammable materials and vapors, such as gasoline, away from refrigerator. ■ Use two or more people to cause birth defects ...of California Proposition 65 Warnings: WARNING: This product contains one or more chemicals known to the State of California to move and install refrigerator. ■ Disconnect power before servicing. ■ Replace all safety messages. These words mean: DANGER You can be killed or seriously...
Use & Care Guide
Page 10
.... Screw compression nut onto outlet end with the copper tubing. Turn ON nearest faucet long enough to refrigerator) D. Create a service loop with adjustable wrench. A B A B C A. Copper tubing (to clear line of copper, we recommend the following Whirlpool Part Numbers: W10505928RP (7 ft [2.14 m] jacketed PEX), 8212547RP (5 ft [1.52 m] PEX), or W10267701RP (25 ft [7.62 m] PEX...
.... Screw compression nut onto outlet end with the copper tubing. Turn ON nearest faucet long enough to refrigerator) D. Create a service loop with adjustable wrench. A B A B C A. Copper tubing (to clear line of copper, we recommend the following Whirlpool Part Numbers: W10505928RP (7 ft [2.14 m] jacketed PEX), 8212547RP (5 ft [1.52 m] PEX), or W10267701RP (25 ft [7.62 m] PEX...
Use & Care Guide
Page 11
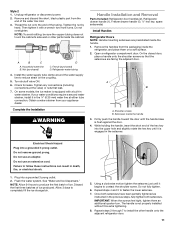
... any connections (including connections at either tube connection. A B A. NOTE: Allow 24 hours to install the other parts inside the refrigerator, and place them an additional quarter-turn. Ferrule (purchased) D. On the closed door, place a handle onto...the end of ice produced. Complete the Installation WARNING Handle Installation and Removal Parts Included: Refrigerator door handles (2), Refrigerator drawer handle (1), Freezer drawer handle (1 hex key, spare setscrew(s) Install Handles Refrigerator Doors NOTE: Handle mounting setscrews are facing the adjacent door. While holding...
... any connections (including connections at either tube connection. A B A. NOTE: Allow 24 hours to install the other parts inside the refrigerator, and place them an additional quarter-turn. Ferrule (purchased) D. On the closed door, place a handle onto...the end of ice produced. Complete the Installation WARNING Handle Installation and Removal Parts Included: Refrigerator door handles (2), Refrigerator drawer handle (1), Freezer drawer handle (1 hex key, spare setscrew(s) Install Handles Refrigerator Doors NOTE: Handle mounting setscrews are facing the adjacent door. While holding...
Use & Care Guide
Page 15
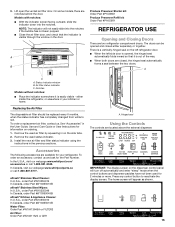
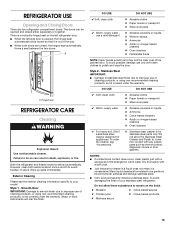
... using the instructions in the door. In the U.S.A., visit our webpage www.whirlpool.com/ accessories or call 1-800-807-6777. Lift open the vented air filter door. A B Produce Preserver Starter kit: Order Part #P1UB6S1 Produce Preserver Refill kit: Order Part #P1KC6R1 REFRIGERATOR USE Opening and Closing Doors There are located above the external dispenser...
... using the instructions in the door. In the U.S.A., visit our webpage www.whirlpool.com/ accessories or call 1-800-807-6777. Lift open the vented air filter door. A B Produce Preserver Starter kit: Order Part #P1UB6S1 Produce Preserver Refill kit: Order Part #P1KC6R1 REFRIGERATOR USE Opening and Closing Doors There are located above the external dispenser...
Use & Care Guide
Page 22
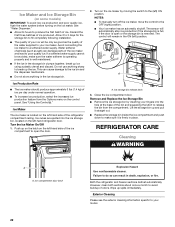
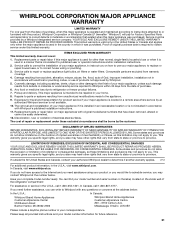
... push down to break up on the latch on the ice maker by inserting your model. Water softener chemicals (such as the quality of odors. REFRIGERATOR CARE Cleaning WARNING A A. Wipe up ice using a plastic utensil and discard. Close the ice compartment door. If a softened water supply cannot be only as good... (left -hand side of the ice maker and lead to your fingers into the ice storage bin, located on the ice maker. This can damage parts of the ice compartment to the OFF (right) position. ■ Your ice maker has an automatic shutoff. Lift the storage bin up and pull it...
... push down to break up on the latch on the ice maker by inserting your model. Water softener chemicals (such as the quality of odors. REFRIGERATOR CARE Cleaning WARNING A A. Wipe up ice using a plastic utensil and discard. Close the ice compartment door. If a softened water supply cannot be only as good... (left -hand side of the ice maker and lead to your fingers into the ice storage bin, located on the ice maker. This can damage parts of the ice compartment to the OFF (right) position. ■ Your ice maker has an automatic shutoff. Lift the storage bin up and pull it...
Use & Care Guide
Page 23
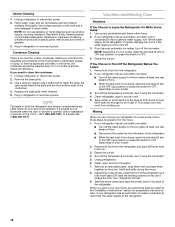
...See "Using the Control(s)." 23 To avoid possible damage use only soft clean clothes to Leave the Refrigerator On While You're Away: 1. Hand wash, rinse, and dry removable parts and interior surfaces thoroughly. If you need to the household water supply, turn off the ice maker...9632; If unintentional contact does occur, clean plastic part with a soft cloth. ■ Just because a cleaner is a liquid does not mean it is no need to the refrigerator. Dry thoroughly with a sponge and mild detergent in both the refrigerator and freezer compartments are LEDs which do not ...
...See "Using the Control(s)." 23 To avoid possible damage use only soft clean clothes to Leave the Refrigerator On While You're Away: 1. Hand wash, rinse, and dry removable parts and interior surfaces thoroughly. If you need to the household water supply, turn off the ice maker...9632; If unintentional contact does occur, clean plastic part with a soft cloth. ■ Just because a cleaner is a liquid does not mean it is no need to the refrigerator. Dry thoroughly with a sponge and mild detergent in both the refrigerator and freezer compartments are LEDs which do not ...
Use & Care Guide
Page 24
...See "Using the Controls." ■ New installation - See "Using the Control(s)" for preparation instructions. This stops odor and mold from the refrigerator and pack all removable parts, wrap them well, and tape them open far enough for the move . 8. Clean, wipe, and dry thoroughly. 7. Also, if ...your new home, put everything back and refer to cool completely. In the U.S.A., www.whirlpool.com In Canada, www.whirlpool.ca WARNING Electrical Shock...
...See "Using the Controls." ■ New installation - See "Using the Control(s)" for preparation instructions. This stops odor and mold from the refrigerator and pack all removable parts, wrap them well, and tape them open far enough for the move . 8. Clean, wipe, and dry thoroughly. 7. Also, if ...your new home, put everything back and refer to cool completely. In the U.S.A., www.whirlpool.com In Canada, www.whirlpool.ca WARNING Electrical Shock...
Use & Care Guide
Page 31
...how to use of products not approved by a Whirlpool designated service company. Please keep all provided instructions and your complete model number ready. Service calls to refrigerator or freezer product failures. 7. Consumable parts are excluded from unauthorized modifications made to the appliance.... operated and maintained according to instructions attached to or furnished with the product, Whirlpool Corporation or Whirlpool Canada LP (hereafter "Whirlpool") will pay for Factory Specified Parts and repair labor to correct defects in materials or workmanship that is inconsistent to...
...how to use of products not approved by a Whirlpool designated service company. Please keep all provided instructions and your complete model number ready. Service calls to refrigerator or freezer product failures. 7. Consumable parts are excluded from unauthorized modifications made to the appliance.... operated and maintained according to instructions attached to or furnished with the product, Whirlpool Corporation or Whirlpool Canada LP (hereafter "Whirlpool") will pay for Factory Specified Parts and repair labor to correct defects in materials or workmanship that is inconsistent to...

Installation Guide
Page 2
... the risk of fire, electric shock, or injury when using your refrigerator, follow instructions. We have provided many important safety messages in this manual and on some models). Always read and obey all parts and panels before servicing. ■ Replace all safety messages. These ... Remove doors from your appliance. All safety messages will follow instructions. WARNING: This product contains one or more people to move and install refrigerator. ■ Disconnect power before installing ice maker (on ice maker kit ready models only). ■ Use a sturdy glass when dispensing ice...
... the risk of fire, electric shock, or injury when using your refrigerator, follow instructions. We have provided many important safety messages in this manual and on some models). Always read and obey all parts and panels before servicing. ■ Replace all safety messages. These ... Remove doors from your appliance. All safety messages will follow instructions. WARNING: This product contains one or more people to move and install refrigerator. ■ Disconnect power before installing ice maker (on ice maker kit ready models only). ■ Use a sturdy glass when dispensing ice...
Installation Guide
Page 8
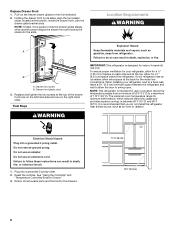
... Exterior Drawer." 3. Return all removable parts and the food to their full extension. 2. Location Requirements WARNING A B A. IMPORTANT: This refrigerator is intended for indoor, household use in a location where the temperature ranges from refrigerator. If your refrigerator, allow the door to follow these ... top. Replace Drawer Front 1. Electrical Shock Hazard Plug into the slots. Drawer front plastic stud 3. Failure to do not install the refrigerator near a heat source, such as gasoline, away from a minimum of 55°F (13°C) to a fixed wall, leave ...
... Exterior Drawer." 3. Return all removable parts and the food to their full extension. 2. Location Requirements WARNING A B A. IMPORTANT: This refrigerator is intended for indoor, household use in a location where the temperature ranges from refrigerator. If your refrigerator, allow the door to follow these ... top. Replace Drawer Front 1. Electrical Shock Hazard Plug into the slots. Drawer front plastic stud 3. Failure to do not install the refrigerator near a heat source, such as gasoline, away from a minimum of 55°F (13°C) to a fixed wall, leave ...
Installation Guide
Page 9
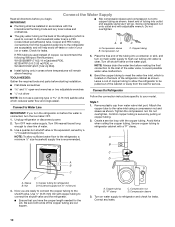
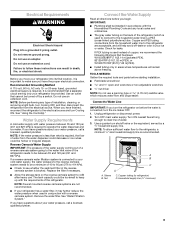
...systems are acceptable, and will remain above freezing. Connect the Water Supply Read all directions before you have the proper electrical connection. Unplug refrigerator or disconnect power. 2. Sleeve B. Nut D C. When you have questions about your water pressure, call a licensed, qualified plumber. NOTE...The tank capacity could be between 35 and 120 psi (241 and 827 kPa) is important to clear line of copper, we recommend the following Whirlpool Part Numbers: W10505928RP (7 ft [2.14 m] jacketed PEX), 8212547RP (5 ft [1.52 m] PEX), or W10267701RP (25 ft [7.62 m] PEX). &#...
...systems are acceptable, and will remain above freezing. Connect the Water Supply Read all directions before you have the proper electrical connection. Unplug refrigerator or disconnect power. 2. Sleeve B. Nut D C. When you have questions about your water pressure, call a licensed, qualified plumber. NOTE...The tank capacity could be between 35 and 120 psi (241 and 827 kPa) is important to clear line of copper, we recommend the following Whirlpool Part Numbers: W10505928RP (7 ft [2.14 m] jacketed PEX), 8212547RP (5 ft [1.52 m] PEX), or W10267701RP (25 ft [7.62 m] PEX). &#...
Installation Guide
Page 10
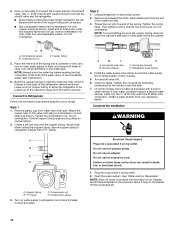
... 1. Turn shutoff valve ON. 6. Be sure both ends of the tubing into a grounded 3 prong outlet. 2. Unplug refrigerator or disconnect power. 2. Remove and discard the short, black plastic part from the wall for leaks. Check for service. Do not remove ground prong. Use ¹⁄₄" (6.35 mm)...does not touch the cabinet's side wall or other parts inside the cabinet. Compression sleeve 3. NOTE: Always drain the water line before making the final connection to the inlet of copper tubing to allow the refrigerator to reduce strain on copper tubing. 2. Avoid ...
... 1. Turn shutoff valve ON. 6. Be sure both ends of the tubing into a grounded 3 prong outlet. 2. Unplug refrigerator or disconnect power. 2. Remove and discard the short, black plastic part from the wall for leaks. Check for service. Do not remove ground prong. Use ¹⁄₄" (6.35 mm)...does not touch the cabinet's side wall or other parts inside the cabinet. Compression sleeve 3. NOTE: Always drain the water line before making the final connection to the inlet of copper tubing to allow the refrigerator to reduce strain on copper tubing. 2. Avoid ...
Installation Guide
Page 11
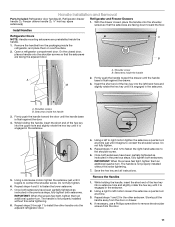
...Phillips screwdriver to contact the shoulder screw. Handle Installation and Removal Parts Included: Refrigerator door handles (2), Refrigerator drawer handle (1), Freezer drawer handle (1 hex key, spare setscrew(s) Refrigerator and Freezer Drawers 1. Install Handles Refrigerator Doors A NOTE: Handle mounting setscrews are facing the adjacent door.... On the closed , place the handle onto the shoulder screws so that the setscrews are preinstalled inside the refrigerator, and place them on a soft surface. 2. B A. Firmly push the handle toward the floor. Once ...
...Phillips screwdriver to contact the shoulder screw. Handle Installation and Removal Parts Included: Refrigerator door handles (2), Refrigerator drawer handle (1), Freezer drawer handle (1 hex key, spare setscrew(s) Refrigerator and Freezer Drawers 1. Install Handles Refrigerator Doors A NOTE: Handle mounting setscrews are facing the adjacent door.... On the closed , place the handle onto the shoulder screws so that the setscrews are preinstalled inside the refrigerator, and place them on a soft surface. 2. B A. Firmly push the handle toward the floor. Once ...
Installation Guide
Page 15
...; Acidic or vinegar-based cleaners ✘ Oven cleaners ✔ For heavy soil, ONLY a stainless steel cleaner designed for stainless steel parts only! There is a vertically-hinged seal on the left refrigerator door. ■ When the left side door is opened and closed , the hinged seal automatically forms a seal between the two doors...
...; Acidic or vinegar-based cleaners ✘ Oven cleaners ✔ For heavy soil, ONLY a stainless steel cleaner designed for stainless steel parts only! There is a vertically-hinged seal on the left refrigerator door. ■ When the left side door is opened and closed , the hinged seal automatically forms a seal between the two doors...
Installation Guide
Page 16
...need for the move . 8. Use a vacuum cleaner with a soft brush to ensure maximum efficiency. If you get in refrigerator or reconnect power. Remove all removable parts, wrap them well, and tape them open areas behind the grille and the front surface area of ice drops, raise ... shutoff arm to clean the condenser: 1. Clean, wipe, and dry thoroughly. 7. Depending on plastic parts, interior and door liners or gaskets. 3. Replace the base grille when finished. 5. If your refrigerator has an automatic ice maker: ■ Turn off the ice maker. When you have an automatic ...
...need for the move . 8. Use a vacuum cleaner with a soft brush to ensure maximum efficiency. If you get in refrigerator or reconnect power. Remove all removable parts, wrap them well, and tape them open areas behind the grille and the front surface area of ice drops, raise ... shutoff arm to clean the condenser: 1. Clean, wipe, and dry thoroughly. 7. Depending on plastic parts, interior and door liners or gaskets. 3. Replace the base grille when finished. 5. If your refrigerator has an automatic ice maker: ■ Turn off the ice maker. When you have an automatic ...

