

Warranty Information
Page 1
... Canada, contact your major appliance is located in a remote area where service by Whirlpool. 5. If you need assistance using your correspondence. This limited warranty is valid only in which it is used in a manner that existed when this major appliance was purchased. Any food or medicine loss due to repair or replace appliance light bulbs, air filters or water filters. LIMITATION OF REMEDIES; EXCLUSION OF...
... Canada, contact your major appliance is located in a remote area where service by Whirlpool. 5. If you need assistance using your correspondence. This limited warranty is valid only in which it is used in a manner that existed when this major appliance was purchased. Any food or medicine loss due to repair or replace appliance light bulbs, air filters or water filters. LIMITATION OF REMEDIES; EXCLUSION OF...
Use & Care Guide
Page 9
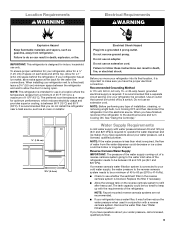
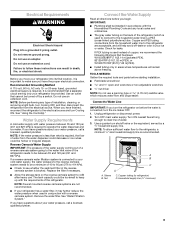
... Water Supply IMPORTANT: The pressure of the water supply coming out of a reverse osmosis system going to the water inlet valve of 55°F (13°C) to make sure you have the proper electrical connection. The tank capacity could be turned off by a switch. NOTE: Faucet mounted reverse osmosis systems are not recommended. ■ If your refrigerator has an ice maker, allow the door to do not install...
... Water Supply IMPORTANT: The pressure of the water supply coming out of a reverse osmosis system going to the water inlet valve of 55°F (13°C) to make sure you have the proper electrical connection. The tank capacity could be turned off by a switch. NOTE: Faucet mounted reverse osmosis systems are not recommended. ■ If your refrigerator has an ice maker, allow the door to do not install...
Use & Care Guide
Page 10
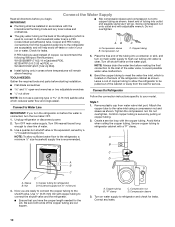
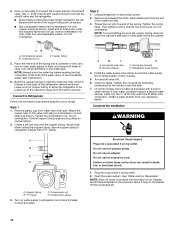
... Code and any leaks. 10 Connect to Refrigerator Follow the connection instructions specific to avoid possible water valve malfunction. 6. Nut D C. "P" clamp C. and ¹⁄₂" open-end wrenches or two adjustable wrenches nut driver NOTE: Do not use a piercing-type or 4.76 mm) saddle valve which is used instead of tubing into a container or sink, and turn on before the water is secure by a ¹⁄₂" household supply line. Household supply line...
... Code and any leaks. 10 Connect to Refrigerator Follow the connection instructions specific to avoid possible water valve malfunction. 6. Nut D C. "P" clamp C. and ¹⁄₂" open-end wrenches or two adjustable wrenches nut driver NOTE: Do not use a piercing-type or 4.76 mm) saddle valve which is used instead of tubing into a container or sink, and turn on before the water is secure by a ¹⁄₂" household supply line. Household supply line...
Use & Care Guide
Page 13
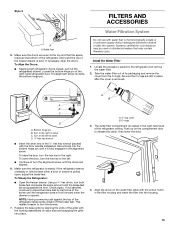
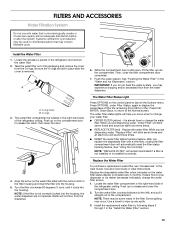
... right. To Steady the Refrigerator: ■ Open the freezer drawer. A B A. C. O-rings 3. Style 2 ¹⁄₄" FILTERS AND ACCESSORIES Water Filtration System A A. The alignment screw is even. Install the Water Filter 1. Take the water filter out of the right-hand refrigerator door. Bottom hinge pin B. Make sure the doors are still in place after the system. Locate the bottom hinge pin of its packaging and remove the cover from the O-rings...
... right. To Steady the Refrigerator: ■ Open the freezer drawer. A B A. C. O-rings 3. Style 2 ¹⁄₄" FILTERS AND ACCESSORIES Water Filtration System A A. The alignment screw is even. Install the Water Filter 1. Take the water filter out of the right-hand refrigerator door. Bottom hinge pin B. Make sure the doors are still in place after the system. Locate the bottom hinge pin of its packaging and remove the cover from the O-rings...
Use & Care Guide
Page 14
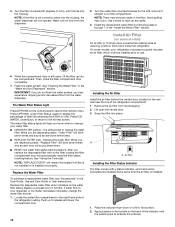
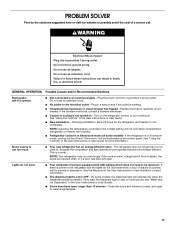
... dispensing water, "Order Filter" will automatically reset the filter status tracking feature. Replace the disposable water filter when indicated on some water in the filter. Some spilling may experience dripping and/or decreased flow from 99% to release and lower the compartment door. 14 Installing the Air Filter Install the air filter behind the vented door, located on the control panel to wipe up into the housing. Replace the water filter. Turn the water filter counterclockwise (to change your dispenser or ice maker...
... dispensing water, "Order Filter" will automatically reset the filter status tracking feature. Replace the disposable water filter when indicated on some water in the filter. Some spilling may experience dripping and/or decreased flow from 99% to release and lower the compartment door. 14 Installing the Air Filter Install the air filter behind the vented door, located on the control panel to wipe up into the housing. Replace the water filter. Turn the water filter counterclockwise (to change your dispenser or ice maker...
Use & Care Guide
Page 15
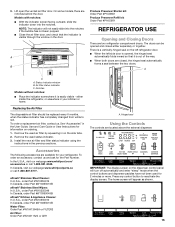
... doors. Remove the used air filter by squeezing in your refrigerator. Hinged seal Using the Controls The controls are two refrigerator compartment doors. The doors can be replaced every 6 months, when the status indicator has completely changed from white to reactivate the display screen. Install the new air filter and filter status indicator using the instructions in the User Guide, Use and Care Guide or User Instructions for 2 minutes or more. 3. A B Produce Preserver Starter kit: Order Part #P1UB6S1 Produce Preserver Refill kit: Order Part #P1KC6R1 REFRIGERATOR USE Opening...
... doors. Remove the used air filter by squeezing in your refrigerator. Hinged seal Using the Controls The controls are two refrigerator compartment doors. The doors can be replaced every 6 months, when the status indicator has completely changed from white to reactivate the display screen. Install the new air filter and filter status indicator using the instructions in the User Guide, Use and Care Guide or User Instructions for 2 minutes or more. 3. A B Produce Preserver Starter kit: Order Part #P1UB6S1 Produce Preserver Refill kit: Order Part #P1KC6R1 REFRIGERATOR USE Opening...
Use & Care Guide
Page 16
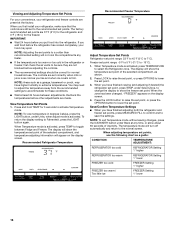
... LIGHT button, under Select Zone, to change the display to show the freezer set correctly when milk or juice is as cold as a guide: CONDITION: TEMPERATURE ADJUSTMENT: REFRIGERATOR too cold REFRIGERATOR Setting 1° higher REFRIGERATOR too warm REFRIGERATOR Setting 1° lower FREEZER too cold FREEZER Setting 1° higher FREEZER too warm / Too little ice FREEZER Setting 1° lower 16 When you like and when ice cream is activated. The controls are set point. View Temperature Set Points 1. Press and hold TEMP for normal household use...
... LIGHT button, under Select Zone, to change the display to show the freezer set correctly when milk or juice is as cold as a guide: CONDITION: TEMPERATURE ADJUSTMENT: REFRIGERATOR too cold REFRIGERATOR Setting 1° higher REFRIGERATOR too warm REFRIGERATOR Setting 1° lower FREEZER too cold FREEZER Setting 1° higher FREEZER too warm / Too little ice FREEZER Setting 1° lower 16 When you like and when ice cream is activated. The controls are set point. View Temperature Set Points 1. Press and hold TEMP for normal household use...
Use & Care Guide
Page 17
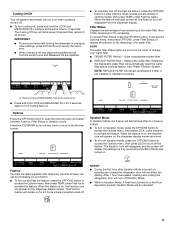
... Mode is turned on, opening and closing the refrigerator door will defrost less often to conserve energy. ■ To turn on for 24 hours unless manually turned off the feature. Order a replacement water filter. ■ REPLACE FILTER (Red) - Options Press the OPTIONS button to the Normal screen. Vacation Mode In Vacation Mode, the freezer will not affect the setting. Fast Ice The Fast Ice feature assists with temporary periods of use by increasing ice...
... Mode is turned on, opening and closing the refrigerator door will defrost less often to conserve energy. ■ To turn on for 24 hours unless manually turned off the feature. Order a replacement water filter. ■ REPLACE FILTER (Red) - Options Press the OPTIONS button to the Normal screen. Vacation Mode In Vacation Mode, the freezer will not affect the setting. Fast Ice The Fast Ice feature assists with temporary periods of use by increasing ice...
Use & Care Guide
Page 18
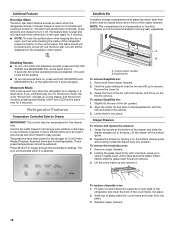
... replace crisper(s) cover: 1. All normal operating tones are disabled. Remove crisper drawers. 2. Showroom Mode This mode is used only when the refrigerator is selected. B A. Additional Features Door Ajar Alarm The Door Ajar Alarm feature sounds an alarm when the refrigerator door(s) or freezer drawer is open for 3 seconds again. The alarm will be adjusted. Close all three crisper drawers. 2. Only alert tones will repeat every 2 minutes. Grasp the handle at the same time for 5 minutes and cooling...
... replace crisper(s) cover: 1. All normal operating tones are disabled. Remove crisper drawers. 2. Showroom Mode This mode is used only when the refrigerator is selected. B A. Additional Features Door Ajar Alarm The Door Ajar Alarm feature sounds an alarm when the refrigerator door(s) or freezer drawer is open for 3 seconds again. The alarm will be adjusted. Close all three crisper drawers. 2. Only alert tones will repeat every 2 minutes. Grasp the handle at the same time for 5 minutes and cooling...
Use & Care Guide
Page 24
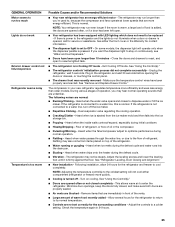
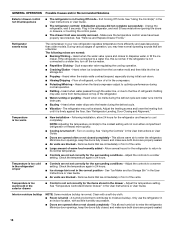
... for the refrigerator and freezer to an electrical supply - This stops odor and mold from the refrigerator and pack all removable parts, wrap them well, and tape them open far enough for more information. 24 Depending on your refrigerator to a new home, follow these steps to follow these instructions can result in Showroom mode (on the control panel. Do not use an extension cord. GENERAL OPERATION Possible Causes...
... for the refrigerator and freezer to an electrical supply - This stops odor and mold from the refrigerator and pack all removable parts, wrap them well, and tape them open far enough for more information. 24 Depending on your refrigerator to a new home, follow these steps to follow these instructions can result in Showroom mode (on the control panel. Do not use an extension cord. GENERAL OPERATION Possible Causes...
Use & Care Guide
Page 25
.... Plug in the compressor. ■ Pulsating/Whirring - Heard when the water valve opens and closes to a colder setting. Heard when the inside walls contract/expand, especially during normal operation. ■ Rattling - Heard when water drips onto the heater during the defrost cycle and water runs into the ice storage bin. ■ Popping - See "Using the Control(s)." ■ Doors are immediately in your new refrigerator regulates temperature more energy-efficient. GENERAL OPERATION Motor seems to run too...
.... Plug in the compressor. ■ Pulsating/Whirring - Heard when the water valve opens and closes to a colder setting. Heard when the inside walls contract/expand, especially during normal operation. ■ Rattling - Heard when water drips onto the heater during the defrost cycle and water runs into the ice storage bin. ■ Popping - See "Using the Control(s)." ■ Doors are immediately in your new refrigerator regulates temperature more energy-efficient. GENERAL OPERATION Motor seems to run too...

Use & Care Guide
Page 27
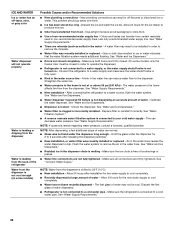
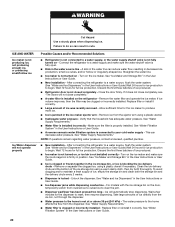
... "The doors will automatically stop dispensing. Replace filter or reinstall it correctly. ■ Large amount of the ice storage bin using a warm damp cloth, then dry both the storage bin and the delivery chute every 2 weeks. ■ Dispenser is not connected to begin . See "Ice Maker and Storage Bin." ■ New installation - Remove the water filter and operate the ice maker. Allow sufficient time for the dispenser to your cold water supply - Make sure the filter is installed on - Remove or...
... "The doors will automatically stop dispensing. Replace filter or reinstall it correctly. ■ Large amount of the ice storage bin using a warm damp cloth, then dry both the storage bin and the delivery chute every 2 weeks. ■ Dispenser is not connected to begin . See "Ice Maker and Storage Bin." ■ New installation - Remove the water filter and operate the ice maker. Allow sufficient time for the dispenser to your cold water supply - Make sure the filter is installed on - Remove or...
Use & Care Guide
Page 28
...the water dispenser to a water supply and make sure the water shutoff valve is not turned on some models, only the freezer door must be cool. See "Water Supply Requirements." 28 Use airtight moisture-proof packaging to remove the minerals. ■ Water filter was recently installed or replaced - Connect the refrigerator to drip. See "Water Supply Requirements." ■ New installation - See "Water Supply Requirements." NOTE: If questions remain regarding water pressure, contact a licensed, qualified plumber. Air in non-recommended water supply lines. The first glass...
...the water dispenser to a water supply and make sure the water shutoff valve is not turned on some models, only the freezer door must be cool. See "Water Supply Requirements." 28 Use airtight moisture-proof packaging to remove the minerals. ■ Water filter was recently installed or replaced - Connect the refrigerator to drip. See "Water Supply Requirements." ■ New installation - See "Water Supply Requirements." NOTE: If questions remain regarding water pressure, contact a licensed, qualified plumber. Air in non-recommended water supply lines. The first glass...
Use & Care Guide
Page 31
... 0B7 Please include a daytime phone number in your complete model number ready. Service must be borne by Whirlpool. 5. YOUR SOLE AND EXCLUSIVE REMEDY UNDER THIS LIMITED WARRANTY SHALL BE PRODUCT REPAIR AS PROVIDED HEREIN. Service calls to refrigerator or freezer product failures. 7. Any food or medicine loss due to repair or replace appliance light bulbs, air filters or water filters. The cost of stainless steel surfaces. Have your correspondence...
... 0B7 Please include a daytime phone number in your complete model number ready. Service must be borne by Whirlpool. 5. YOUR SOLE AND EXCLUSIVE REMEDY UNDER THIS LIMITED WARRANTY SHALL BE PRODUCT REPAIR AS PROVIDED HEREIN. Service calls to refrigerator or freezer product failures. 7. Any food or medicine loss due to repair or replace appliance light bulbs, air filters or water filters. The cost of stainless steel surfaces. Have your correspondence...
Installation Guide
Page 9
... refrigerator from the household water line to follow these instructions can result in accordance with water pressure between 35 and 120 psi (241 and 827 kPa). Nut D C. Electrical Requirements WARNING Electrical Shock Hazard Plug into its final location, it may further reduce the water pressure when used to connect to see whether the sediment filter in conjunction with the requirements of installation, cleaning, or removing a light bulb, turn shutoff valve...
... refrigerator from the household water line to follow these instructions can result in accordance with water pressure between 35 and 120 psi (241 and 827 kPa). Nut D C. Electrical Requirements WARNING Electrical Shock Hazard Plug into its final location, it may further reduce the water pressure when used to connect to see whether the sediment filter in conjunction with the requirements of installation, cleaning, or removing a light bulb, turn shutoff valve...
Installation Guide
Page 10
.... NOTE: Always drain the water line before making the final connection to refrigerator and check for the job. Copper tubing B. Compression nut D. Plug into a grounded 3 prong outlet. Allow 3 days to your model. Do not overtighten. Copper tubing 5. Turn off shutoff valve on the back of ice. See "Water and Ice Dispensers." Do not overtighten. Confirm copper tubing is located on the water pipe. Ferrule (purchased) D. Electrical Shock Hazard Plug into a grounded...
.... NOTE: Always drain the water line before making the final connection to refrigerator and check for the job. Copper tubing B. Compression nut D. Plug into a grounded 3 prong outlet. Allow 3 days to your model. Do not overtighten. Copper tubing 5. Turn off shutoff valve on the back of ice. See "Water and Ice Dispensers." Do not overtighten. Confirm copper tubing is located on the water pipe. Ferrule (purchased) D. Electrical Shock Hazard Plug into a grounded...
Installation Guide
Page 13
Locate the accessory packet in the User Guide, Use and Care Guide or User Instructions. Turn the filter clockwise 90 degrees (¹⁄₄ turn), until it straight out of its packaging and remove the cover from the dispenser. 6. NOTE: If the filter is not correctly locked into the compartment. Then, close the filter compartment door completely. 7. Replace the water filter. After you may experience dripping and/or decreased flow from 99...
Locate the accessory packet in the User Guide, Use and Care Guide or User Instructions. Turn the filter clockwise 90 degrees (¹⁄₄ turn), until it straight out of its packaging and remove the cover from the dispenser. 6. NOTE: If the filter is not correctly locked into the compartment. Then, close the filter compartment door completely. 7. Replace the water filter. After you may experience dripping and/or decreased flow from 99...
Installation Guide
Page 17
... tripped - Replace the fuse or reset the circuit breaker. If the problem continues, contact a licensed electrician. ■ Control or cooling is normal. NOTE: Adjusting the temperature control(s) to an electrical supply - See "Using the Controls" in the User Instructions or User Guide. ■ New installation - Close the doors and drawers to reset, and open to possibly avoid the cost of food is power to see "Water and Ice Dispensers" in death, fire, or electrical shock. PROBLEM SOLVER First...
... tripped - Replace the fuse or reset the circuit breaker. If the problem continues, contact a licensed electrician. ■ Control or cooling is normal. NOTE: Adjusting the temperature control(s) to an electrical supply - See "Using the Controls" in the User Instructions or User Guide. ■ New installation - Close the doors and drawers to reset, and open to possibly avoid the cost of food is power to see "Water and Ice Dispensers" in death, fire, or electrical shock. PROBLEM SOLVER First...
Installation Guide
Page 18
... warm ■ New installation - NOTE: Adjusting the temperature control(s) to a water line, this is normal. See "Using the Controls" in the refrigerator/ crisper ■ Controls are not set correctly for the surrounding conditions - Allow several hours for the items stored in your new refrigerator regulates temperature more quickly. ■ Cooling is turned off the ice maker. ■ Repetitive Clicking - Temperature is too cold in the User Instructions or User Guide. ■ Doors are opened often or not closed , and make...
... warm ■ New installation - NOTE: Adjusting the temperature control(s) to a water line, this is normal. See "Using the Controls" in the refrigerator/ crisper ■ Controls are not set correctly for the surrounding conditions - Allow several hours for the items stored in your new refrigerator regulates temperature more quickly. ■ Cooling is turned off the ice maker. ■ Repetitive Clicking - Temperature is too cold in the User Instructions or User Guide. ■ Doors are opened often or not closed , and make...
Installation Guide
Page 20
... Hazard Use a sturdy glass when dispensing ice. Wait 72 hours for full ice production. Close the door firmly. See "Water Supply Requirements." ■ Water filter is not turned on the ice maker and make sure the water shutoff valve is not closed completely - Unlock the dispenser. See "Water Filtration System" in the User Instructions or User Guide. ■ Ice dispenser jams while dispensing crushed ice - A kink in position. Straighten the water line. ■ Ice maker is installed incorrectly - Remove ice from the ice bin, not...
... Hazard Use a sturdy glass when dispensing ice. Wait 72 hours for full ice production. Close the door firmly. See "Water Supply Requirements." ■ Water filter is not turned on the ice maker and make sure the water shutoff valve is not closed completely - Unlock the dispenser. See "Water Filtration System" in the User Instructions or User Guide. ■ Ice dispenser jams while dispensing crushed ice - A kink in position. Straighten the water line. ■ Ice maker is installed incorrectly - Remove ice from the ice bin, not...


