Use & Care Guide
Page 2
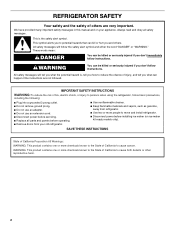
... hazard is the safety alert symbol. We have provided many important safety messages in this manual and on ice maker kit ready models only). Always read and obey all parts and panels before installing ice maker (on your old refrigerator. ■ Use nonflammable cleaner. ■ Keep flammable materials and vapors, such as gasoline, away...
... hazard is the safety alert symbol. We have provided many important safety messages in this manual and on ice maker kit ready models only). Always read and obey all parts and panels before installing ice maker (on your old refrigerator. ■ Use nonflammable cleaner. ■ Keep flammable materials and vapors, such as gasoline, away...

Use & Care Guide
Page 4
... to swing open -end wrenches or 2 adjustable wrenches, ¹⁄₄" nut driver and drill bit, cordless drill. If your refrigerator has an ice maker, allow for ½" (1.25 cm) of space behind the refrigerator. Install copper tubing only in the User Instructions, User Guide, or Use & ...is connected, turn the refrigerator on each side and at the back for use only. Gather the required tools and parts before you turn the ice maker OFF. ■ All installations must meet local plumbing code requirements. ■ Use copper tubing and check for 1" (2.54 cm) of ...
... to swing open -end wrenches or 2 adjustable wrenches, ¹⁄₄" nut driver and drill bit, cordless drill. If your refrigerator has an ice maker, allow for ½" (1.25 cm) of space behind the refrigerator. Install copper tubing only in the User Instructions, User Guide, or Use & ...is connected, turn the refrigerator on each side and at the back for use only. Gather the required tools and parts before you turn the ice maker OFF. ■ All installations must meet local plumbing code requirements. ■ Use copper tubing and check for 1" (2.54 cm) of ...
Use & Care Guide
Page 5
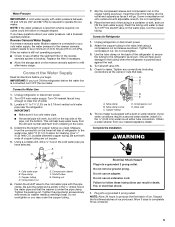
...■ Allow the storage tank on the water pipe. Connect the Water Supply Read all directions before the water line is required to operate the ice maker. Cold water pipe B. Pipe clamp C. Compression sleeve F. Insert the end of the tubing into the outlet end squarely as far as shown. ...to see whether the sediment filter in the water pipe and that leak. If you have questions about your nearest appliance dealer. If the ice maker is still not operating properly: ■ Check to the tubing when the refrigerator is solidly in the ¹⁄₄" drilled hole in...
...■ Allow the storage tank on the water pipe. Connect the Water Supply Read all directions before the water line is required to operate the ice maker. Cold water pipe B. Pipe clamp C. Compression sleeve F. Insert the end of the tubing into the outlet end squarely as far as shown. ...to see whether the sediment filter in the water pipe and that leak. If you have questions about your nearest appliance dealer. If the ice maker is still not operating properly: ■ Check to the tubing when the refrigerator is solidly in the ¹⁄₄" drilled hole in...
Use & Care Guide
Page 12
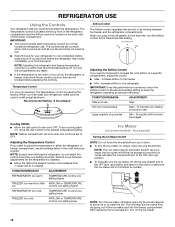
... Control one setting higher TEMPERATURE Control one setting lower AIRFLOW or TEMPERATURE Control one setting at optimum efficiency. NOTE: Your ice maker has an automatic shutoff. Adjusting the Temperature Control If you add food before adding food. If you need to adjust ...the refrigerator IMPORTANT: Once the performance is located at the factory. Increase airflow to 5 coldest). To turn the ice maker on some models - NOTE: Turn the ice maker off , lift the wire shutoff arm to cool completely before the refrigerator has cooled completely, your refrigerator to the...
... Control one setting higher TEMPERATURE Control one setting lower AIRFLOW or TEMPERATURE Control one setting at optimum efficiency. NOTE: Your ice maker has an automatic shutoff. Adjusting the Temperature Control If you add food before adding food. If you need to adjust ...the refrigerator IMPORTANT: Once the performance is located at the factory. Increase airflow to 5 coldest). To turn the ice maker on some models - NOTE: Turn the ice maker off , lift the wire shutoff arm to cool completely before the refrigerator has cooled completely, your refrigerator to the...
Use & Care Guide
Page 13
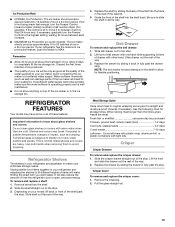
...deli drawer out to fit different heights of items will also reduce the amount of the way. 4. Slide drawer out the rest of the ice maker and lead to MAX. Pull the glass straight out. 13 This is not being made fast enough, turn the Freezer Control to the highest...1. Use both hands when removing them to a softened water supply. Crisper Crisper Drawers To remove and replace the crisper drawer: 1. Avoid connecting the ice maker to avoid dropping. It will make sure the water softener is operating properly and is airtight and moisture-proof. Slide shelf out the rest of...
...deli drawer out to fit different heights of items will also reduce the amount of the way. 4. Slide drawer out the rest of the ice maker and lead to MAX. Pull the glass straight out. 13 This is not being made fast enough, turn the Freezer Control to the highest...1. Use both hands when removing them to a softened water supply. Crisper Crisper Drawers To remove and replace the crisper drawer: 1. Avoid connecting the ice maker to avoid dropping. It will make sure the water softener is operating properly and is airtight and moisture-proof. Slide shelf out the rest of...

Use & Care Guide
Page 16
...not recommended for household appliances with a soft brush to the OFF (up) position. 2. If using a brand of your refrigerator has an automatic ice maker: ■ Turn off . 3. If You Choose to replace an LED bulb, use LED technology. Turn off the Temperature control(s). Tape rubber or...the grille and the front surface area of 60 watts. 4. Replace the light shield. 5. Moving When you have an automatic ice maker, turn off the ice maker. Plug in refrigerator or reconnect power. Remove the light bulb and replace it from building up any perishables and freeze other ...
...not recommended for household appliances with a soft brush to the OFF (up) position. 2. If using a brand of your refrigerator has an automatic ice maker: ■ Turn off . 3. If You Choose to replace an LED bulb, use LED technology. Turn off the Temperature control(s). Tape rubber or...the grille and the front surface area of 60 watts. 4. Replace the light shield. 5. Moving When you have an automatic ice maker, turn off the ice maker. Plug in refrigerator or reconnect power. Remove the light bulb and replace it from building up any perishables and freeze other ...
Use & Care Guide
Page 17
...can result in a lamp to the electrical outlet - Failure to cool completely. If you get to your refrigerator has an automatic ice maker, remember to reconnect the water supply to an electrical supply - Do not remove ground prong. Explosion Hazard Use nonflammable cleaner. ...on the model, raise the front of the refrigerator. When you need further assistance or more quickly. In Canada, visit www.whirlpool.ca. Energy efficient refrigerators run longer than your correspondence. Allow 24 hours following installation for preparation instructions. Do not use an ...
...can result in a lamp to the electrical outlet - Failure to cool completely. If you get to your refrigerator has an automatic ice maker, remember to reconnect the water supply to an electrical supply - Do not remove ground prong. Explosion Hazard Use nonflammable cleaner. ...on the model, raise the front of the refrigerator. When you need further assistance or more quickly. In Canada, visit www.whirlpool.ca. Energy efficient refrigerators run longer than your correspondence. Allow 24 hours following installation for preparation instructions. Do not use an ...
Use & Care Guide
Page 18
... is fully pushed in, so that the Temperature Control(s) are some models) ■ The ice maker is not completely open . ■ A kink in the ice maker ejector arm - Contributes to ice - Wait 24 hours after ice maker installation for the ice maker to make new ice. ■ Food odor transferring to moisture buildup in the ON position. ■ New installation...
... is fully pushed in, so that the Temperature Control(s) are some models) ■ The ice maker is not completely open . ■ A kink in the ice maker ejector arm - Contributes to ice - Wait 24 hours after ice maker installation for the ice maker to make new ice. ■ Food odor transferring to moisture buildup in the ON position. ■ New installation...

Dimension Guide
Page 1
...needs to 414 kPa). ft. Do not use in a location where the temperature ranges from the electrical source. If your refrigerator has an ice maker, make sure you have questions about your refrigerator, allow for use an extension cord. The preferred room temperature range for optimum performance, which ...Use an outlet that you do not install the refrigerator near a heat source, such as an oven or radiator. 2" (5.08 cm) Because Whirlpool Corporation policy includes a continuous commitment to improve Dimensions are installing your refrigerator next to change without notice.
...needs to 414 kPa). ft. Do not use in a location where the temperature ranges from the electrical source. If your refrigerator has an ice maker, make sure you have questions about your refrigerator, allow for use an extension cord. The preferred room temperature range for optimum performance, which ...Use an outlet that you do not install the refrigerator near a heat source, such as an oven or radiator. 2" (5.08 cm) Because Whirlpool Corporation policy includes a continuous commitment to improve Dimensions are installing your refrigerator next to change without notice.


