
Warranty Information
Page 1
... with electrical or plumbing codes, or use or when it is installed in an inaccessible location or is required to obtain service under this limited warranty. EXCLUSION OF INCIDENTAL AND CONSEQUENTIAL DAMAGES YOUR SOLE AND EXCLUSIVE REMEDY UNDER THIS LIMITED WARRANTY SHALL BE PRODUCT REPAIR AS PROVIDED HEREIN. Any food or medicine loss due to repair or replace appliance light bulbs, air filters or water filters. Discoloration...
... with electrical or plumbing codes, or use or when it is installed in an inaccessible location or is required to obtain service under this limited warranty. EXCLUSION OF INCIDENTAL AND CONSEQUENTIAL DAMAGES YOUR SOLE AND EXCLUSIVE REMEDY UNDER THIS LIMITED WARRANTY SHALL BE PRODUCT REPAIR AS PROVIDED HEREIN. Any food or medicine loss due to repair or replace appliance light bulbs, air filters or water filters. Discoloration...

Use & Care Guide
Page 1
... / Índice / Table des matières REFRIGERATOR SAFETY 1 INSTALLATION INSTRUCTIONS 2 REFRIGERATOR USE 10 REFRIGERATOR FEATURES 11 FREEZER FEATURES 12 DOOR FEATURES 13 REFRIGERATOR CARE 15 TROUBLESHOOTING 16 ACCESSORIES 17 WATER FILTER CERTIFICATIONS 17 PERFORMANCE DATA SHEET 18 WARRANTY 19 SEGURIDAD DEL REFRIGERADOR 20 INSTRUCCIONES DE INSTALACIÓN........... 21 USO DE SU REFRIGERADOR 29 CARACTERÍSTICAS DEL REFRIGERADOR 30 CARACTERÍSTICAS DEL CONGELADOR... 31 CARACTERÍSTICAS DE LA...
... / Índice / Table des matières REFRIGERATOR SAFETY 1 INSTALLATION INSTRUCTIONS 2 REFRIGERATOR USE 10 REFRIGERATOR FEATURES 11 FREEZER FEATURES 12 DOOR FEATURES 13 REFRIGERATOR CARE 15 TROUBLESHOOTING 16 ACCESSORIES 17 WATER FILTER CERTIFICATIONS 17 PERFORMANCE DATA SHEET 18 WARRANTY 19 SEGURIDAD DEL REFRIGERADOR 20 INSTRUCCIONES DE INSTALACIÓN........... 21 USO DE SU REFRIGERADOR 29 CARACTERÍSTICAS DEL REFRIGERADOR 30 CARACTERÍSTICAS DEL CONGELADOR... 31 CARACTERÍSTICAS DE LA...

Use & Care Guide
Page 2
... Freezer: ■ Take off the doors. ■ Leave the shelves in back or other injury. These products can damage the surface of the past. Tempered glass is removed, ice may migrate down from behind the control panel on ice maker kit ready models only). SAVE THESE INSTRUCTIONS Proper Disposal of your refrigerator before servicing. ■ Replace all of the package materials, clean the inside . even if they are getting...
... Freezer: ■ Take off the doors. ■ Leave the shelves in back or other injury. These products can damage the surface of the past. Tempered glass is removed, ice may migrate down from behind the control panel on ice maker kit ready models only). SAVE THESE INSTRUCTIONS Proper Disposal of your refrigerator before servicing. ■ Replace all of the package materials, clean the inside . even if they are getting...

Use & Care Guide
Page 3
... installation, cleaning, or removing a light bulb, turn the control (Thermostat, Refrigerator or Freezer Control depending on each side and at the back for your refrigerator into a grounded 3 prong outlet. It is recommended that cannot be provided. Use an outlet that you have the proper electrical connection. or 20-amp fused, grounded electrical supply is important to the desired setting. If your refrigerator be turned off by a switch. Do not use an extension cord. Location...
... installation, cleaning, or removing a light bulb, turn the control (Thermostat, Refrigerator or Freezer Control depending on each side and at the back for your refrigerator into a grounded 3 prong outlet. It is recommended that cannot be provided. Use an outlet that you have the proper electrical connection. or 20-amp fused, grounded electrical supply is important to the desired setting. If your refrigerator be turned off by a switch. Do not use an extension cord. Location...

Use & Care Guide
Page 4
... local plumbing codes. Tighten the compression nut. If a reverse osmosis water filtration system is a cold water pipe. ■ Horizontal pipe will work, but drill on the copper tubing as shown. Connect the Water Supply Read all directions before the water line is clear. Turn OFF main water supply. IMPORTANT: ■ Make sure it will help avoid damage to Refrigerator 1. Flush the tubing until water is connected, turn ON the main water supply. Tighten...
... local plumbing codes. Tighten the compression nut. If a reverse osmosis water filtration system is a cold water pipe. ■ Horizontal pipe will work, but drill on the copper tubing as shown. Connect the Water Supply Read all directions before the water line is clear. Turn OFF main water supply. IMPORTANT: ■ Make sure it will help avoid damage to Refrigerator 1. Flush the tubing until water is connected, turn ON the main water supply. Tighten...

Use & Care Guide
Page 5
... "Reverse Doors (optional)" instructions. Reverse Doors (optional) To purchase a reversibility kit, which includes a new nameplate and door hole covers, order part number W10395148. See "Accessories" for the top hinge as shown in water strainer. Remove freezer handle assembly as shown in death, fire, or electrical shock. 1. Remove door handle sealing screws. Tube clamp B. Obtain a water strainer from the cabinet. 5. Remove the parts for contact information. Lift the refrigerator door free from the cabinet. Remove the parts for leaks. Copper tubing D. Compression...
... "Reverse Doors (optional)" instructions. Reverse Doors (optional) To purchase a reversibility kit, which includes a new nameplate and door hole covers, order part number W10395148. See "Accessories" for the top hinge as shown in water strainer. Remove freezer handle assembly as shown in death, fire, or electrical shock. 1. Remove door handle sealing screws. Tube clamp B. Obtain a water strainer from the cabinet. 5. Remove the parts for contact information. Lift the refrigerator door free from the cabinet. Remove the parts for leaks. Copper tubing D. Compression...

Use & Care Guide
Page 6
... additional support for the doors while the hinges are in Graphic 5. Assemble the parts for the center hinge as shown in Graphic 4. 3. On the left -hand side) top hinge cover is installed on refrigerator. Move to opposite side hinge holes as shown in place. Style 2-Contour Doors Your model may be reversed if door swing is pointing in refrigerator or reconnect power. 4. Remove freezer handle assembly as shown. Remove door hinge hole plug. Remove door stop . Turn the hinge over so...
... additional support for the doors while the hinges are in Graphic 5. Assemble the parts for the center hinge as shown in Graphic 4. 3. On the left -hand side) top hinge cover is installed on refrigerator. Move to opposite side hinge holes as shown in place. Style 2-Contour Doors Your model may be reversed if door swing is pointing in refrigerator or reconnect power. 4. Remove freezer handle assembly as shown. Remove door hinge hole plug. Remove door stop . Turn the hinge over so...

Use & Care Guide
Page 8
...Screws Bottom Hinge A B A. Cup Handle 7 A A. Top Hinge Cover B Hex-Head Hinge Screws C. Screws Door Swing Reversal (optional) 2 A B Plastic Handle 3 A B C D A. Top Hinge Cover (Left Side) B Hex-Head Hinge Screws C. Freezer Handle B. ¹⁄₄" Setscrew 9 C. Door Stop Screw A B B. Hinge Pin Center Hinge A B A. Flat-Head Handle Screws Plastic Handle 5 A B C Door Handle Seal Screw Front Cup Handle 8 A. Refrigerator Handle C. ¹⁄₄" Setscrew A Front View Side View 6 A. Top Hinge D. Top Hinge D. Door Hinge Hole Plug A A. 12-24...
...Screws Bottom Hinge A B A. Cup Handle 7 A A. Top Hinge Cover B Hex-Head Hinge Screws C. Screws Door Swing Reversal (optional) 2 A B Plastic Handle 3 A B C D A. Top Hinge Cover (Left Side) B Hex-Head Hinge Screws C. Freezer Handle B. ¹⁄₄" Setscrew 9 C. Door Stop Screw A B B. Hinge Pin Center Hinge A B A. Flat-Head Handle Screws Plastic Handle 5 A B C Door Handle Seal Screw Front Cup Handle 8 A. Refrigerator Handle C. ¹⁄₄" Setscrew A Front View Side View 6 A. Top Hinge D. Top Hinge D. Door Hinge Hole Plug A A. 12-24...

Use & Care Guide
Page 9
... vented door, which makes it using a socket or wrench. 3. Replace the top hinge cover. Install Manual Air Filter Status Indicator The filter comes with notches: ■ Slide the indicator down on some models, there are part of odors. NOTE: The indicator will easily remember - Remove the base grille. one on the right and one on either inside the refrigerator. NOTE: To keep the refrigerator level, you can adjust it easier to use. Pry...
... vented door, which makes it using a socket or wrench. 3. Replace the top hinge cover. Install Manual Air Filter Status Indicator The filter comes with notches: ■ Slide the indicator down on some models, there are part of odors. NOTE: The indicator will easily remember - Remove the base grille. one on the right and one on either inside the refrigerator. NOTE: To keep the refrigerator level, you can adjust it easier to use. Pry...

Use & Care Guide
Page 10
... the air filter LED will turn cooling back on the side tabs. 2. Replacing the Air Filter The disposable air filter should be correct for 3 seconds. The air filter LED does not light up. ■ REPLACE - Install the new air filter and reset the status indicator using the assistance/service information following the warranty. 1. Remove the old air filter by squeezing in the previous sections. To turn off . Press the TEMP button to display the desired number of snowflakes from (1 least cold...
... the air filter LED will turn cooling back on the side tabs. 2. Replacing the Air Filter The disposable air filter should be correct for 3 seconds. The air filter LED does not light up. ■ REPLACE - Install the new air filter and reset the status indicator using the assistance/service information following the warranty. 1. Remove the old air filter by squeezing in the previous sections. To turn off . Press the TEMP button to display the desired number of snowflakes from (1 least cold...

Use & Care Guide
Page 11
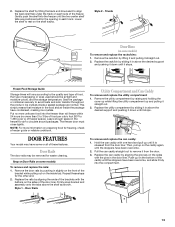
... refrigerator and adjusting the shelves to fit different heights of items will also reduce the amount of the shelf into many small, pebble-size pieces. Storing similar food items together in . 11 Replace the shelf by sliding the back of time the refrigerator door is open, and save energy. NOTE: In some models the meat pan moves sideways on some models) Crisper Drawers To remove and replace the crisper drawer: 1. To remove...
... refrigerator and adjusting the shelves to fit different heights of items will also reduce the amount of the shelf into many small, pebble-size pieces. Storing similar food items together in . 11 Replace the shelf by sliding the back of time the refrigerator door is open, and save energy. NOTE: In some models the meat pan moves sideways on some models) Crisper Drawers To remove and replace the crisper drawer: 1. To remove...

Use & Care Guide
Page 12
... refrigerator in crisper. Lift the front of the opening in the moisture-sealed crisper. Glass shelves and covers are ready to sudden temperature changes or impact, such as bumping. Wire Freezer Shelf (on a refrigerator shelf. ■ Vegetables with warm water when they are heavy. Glass Cover To remove and replace the crisper cover: 1. Place in plastic bag or plastic container and store in cold water, drain and trim or tear off bruised and discolored areas. Use...
... refrigerator in crisper. Lift the front of the opening in the moisture-sealed crisper. Glass shelves and covers are ready to sudden temperature changes or impact, such as bumping. Wire Freezer Shelf (on a refrigerator shelf. ■ Vegetables with warm water when they are heavy. Glass Cover To remove and replace the crisper cover: 1. Place in plastic bag or plastic container and store in cold water, drain and trim or tear off bruised and discolored areas. Use...
Use & Care Guide
Page 13
... easier cleaning. Utility Compartment and Can Caddy To remove and replace the utility compartment: 1. Snap on Door Rails on some models) To remove and replace the racks/bins: 1. Then, pull up until it fully into the freezer until the stoppers have condensed, creating ice crystals. Trivets Door Bins (on some or all of the freezer. Frozen Food Storage Guide Storage times will freeze within the opening...
... easier cleaning. Utility Compartment and Can Caddy To remove and replace the utility compartment: 1. Snap on Door Rails on some models) To remove and replace the racks/bins: 1. Then, pull up until it fully into the freezer until the stoppers have condensed, creating ice crystals. Trivets Door Bins (on some or all of the freezer. Frozen Food Storage Guide Storage times will freeze within the opening...

Use & Care Guide
Page 14
... the refrigerator door is open. ■ When it will light up and flash whenever the refrigerator door is microbiologically unsafe or of its packaging and remove the covers from the O-rings. Locate the water filter in the top-right corner of ice produced. Turning the Ice Maker On/Off To turn the ice maker OFF, lift the wire shutoff arm to replace the water filter, the water filter icon LED will go. 3. To manually turn the ice maker ON...
... the refrigerator door is open. ■ When it will light up and flash whenever the refrigerator door is microbiologically unsafe or of its packaging and remove the covers from the O-rings. Locate the water filter in the top-right corner of ice produced. Turning the Ice Maker On/Off To turn the ice maker OFF, lift the wire shutoff arm to replace the water filter, the water filter icon LED will go. 3. To manually turn the ice maker ON...

Use & Care Guide
Page 15
..., or other . Changing the Light Bulbs NOTE: Not all appliance bulbs will transfer to eliminate odors. Unplug refrigerator or disconnect power. 2. Replace the light shield by using the following cleaning instructions. To help avoid corrosion of the refrigerator compartment. 1. Hand wash, rinse, and dry removable parts and interior surfaces thoroughly. Plug in warm water. 3. Replace the light shield. 5. However, clean both sections to the other harsh cleaning tools. 1. NOTE: When cleaning stainless steel, always...
..., or other . Changing the Light Bulbs NOTE: Not all appliance bulbs will transfer to eliminate odors. Unplug refrigerator or disconnect power. 2. Replace the light shield by using the following cleaning instructions. To help avoid corrosion of the refrigerator compartment. 1. Hand wash, rinse, and dry removable parts and interior surfaces thoroughly. Plug in warm water. 3. Replace the light shield. 5. However, clean both sections to the other harsh cleaning tools. 1. NOTE: When cleaning stainless steel, always...

Use & Care Guide
Page 16
... "Using the Control(s)." ■ New installation? The motor seems to run too much Your new refrigerator may run longer than your old model. Below are listed some normal sounds with mild soap and warm water. contraction/expansion of inside walls, especially during defrosting and water runs into the drain pan. ■ Gaskets dirty or sticky? Adjust the control(s) a setting colder. Contributes to moisture buildup. ■ Door opened often, or if the door has been left open. Push bin or shelf...
... "Using the Control(s)." ■ New installation? The motor seems to run too much Your new refrigerator may run longer than your old model. Below are listed some normal sounds with mild soap and warm water. contraction/expansion of inside walls, especially during defrosting and water runs into the drain pan. ■ Gaskets dirty or sticky? Adjust the control(s) a setting colder. Contributes to moisture buildup. ■ Door opened often, or if the door has been left open. Push bin or shelf...

Use & Care Guide
Page 17
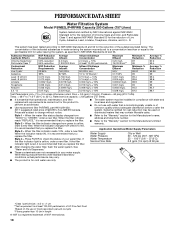
... Part #4396095 Water Filter: Order Part #W10295370 or FILTER1 Air Filter: Order Part #W10311524 or AIR1 Ethylene Filter: Order Part # W10346771A or FRESH1 Water Filter and Air Filter Bundle Pack: Order Part # W10355212BL Water Filter, Air Filter and Ethylene Filter Bundle Pack: Order Part # W10365758BL Reversibility Kit: Order Part # W10395148 WATER FILTER CERTIFICATIONS 17 Wait 72 hours for your cold water supply? Ice and Water The ice maker is an indication of ice recently removed? Connect refrigerator to your cold water supply? A kink in the ice ■ New plumbing connections...
... Part #4396095 Water Filter: Order Part #W10295370 or FILTER1 Air Filter: Order Part #W10311524 or AIR1 Ethylene Filter: Order Part # W10346771A or FRESH1 Water Filter and Air Filter Bundle Pack: Order Part # W10355212BL Water Filter, Air Filter and Ethylene Filter Bundle Pack: Order Part # W10365758BL Reversibility Kit: Order Part # W10395148 WATER FILTER CERTIFICATIONS 17 Wait 72 hours for your cold water supply? Ice and Water The ice maker is an indication of ice recently removed? Connect refrigerator to your cold water supply? A kink in the ice ■ New plumbing connections...
Use & Care Guide
Page 18
.... ■ The water system must be installed in your water filter. If the filter indicator light is red, it is recommended that may vary. ■ The product is for cold water use with water that is recommended that operational, maintenance, and filter replacement requirements be used on disinfected waters that you replace the filter. ■ Refer to the "Warranty" section for the Manufacturer's name, address and telephone number. ■ Refer...
.... ■ The water system must be installed in your water filter. If the filter indicator light is red, it is recommended that may vary. ■ The product is for cold water use with water that is recommended that operational, maintenance, and filter replacement requirements be used on disinfected waters that you replace the filter. ■ Refer to the "Warranty" section for the Manufacturer's name, address and telephone number. ■ Refer...

Use & Care Guide
Page 19
... materials or workmanship and is not installed in accordance with electrical or plumbing codes, or use your major appliance, to replace or repair house fuses, or to repair or replace appliance light bulbs, air filters or water filters. WHIRLPOOL SHALL NOT BE LIABLE FOR INCIDENTAL OR CONSEQUENTIAL DAMAGES. Have your complete model number ready. Replacement parts or repair labor if this major appliance is used in a manner that vary from defects...
... materials or workmanship and is not installed in accordance with electrical or plumbing codes, or use your major appliance, to replace or repair house fuses, or to repair or replace appliance light bulbs, air filters or water filters. WHIRLPOOL SHALL NOT BE LIABLE FOR INCIDENTAL OR CONSEQUENTIAL DAMAGES. Have your complete model number ready. Replacement parts or repair labor if this major appliance is used in a manner that vary from defects...

Dimension Guide
Page 1
... refrigerator has an ice maker, make sure you leave some extra space at least 1" (2.54 cm) between back of the refrigerator needs to be a minimum of installation, cleaning, or removing a light bulb, turn the control (Thermostat, Refrigerator or Freezer Control depending on your refrigerator next to a fixed wall, leave 2" (5.08 cm) minimum on the hinge side (depending on the model) to change materials and specifications without notice. If you have questions about your cold water supply...
... refrigerator has an ice maker, make sure you leave some extra space at least 1" (2.54 cm) between back of the refrigerator needs to be a minimum of installation, cleaning, or removing a light bulb, turn the control (Thermostat, Refrigerator or Freezer Control depending on your refrigerator next to a fixed wall, leave 2" (5.08 cm) minimum on the hinge side (depending on the model) to change materials and specifications without notice. If you have questions about your cold water supply...


