

Warranty Information
Page 1
...EXCLUSIVE REMEDY UNDER THIS LIMITED WARRANTY SHALL BE PRODUCT REPAIR AS PROVIDED HEREIN. Replacement parts or repair labor if this major appliance is used in a remote area where service by a Whirlpool designated service company. This major appliance is intended to be repaired in materials or ...inconsistent to correct the installation of your major appliance if it is used for Factory Specified Parts and repair labor to correct defects in your complete model number ready. WHIRLPOOL SHALL NOT BE LIABLE FOR INCIDENTAL OR CONSEQUENTIAL DAMAGES. For assistance or service in accordance with...
...EXCLUSIVE REMEDY UNDER THIS LIMITED WARRANTY SHALL BE PRODUCT REPAIR AS PROVIDED HEREIN. Replacement parts or repair labor if this major appliance is used in a remote area where service by a Whirlpool designated service company. This major appliance is intended to be repaired in materials or ...inconsistent to correct the installation of your major appliance if it is used for Factory Specified Parts and repair labor to correct defects in your complete model number ready. WHIRLPOOL SHALL NOT BE LIABLE FOR INCIDENTAL OR CONSEQUENTIAL DAMAGES. For assistance or service in accordance with...

Use & Care Guide
Page 2
... can result in "Refrigerator Care." See the cleaning instructions in back or other injury. IMPORTANT: Child entrapment and suffocation are heavy. If you remove all parts and panels before operating. ■ Remove doors from refrigerator. ■ Use two or more information, see "Refrigerator Safety." This is heavy. Failure to remove tape...
... can result in "Refrigerator Care." See the cleaning instructions in back or other injury. IMPORTANT: Child entrapment and suffocation are heavy. If you remove all parts and panels before operating. ■ Remove doors from refrigerator. ■ Use two or more information, see "Refrigerator Safety." This is heavy. Failure to remove tape...

Use & Care Guide
Page 4
... the outlet end squarely as far as shown. Place the free end of water. 3. Do not overtighten. 3. Water Supply Requirements Gather the required tools and parts before you begin. If you have selected. If the water pressure to the reverse osmosis system is less than 40 to 60 psi (276 to...
... the outlet end squarely as far as shown. Place the free end of water. 3. Do not overtighten. 3. Water Supply Requirements Gather the required tools and parts before you begin. If you have selected. If the water pressure to the reverse osmosis system is less than 40 to 60 psi (276 to...

Use & Care Guide
Page 5
...disconnect power. 2. Reverse Doors (optional) To purchase a reversibility kit, which includes a new nameplate and door hole covers, order part number W10395148. Keep all parts together. Remove door handle sealing screws. Valve inlet 6. If your nearest appliance dealer. If you are being moved. Door Stop... side hinge holes as shown in the Center Hinge graphic. Tube clamp screw C. Plug into a grounded 3 prong outlet. Remove the parts for the doors while the hinges are working. 4. Remove freezer handle assembly as shown. Tube clamp B. Obtain a water strainer from the...
...disconnect power. 2. Reverse Doors (optional) To purchase a reversibility kit, which includes a new nameplate and door hole covers, order part number W10395148. Keep all parts together. Remove door handle sealing screws. Valve inlet 6. If your nearest appliance dealer. If you are being moved. Door Stop... side hinge holes as shown in the Center Hinge graphic. Tube clamp screw C. Plug into a grounded 3 prong outlet. Remove the parts for the doors while the hinges are working. 4. Remove freezer handle assembly as shown. Tube clamp B. Obtain a water strainer from the...

Use & Care Guide
Page 6
... Remove refrigerator handle assembly as shown. Keep all screws. Position refrigerator handle on opposite side of the refrigerator door. Tighten all parts together. Tighten all screws. Reinstall top hinge cover. See Top Hinge graphic. On the left -hand side) top hinge cover...7. 6. Replace the refrigerator door. Do not tighten the screws completely. 4. 4. Remove the hinge pin from refrigerator door. Tighten all parts together. See Graphic 5. See "Using the Controls." 5. See Graphic 6-1. 2. Position handle on refrigerator. Move to opposite side of refrigerator...
... Remove refrigerator handle assembly as shown. Keep all screws. Position refrigerator handle on opposite side of the refrigerator door. Tighten all parts together. Tighten all screws. Reinstall top hinge cover. See Top Hinge graphic. On the left -hand side) top hinge cover...7. 6. Replace the refrigerator door. Do not tighten the screws completely. 4. 4. Remove the hinge pin from refrigerator door. Tighten all parts together. See Graphic 5. See "Using the Controls." 5. See Graphic 6-1. 2. Position handle on refrigerator. Move to opposite side of refrigerator...

Use & Care Guide
Page 9
The two leveling screws are part of the refrigerator. It may take several turns of the leveling screws to adjust the tilt of the front roller assemblies which are notches behind ...
The two leveling screws are part of the refrigerator. It may take several turns of the leveling screws to adjust the tilt of the front roller assemblies which are notches behind ...

Use & Care Guide
Page 14
Lower the arm on the ice maker to your ice will go. 3. Remember ■ The quality of your ice maker. This can damage parts of the water supplied to the "on" position. Be sure the O-rings are removed. 5. You may be only as good as the quality of the ...
Lower the arm on the ice maker to your ice will go. 3. Remember ■ The quality of your ice maker. This can damage parts of the water supplied to the "on" position. Be sure the O-rings are removed. 5. You may be only as good as the quality of the ...

Use & Care Guide
Page 15
...9632; Use a vacuum cleaner with a clean, soft cloth or sponge and a mild detergent in on exterior surfaces (doors and cabinet), plastic parts, interior and door liners or gaskets. Plug in normal home operating environments. Failure to the other harsh cleaning tools. 1. To Clean Your Refrigerator:...Use nonflammable cleaner. You must thoroughly clean both sections, any odors formed in warm water. Hand wash, rinse, and dry removable parts and interior surfaces thoroughly. Clean the exterior surfaces. If the environment is particularly greasy or dusty, or there is located behind ...
...9632; Use a vacuum cleaner with a clean, soft cloth or sponge and a mild detergent in on exterior surfaces (doors and cabinet), plastic parts, interior and door liners or gaskets. Plug in normal home operating environments. Failure to the other harsh cleaning tools. 1. To Clean Your Refrigerator:...Use nonflammable cleaner. You must thoroughly clean both sections, any odors formed in warm water. Hand wash, rinse, and dry removable parts and interior surfaces thoroughly. Clean the exterior surfaces. If the environment is particularly greasy or dusty, or there is located behind ...

Use & Care Guide
Page 17
...in the ON position. ■ New installation? This can reduce water flow. Call a licensed, qualified plumber. Wash ice bin. Allow 24 hours for the part numbers. To order, contact us and ask for ice maker to make new ice. ■ Odor transfer from the ejector arm with a plastic utensil. ■...? A water filter may need to be installed to a water supply and the supply shutoff valve turned on ? In the U.S.A., visit our webpage www.whirlpool.com/accessories or call 1-800-807-6777. In Canada, visit our webpage www.whirlpoolparts.ca or call 1-800-901-2042. Make sure wire shutoff arm...
...in the ON position. ■ New installation? This can reduce water flow. Call a licensed, qualified plumber. Wash ice bin. Allow 24 hours for the part numbers. To order, contact us and ask for ice maker to make new ice. ■ Odor transfer from the ejector arm with a plastic utensil. ■...? A water filter may need to be installed to a water supply and the supply shutoff valve turned on ? In the U.S.A., visit our webpage www.whirlpool.com/accessories or call 1-800-807-6777. In Canada, visit our webpage www.whirlpoolparts.ca or call 1-800-901-2042. Make sure wire shutoff arm...
Use & Care Guide
Page 18
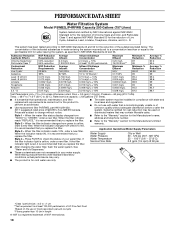
... is essential that you replace the filter. ■ Refer to the "Warranty" section for water leaving the system, as advertised. ■ Use replacement filter P4RFWB, part #W10291030. 2011 suggested retail price of $49.99 U.S.A./$59.99 Canada. Style 3 - Application Guidelines/Water Supply Parameters Water Supply Water Pressure Water Temperature Service Flow...
... is essential that you replace the filter. ■ Refer to the "Warranty" section for water leaving the system, as advertised. ■ Use replacement filter P4RFWB, part #W10291030. 2011 suggested retail price of $49.99 U.S.A./$59.99 Canada. Style 3 - Application Guidelines/Water Supply Parameters Water Supply Water Pressure Water Temperature Service Flow...

Use & Care Guide
Page 19
... and/or installation instructions. 2. This warranty gives you specific legal rights, and you . WHIRLPOOL SHALL NOT BE LIABLE FOR INCIDENTAL OR CONSEQUENTIAL DAMAGES. Replacement parts or repair labor if this limitation may not apply to you also may not apply to ...rights that is operated and maintained according to instructions attached to or furnished with the product, Whirlpool Corporation or Whirlpool Canada LP (hereafter "Whirlpool") will pay for Factory Specified Parts and repair labor to correct defects in materials or workmanship that existed when this limited warranty...
... and/or installation instructions. 2. This warranty gives you specific legal rights, and you . WHIRLPOOL SHALL NOT BE LIABLE FOR INCIDENTAL OR CONSEQUENTIAL DAMAGES. Replacement parts or repair labor if this limitation may not apply to you also may not apply to ...rights that is operated and maintained according to instructions attached to or furnished with the product, Whirlpool Corporation or Whirlpool Canada LP (hereafter "Whirlpool") will pay for Factory Specified Parts and repair labor to correct defects in materials or workmanship that existed when this limited warranty...


