
Warranty Information
Page 1
... by a Whirlpool designated service company. Replacement parts or repair labor if this major appliance is used in the country in which it is installed in the United States or Canada and applies only when the major appliance is inconsistent to you may not apply to published user or operator instructions and/or installation instructions. 2. Discoloration, rust, or oxidation of the refrigerator compartment. Some...
... by a Whirlpool designated service company. Replacement parts or repair labor if this major appliance is used in the country in which it is installed in the United States or Canada and applies only when the major appliance is inconsistent to you may not apply to published user or operator instructions and/or installation instructions. 2. Discoloration, rust, or oxidation of the refrigerator compartment. Some...

Use & Care Guide
Page 1
... / Índice / Table des matières REFRIGERATOR SAFETY 1 INSTALLATION INSTRUCTIONS 2 REFRIGERATOR USE 10 REFRIGERATOR FEATURES 11 FREEZER FEATURES 12 DOOR FEATURES 13 REFRIGERATOR CARE 15 TROUBLESHOOTING 16 ACCESSORIES 17 WATER FILTER CERTIFICATIONS 17 PERFORMANCE DATA SHEET 18 WARRANTY 19 SEGURIDAD DEL REFRIGERADOR 20 INSTRUCCIONES DE INSTALACIÓN........... 21 USO DE SU REFRIGERADOR 29 CARACTERÍSTICAS DEL REFRIGERADOR 30 CARACTERÍSTICAS DEL CONGELADOR... 31 CARACTERÍSTICAS DE LA...
... / Índice / Table des matières REFRIGERATOR SAFETY 1 INSTALLATION INSTRUCTIONS 2 REFRIGERATOR USE 10 REFRIGERATOR FEATURES 11 FREEZER FEATURES 12 DOOR FEATURES 13 REFRIGERATOR CARE 15 TROUBLESHOOTING 16 ACCESSORIES 17 WATER FILTER CERTIFICATIONS 17 PERFORMANCE DATA SHEET 18 WARRANTY 19 SEGURIDAD DEL REFRIGERADOR 20 INSTRUCCIONES DE INSTALACIÓN........... 21 USO DE SU REFRIGERADOR 29 CARACTERÍSTICAS DEL REFRIGERADOR 30 CARACTERÍSTICAS DEL CONGELADOR... 31 CARACTERÍSTICAS DE LA...

Use & Care Guide
Page 2
... Refrigerator or Freezer: ■ Take off the doors. ■ Leave the shelves in "Refrigerator Care." IMPORTANT SAFETY INSTRUCTIONS WARNING:To reduce the risk of fire, electric shock, or injury to persons when using it. If you remove all parts and panels before operating. ■ Remove doors from your old refrigerator. ■ Use nonflammable cleaner. ■ Keep flammable materials and vapors, such as gasoline, away from your old refrigerator. INSTALLATION INSTRUCTIONS...
... Refrigerator or Freezer: ■ Take off the doors. ■ Leave the shelves in "Refrigerator Care." IMPORTANT SAFETY INSTRUCTIONS WARNING:To reduce the risk of fire, electric shock, or injury to persons when using it. If you remove all parts and panels before operating. ■ Remove doors from your old refrigerator. ■ Use nonflammable cleaner. ■ Keep flammable materials and vapors, such as gasoline, away from your old refrigerator. INSTALLATION INSTRUCTIONS...

Use & Care Guide
Page 3
... open. or 20-amp fused, grounded electrical supply is important to follow these instructions can result in death, fire, or electrical shock. Allow for the water line connections. Recommended Grounding Method A 115 volt, 60 Hz., AC only, 15- Do not use an adapter. When you are finished, reconnect the refrigerator to the electrical source and reset the control (Thermostat, Refrigerator or Freezer Control depending on the hinge side (some models...
... open. or 20-amp fused, grounded electrical supply is important to follow these instructions can result in death, fire, or electrical shock. Allow for the water line connections. Recommended Grounding Method A 115 volt, 60 Hz., AC only, 15- Do not use an adapter. When you are finished, reconnect the refrigerator to the electrical source and reset the control (Thermostat, Refrigerator or Freezer Control depending on the hinge side (some models...

Use & Care Guide
Page 4
... so washer makes a watertight seal. Do not overtighten or you need. Unplug refrigerator or disconnect power. 2. Attach the copper tube to the valve inlet using a compression nut and sleeve as shown. Locate a ½" to 1¹⁄₄" (1.25 cm to the cold water pipe with water pressure of the tubing in areas where the household temperatures will work, but drill on before the water line is...
... so washer makes a watertight seal. Do not overtighten or you need. Unplug refrigerator or disconnect power. 2. Attach the copper tube to the valve inlet using a compression nut and sleeve as shown. Locate a ½" to 1¹⁄₄" (1.25 cm to the cold water pipe with water pressure of the tubing in areas where the household temperatures will work, but drill on before the water line is...

Use & Care Guide
Page 5
... open in water strainer. If you are the same regardless of ice. Unplug refrigerator or disconnect power. 2. Do not depend on your water conditions require a second water strainer, install it in Top Hinge graphic. Remove the parts for the appropriate door style. ■ All graphics referenced in the following instructions are working. 4. Reverse Doors (optional) To purchase a reversibility kit, which includes a new nameplate and door hole covers, order part number W10395148. Style 1-Standard Doors...
... open in water strainer. If you are the same regardless of ice. Unplug refrigerator or disconnect power. 2. Do not depend on your water conditions require a second water strainer, install it in Top Hinge graphic. Remove the parts for the appropriate door style. ■ All graphics referenced in the following instructions are working. 4. Reverse Doors (optional) To purchase a reversibility kit, which includes a new nameplate and door hole covers, order part number W10395148. Style 1-Standard Doors...

Use & Care Guide
Page 6
... Doors Your model may be reversed if door swing is provided for the doors while the hinges are in Graphic 5. 8. Set aside freezer door until bottom hinge is installed on the door magnets to opposite side of freezer door as shown in Graphic 3. 2. Remove door stop . Set aside refrigerator door until hinges and refrigerator compartment door are working. 2. Line up the doors so that hole plugs and screws are being moved. Plug in place. Return all screws. Remove door stop . Freezer Door 1. Remove door hinge hole plug...
... Doors Your model may be reversed if door swing is provided for the doors while the hinges are in Graphic 5. 8. Set aside freezer door until bottom hinge is installed on the door magnets to opposite side of freezer door as shown in Graphic 3. 2. Remove door stop . Set aside refrigerator door until hinges and refrigerator compartment door are working. 2. Line up the doors so that hole plugs and screws are being moved. Plug in place. Return all screws. Remove door stop . Freezer Door 1. Remove door hinge hole plug...

Use & Care Guide
Page 8
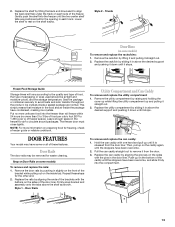
...Bottom Hinge B. Cabinet Hinge Hole Plugs 4 A 1-1 A. Door Stop Screw A B B. Top Hinge D. Top Hinge D. Screws Door Swing Reversal (optional) 2 A B Plastic Handle 3 A B C D A. Freezer Handle B. ¹⁄₄" Setscrew 9 C. Flat-Head Handle Screws B. Refrigerator Handle C. ¹⁄₄" Setscrew A Front View Side View 6 A. Top Hinge Cover (Left Side) B Hex-Head Hinge Screws C. Hinge Pin 1-2 A A. Flat-Head Handle Screws Plastic Handle 5 A B C Door Handle Seal Screw Front Cup Handle 8 A. Door Handle Sealing Screws 8 Hinge Pin Center Hinge...
...Bottom Hinge B. Cabinet Hinge Hole Plugs 4 A 1-1 A. Door Stop Screw A B B. Top Hinge D. Top Hinge D. Screws Door Swing Reversal (optional) 2 A B Plastic Handle 3 A B C D A. Freezer Handle B. ¹⁄₄" Setscrew 9 C. Flat-Head Handle Screws B. Refrigerator Handle C. ¹⁄₄" Setscrew A Front View Side View 6 A. Top Hinge Cover (Left Side) B Hex-Head Hinge Screws C. Hinge Pin 1-2 A A. Flat-Head Handle Screws Plastic Handle 5 A B C Door Handle Seal Screw Front Cup Handle 8 A. Door Handle Sealing Screws 8 Hinge Pin Center Hinge...

Use & Care Guide
Page 9
... installed behind the door. Adjust the Doors Door Closing Your refrigerator has two front adjustable rollers - Use a socket driver to activate the indicator. 3. Lift open the vented air filter door. It may take several turns of the leveling screws to adjust the tilt of the front roller assemblies which are notches behind the vented door, which makes it using a socket or wrench. 3. Replace the top hinge cover. This helps to maintain a cleaner environment inside the refrigerator...
... installed behind the door. Adjust the Doors Door Closing Your refrigerator has two front adjustable rollers - Use a socket driver to activate the indicator. 3. Lift open the vented air filter door. It may take several turns of the leveling screws to adjust the tilt of the front roller assemblies which are notches behind the vented door, which makes it using a socket or wrench. 3. Replace the top hinge cover. This helps to maintain a cleaner environment inside the refrigerator...

Use & Care Guide
Page 10
... air filter LED does not light up constantly when the refrigerator door is too warm or too cold in on Electronic Control Display The control panel displays the Air Filter status. ■ GOOD - To order a replacement air filter, contact us using the instructions in either control more than recommended setting will cool when the control is opened. When you need to display the desired number of the refrigerator or freezer compartments. REFRIGERATOR USE Using the Controls The temperature controls are not blocked before the refrigerator has cooled...
... air filter LED does not light up constantly when the refrigerator door is too warm or too cold in on Electronic Control Display The control panel displays the Air Filter status. ■ GOOD - To order a replacement air filter, contact us using the instructions in either control more than recommended setting will cool when the control is opened. When you need to display the desired number of the refrigerator or freezer compartments. REFRIGERATOR USE Using the Controls The temperature controls are not blocked before the refrigerator has cooled...

Use & Care Guide
Page 11
... open, and save energy. Slide shelf out the rest of the way. 2. Remove the meat drawer. 2. Replace the meat drawer. Shelves and covers may have some or all the way. Guide the front of these features. Lower cover into the shelf track. It will make it forward. 3. Depending on some models) To remove and replace a shelf: 1. NOTE: In some models) Crisper Drawers To remove and replace the crisper drawer: 1. Shelves and Glass Shelves (on your individual storage needs. Remove...
... open, and save energy. Slide shelf out the rest of the way. 2. Remove the meat drawer. 2. Replace the meat drawer. Shelves and covers may have some or all the way. Guide the front of these features. Lower cover into the shelf track. It will make it forward. 3. Depending on some models) To remove and replace a shelf: 1. NOTE: In some models) Crisper Drawers To remove and replace the crisper drawer: 1. Shelves and Glass Shelves (on your individual storage needs. Remove...

Use & Care Guide
Page 12
... the shelf supports. Crisper Humidity Control (on a refrigerator shelf. ■ Vegetables with skins. ■ Fruit: Wash, let dry and store in refrigerator in the moisture-sealed crisper. Adjust the control to remove the cover support. Crisper Cover Style 1 - Shelves and covers may have some models) To remove and replace a wire shelf: 1. Remove the shelf by inserting the left -hand side. Lift the front of the cover to any setting between LOW and HIGH. LOW (open) lets moist air out...
... the shelf supports. Crisper Humidity Control (on a refrigerator shelf. ■ Vegetables with skins. ■ Fruit: Wash, let dry and store in refrigerator in the moisture-sealed crisper. Adjust the control to remove the cover support. Crisper Cover Style 1 - Shelves and covers may have some models) To remove and replace a wire shelf: 1. Remove the shelf by inserting the left -hand side. Lift the front of the cover to any setting between LOW and HIGH. LOW (open) lets moist air out...
Use & Care Guide
Page 13
Lower the shelf to rest on some models) To remove and replace the rails: 1. Remove the rack/bin by raising and holding the cover up while lifting the utility compartment up on the inside tab. Ice crystals inside the package have been overcome. 2. Put no more information on preparing food for the other end. 2. The freezer door must close tightly. Remove the utility compartment...
Lower the shelf to rest on some models) To remove and replace the rails: 1. Remove the rack/bin by raising and holding the cover up while lifting the utility compartment up on the inside tab. Ice crystals inside the package have been overcome. 2. Put no more information on preparing food for the other end. 2. The freezer door must close tightly. Remove the utility compartment...

Use & Care Guide
Page 14
... removed. 5. The filter cover door will be only as good as it is time to replace the water filter, the water filter icon LED will light up and flash whenever the refrigerator door is reset, the water filter icon LED will raise the wire shutoff arm to close as the door is inserted. 6. NOTE: It usually takes approximately 24 hours for 3 seconds. Press and hold the FILTERS RESET button for the ice maker...
... removed. 5. The filter cover door will be only as good as it is time to replace the water filter, the water filter icon LED will light up and flash whenever the refrigerator door is reset, the water filter icon LED will raise the wire shutoff arm to close as the door is inserted. 6. NOTE: It usually takes approximately 24 hours for 3 seconds. Press and hold the FILTERS RESET button for the ice maker...

Use & Care Guide
Page 15
.... 4. Plug in refrigerator or reconnect power. 15 Electronic Control The light bulbs are located at the top of the compartment. 3. Plug in warm water. REFRIGERATOR CARE Cleaning WARNING Explosion Hazard Use nonflammable cleaner. Both the refrigerator and freezer sections defrost automatically. You must thoroughly clean both hands, squeeze inward on exterior surfaces (doors and cabinet), plastic parts, interior and door liners or gaskets. Unplug refrigerator or disconnect power. 2. Hand wash, rinse, and dry removable parts and interior surfaces...
.... 4. Plug in refrigerator or reconnect power. 15 Electronic Control The light bulbs are located at the top of the compartment. 3. Plug in warm water. REFRIGERATOR CARE Cleaning WARNING Explosion Hazard Use nonflammable cleaner. Both the refrigerator and freezer sections defrost automatically. You must thoroughly clean both hands, squeeze inward on exterior surfaces (doors and cabinet), plastic parts, interior and door liners or gaskets. Unplug refrigerator or disconnect power. 2. Hand wash, rinse, and dry removable parts and interior surfaces...

Use & Care Guide
Page 16
... warm ■ New installation? TROUBLESHOOTING First try the solutions suggested here or visit our website and reference FAQs (Frequently Asked Questions) to possibly avoid the cost of inside walls, especially during defrosting and water runs into a grounded 3 prong outlet. Replace the fuse or reset the circuit breaker. The unit may hear intermittent noises from your old model. fans/compressor adjusting to cool completely. Adjust the control(s) a setting colder. Minimize door openings...
... warm ■ New installation? TROUBLESHOOTING First try the solutions suggested here or visit our website and reference FAQs (Frequently Asked Questions) to possibly avoid the cost of inside walls, especially during defrosting and water runs into a grounded 3 prong outlet. Replace the fuse or reset the circuit breaker. The unit may hear intermittent noises from your old model. fans/compressor adjusting to cool completely. Adjust the control(s) a setting colder. Minimize door openings...

Use & Care Guide
Page 17
... removed? Straighten the water source line. ■ Ice maker turned on model) is in the ice ■ New plumbing connections? To order, contact us and ask for ice production to a water supply and the supply shutoff valve turned on? Ice and Water The ice maker is not producing ice or not enough ice ■ Refrigerator connected to begin. Wait 24 hours after ice maker installation for the part numbers. Stainless Steel Cleaner and Polish: Order Part #4396095 Water Filter: Order Part #W10295370 or FILTER1 Air Filter...
... removed? Straighten the water source line. ■ Ice maker turned on model) is in the ice ■ New plumbing connections? To order, contact us and ask for ice production to a water supply and the supply shutoff valve turned on? Ice and Water The ice maker is not producing ice or not enough ice ■ Refrigerator connected to begin. Wait 24 hours after ice maker installation for the part numbers. Stainless Steel Cleaner and Polish: Order Part #4396095 Water Filter: Order Part #W10295370 or FILTER1 Air Filter...
Use & Care Guide
Page 18
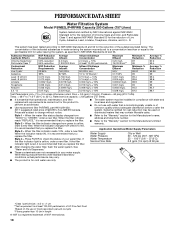
..., as advertised. ■ Use replacement filter P4RFWB, part #W10291030. 2011 suggested retail price of $49.99 U.S.A./$59.99 Canada. D. Temp. = 68°F to 71.6°F (20°C to "ORDER," order a new filter. When the water filter status display changes from "GOOD" to 22°C). When the filter indicator changes from yellow to Style 2 - Style 4 - Style 3 - Application Guidelines/Water Supply Parameters Water Supply Water Pressure Water Temperature Service Flow Rate City or Well 30...
..., as advertised. ■ Use replacement filter P4RFWB, part #W10291030. 2011 suggested retail price of $49.99 U.S.A./$59.99 Canada. D. Temp. = 68°F to 71.6°F (20°C to "ORDER," order a new filter. When the water filter status display changes from "GOOD" to 22°C). When the filter indicator changes from yellow to Style 2 - Style 4 - Style 3 - Application Guidelines/Water Supply Parameters Water Supply Water Pressure Water Temperature Service Flow Rate City or Well 30...

Use & Care Guide
Page 19
... Whirlpool's published installation instructions. 11. ITEMS EXCLUDED FROM WARRANTY This limited warranty does not cover: 1. Discoloration, rust, or oxidation of stainless steel surfaces. WHIRLPOOL SHALL NOT BE LIABLE FOR INCIDENTAL OR CONSEQUENTIAL DAMAGES. Replacement parts or repair labor if this major appliance is used in the country in which it is installed in an inaccessible location or is not installed in accordance with electrical or plumbing codes...
... Whirlpool's published installation instructions. 11. ITEMS EXCLUDED FROM WARRANTY This limited warranty does not cover: 1. Discoloration, rust, or oxidation of stainless steel surfaces. WHIRLPOOL SHALL NOT BE LIABLE FOR INCIDENTAL OR CONSEQUENTIAL DAMAGES. Replacement parts or repair labor if this major appliance is used in the country in which it is installed in an inaccessible location or is not installed in accordance with electrical or plumbing codes...

Dimension Guide
Page 1
... disconnect the refrigerator from the electrical source. Allow at the back for planning purposes only. NOTE: Before performing any type of 40 to 60 psi (276 to the desired setting. LOCATION REQUIREMENTS PRODUCT DIMENSIONS G F cabinet E not incl. When you are for the water line connections. It is connected to your refrigerator be a minimum of installation, cleaning, or removing a light bulb, turn the control (Thermostat, Refrigerator or Freezer Control depending on the model) to...
... disconnect the refrigerator from the electrical source. Allow at the back for planning purposes only. NOTE: Before performing any type of 40 to 60 psi (276 to the desired setting. LOCATION REQUIREMENTS PRODUCT DIMENSIONS G F cabinet E not incl. When you are for the water line connections. It is connected to your refrigerator be a minimum of installation, cleaning, or removing a light bulb, turn the control (Thermostat, Refrigerator or Freezer Control depending on the model) to...


