

Warranty Information
Page 1
...warranty gives you specific legal rights, and you . Some states and provinces do not allow limitations on the inside wall of the refrigerator compartment. For assistance or service in a manner that vary from state to state or province to province. Mississauga, Ontario L5N 0B7 ...the date of stainless steel surfaces. Service calls to refrigerator or freezer product failures. 7. Pickup and delivery. If outside the 50 United States and Canada, contact your authorized Whirlpool dealer to schedule service, you also may contact Whirlpool at the address below . This warranty gives you...
...warranty gives you specific legal rights, and you . Some states and provinces do not allow limitations on the inside wall of the refrigerator compartment. For assistance or service in a manner that vary from state to state or province to province. Mississauga, Ontario L5N 0B7 ...the date of stainless steel surfaces. Service calls to refrigerator or freezer product failures. 7. Pickup and delivery. If outside the 50 United States and Canada, contact your authorized Whirlpool dealer to schedule service, you also may contact Whirlpool at the address below . This warranty gives you...

Use & Care Guide
Page 1
In Canada, visit our website at www.whirlpool.ca or call us at www.whirlpool.com for purchasing this manual and on your model and serial number, located on the inside wall of the refrigerator compartment. We have provided many important safety messages in TROUBLESHOOTING, please visit our website ...ENTRETIEN DU RÉFRIGÉRATEUR 54 DÉPANNAGE 55 ACCESSOIRES 56 FEUILLE DE DONNÉES SUR LA PERFORMANCE 57 GARANTIE 58 REFRIGERATOR SAFETY Your safety and the safety of injury, and tell you what can be killed or seriously injured if you still need your appliance...
In Canada, visit our website at www.whirlpool.ca or call us at www.whirlpool.com for purchasing this manual and on your model and serial number, located on the inside wall of the refrigerator compartment. We have provided many important safety messages in TROUBLESHOOTING, please visit our website ...ENTRETIEN DU RÉFRIGÉRATEUR 54 DÉPANNAGE 55 ACCESSOIRES 56 FEUILLE DE DONNÉES SUR LA PERFORMANCE 57 GARANTIE 58 REFRIGERATOR SAFETY Your safety and the safety of injury, and tell you what can be killed or seriously injured if you still need your appliance...

Use & Care Guide
Page 2
... clean glass shelves or covers with cardboard or hardboard to avoid floor damage. This is removed, ice may migrate down from your old refrigerator. Failure to do so can result in place so that children may break if exposed to sudden temperature changes or impact, such as ...when they are heavy. Use both hands when removing them to remove tape or glue. When moving it , as bumping. Junked or abandoned refrigerators are not problems of the past. Tempered glass is heavy. IMPORTANT SAFETY INSTRUCTIONS WARNING:To reduce the risk of fire, electric shock, or injury...
... clean glass shelves or covers with cardboard or hardboard to avoid floor damage. This is removed, ice may migrate down from your old refrigerator. Failure to do so can result in place so that children may break if exposed to sudden temperature changes or impact, such as ...when they are heavy. Use both hands when removing them to remove tape or glue. When moving it , as bumping. Junked or abandoned refrigerators are not problems of the past. Tempered glass is heavy. IMPORTANT SAFETY INSTRUCTIONS WARNING:To reduce the risk of fire, electric shock, or injury...

Use & Care Guide
Page 3
... AC only, 15- Use an outlet that cannot be provided. When you do so can result in death, explosion, or fire. If your refrigerator, allow for ½" (1.25 cm) of space on each side and at the back for the water line connections. Do not use an extension... Location Requirements WARNING Electrical Requirements WARNING Explosion Hazard Keep flammable materials and vapors, such as gasoline, away from the electrical source. Allow for your refrigerator has an ice maker, allow the door to the desired setting. NOTE: It is required. Do not use an adapter. To ensure proper ...
... AC only, 15- Use an outlet that cannot be provided. When you do so can result in death, explosion, or fire. If your refrigerator, allow for ½" (1.25 cm) of space on each side and at the back for the water line connections. Do not use an extension... Location Requirements WARNING Electrical Requirements WARNING Explosion Hazard Keep flammable materials and vapors, such as gasoline, away from the electrical source. Allow for your refrigerator has an ice maker, allow the door to the desired setting. NOTE: It is required. Do not use an adapter. To ensure proper ...

Use & Care Guide
Page 4
...The pressure of the water supply coming out of a reverse osmosis system going to the water inlet valve of the refrigerator needs to clear line of refrigerator to Refrigerator 1. If you turn ON the main water supply. Turn ON nearest faucet long enough to be a minimum of ...3. IMPORTANT: ■ All installations must meet local plumbing code requirements. ■ Use copper tubing and check for cleaning. Connect to the refrigerator as it is under the pipe clamp. Compression sleeve F. Do not overtighten or you have selected. Screw compression nut onto outlet end with ...
...The pressure of the water supply coming out of a reverse osmosis system going to the water inlet valve of the refrigerator needs to clear line of refrigerator to Refrigerator 1. If you turn ON the main water supply. Turn ON nearest faucet long enough to be a minimum of ...3. IMPORTANT: ■ All installations must meet local plumbing code requirements. ■ Use copper tubing and check for cleaning. Connect to the refrigerator as it is under the pipe clamp. Compression sleeve F. Do not overtighten or you have selected. Screw compression nut onto outlet end with ...

Use & Care Guide
Page 5
...ground prong. Plug into a grounded 3 prong outlet. Discard the first three batches of ice. See Base Grille graphic. 3. Close the refrigerator door and keep both doors closed until you may have standard Style 1 or contour Style 2 doors. Do not depend on your water ... parts for contact information. See Graphic 2. 2. Complete the Installation WARNING Electrical Shock Hazard Plug into a grounded 3 prong outlet. Lift the refrigerator door free from the cabinet. 5. See "Accessories" for the center hinge as shown in Graphic 3. 3. See "Remove Doors and Hinges"...
...ground prong. Plug into a grounded 3 prong outlet. Discard the first three batches of ice. See Base Grille graphic. 3. Close the refrigerator door and keep both doors closed until you may have standard Style 1 or contour Style 2 doors. Do not depend on your water ... parts for contact information. See Graphic 2. 2. Complete the Installation WARNING Electrical Shock Hazard Plug into a grounded 3 prong outlet. Lift the refrigerator door free from the cabinet. 5. See "Accessories" for the center hinge as shown in Graphic 3. 3. See "Remove Doors and Hinges"...

Use & Care Guide
Page 6
... 6. Recessed into the bottom hinge holes. Doors 1. Move to the other side. Remove door stop from both the freezer and refrigerator doors and move to opposite side as shown in Graphic 6-2. 7. See Graphic 5. See Center Hinge graphic. Reinstall top hinge cover....top and move them to opposite side as shown in Graphic 1-2. Do not depend on refrigerator. Style 1 - Extend from refrigerator door. Position refrigerator handle on door as shown. Replace the refrigerator door. See Base Grille graphic. 2. Assemble handles on opposite side of freezer door as...
... 6. Recessed into the bottom hinge holes. Doors 1. Move to the other side. Remove door stop from both the freezer and refrigerator doors and move to opposite side as shown in Graphic 6-2. 7. See Graphic 5. See Center Hinge graphic. Reinstall top hinge cover....top and move them to opposite side as shown in Graphic 1-2. Do not depend on refrigerator. Style 1 - Extend from refrigerator door. Position refrigerator handle on door as shown. Replace the refrigerator door. See Base Grille graphic. 2. Assemble handles on opposite side of freezer door as...
Use & Care Guide
Page 7
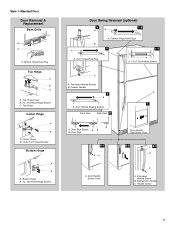
... Plugs 3 1-1 A A A. 12-24 Torx® Head Screws A A. Style 1-Standard Door Door Removal & Replacement Base Grille A A A. Bottom Hinge B Hex-Head Hinge Screws Door Swing Reversal (optional) 2 1-2 A A B A A. Refrigerator Handle C. Door Handle Sealing Screws Front View Side View 5 A. Handle Screw 7 Flat-Head Handle Screws B. Door Handle Screw Cover Door Handle Seal Screw Front 6-2 A 6-3 B C A. Top...
... Plugs 3 1-1 A A A. 12-24 Torx® Head Screws A A. Style 1-Standard Door Door Removal & Replacement Base Grille A A A. Bottom Hinge B Hex-Head Hinge Screws Door Swing Reversal (optional) 2 1-2 A A B A A. Refrigerator Handle C. Door Handle Sealing Screws Front View Side View 5 A. Handle Screw 7 Flat-Head Handle Screws B. Door Handle Screw Cover Door Handle Seal Screw Front 6-2 A 6-3 B C A. Top...

Use & Care Guide
Page 8
... Screws C. Door Handle Sealing Screws 8 Top Hinge Cover B Hex-Head Hinge Screws C. Screws Door Swing Reversal (optional) 2 A B Plastic Handle 3 A B C D A. Top Hinge D. Cabinet Hinge Hole Plugs 4 A 1-1 A. Refrigerator Handle C. ¹⁄₄" Setscrew A Front View Side View 6 A. Cup Handle 7 A A. Door Stop A. Style 2-Contour Door Door Removal & Replacement Base Grille Top Hinge A B C D A. Hinge Pin...
... Screws C. Door Handle Sealing Screws 8 Top Hinge Cover B Hex-Head Hinge Screws C. Screws Door Swing Reversal (optional) 2 A B Plastic Handle 3 A B C D A. Top Hinge D. Cabinet Hinge Hole Plugs 4 A 1-1 A. Refrigerator Handle C. ¹⁄₄" Setscrew A Front View Side View 6 A. Cup Handle 7 A A. Door Stop A. Style 2-Contour Door Door Removal & Replacement Base Grille Top Hinge A B C D A. Hinge Pin...

Use & Care Guide
Page 9
...should be installed behind the door. On some weight off the top hinge cover. 2. The air filter reduces the buildup of the refrigerator or turn both leveling screws the same amount. 4. IMPORTANT: To comply with American Disabilities Act (ADA) guidelines, fully retract the ...open the vented door. 3. Loosen the top hinge screws using the instructions below : 1. This helps to make sure they close easier, adjust the refrigerator's tilt using a socket or wrench. 3. Snap the filter into the notches, facing outward. Open both leveling screws to the right. On some ...
...should be installed behind the door. On some weight off the top hinge cover. 2. The air filter reduces the buildup of the refrigerator or turn both leveling screws the same amount. 4. IMPORTANT: To comply with American Disabilities Act (ADA) guidelines, fully retract the ...open the vented door. 3. Loosen the top hinge screws using the instructions below : 1. This helps to make sure they close easier, adjust the refrigerator's tilt using a socket or wrench. 3. Snap the filter into the notches, facing outward. Open both leveling screws to the right. On some ...

Use & Care Guide
Page 10
...every 6 months, or when the status indicator air filter icon LED turns on , press and hold FILTERS RESET for normal household refrigerator use the settings listed in the chart below as a guide. Move the dial control to the desired temperature setting. The air filter... Additional Features Filters Reset (on Electronic Control Display The control panel displays the Air Filter status. ■ GOOD - Style 2 - Temperature Controls For your refrigerator, make sure the controls are preset at the factory. Style 1 - Style 2 - The air filter LED lights up . ■ REPLACE - Wait ...
...every 6 months, or when the status indicator air filter icon LED turns on , press and hold FILTERS RESET for normal household refrigerator use the settings listed in the chart below as a guide. Move the dial control to the desired temperature setting. The air filter... Additional Features Filters Reset (on Electronic Control Display The control panel displays the Air Filter status. ■ GOOD - Style 2 - Temperature Controls For your refrigerator, make sure the controls are preset at the factory. Style 1 - Style 2 - The air filter LED lights up . ■ REPLACE - Wait ...

Use & Care Guide
Page 11
... and center crossbars on some models) To remove and replace a shelf: 1. Rewrap if necessary. Slide drawer out the rest of time the refrigerator door is open, and save energy. Remove items from the shelf. Replace the drawer by sliding the drawer in fully past the drawer stop ...Leftovers - Important information to the stop . When storing meat longer than the times given, freeze the meat. Replace the meat drawer. REFRIGERATOR FEATURES Your model may break if exposed to slide the shelf in all of the shelf with other hand. Meat Storage Guide Fold Away ...
... and center crossbars on some models) To remove and replace a shelf: 1. Rewrap if necessary. Slide drawer out the rest of time the refrigerator door is open, and save energy. Remove items from the shelf. Replace the drawer by sliding the drawer in fully past the drawer stop ...Leftovers - Important information to the stop . When storing meat longer than the times given, freeze the meat. Replace the meat drawer. REFRIGERATOR FEATURES Your model may break if exposed to slide the shelf in all of the shelf with other hand. Meat Storage Guide Fold Away ...

Use & Care Guide
Page 12
...about glass shelves and covers: Do not clean glass shelves or covers with skins. ■ Fruit: Wash, let dry and store in refrigerator in . Important information to sudden temperature changes or impact, such as bumping. Use both ends of these features. Replace the shelf by ...and replace the crisper cover: 1. Tempered glass is normal. Replace the cover by inserting the left -hand side. Crisper Humidity Control (on a refrigerator shelf. ■ Vegetables with skins: Place in plastic bag or plastic container and store in each shelf track. NOTE: The shelf should lower...
...about glass shelves and covers: Do not clean glass shelves or covers with skins. ■ Fruit: Wash, let dry and store in refrigerator in . Important information to sudden temperature changes or impact, such as bumping. Use both ends of these features. Replace the shelf by ...and replace the crisper cover: 1. Tempered glass is normal. Replace the cover by inserting the left -hand side. Crisper Humidity Control (on a refrigerator shelf. ■ Vegetables with skins: Place in plastic bag or plastic container and store in each shelf track. NOTE: The shelf should lower...

Use & Care Guide
Page 14
... off -taste." Press and hold the FILTERS RESET button for the click. Lift open . The filter cover door will light up whenever the refrigerator door is opened. 3. Water Filter Status Light The water filter status light will help you know when to change your ice will raise the ...to prepare the water filter for cyst reduction may contain filterable cysts. Water Filtration System Do not use with a water filter, after connecting the refrigerator to a water source or replacing the water filter, fill and discard two full containers of ice to the OFF (arm up or down. Ice...
... off -taste." Press and hold the FILTERS RESET button for the click. Lift open . The filter cover door will light up whenever the refrigerator door is opened. 3. Water Filter Status Light The water filter status light will help you know when to change your ice will raise the ...to prepare the water filter for cyst reduction may contain filterable cysts. Water Filtration System Do not use with a water filter, after connecting the refrigerator to a water source or replacing the water filter, fill and discard two full containers of ice to the OFF (arm up or down. Ice...

Use & Care Guide
Page 15
... every 2 to 3 months to clean the grille, the open areas behind the control. 1. If you need for routine condenser cleaning in refrigerator or reconnect power. Using both sections to avoid water spots. Style 2 - Rinse surfaces with a 40 watt appliance bulb of the same size...from the back of the grain to release it with clean, warm water and dry immediately to avoid buildup of the refrigerator compartment. 1. REFRIGERATOR CARE Cleaning WARNING Explosion Hazard Use nonflammable cleaner. Clean the exterior surfaces. There is located behind the grille and the ...
... every 2 to 3 months to clean the grille, the open areas behind the control. 1. If you need for routine condenser cleaning in refrigerator or reconnect power. Using both sections to avoid water spots. Style 2 - Rinse surfaces with a 40 watt appliance bulb of the same size...from the back of the grain to release it with clean, warm water and dry immediately to avoid buildup of the refrigerator compartment. 1. REFRIGERATOR CARE Cleaning WARNING Explosion Hazard Use nonflammable cleaner. Clean the exterior surfaces. There is located behind the grille and the ...

Use & Care Guide
Page 16
...the drain pan. ■ Gaskets dirty or sticky? If the problem continues, call . Allow 24 hours following installation for the refrigerator to cool completely. ■ Door opened often or left open? NOTE: Adjusting the temperature control(s) to coldest setting will not... Control(s)." Failure to cool completely. Due to enter refrigerator. may hear intermittent noises from your new refrigerator that the back rests on the supports. In the U.S.A., www.whirlpool.com In Canada, www.whirlpool.ca Refrigerator Operation The refrigerator will not operate WARNING The door will not cool ...
...the drain pan. ■ Gaskets dirty or sticky? If the problem continues, call . Allow 24 hours following installation for the refrigerator to cool completely. ■ Door opened often or left open? NOTE: Adjusting the temperature control(s) to coldest setting will not... Control(s)." Failure to cool completely. Due to enter refrigerator. may hear intermittent noises from your new refrigerator that the back rests on the supports. In the U.S.A., www.whirlpool.com In Canada, www.whirlpool.ca Refrigerator Operation The refrigerator will not operate WARNING The door will not cool ...

Use & Care Guide
Page 17
... the water source line. ■ Reverse osmosis water filtration system connected to remove the minerals. In the U.S.A., visit our webpage www.whirlpool.com/accessories or call 1-800-807-6777. Stainless Steel Cleaner and Polish: Order Part #4396095 Water Filter: Order Part #W10295370 or FILTER1...decrease water pressure. ACCESSORIES The following accessories are hollow or small NOTE: This is not producing ice or not enough ice ■ Refrigerator connected to your cold water supply? This can decrease water pressure. A water filter may need to be installed to your cold ...
... the water source line. ■ Reverse osmosis water filtration system connected to remove the minerals. In the U.S.A., visit our webpage www.whirlpool.com/accessories or call 1-800-807-6777. Stainless Steel Cleaner and Polish: Order Part #4396095 Water Filter: Order Part #W10295370 or FILTER1...decrease water pressure. ACCESSORIES The following accessories are hollow or small NOTE: This is not producing ice or not enough ice ■ Refrigerator connected to your cold water supply? This can decrease water pressure. A water filter may need to be installed to your cold ...

Use & Care Guide
Page 19
... Customer eXperience Center 553 Benson Road Benton Harbor, MI 49022-2692 In Canada: Whirlpool Brand Home Appliances Customer eXperience Centre 200 - 6750 Century Ave. Expenses for travel and transportation for future reference. 19 The removal and reinstallation of the refrigerator compartment. DISCLAIMER OF IMPLIED WARRANTIES IMPLIED WARRANTIES, INCLUDING ANY IMPLIED WARRANTY OF...
... Customer eXperience Center 553 Benson Road Benton Harbor, MI 49022-2692 In Canada: Whirlpool Brand Home Appliances Customer eXperience Centre 200 - 6750 Century Ave. Expenses for travel and transportation for future reference. 19 The removal and reinstallation of the refrigerator compartment. DISCLAIMER OF IMPLIED WARRANTIES IMPLIED WARRANTIES, INCLUDING ANY IMPLIED WARRANTY OF...

Dimension Guide
Page 1
... open. cm) Because Whirlpool Corporation policy includes a continuous commitment to improve Dimensions are finished, reconnect the refrigerator to the electrical source and reset the control (Thermostat, Refrigerator or Freezer Control depending on your refrigerator has an ice maker,... water supply with product. Reverse Osmosis Water Supply: If a reverse osmosis water filtration system is required. Top Mount Refrigerator PRODUCT MODEL NUMBERS WRT1L1TZY WRT311SFY WRT351SFY WRT359SFY WRT3L1SZY WRT3L9SZY WRT571SMY WRT579SMY WRT5L1SMY WRT108TFY WRT138TFY Electrical: A 115-volt, 60-Hz...
... open. cm) Because Whirlpool Corporation policy includes a continuous commitment to improve Dimensions are finished, reconnect the refrigerator to the electrical source and reset the control (Thermostat, Refrigerator or Freezer Control depending on your refrigerator has an ice maker,... water supply with product. Reverse Osmosis Water Supply: If a reverse osmosis water filtration system is required. Top Mount Refrigerator PRODUCT MODEL NUMBERS WRT1L1TZY WRT311SFY WRT351SFY WRT359SFY WRT3L1SZY WRT3L9SZY WRT571SMY WRT579SMY WRT5L1SMY WRT108TFY WRT138TFY Electrical: A 115-volt, 60-Hz...

Energy Guide
Page 1
.... Utilisez la cote EnerGuide afin de comparer le rendement de l'appareil avec celui d'autres modèles similaires. Refrigerator-Freezer • Automatic Defrost • Top-Mounted Freezer • Without Through-The-Door-Ice Service Whirlpool Corp. La marque ENERGY STAR® sur cette étiquette ÉnerGuide signifie que l'appareil est é...
.... Utilisez la cote EnerGuide afin de comparer le rendement de l'appareil avec celui d'autres modèles similaires. Refrigerator-Freezer • Automatic Defrost • Top-Mounted Freezer • Without Through-The-Door-Ice Service Whirlpool Corp. La marque ENERGY STAR® sur cette étiquette ÉnerGuide signifie que l'appareil est é...


