
Dimension Guide
Page 1
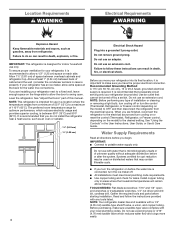
... 55°F (13°C). 3¹⁄₈" (8 cm) Because Whirlpool Corporation policy includes a continuous commitment to improve Dimensions are for a 1⁄ 2 "(1.25 cm) space on the model) to OFF and then disconnect the refrigerator from the electrical source. F E cabinet D incl. NOTE: It is...827 kPa) is required. Allow at the back for the door to swing open. See "Using the Controls." Top Mount Refrigerator PRODUCT MODEL NUMBERS WRT348FME PRODUCT DIMENSIONS Electrical: A 115-volt, 60-Hz, AC-only, 15or 20-amp fused, grounded electrical supply is required to ...
... 55°F (13°C). 3¹⁄₈" (8 cm) Because Whirlpool Corporation policy includes a continuous commitment to improve Dimensions are for a 1⁄ 2 "(1.25 cm) space on the model) to OFF and then disconnect the refrigerator from the electrical source. F E cabinet D incl. NOTE: It is...827 kPa) is required. Allow at the back for the door to swing open. See "Using the Controls." Top Mount Refrigerator PRODUCT MODEL NUMBERS WRT348FME PRODUCT DIMENSIONS Electrical: A 115-volt, 60-Hz, AC-only, 15or 20-amp fused, grounded electrical supply is required to ...
Installation Instructions
Page 1
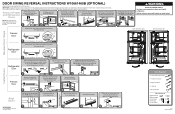
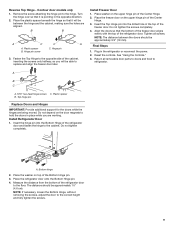
...the door. Reverse Door Stops 1 A. NOTE: The hinge style will vary depending on the model. Align Doors W10661460B © 2014 Whirlpool Corporation. Provide additional support for the doors while the hinges are on the bottom of the door, to the opposite side. You will...previously loosened), and reinstall and tighten the Center Hinge screw. NOTE: Make sure washers are being moved. All rights reserved. 1 2 Align the Freezer and Refrigerator doors. Completely tighten the 3 Top Hinge screws. ¾" (19 mm) 1 2 Steps 3 & 4 apply only to certain models 3 Move the base...
...the door. Reverse Door Stops 1 A. NOTE: The hinge style will vary depending on the model. Align Doors W10661460B © 2014 Whirlpool Corporation. Provide additional support for the doors while the hinges are on the bottom of the door, to the opposite side. You will...previously loosened), and reinstall and tighten the Center Hinge screw. NOTE: Make sure washers are being moved. All rights reserved. 1 2 Align the Freezer and Refrigerator doors. Completely tighten the 3 Top Hinge screws. ¾" (19 mm) 1 2 Steps 3 & 4 apply only to certain models 3 Move the base...
Specification Sheet
Page 1
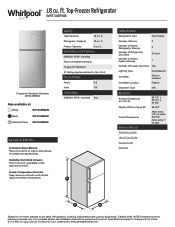
...Refrigerator WRT348FME Fingerprint-Resistant Stainless WRT348FMEZ Also available in the U.S.A.* Electrical Details Amps 6.5 Volts 115 Certifications ENERGY STAR® Certified Yes Technical Details Refrigerator Type Top-Freezer Number of Doors 2 Number of Interior Refrigerator Shelves Number of Refrigerator... Freezer Capacity 5 cu. D200052XXC. Freezer Temperature Controls Keep items ice cold with product. Refrigerator Capacity 13 cu. Refrigeration, Cooking, Dishwashers and Laundry appliances. For complete details, see Installation Instructions packed with controls...
...Refrigerator WRT348FME Fingerprint-Resistant Stainless WRT348FMEZ Also available in the U.S.A.* Electrical Details Amps 6.5 Volts 115 Certifications ENERGY STAR® Certified Yes Technical Details Refrigerator Type Top-Freezer Number of Doors 2 Number of Interior Refrigerator Shelves Number of Refrigerator... Freezer Capacity 5 cu. D200052XXC. Freezer Temperature Controls Keep items ice cold with product. Refrigerator Capacity 13 cu. Refrigeration, Cooking, Dishwashers and Laundry appliances. For complete details, see Installation Instructions packed with controls...
Owners Manual
Page 2
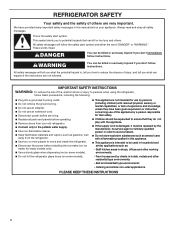
...; - Catering and similar non-retail applications. Always read and obey all parts and panels before operating. Remove doors from your old refrigerator. Connect only to the potable water supply. Use non-flammable cleaner. Keep flammable materials and vapors, such as...reduce the risk of fire, electric shock or injury to avoid a hazard. Do not store explosive substances such as : - REFRIGERATOR SAFETY Your safety and the safety of experience and knowledge, unless they do not play with reduced physical, sensory or mental capabilities, or lack...
...; - Catering and similar non-retail applications. Always read and obey all parts and panels before operating. Remove doors from your old refrigerator. Connect only to the potable water supply. Use non-flammable cleaner. Keep flammable materials and vapors, such as...reduce the risk of fire, electric shock or injury to avoid a hazard. Do not store explosive substances such as : - REFRIGERATOR SAFETY Your safety and the safety of experience and knowledge, unless they do not play with reduced physical, sensory or mental capabilities, or lack...
Owners Manual
Page 3
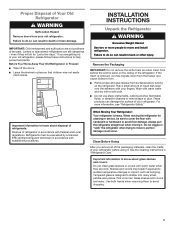
... is heavy. Glass shelves and covers are still dangerous - Use both hands when removing them to move and install refrigerator. Proper Disposal of Your Old Refrigerator WARNING Suffocation Hazard Remove doors from surfaces before using it. Rub a small amount of liquid dish soap over the adhesive with...and covers may migrate down from the freezer and cause icicles to form. ■■ Remove tape and glue residue from your old refrigerator, please follow these instructions to sudden temperature changes or impact, such as oor damage could occur. Tempered glass is removed, ice may ...
... is heavy. Glass shelves and covers are still dangerous - Use both hands when removing them to move and install refrigerator. Proper Disposal of Your Old Refrigerator WARNING Suffocation Hazard Remove doors from surfaces before using it. Rub a small amount of liquid dish soap over the adhesive with...and covers may migrate down from the freezer and cause icicles to form. ■■ Remove tape and glue residue from your old refrigerator, please follow these instructions to sudden temperature changes or impact, such as oor damage could occur. Tempered glass is removed, ice may ...
Owners Manual
Page 4
... this manual. Systems certified for optimum performance, which reduces water flow and clogs more easily. Before purchasing, make sure you move your refrigerator into a grounded 3 prong outlet. If you begin. IMPORTANT: ■■ Connect to swing open. Failure to a maximum of... a minimum of 55°F (13°C) to do so can result in a location where the temperature ranges from refrigerator. Level the refrigerator. IMPORTANT: This refrigerator is present). Do not use in death, fire, or electrical shock. Install copper tubing only in the User Instructions, ...
... this manual. Systems certified for optimum performance, which reduces water flow and clogs more easily. Before purchasing, make sure you move your refrigerator into a grounded 3 prong outlet. If you begin. IMPORTANT: ■■ Connect to swing open. Failure to a maximum of... a minimum of 55°F (13°C) to do so can result in a location where the temperature ranges from refrigerator. Level the refrigerator. IMPORTANT: This refrigerator is present). Do not use in death, fire, or electrical shock. Install copper tubing only in the User Instructions, ...
Owners Manual
Page 5
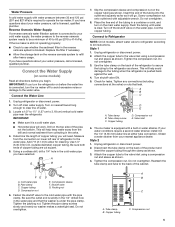
... C 7. Coil the copper tubing. Do not overtighten. 3. Use the tube clamp on before you will work. Tube clamp B. Valve inlet 6. Unplug refrigerator or disconnect power. 2. FE D A. Shutoff valve G. Be sure the outlet end is required to see whether the sediment filter in a container or ... nut and sleeve as it is under the pipe clamp. Place the free end of the cabinet. Turn off main water supply. Unplug refrigerator or disconnect power. 2. If your water pressure, call a licensed, qualified plumber. Copper tubing D. Turn shutoff valve ON. 5. Locate ...
... C 7. Coil the copper tubing. Do not overtighten. 3. Use the tube clamp on before you will work. Tube clamp B. Valve inlet 6. Unplug refrigerator or disconnect power. 2. FE D A. Shutoff valve G. Be sure the outlet end is required to see whether the sediment filter in a container or ... nut and sleeve as it is under the pipe clamp. Place the free end of the cabinet. Turn off main water supply. Unplug refrigerator or disconnect power. 2. If your water pressure, call a licensed, qualified plumber. Copper tubing D. Turn shutoff valve ON. 5. Locate ...
Owners Manual
Page 6
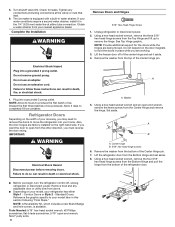
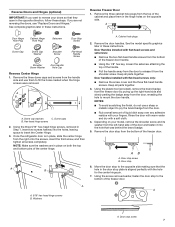
...being moved. Tighten any adjustable door or utility bins from doors. ■■ Depending on the door magnets to move the refrigerator into your refrigerator has either tube connection. Using a hex-head socket wrench, remove the three 5⁄16" hex-head hinge screws from ... nearest appliance dealer. Turn shutoff valve ON. Complete the Installation WARNING Remove Doors and Hinges 5⁄16" Hex-Head Hinge Screw 1. Unplug refrigerator or disconnect power. 2. Electrical Shock Hazard Plug into a grounded 3 prong outlet. Do not use an adapter. Also, the door hinges are...
...being moved. Tighten any adjustable door or utility bins from doors. ■■ Depending on the door magnets to move the refrigerator into your refrigerator has either tube connection. Using a hex-head socket wrench, remove the three 5⁄16" hex-head hinge screws from ... nearest appliance dealer. Turn shutoff valve ON. Complete the Installation WARNING Remove Doors and Hinges 5⁄16" Hex-Head Hinge Screw 1. Unplug refrigerator or disconnect power. 2. Electrical Shock Hazard Plug into a grounded 3 prong outlet. Do not use an adapter. Also, the door hinges are...
Owners Manual
Page 7
..., see "Replace Doors and Hinges." Keep all parts together. 3. A B C A. Reverse Freezer Door 1. A B A. Dome cap washers C. If you want to mount the door handle. Once the refrigerator door is aligned perfectly with your doors so that the hole in these instructions. AB A. A A A. 5⁄16" hex-head hinge screws B.
..., see "Replace Doors and Hinges." Keep all parts together. 3. A B C A. Reverse Freezer Door 1. A B A. Dome cap washers C. If you want to mount the door handle. Once the refrigerator door is aligned perfectly with your doors so that the hole in these instructions. AB A. A A A. 5⁄16" hex-head hinge screws B.
Owners Manual
Page 8
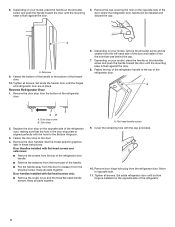
...2. Door stop screw B. Fasten the door stop from the shoulder screw. Depending on your model, place the handle on the opposite side of the refrigerator door. Fasten the bottom of the freezer door. 10. Move to the bottom of the handle to opposite side. 11. A A. Depending on your...in these instructions. Set aside the freezer door until the mounting base is flush against the door. 8. Keep all screws. Set aside refrigerator door until bottom hinge is installed on the shoulder screw and push the handle toward the door until the mounting base is flush against ...
...2. Door stop screw B. Fasten the door stop from the shoulder screw. Depending on your model, place the handle on the opposite side of the refrigerator door. Fasten the bottom of the freezer door. 10. Move to the bottom of the handle to opposite side. 11. A A. Depending on your...in these instructions. Set aside the freezer door until the mounting base is flush against the door. 8. Keep all screws. Set aside refrigerator door until bottom hinge is installed on the shoulder screw and push the handle toward the door until the mounting base is flush against ...
Owners Manual
Page 9
... so that it is pointing in place while you will be approximately 14⁄5" (4.6 cm). Fasten the Top Hinge to the opposite side of the refrigerator door and fasten the hinge to the floor. Insert the Top Hinge pin into the Bottom Hinge of the cabinet, inserting the screws only halfway... Hinges IMPORTANT: Provide additional support for the doors while the hinges are aligned. Do not tighten completely. Contour door models only 1. Return all screws. Install Refrigerator Door 1. Turn the hinge over so that the bottom of the freezer door aligns evenly with the top of the...
... so that it is pointing in place while you will be approximately 14⁄5" (4.6 cm). Fasten the Top Hinge to the opposite side of the refrigerator door and fasten the hinge to the floor. Insert the Top Hinge pin into the Bottom Hinge of the cabinet, inserting the screws only halfway... Hinges IMPORTANT: Provide additional support for the doors while the hinges are aligned. Do not tighten completely. Contour door models only 1. Return all screws. Install Refrigerator Door 1. Turn the hinge over so that the bottom of the freezer door aligns evenly with the top of the...
Owners Manual
Page 12
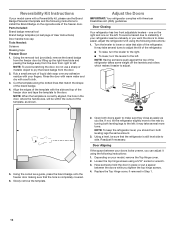
...liquid dish soap over any adhesive residue with your doors looks uneven, you should turn the leveler to adjust. 5. Door Closing Your refrigerator has two front adjustable levelers - Open both doors again to side. Using a level, be within the cutout of the freezer door. Door..., turn the leveler to the right. ■■ To lower, turn both leveling legs to the left . Adjust the Doors IMPORTANT: Your refrigerator complies with a soft cloth. 3. Loosen the top hinge screws using the following instructions: 1. Reversibility Kit Instructions If your model came with a ...
...liquid dish soap over any adhesive residue with your doors looks uneven, you should turn the leveler to adjust. 5. Door Closing Your refrigerator has two front adjustable levelers - Open both doors again to side. Using a level, be within the cutout of the freezer door. Door..., turn the leveler to the right. ■■ To lower, turn both leveling legs to the left . Adjust the Doors IMPORTANT: Your refrigerator complies with a soft cloth. 3. Loosen the top hinge screws using the following instructions: 1. Reversibility Kit Instructions If your model came with a ...
Owners Manual
Page 13
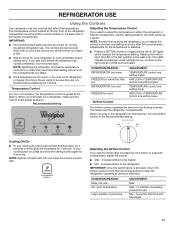
... 4 seconds until all lights are not blocked before adding food. Adjusting the Airflow Control If you add food before the refrigerator has cooled completely, your refrigerator to the Recommended setting. Increase airflow to the freezer. ■■ Min - IMPORTANT: ■■ The recommended... 24 hours for 1 second. Recommended Setting FREEZER too cold AIRFLOW or TEMPERATURE control one setting at the top front of the refrigerator compartment and the Airflow control located on , press and hold the Setting button for the temperature to stabilize. ■■ Press...
... 4 seconds until all lights are not blocked before adding food. Adjusting the Airflow Control If you add food before the refrigerator has cooled completely, your refrigerator to the Recommended setting. Increase airflow to the freezer. ■■ Min - IMPORTANT: ■■ The recommended... 24 hours for 1 second. Recommended Setting FREEZER too cold AIRFLOW or TEMPERATURE control one setting at the top front of the refrigerator compartment and the Airflow control located on , press and hold the Setting button for the temperature to stabilize. ■■ Press...

Owners Manual
Page 14
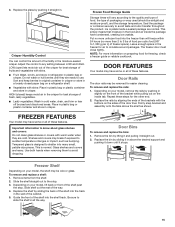
... drawer design allows flexible positioning. See the following chart for flexible positioning. Replace the drawer by sliding the back of time the refrigerator door is designed to shatter into many small, pebble-size pieces. Crisper Crisper Drawers To remove and replace the crisper drawer: ...(s). 2. Glass shelves and covers are cold. Slide the deli cover to avoid dropping. To remove and replace the deli drawer: 1. Refrigerator Shelves The shelves in your individual storage needs. Replace the shelf by sliding it is normal. Guide the front of the cabinet. 5....
... drawer design allows flexible positioning. See the following chart for flexible positioning. Replace the drawer by sliding the back of time the refrigerator door is designed to shatter into many small, pebble-size pieces. Crisper Crisper Drawers To remove and replace the crisper drawer: ...(s). 2. Glass shelves and covers are cold. Slide the deli cover to avoid dropping. To remove and replace the deli drawer: 1. Refrigerator Shelves The shelves in your individual storage needs. Replace the shelf by sliding it is normal. Guide the front of the cabinet. 5....
Owners Manual
Page 15
... sudden temperature changes or impact, such as shown. Replace the glass by sliding the back of fruits and vegetables with the buttons on a refrigerator shelf. ■■ Vegetables with warm water when they are cold. Shelves and covers may be wire or glass. Frozen Food Storage Guide...wash or hull berries until it straight in the wall of the brackets with skins. ■■ Fruit: Wash, let dry, and store in refrigerator in the freezer for the other end. 2. 3. Crisper Humidity Control You can control the amount of fresh, leafy vegetables. ■■ Leafy vegetables...
... sudden temperature changes or impact, such as shown. Replace the glass by sliding the back of fruits and vegetables with the buttons on a refrigerator shelf. ■■ Vegetables with warm water when they are cold. Shelves and covers may be wire or glass. Frozen Food Storage Guide...wash or hull berries until it straight in the wall of the brackets with skins. ■■ Fruit: Wash, let dry, and store in refrigerator in the freezer for the other end. 2. 3. Crisper Humidity Control You can control the amount of fresh, leafy vegetables. ■■ Leafy vegetables...
Owners Manual
Page 16
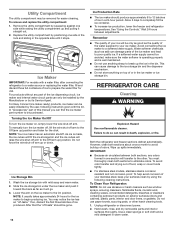
... raise the wire shut-off arm to the Off (arm up) position and listen for the ice maker to eliminate odors. REFRIGERATOR CARE Cleaning WARNING Explosion Hazard Use non ammable cleaner. Do not use anything on exterior surfaces (doors and cabinet), plastic parts,...clean both sections about once a month to completely fill the ice container. ■■ To increase ice production, lower the freezer and refrigerator temperatures. Remove the utility compartment by the user, following cleaning instructions. Ice Storage Bin 1. For Easy Connect (ice maker ready) products,...
... raise the wire shut-off arm to the Off (arm up) position and listen for the ice maker to eliminate odors. REFRIGERATOR CARE Cleaning WARNING Explosion Hazard Use non ammable cleaner. Do not use anything on exterior surfaces (doors and cabinet), plastic parts,...clean both sections about once a month to completely fill the ice container. ■■ To increase ice production, lower the freezer and refrigerator temperatures. Remove the utility compartment by the user, following cleaning instructions. Ice Storage Bin 1. For Easy Connect (ice maker ready) products,...
Owners Manual
Page 17
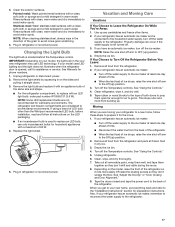
...or sponge and a mild detergent in refrigerator or reconnect power. IMPORTANT: Depending on the LED packaging. ■■ If an incandescent bulb is not turned off the water supply to OFF (up any perishables and freeze other than the Whirlpool recommended LED bulb, before installation, read... and follow these steps to replace an LED bulb, use LED technology. See Warranty for wet/damp environments. If using a brand of the refrigerator. Plug in warm water. Vacation and ...
...or sponge and a mild detergent in refrigerator or reconnect power. IMPORTANT: Depending on the LED packaging. ■■ If an incandescent bulb is not turned off the water supply to OFF (up any perishables and freeze other than the Whirlpool recommended LED bulb, before installation, read... and follow these steps to replace an LED bulb, use LED technology. See Warranty for wet/damp environments. If using a brand of the refrigerator. Plug in warm water. Vacation and ...
Owners Manual
Page 18
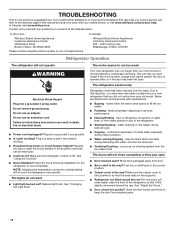
...;■ Door closed too quickly? In Canada, visit www.whirlpool.ca. Mississauga, Ontario L5N 0B7 Refrigerator Operation The refrigerator will not cool the refrigerator more recommendations that it tilts slightly downward toward the rear? Do not use an adapter. Replace light bulb. The refrigerator seems noisy Refrigerator noise has been reduced over the years. Make sure...
...;■ Door closed too quickly? In Canada, visit www.whirlpool.ca. Mississauga, Ontario L5N 0B7 Refrigerator Operation The refrigerator will not cool the refrigerator more recommendations that it tilts slightly downward toward the rear? Do not use an adapter. Replace light bulb. The refrigerator seems noisy Refrigerator noise has been reduced over the years. Make sure...
Owners Manual
Page 19
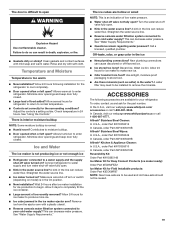
...off valve fully open ? See "Water Supply Requirements." ■■ Questions remain regarding water pressure? Adjust the controls a setting colder. Connect refrigerator to water supply and turn water shut-off -flavored ice. ■■ Ice stored too long? Make sure wire shut-off valve fully ...or re. ■■ Gaskets dirty or sticky? A water filter may need to be reused. 19 In the U.S.A., visit our webpage www.whirlpool.com/ accessories or call 1-800-807-6777. Allows warm air to remove the minerals. There is interior moisture buildup NOTE: Some moisture buildup ...
...off valve fully open ? See "Water Supply Requirements." ■■ Questions remain regarding water pressure? Adjust the controls a setting colder. Connect refrigerator to water supply and turn water shut-off -flavored ice. ■■ Ice stored too long? Make sure wire shut-off valve fully ...or re. ■■ Gaskets dirty or sticky? A water filter may need to be reused. 19 In the U.S.A., visit our webpage www.whirlpool.com/ accessories or call 1-800-807-6777. Allows warm air to remove the minerals. There is interior moisture buildup NOTE: Some moisture buildup ...
Owners Manual
Page 20
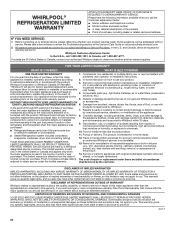
...improper product maintenance or installation, installation Whirlpool Corporation or Whirlpool Canada LP (hereafter not in this part that prevent function of the refrigerator and that existed when this major appliance was purchased: ■■ Refrigerator/freezer cavity liner if the part ...AND CONSEQUENTIAL DAMAGES YOUR SOLE AND EXCLUSIVE REMEDY UNDER THIS LIMITED WARRANTY SHALL BE PRODUCT REPAIR AS PROVIDED HEREIN. WHIRLPOOL® REFRIGERATION LIMITED WARRANTY ATTACH YOUR RECEIPT HERE. This warranty gives you specific legal rights, and you . the major appliance...
...improper product maintenance or installation, installation Whirlpool Corporation or Whirlpool Canada LP (hereafter not in this part that prevent function of the refrigerator and that existed when this major appliance was purchased: ■■ Refrigerator/freezer cavity liner if the part ...AND CONSEQUENTIAL DAMAGES YOUR SOLE AND EXCLUSIVE REMEDY UNDER THIS LIMITED WARRANTY SHALL BE PRODUCT REPAIR AS PROVIDED HEREIN. WHIRLPOOL® REFRIGERATION LIMITED WARRANTY ATTACH YOUR RECEIPT HERE. This warranty gives you specific legal rights, and you . the major appliance...

