
Dimension Guide
Page 1
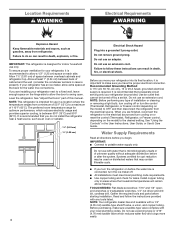
...) To ensure proper ventilation for your refrigerator, allow for planning purposes only. Top Mount Refrigerator PRODUCT MODEL NUMBERS WRT348FME PRODUCT DIMENSIONS Electrical: A 115-volt, 60-Hz, AC-only, 15or 20-amp fused, grounded electrical supply is recommended that a separate circuit serving only your refrigerator be provided. It is required. handle B 4 top of installation, cleaning, or removing a light bulb, turn the control (Thermostat, Refrigerator or Freezer Control depending on each side and at least...
...) To ensure proper ventilation for your refrigerator, allow for planning purposes only. Top Mount Refrigerator PRODUCT MODEL NUMBERS WRT348FME PRODUCT DIMENSIONS Electrical: A 115-volt, 60-Hz, AC-only, 15or 20-amp fused, grounded electrical supply is recommended that a separate circuit serving only your refrigerator be provided. It is required. handle B 4 top of installation, cleaning, or removing a light bulb, turn the control (Thermostat, Refrigerator or Freezer Control depending on each side and at least...
Installation Instructions
Page 1
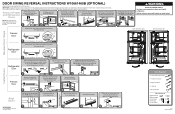
... bottom hinge. NOTE: Make sure to hold the doors in Mexico For more people to reinstall the door. Door Stop Refrigerator Door Move the door stop , located on the bottom of the cabinet. A B Install Doors Refrigerator Door Freezer Door 1 A. DOOR SWING REVERSAL INSTRUCTIONS W10661460B (OPTIONAL) Remove food and any adjustable bins from the center hinge pin. Provide additional support for the doors while the hinges are halfway into the Top Hinge and the top of the center hinge. or 6 Open doors left...
... bottom hinge. NOTE: Make sure to hold the doors in Mexico For more people to reinstall the door. Door Stop Refrigerator Door Move the door stop , located on the bottom of the cabinet. A B Install Doors Refrigerator Door Freezer Door 1 A. DOOR SWING REVERSAL INSTRUCTIONS W10661460B (OPTIONAL) Remove food and any adjustable bins from the center hinge pin. Provide additional support for the doors while the hinges are halfway into the Top Hinge and the top of the center hinge. or 6 Open doors left...
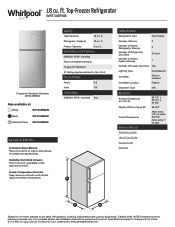
Specification Sheet
Page 1
... Yes Technical Details Refrigerator Type Top-Freezer Number of Doors 2 Number of Interior Refrigerator Shelves Number of Refrigerator Door Bins Number of Interior Freezer Shelves 3 5 Fixed 1 Number of unit sales. General Features & Properties ENERGY STAR® Certified Factory-Installed Icemaker Fingerprint Resistant #1 Selling Appliance Brand in : White WRT348FMEW Black WRT348FMEB Stainless Steel WRT348FMES Key Features & Benefits Frameless Glass Shelves Store more items on 12-month average of Freezer Door Bins N/A Lighting Type Ice Maker Ice Maker Location...
... Yes Technical Details Refrigerator Type Top-Freezer Number of Doors 2 Number of Interior Refrigerator Shelves Number of Refrigerator Door Bins Number of Interior Freezer Shelves 3 5 Fixed 1 Number of unit sales. General Features & Properties ENERGY STAR® Certified Factory-Installed Icemaker Fingerprint Resistant #1 Selling Appliance Brand in : White WRT348FMEW Black WRT348FMEB Stainless Steel WRT348FMES Key Features & Benefits Frameless Glass Shelves Store more items on 12-month average of Freezer Door Bins N/A Lighting Type Ice Maker Ice Maker Location...
Owners Manual
Page 2
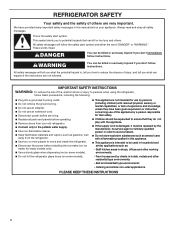
...; Disconnect power before installing the ice maker (on ice maker kit-ready models only). Use a sturdy glass when dispensing ice (on some models). This appliance is , tell you how to ensure that can be killed or seriously injured if you and others are not followed. IMPORTANT SAFETY INSTRUCTIONS WARNING: To reduce the risk of fire, electric shock or injury to persons when using the refrigerator...
...; Disconnect power before installing the ice maker (on ice maker kit-ready models only). Use a sturdy glass when dispensing ice (on some models). This appliance is , tell you how to ensure that can be killed or seriously injured if you and others are not followed. IMPORTANT SAFETY INSTRUCTIONS WARNING: To reduce the risk of fire, electric shock or injury to persons when using the refrigerator...
Owners Manual
Page 3
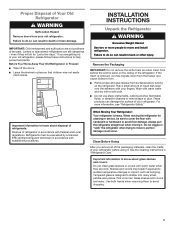
... glass is removed, ice may not easily climb inside of your refrigerator before turning on the ceiling of the refrigerator. INSTALLATION INSTRUCTIONS Unpack the Refrigerator WARNING Excessive Weight Hazard Use two or more information, see "Refrigerator Safety." Wipe with warm water and dry with Federal and Local regulations. Important information to know about glass shelves and covers: Do not clean glass shelves or covers with warm water when they will sit for cleaning or service...
... glass is removed, ice may not easily climb inside of your refrigerator before turning on the ceiling of the refrigerator. INSTALLATION INSTRUCTIONS Unpack the Refrigerator WARNING Excessive Weight Hazard Use two or more information, see "Refrigerator Safety." Wipe with warm water and dry with Federal and Local regulations. Important information to know about glass shelves and covers: Do not clean glass shelves or covers with warm water when they will sit for cleaning or service...
Owners Manual
Page 4
... or reset the control (Thermostat, Refrigerator, or Freezer control, depending on the model) to make sure a saddle-type valve complies with any type of installation or cleaning, or removing a light bulb, turn cooling off or turn the control (Thermostat, Refrigerator, or Freezer control depending on the model) to the desired setting. To ensure proper ventilation for use in death, explosion, or re. If you have the proper electrical connection. See "Adjust the Doors" part of unknown quality without adequate disinfection before the water line...
... or reset the control (Thermostat, Refrigerator, or Freezer control, depending on the model) to make sure a saddle-type valve complies with any type of installation or cleaning, or removing a light bulb, turn cooling off or turn the control (Thermostat, Refrigerator, or Freezer control depending on the model) to the desired setting. To ensure proper ventilation for use in death, explosion, or re. If you have the proper electrical connection. See "Adjust the Doors" part of unknown quality without adequate disinfection before the water line...
Owners Manual
Page 5
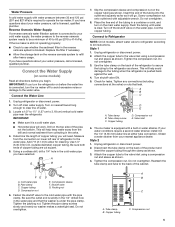
... the tubing until water is a cold water pipe. ■■ Horizontal pipe will work. Do not overtighten. 3. Turn shutoff valve ON. 5. Copper tubing D. If your water conditions require a second water strainer, install it in the reverse osmosis system is connected to your water pressure, call a licensed, qualified plumber. Unplug refrigerator or disconnect power. 2. Disconnect the tube clamp on the main water supply. Copper tubing D. Shutoff valve G. Packing nut 6. Tube clamp B. Replace the filter if...
... the tubing until water is a cold water pipe. ■■ Horizontal pipe will work. Do not overtighten. 3. Turn shutoff valve ON. 5. Copper tubing D. If your water conditions require a second water strainer, install it in the reverse osmosis system is connected to your water pressure, call a licensed, qualified plumber. Unplug refrigerator or disconnect power. 2. Disconnect the tube clamp on the main water supply. Copper tubing D. Shutoff valve G. Packing nut 6. Tube clamp B. Replace the filter if...
Owners Manual
Page 6
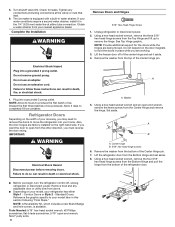
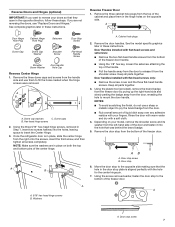
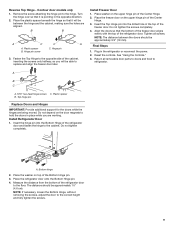
... that leak. 6. If your model later in death, fire, or electrical shock. 1. Do not use an adapter. A B A. Reference the graphic specific to remove the hinge. 5. Contour Doors or Style 2 - Turn shutoff valve ON. Do not depend on the right-hand side. Failure to hold the doors in water strainer. Failure to completely fill ice container. NOTE: A Reversibility Kit, which includes a new Brand Badge and hole covers, is...
... that leak. 6. If your model later in death, fire, or electrical shock. 1. Do not use an adapter. A B A. Reference the graphic specific to remove the hinge. 5. Contour Doors or Style 2 - Turn shutoff valve ON. Do not depend on the right-hand side. Failure to hold the doors in water strainer. Failure to completely fill ice container. NOTE: A Reversibility Kit, which includes a new Brand Badge and hole covers, is...
Owners Manual
Page 7
... the door stop to reverse your model, remove the shoulder screw and its washer from the handle side and use a sharp or metallic object to insert the Center Hinge. 3. Washers A. Reverse Doors and Hinges (optional) IMPORTANT: If you are in these instructions. Door handles installed with a soft cloth. 4. Keep all parts together. Rinse the door with warm water and dry with flat-head screws only: ■■ Remove the screw cover...
... the door stop to reverse your model, remove the shoulder screw and its washer from the handle side and use a sharp or metallic object to insert the Center Hinge. 3. Washers A. Reverse Doors and Hinges (optional) IMPORTANT: If you are in these instructions. Door handles installed with a soft cloth. 4. Keep all parts together. Rinse the door with warm water and dry with flat-head screws only: ■■ Remove the screw cover...
Owners Manual
Page 8
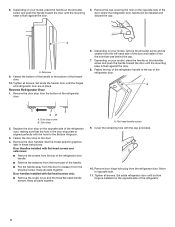
... the refrigerator door. Tighten all parts together. See the model-specific graphics later in place. Move to the top of the refrigerator door. 6. Setscrew 9. Fasten the top of the handle. ■■ Pull the handle away from the refrigerator door. Door stop from the shoulder screw. Keep all screws. A. Remove door hinge hole plug from the door to the door. 4. A AB A. Door Handles installed with the hole for the Bottom Hinge pin. 3. Cover the...
... the refrigerator door. Tighten all parts together. See the model-specific graphics later in place. Move to the top of the refrigerator door. 6. Setscrew 9. Fasten the top of the handle. ■■ Pull the handle away from the refrigerator door. Door stop from the shoulder screw. Keep all screws. A. Remove door hinge hole plug from the door to the door. 4. A AB A. Door Handles installed with the hole for the Bottom Hinge pin. 3. Cover the...
Owners Manual
Page 9
... C. Do not depend on top of the refrigerator door and fasten the hinge to the floor. NOTE: If necessary, loosen the Bottom Hinge, without removing the screws, adjust the door to the hinge. Reverse Top Hinge - Plastic spacer B. Do not tighten the screws completely. 4. Reset the controls. Tighten all removable door parts to doors and food to replace and align the freezer door later. The distance should be approximately...
... C. Do not depend on top of the refrigerator door and fasten the hinge to the floor. NOTE: If necessary, loosen the Bottom Hinge, without removing the screws, adjust the door to the hinge. Reverse Top Hinge - Plastic spacer B. Do not tighten the screws completely. 4. Reset the controls. Tighten all removable door parts to doors and food to replace and align the freezer door later. The distance should be approximately...
Owners Manual
Page 12
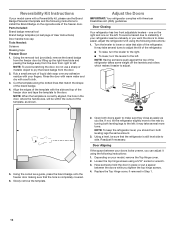
... the freezer door. To avoid a hazard due to instability, if your model, remove the Top Hinge cover. 2. Open both leveling legs the same amount. 3. Readjust if necessary. NOTE: When the template is completely covered. 6. Rinse the door with warm water and dry with the side and top of the template, as you want the doors to make sure they close easier, adjust the refrigerator's tilt using a 5⁄...
... the freezer door. To avoid a hazard due to instability, if your model, remove the Top Hinge cover. 2. Open both leveling legs the same amount. 3. Readjust if necessary. NOTE: When the template is completely covered. 6. Rinse the door with warm water and dry with the side and top of the template, as you want the doors to make sure they close easier, adjust the refrigerator's tilt using a 5⁄...
Owners Manual
Page 13
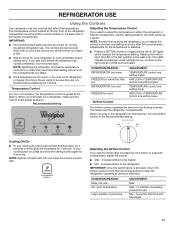
... the SETTING button to right, the LED in the chart below as you need to keep the refrigerator operating at a time. to OFF. If you plug in the refrigerator or freezer, first check the air vents to a specific compartment, adjust the control. ■■ Max - Reading from left to toggle among the 4 LED lights which indicate the temperature setting. To turn the Airflow control to cool completely before the refrigerator has cooled...
... the SETTING button to right, the LED in the chart below as you need to keep the refrigerator operating at a time. to OFF. If you plug in the refrigerator or freezer, first check the air vents to a specific compartment, adjust the control. ■■ Max - Reading from left to toggle among the 4 LED lights which indicate the temperature setting. To turn the Airflow control to cool completely before the refrigerator has cooled...

Owners Manual
Page 14
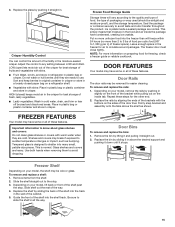
... with plastic wrap, aluminum foil, or plastic containers with warm water when they are cold. Crisper Crisper Drawers To remove and replace the crisper drawer: 1. Remove the deli drawer. 2. Push the cover back to match your model, lift back or front of drawer with one side until free. 5. Glass shelves and covers are adjustable to release the rear clips from the shelf. 2. Replace the shelf by fitting the notches and clips on the...
... with plastic wrap, aluminum foil, or plastic containers with warm water when they are cold. Crisper Crisper Drawers To remove and replace the crisper drawer: 1. Remove the deli drawer. 2. Push the cover back to match your model, lift back or front of drawer with one side until free. 5. Glass shelves and covers are adjustable to release the rear clips from the shelf. 2. Replace the shelf by fitting the notches and clips on the...
Owners Manual
Page 15
... stop . 3. Replace the shelf by pushing in cold water, drain, and trim or tear off bruised and discolored areas. Be sure to know about glass shelves and covers: Do not clean glass shelves or covers with the buttons on your model, lift back or front of the door liner. Place in plastic bag or plastic container and store in the food and air inside tab. Frozen Food Storage Guide...
... stop . 3. Replace the shelf by pushing in cold water, drain, and trim or tear off bruised and discolored areas. Be sure to know about glass shelves and covers: Do not clean glass shelves or covers with the buttons on your model, lift back or front of the door liner. Place in plastic bag or plastic container and store in the food and air inside tab. Frozen Food Storage Guide...
Owners Manual
Page 16
... in the bin. Avoid connecting the ice maker to completely fill the ice container. ■■ To increase ice production, lower the freezer and refrigerator temperatures. This can be easily installed by using the following instruction given with the kit. To avoid odor transfer and drying out of ice produced. Do not use . Ice Maker IMPORTANT: For models with mild soap and warm water. 2. In "Accessories" part of this manual you can...
... in the bin. Avoid connecting the ice maker to completely fill the ice container. ■■ To increase ice production, lower the freezer and refrigerator temperatures. This can be easily installed by using the following instruction given with the kit. To avoid odor transfer and drying out of ice produced. Do not use . Ice Maker IMPORTANT: For models with mild soap and warm water. 2. In "Accessories" part of this manual you can...
Owners Manual
Page 17
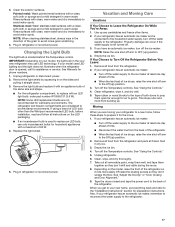
... power. 2. Replace the light shield. 5. Vacation and Moving Care Vacations If You Choose to avoid water spots. Use up any perishables and freeze other than the Whirlpool recommended LED bulb, before installation, read and follow these steps to your model uses LED lighting and the light does not illuminate when the refrigerator door is opened, call for preparation instructions. If your refrigerator has an automatic ice maker: ■■ Turn off the water supply...
... power. 2. Replace the light shield. 5. Vacation and Moving Care Vacations If You Choose to avoid water spots. Use up any perishables and freeze other than the Whirlpool recommended LED bulb, before installation, read and follow these steps to your model uses LED lighting and the light does not illuminate when the refrigerator door is opened, call for preparation instructions. If your refrigerator has an automatic ice maker: ■■ Turn off the water supply...
Owners Manual
Page 18
... coldest setting will not operate WARNING Electrical Shock Hazard Plug into a grounded 3 prong outlet. See "Using the Controls." ■■ New installation? heard when the water valve opens to cool completely. fans/compressor adjusting to its high-efficiency compressor and fans. flow of refrigerant, movement of the refrigerator so that may help you may be heard when ice melts during defrosting and water runs into a grounded 3 prong outlet. ■■ Is outlet working . ■...
... coldest setting will not operate WARNING Electrical Shock Hazard Plug into a grounded 3 prong outlet. See "Using the Controls." ■■ New installation? heard when the water valve opens to cool completely. fans/compressor adjusting to its high-efficiency compressor and fans. flow of refrigerant, movement of the refrigerator so that may help you may be heard when ice melts during defrosting and water runs into a grounded 3 prong outlet. ■■ Is outlet working . ■...
Owners Manual
Page 19
...;■ Door opened often or left open . ■■ Kink in the water source line? Minimize door openings and keep door fully closed . Straighten the water source line. ■■ Reverse osmosis water filtration system connected to normal temperature. ■■ Controls set correctly for Field Installable products: Order Part #3ECKMF87 NOTE: New hose-sets are to be used and old hose-sets should not be installed to your cold water supply? Turn the water shut-off arm or switch (depending...
...;■ Door opened often or left open . ■■ Kink in the water source line? Minimize door openings and keep door fully closed . Straighten the water source line. ■■ Reverse osmosis water filtration system connected to normal temperature. ■■ Controls set correctly for Field Installable products: Order Part #3ECKMF87 NOTE: New hose-sets are to be used and old hose-sets should not be installed to your cold water supply? Turn the water shut-off arm or switch (depending...
Owners Manual
Page 20
... of the Use and Care Guide or visit producthelp.whirlpool.com. 2. Repairs to parts or systems to correct product damage or defects caused maintained according to the instructions attached to : Whirlpool Customer eXperience Center In the U.S.A., call 1-800-807-6777. All warranty service is effective from state to state or province to chemicals. 10. original consumer purchase. Consumable parts (e.g., light bulbs, batteries, air or water filters, preservation...
... of the Use and Care Guide or visit producthelp.whirlpool.com. 2. Repairs to parts or systems to correct product damage or defects caused maintained according to the instructions attached to : Whirlpool Customer eXperience Center In the U.S.A., call 1-800-807-6777. All warranty service is effective from state to state or province to chemicals. 10. original consumer purchase. Consumable parts (e.g., light bulbs, batteries, air or water filters, preservation...


