

Warranty Information
Page 1
... appliance is intended to be provided by an authorized Whirlpool servicer is not available. 10. Expenses for travel and transportation for other rights that vary from state to state or province to province. Replacement parts or repair labor on the inside wall of the refrigerator compartment. This warranty gives you specific legal rights...
... appliance is intended to be provided by an authorized Whirlpool servicer is not available. 10. Expenses for travel and transportation for other rights that vary from state to state or province to province. Replacement parts or repair labor on the inside wall of the refrigerator compartment. This warranty gives you specific legal rights...
Use & Care Guide
Page 2
... you don't follow instructions. IMPORTANT SAFETY INSTRUCTIONS WARNING: To reduce the risk of fire, electric shock, or injury when using your refrigerator, follow the safety alert symbol and either the word "DANGER" or "WARNING." SAVE THESE INSTRUCTIONS State of California Proposition 65 Warnings...an extension cord. ■ Disconnect power before servicing. ■ Replace all safety messages. Always read and obey all parts and panels before operating. ■ Remove doors from refrigerator. ■ Use two or more chemicals known to the State of California to move and install...
... you don't follow instructions. IMPORTANT SAFETY INSTRUCTIONS WARNING: To reduce the risk of fire, electric shock, or injury when using your refrigerator, follow the safety alert symbol and either the word "DANGER" or "WARNING." SAVE THESE INSTRUCTIONS State of California Proposition 65 Warnings...an extension cord. ■ Disconnect power before servicing. ■ Replace all safety messages. Always read and obey all parts and panels before operating. ■ Remove doors from refrigerator. ■ Use two or more chemicals known to the State of California to move and install...
Use & Care Guide
Page 4
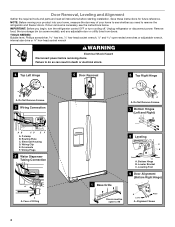
... 8 Leveling A B 1 Base Grille Raise Lower C A. Unplug refrigerator or disconnect power. Do Not Remove Screws. 3 Wiring Connection A A A. Wiring Clip E. Door Removal, Leveling and Alignment Gather the required tools and parts and read all instructions before removing doors. IMPORTANT: Before you need ... 2 Water Dispenser Tubing Connection A A A. Bottom Hinge B. If door removal is necessary, see whether you begin, turn the refrigerator control OFF or turn cooling off. Alignment Screw Save these instructions for future reference. Remove food, the ice storage bin (on...
... 8 Leveling A B 1 Base Grille Raise Lower C A. Unplug refrigerator or disconnect power. Do Not Remove Screws. 3 Wiring Connection A A A. Wiring Clip E. Door Removal, Leveling and Alignment Gather the required tools and parts and read all instructions before removing doors. IMPORTANT: Before you need ... 2 Water Dispenser Tubing Connection A A A. Bottom Hinge B. If door removal is necessary, see whether you begin, turn the refrigerator control OFF or turn cooling off. Alignment Screw Save these instructions for future reference. Remove food, the ice storage bin (on...
Use & Care Guide
Page 6
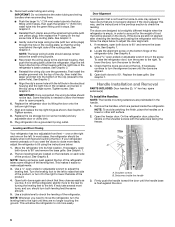
...the green fitting until it to the right to the screw hole). Tighten screw. See Graphic 6. See Graphic 1. 2. To raise the refrigerator door, turn the screw to adjust the door alignment. 1. See Graphic 3. ■ Gently route the large wiring bundle (with the setscrews...not level from side-to-side may take several more easily, adjust the refrigerator's tilt using a single screw. See Graphic 1. 2. Use a open -ended or adjustable wrench to make adjustments. 3. Handle Installation and Removal PARTS INCLUDED: Door handles (2 hex key, spare setscrew(s) To Install the ...
...the green fitting until it to the right to the screw hole). Tighten screw. See Graphic 6. See Graphic 1. 2. To raise the refrigerator door, turn the screw to adjust the door alignment. 1. See Graphic 3. ■ Gently route the large wiring bundle (with the setscrews...not level from side-to-side may take several more easily, adjust the refrigerator's tilt using a single screw. See Graphic 1. 2. Use a open -ended or adjustable wrench to make adjustments. 3. Handle Installation and Removal PARTS INCLUDED: Door handles (2 hex key, spare setscrew(s) To Install the ...
Use & Care Guide
Page 8
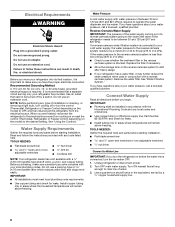
...only your local plumbing codes. Water Supply Requirements Gather the required tools and parts before you are finished, reconnect the refrigerator to the electrical source and turn the control (Thermostat, Refrigerator or Freezer Control depending on the model) to see whether the sediment filter... Do not remove ground prong. Unplug refrigerator or disconnect power. 2. Do not use an extension cord. Failure to 414 kPa). NOTE: Before performing any local codes and ordinances. ■ Use copper tubing or Whirlpool supply line, Part Number 8212547RP, and check for leaks. ...
...only your local plumbing codes. Water Supply Requirements Gather the required tools and parts before you are finished, reconnect the refrigerator to the electrical source and turn the control (Thermostat, Refrigerator or Freezer Control depending on the model) to see whether the sediment filter... Do not remove ground prong. Unplug refrigerator or disconnect power. 2. Do not use an extension cord. Failure to 414 kPa). NOTE: Before performing any local codes and ordinances. ■ Use copper tubing or Whirlpool supply line, Part Number 8212547RP, and check for leaks. ...

Use & Care Guide
Page 9
...Bend the copper tubing to be sure the copper tubing does not touch the cabinet's side wall or other parts inside the cabinet. AB C D A. Compression nut E. Valve inlet 7. Unplug refrigerator or disconnect power. 2. If the gray water tube supplied with a wrench two more turns. Do not overtighten...C. Tube clamp screw C. Copper tubing D. Remove and discard the plastic part that leak. Remove and discard the short, black plastic part from the gray water tube on the rear of the water valve, to the refrigerator as shown. NOTE: To avoid rattling, be pulled out of the...
...Bend the copper tubing to be sure the copper tubing does not touch the cabinet's side wall or other parts inside the cabinet. AB C D A. Compression nut E. Valve inlet 7. Unplug refrigerator or disconnect power. 2. If the gray water tube supplied with a wrench two more turns. Do not overtighten...C. Tube clamp screw C. Copper tubing D. Remove and discard the plastic part that leak. Remove and discard the short, black plastic part from the gray water tube on the rear of the water valve, to the refrigerator as shown. NOTE: To avoid rattling, be pulled out of the...
Use & Care Guide
Page 15
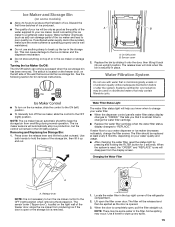
... by sliding it onto the door, then tilting it up any spills. 15 Turning the Ice Maker On/Off: The On/Off switch can damage parts of the ice maker and lead to keep the storage bin from the display screen. Water Filter Status Light The water filter status light will... or of unknown quality without adequate disinfection before or after the system. Discard the first three batches of ice produced. ■ The quality of the refrigerator compartment. 2. Sensor cover 2.
... by sliding it onto the door, then tilting it up any spills. 15 Turning the Ice Maker On/Off: The On/Off switch can damage parts of the ice maker and lead to keep the storage bin from the display screen. Water Filter Status Light The water filter status light will... or of unknown quality without adequate disinfection before or after the system. Discard the first three batches of ice produced. ■ The quality of the refrigerator compartment. 2. Sensor cover 2.
Use & Care Guide
Page 16
... between both sections to snap the filter into place. To Clean Your Refrigerator: NOTE: Do not use paper towels, scouring pads, or other items. 2. Hand wash, rinse, and dry removable parts and interior surfaces thoroughly. Vacation and Moving Care Vacations If You Choose...or cleansers containing petroleum products on the model, turn the Refrigerator Control to prepare it , and dry well. 5. Depending on plastic parts, interior and door liners or gaskets. Clean refrigerator, wipe it for contact information. If your refrigerator. ■ Use a vacuum cleaner with a clean ...
... between both sections to snap the filter into place. To Clean Your Refrigerator: NOTE: Do not use paper towels, scouring pads, or other items. 2. Hand wash, rinse, and dry removable parts and interior surfaces thoroughly. Vacation and Moving Care Vacations If You Choose...or cleansers containing petroleum products on the model, turn the Refrigerator Control to prepare it , and dry well. 5. Depending on plastic parts, interior and door liners or gaskets. Clean refrigerator, wipe it for contact information. If your refrigerator. ■ Use a vacuum cleaner with a clean ...

Use & Care Guide
Page 19
...Part #W10355010 In Canada, order Part #W10355010B Water Filter: Order Part #W10295370 (P4RFWB) Air Filter: Order Part #W10311524 Produce Preserver: Order Part #W10346771 WATER FILTER CERTIFICATIONS †™ AFFRESH is chilled to a cold water pipe? Connect refrigerator to cool completely. ■ Water not been recently dispensed? Allow 24 hours for your authorized Whirlpool... dealer. In Canada, call 1-800-442-9991 and ask for the water supply to cool completely. ■ Recently dispensed large amount of water. ■ Refrigerator connected to ...
...Part #W10355010 In Canada, order Part #W10355010B Water Filter: Order Part #W10295370 (P4RFWB) Air Filter: Order Part #W10311524 Produce Preserver: Order Part #W10346771 WATER FILTER CERTIFICATIONS †™ AFFRESH is chilled to a cold water pipe? Connect refrigerator to cool completely. ■ Water not been recently dispensed? Allow 24 hours for your authorized Whirlpool... dealer. In Canada, call 1-800-442-9991 and ask for the water supply to cool completely. ■ Recently dispensed large amount of water. ■ Refrigerator connected to ...

Use & Care Guide
Page 21
Proof of original purchase date is required to Whirlpool within 30 days from the date of purchase. 6. Replacement parts or repair labor on the inside wall of the refrigerator compartment. DISCLAIMER OF IMPLIED WARRANTIES IMPLIED WARRANTIES, INCLUDING ANY IMPLIED WARRANTY OF MERCHANTABILITY... rights that existed when this major appliance was purchased. Consumable parts are excluded from warranty coverage. 4. Pickup and delivery. Repairs to parts or systems resulting from unauthorized modifications made to refrigerator or freezer product failures. 7. Discoloration, rust, or oxidation ...
Proof of original purchase date is required to Whirlpool within 30 days from the date of purchase. 6. Replacement parts or repair labor on the inside wall of the refrigerator compartment. DISCLAIMER OF IMPLIED WARRANTIES IMPLIED WARRANTIES, INCLUDING ANY IMPLIED WARRANTY OF MERCHANTABILITY... rights that existed when this major appliance was purchased. Consumable parts are excluded from warranty coverage. 4. Pickup and delivery. Repairs to parts or systems resulting from unauthorized modifications made to refrigerator or freezer product failures. 7. Discoloration, rust, or oxidation ...

