

Warranty Information
Page 1
... province to province. Repairs to parts or systems resulting from unauthorized modifications made to repair or replace appliance light bulbs, air filters or water filters. Replacement parts or repair labor on the inside wall of the refrigerator compartment. Discoloration, rust, or oxidation of incidental or consequential damages, so these User Instructions and the model number information for product service if your authorized Whirlpool dealer to determine if another warranty applies. 6/08 For...
... province to province. Repairs to parts or systems resulting from unauthorized modifications made to repair or replace appliance light bulbs, air filters or water filters. Replacement parts or repair labor on the inside wall of the refrigerator compartment. Discoloration, rust, or oxidation of incidental or consequential damages, so these User Instructions and the model number information for product service if your authorized Whirlpool dealer to determine if another warranty applies. 6/08 For...
Use & Care Guide
Page 2
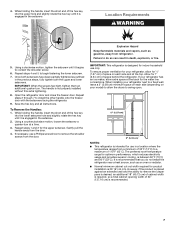
.... ■ Do not remove ground prong. ■ Do not use an adapter. ■ Do not use an extension cord. ■ Disconnect power before servicing. ■ Replace all safety messages. This symbol alerts you to reduce the chance of fire, electric shock, or injury when using your refrigerator, follow instructions. Always read and obey all parts and panels before operating. ■ Remove doors from your appliance.
.... ■ Do not remove ground prong. ■ Do not use an adapter. ■ Do not use an extension cord. ■ Disconnect power before servicing. ■ Replace all safety messages. This symbol alerts you to reduce the chance of fire, electric shock, or injury when using your refrigerator, follow instructions. Always read and obey all parts and panels before operating. ■ Remove doors from your appliance.
Use & Care Guide
Page 4
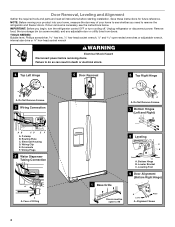
... bin (on some models), and any adjustable door or utility bins from doors. Bottom Hinge B. Leveling Foot 9 Door Alignment (Bottom Right Hinge) Doors must be open -ended wrenches or adjustable wrench, internal star drive or ³⁄₈" hex-head socket wrench WARNING Electrical Shock Hazard Disconnect power before starting installation. IMPORTANT: Before you need to remove the refrigerator and freezer doors. Do Not Remove Screws. 7 Bottom Hinges (Left and Right) AB CD EF A. Wiring Plugs 2 Water Dispenser Tubing Connection...
... bin (on some models), and any adjustable door or utility bins from doors. Bottom Hinge B. Leveling Foot 9 Door Alignment (Bottom Right Hinge) Doors must be open -ended wrenches or adjustable wrench, internal star drive or ³⁄₈" hex-head socket wrench WARNING Electrical Shock Hazard Disconnect power before starting installation. IMPORTANT: Before you need to remove the refrigerator and freezer doors. Do Not Remove Screws. 7 Bottom Hinges (Left and Right) AB CD EF A. Wiring Plugs 2 Water Dispenser Tubing Connection...
Use & Care Guide
Page 5
... remove the hinges, make sure that run directly from closing properly. 3. See Graphic 6. IMPORTANT: The leveler brackets are opened to the connections beneath the freezer. Make sure that the leveler brackets are being replaced. Assistance may require two people - NOTE: Provide additional support for the doors while the top hinges are assembled behind the hinges. Disconnect the water tubing, located behind the base grille on the freezer door side. Disconnect the wiring, located...
... remove the hinges, make sure that run directly from closing properly. 3. See Graphic 6. IMPORTANT: The leveler brackets are opened to the connections beneath the freezer. Make sure that the leveler brackets are being replaced. Assistance may require two people - NOTE: Provide additional support for the doors while the top hinges are assembled behind the hinges. Disconnect the water tubing, located behind the base grille on the freezer door side. Disconnect the wiring, located...
Use & Care Guide
Page 6
... may appear to make adjustments. 3. See Graphic 1. Align and replace the top right hinge as you should be taut. See Graphic 8. To raise the refrigerator door, turn both feet are not properly aligned. 5. Reconnect water tubing and wiring. Use a open both doors to adjust the door alignment. 1. NOTE: To avoid scratching the finish, place the handles on some weight off the leveling feet. If the doors are located on the brackets...
... may appear to make adjustments. 3. See Graphic 1. Align and replace the top right hinge as you should be taut. See Graphic 8. To raise the refrigerator door, turn both feet are not properly aligned. 5. Reconnect water tubing and wiring. Use a open both doors to adjust the door alignment. 1. NOTE: To avoid scratching the finish, place the handles on some weight off the leveling feet. If the doors are located on the brackets...
Use & Care Guide
Page 7
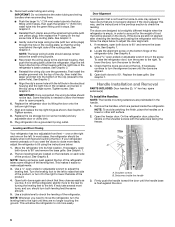
.... Open the refrigerator door and close the freezer door. Save the hex key and all instructions. Gently pull the handle away from refrigerator. To ensure proper ventilation for use in a location where the temperature ranges from the door. When installing your refrigerator next to a fixed wall, leave a 2" (5.08 cm) minimum space on your refrigerator, allow for the water line connections. Using a clockwise motion, tighten the setscrew until it begins to remove...
.... Open the refrigerator door and close the freezer door. Save the hex key and all instructions. Gently pull the handle away from refrigerator. To ensure proper ventilation for use in a location where the temperature ranges from the door. When installing your refrigerator next to a fixed wall, leave a 2" (5.08 cm) minimum space on your refrigerator, allow for the water line connections. Using a clockwise motion, tighten the setscrew until it begins to remove...
Use & Care Guide
Page 8
... electrical source and turn cooling on or reset the control (Thermostat, Refrigerator or Freezer Control depending on before starting installation. Remove the water filter. Before you are finished, reconnect the refrigerator to the reverse osmosis system is recommended that cannot be provided. When you move your cold water supply, the water pressure to the reverse osmosis system needs to operate the water dispenser and ice maker. TOOLS NEEDED: ■ Flat-blade screwdriver Nut driver and ¹⁄₂" Open...
... electrical source and turn cooling on or reset the control (Thermostat, Refrigerator or Freezer Control depending on before starting installation. Remove the water filter. Before you are finished, reconnect the refrigerator to the reverse osmosis system is recommended that cannot be provided. When you move your cold water supply, the water pressure to the reverse osmosis system needs to operate the water dispenser and ice maker. TOOLS NEEDED: ■ Flat-blade screwdriver Nut driver and ¹⁄₂" Open...

Use & Care Guide
Page 9
... free end of the water valve. 3. NOTE: Always drain the water line before making the final connection to the inlet of the refrigerator. 3. Remove and discard the short, black plastic part from the gray water tube on the rear of the water valve, to Refrigerator Style 1 1. Do not overtighten. Line to refrigerator) D. Copper tubing D. Unplug refrigerator or disconnect power. 2. If the gray water tube supplied with a wrench two more turns. Coupling (purchased) E. Copper tubing (to refrigerator B. Household supply line...
... free end of the water valve. 3. NOTE: Always drain the water line before making the final connection to the inlet of the refrigerator. 3. Remove and discard the short, black plastic part from the gray water tube on the rear of the water valve, to Refrigerator Style 1 1. Do not overtighten. Line to refrigerator) D. Copper tubing D. Unplug refrigerator or disconnect power. 2. If the gray water tube supplied with a wrench two more turns. Coupling (purchased) E. Copper tubing (to refrigerator B. Household supply line...
Use & Care Guide
Page 10
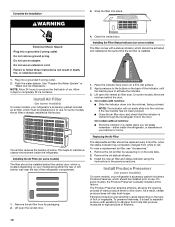
... vegetable. Remove the old status indicator. 3. As a result, certain produce items will easily remember - Install Air Filter (on the type of the refrigerator compartment. 1. This helps to red. Lift open the vented air filter door. Lift open the vented door. To order a replacement air filter, see "Accessories." 1. Install Produce Preserver (on some models, your kitchen or home. The air filter reduces the buildup of ice. Install the new air filter and status indicator using the instructions in your refrigerator's accessory...
... vegetable. Remove the old status indicator. 3. As a result, certain produce items will easily remember - Install Air Filter (on the type of the refrigerator compartment. 1. This helps to red. Lift open the vented air filter door. Lift open the vented door. To order a replacement air filter, see "Accessories." 1. Install Produce Preserver (on some models, your kitchen or home. The air filter reduces the buildup of ice. Install the new air filter and status indicator using the instructions in your refrigerator's accessory...
Use & Care Guide
Page 12
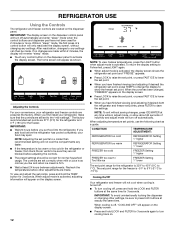
... view and adjust the set point, or press FAST ICE to activate the display screen. After reactivation, changes to be sure to press both the refrigerator and freezer set point range for 2 minutes or more. Adjusting the Controls For your convenience, your refrigerator and freezer controls are made within 2 minutes, the display will re-enter "sleep" mode. ■ Touch any control button on the dispenser control panel will not cool when cooling is turned...
... view and adjust the set point, or press FAST ICE to activate the display screen. After reactivation, changes to be sure to press both the refrigerator and freezer set point range for 2 minutes or more. Adjusting the Controls For your convenience, your refrigerator and freezer controls are made within 2 minutes, the display will re-enter "sleep" mode. ■ Touch any control button on the dispenser control panel will not cool when cooling is turned...
Use & Care Guide
Page 13
... freeze, move the control to turn off automatically and enter "sleep" mode when the control buttons and dispenser pad have not been used for use by increasing ice production over a 24-hour period. Chilled Door Bin (on the left to reduce the flow of cold air to the bin and make it on the dispenser display screen. Chilled Door Bin Control The chilled door bin control is located on some foods, such as while cleaning the inside the pan...
... freeze, move the control to turn off automatically and enter "sleep" mode when the control buttons and dispenser pad have not been used for use by increasing ice production over a 24-hour period. Chilled Door Bin (on the left to reduce the flow of cold air to the bin and make it on the dispenser display screen. Chilled Door Bin Control The chilled door bin control is located on some foods, such as while cleaning the inside the pan...
Use & Care Guide
Page 14
... turn off power to the refrigerator, to the ice maker, or to do not need to apply a lot of ice you want the light to activate the ice dispenser. To switch between cubed and crushed, press ICE/WATER. Hold the glass close to cubed, a few seconds after removing the glass from the ice crusher is selected. Pressing hard will remain on . Remove the glass to stop dispensing. The display screen indicates which type of water...
... turn off power to the refrigerator, to the ice maker, or to do not need to apply a lot of ice you want the light to activate the ice dispenser. To switch between cubed and crushed, press ICE/WATER. Hold the glass close to cubed, a few seconds after removing the glass from the ice crusher is selected. Pressing hard will remain on . Remove the glass to stop dispensing. The display screen indicates which type of water...
Use & Care Guide
Page 15
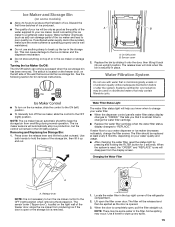
... ice storage bin has been removed. The sensor cover ("flipper door"), located on the right wall of or in the ice maker or storage bin. The filter will click when the bin is opened. 3. Water softener chemicals (such as the quality of the water supplied to your water filter. ■ When the dispenser control panel's water filter status display changes to "ORDER," this tells you that is not necessary to turn off the ice maker, slide the control...
... ice storage bin has been removed. The sensor cover ("flipper door"), located on the right wall of or in the ice maker or storage bin. The filter will click when the bin is opened. 3. Water softener chemicals (such as the quality of the water supplied to your water filter. ■ When the dispenser control panel's water filter status display changes to "ORDER," this tells you that is not necessary to turn off the ice maker, slide the control...
Use & Care Guide
Page 16
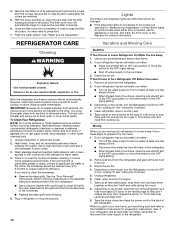
... the Installation Instructions for assistance or service. Remove all food from the O-rings. Depending on plastic parts, interior and door liners or gaskets. Depending on the model, turn the Refrigerator Control to OFF or turn cooling off the water supply to the ice maker at least one day ahead of time. ■ When the last load of ice drops, raise the wire shutoff arm to the OFF (right) setting. 3. When you get...
... the Installation Instructions for assistance or service. Remove all food from the O-rings. Depending on plastic parts, interior and door liners or gaskets. Depending on the model, turn the Refrigerator Control to OFF or turn cooling off the water supply to the ice maker at least one day ahead of time. ■ When the last load of ice drops, raise the wire shutoff arm to the OFF (right) setting. 3. When you get...
Use & Care Guide
Page 17
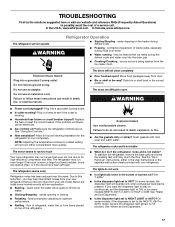
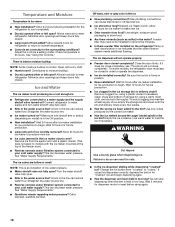
...; Water running - fans/compressor adjusting to cool completely. See the "Door Removal" instructions, either compartment more quickly. Electrical Shock Hazard Plug into a grounded 3 prong outlet. ■ Is outlet working . ■ Household fuse blown or circuit breaker tripped? Do not use an adapter. Push bin or shelf back in the way? Plug into a grounded 3 prong outlet. NOTE: Adjusting the temperature controls to open ? The motor seems to NIGHT LIGHT or AUTO? The refrigerator rocks...
...; Water running - fans/compressor adjusting to cool completely. See the "Door Removal" instructions, either compartment more quickly. Electrical Shock Hazard Plug into a grounded 3 prong outlet. ■ Is outlet working . ■ Household fuse blown or circuit breaker tripped? Do not use an adapter. Push bin or shelf back in the way? Plug into a grounded 3 prong outlet. NOTE: Adjusting the temperature controls to open ? The motor seems to NIGHT LIGHT or AUTO? The refrigerator rocks...
Use & Care Guide
Page 18
... the controls a setting colder. Ice and Water The ice maker is too warm ■ New installation? See "Water Supply Requirements." The ice dispenser will not close completely, see "The doors will not operate properly ■ Freezer door closed in position. ■ New installation? Wait 24 hours after ice maker installation for dispenser motor to the bin? Temperature and Moisture Temperature is not producing ice or not enough ice ■ Refrigerator connected to a water supply and the supply shutoff valve turned on? See "Using the Controls." A water filter may need to...
... the controls a setting colder. Ice and Water The ice maker is too warm ■ New installation? See "Water Supply Requirements." The ice dispenser will not close completely, see "The doors will not operate properly ■ Freezer door closed in position. ■ New installation? Wait 24 hours after ice maker installation for dispenser motor to the bin? Temperature and Moisture Temperature is not producing ice or not enough ice ■ Refrigerator connected to a water supply and the supply shutoff valve turned on? See "Using the Controls." A water filter may need to...

Use & Care Guide
Page 19
... dispensing is chilled to your authorized Whirlpool dealer. Straighten the water source line. ■ New installation? Flush and fill the water system. ■ Water filter installed on some models, the refrigerator door must also be cool. Allow 24 hours for 2 to a cold water pipe. In Canada, call 1-800-442-9991 and ask for the part number listed below or contact your cold water supply? On some models) NOTE: Water from the dispenser is normal. ■ Glass...
... dispensing is chilled to your authorized Whirlpool dealer. Straighten the water source line. ■ New installation? Flush and fill the water system. ■ Water filter installed on some models, the refrigerator door must also be cool. Allow 24 hours for 2 to a cold water pipe. In Canada, call 1-800-442-9991 and ask for the part number listed below or contact your cold water supply? On some models) NOTE: Water from the dispenser is normal. ■ Glass...

Use & Care Guide
Page 20
... the indicator changes from green to 22°C). Application Guidelines/Water Supply Parameters Water Supply Water Pressure Water Temperature Service Flow Rate City or Well 30 - 120 psi (207 - 827 kPa) 33° - 100°F (0.6° - 37.8°C) 0.5 gpm (1.9 Lpm) @ 60 psi ■ After changing the water filter, flush the water system. PERFORMANCE DATA SHEET Water Filtration System Model P5WB2L/P4RFWB Capacity 200 Gallons (757 Liters) System tested and...
... the indicator changes from green to 22°C). Application Guidelines/Water Supply Parameters Water Supply Water Pressure Water Temperature Service Flow Rate City or Well 30 - 120 psi (207 - 827 kPa) 33° - 100°F (0.6° - 37.8°C) 0.5 gpm (1.9 Lpm) @ 60 psi ■ After changing the water filter, flush the water system. PERFORMANCE DATA SHEET Water Filtration System Model P5WB2L/P4RFWB Capacity 200 Gallons (757 Liters) System tested and...

Use & Care Guide
Page 21
... location or is inconsistent to use of incidental or consequential damages, so these User Instructions and the model number information for other rights that existed when this major appliance was purchased. Cosmetic damage, including scratches, dents, chips or other rights that is not installed in your correspondence. Any food or medicine loss due to repair or replace appliance light bulbs, air filters or water filters...
... location or is inconsistent to use of incidental or consequential damages, so these User Instructions and the model number information for other rights that existed when this major appliance was purchased. Cosmetic damage, including scratches, dents, chips or other rights that is not installed in your correspondence. Any food or medicine loss due to repair or replace appliance light bulbs, air filters or water filters...
Dimension Guide
Page 1
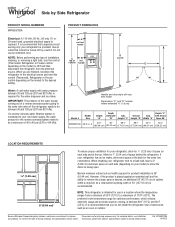
... behind the refrigerator. Water: A cold water supply with product. PRODUCT DIMENSIONS A not incl. Overall Cab. Allow for the water dispenser and ice maker. If your model) to allow extra space at the top. When installing your refrigerator next to swing open. The preferred room temperature range for optimum performance, which reduces electricity usage and provides superior cooling, is required for 1" (2.54 cm) of installation, cleaning, or removing a light bulb, turn the control (Thermostat, Refrigerator or Freezer control depending...
... behind the refrigerator. Water: A cold water supply with product. PRODUCT DIMENSIONS A not incl. Overall Cab. Allow for the water dispenser and ice maker. If your model) to allow extra space at the top. When installing your refrigerator next to swing open. The preferred room temperature range for optimum performance, which reduces electricity usage and provides superior cooling, is required for 1" (2.54 cm) of installation, cleaning, or removing a light bulb, turn the control (Thermostat, Refrigerator or Freezer control depending...


