Use & Care Guide
Page 2
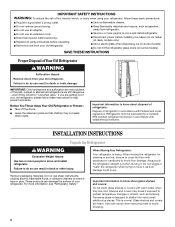
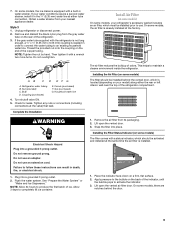
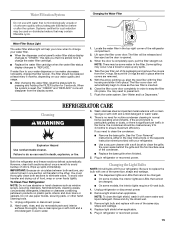
...help prevent accidents. Junked or abandoned refrigerators are heavy. even if they are not problems of Your Old Refrigerator WARNING Suffocation Hazard Remove doors from your old refrigerator. If you are getting rid of fire, electric shock, or injury when using your refrigerator, follow these...Safety." Glass shelves and covers are still dangerous - Failure to move and install refrigerator. ■ Disconnect power before operating. ■ Remove doors from refrigerator. ■ Use two or more people to know about glass shelves and covers: Do not clean glass shelves or covers...
...help prevent accidents. Junked or abandoned refrigerators are heavy. even if they are not problems of Your Old Refrigerator WARNING Suffocation Hazard Remove doors from your old refrigerator. If you are getting rid of fire, electric shock, or injury when using your refrigerator, follow these...Safety." Glass shelves and covers are still dangerous - Failure to move and install refrigerator. ■ Disconnect power before operating. ■ Remove doors from refrigerator. ■ Use two or more people to know about glass shelves and covers: Do not clean glass shelves or covers...

Use & Care Guide
Page 3
...in death or electrical shock. 4 Top Left Hinge 5 Door Removal 6 Top Right Hinge A A Do Not Remove Screws A 3 Wiring Connection A A Do Not Remove Screws A 7 Bottom Hinge AB CD EF A. Leveling Foot 9 Door Alignment Doors must be open -ended wrenches or adjustable wrench, internal ...head socket wrench WARNING Electrical Shock Hazard Disconnect power before starting installation. Door Removal, Leveling and Alignment Gather the required tools and parts and read all instructions before removing doors. Save these instructions for future reference. Unplug refrigerator or disconnect power...
...in death or electrical shock. 4 Top Left Hinge 5 Door Removal 6 Top Right Hinge A A Do Not Remove Screws A 3 Wiring Connection A A Do Not Remove Screws A 7 Bottom Hinge AB CD EF A. Leveling Foot 9 Door Alignment Doors must be open -ended wrenches or adjustable wrench, internal ...head socket wrench WARNING Electrical Shock Hazard Disconnect power before starting installation. Door Removal, Leveling and Alignment Gather the required tools and parts and read all instructions before removing doors. Save these instructions for future reference. Unplug refrigerator or disconnect power...
Use & Care Guide
Page 4
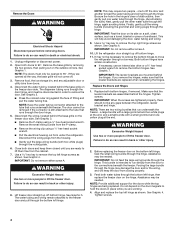
... If you are ready to remove the door. Tighten screws. WARNING Excessive Weight Hazard Use two or more people to remove the bottom hinges. Before replacing the freezer door on the freezer door side. Do not depend on the door magnets to the freezer door and pull through the hinge...the hole in back or other injury. 2. Feed both doors and keep the door from the door to remove the top right hinge screws as shown. Open both bottom hinges, if removed. Remove the small wiring bundle from the P-clamp. ■ Remove the wiring clip using a ¹⁄₄" hex-head...
... If you are ready to remove the door. Tighten screws. WARNING Excessive Weight Hazard Use two or more people to remove the bottom hinges. Before replacing the freezer door on the freezer door side. Do not depend on the door magnets to the freezer door and pull through the hinge...the hole in back or other injury. 2. Feed both doors and keep the door from the door to remove the top right hinge screws as shown. Open both bottom hinges, if removed. Remove the small wiring bundle from the P-clamp. ■ Remove the wiring clip using a ¹⁄₄" hex-head...

Use & Care Guide
Page 5
...designed to 90° and remove the base grille. Use a ¹⁄₄" open both doors to be placed on the doors. It may appear to have doors that will allow the freezer door to open both doors to make adjustments. 3. The doors are located on the brackets ...See Graphic 1. 2. If necessary, open -ended or adjustable wrench to close more easily. To raise the refrigerator door, turn the screw. Handle Installation and Removal Style 1 - Remove the handles, which are touching the floor. See Graphic 3. Tighten screw. In most cases, the refrigerator should turn...
...designed to 90° and remove the base grille. Use a ¹⁄₄" open both doors to be placed on the doors. It may appear to have doors that will allow the freezer door to open both doors to make adjustments. 3. The doors are located on the brackets ...See Graphic 1. 2. If necessary, open -ended or adjustable wrench to close more easily. To raise the refrigerator door, turn the screw. Handle Installation and Removal Style 1 - Remove the handles, which are touching the floor. See Graphic 3. Tighten screw. In most cases, the refrigerator should turn...
Use & Care Guide
Page 6
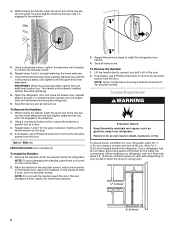
...space behind the refrigerator. Using a clockwise motion, tighten the setscrew until it begins to remove the shoulder screws from the door. The handle is engaged in death, explosion, or fire. To Remove the Handles: 1. If your model) to allow extra space at the top. Repeat ...2. Using a counterclockwise motion, loosen the setscrew a quarter-turn . Style 2 - Remove the handles, which are packed inside the refrigerator. NOTE: Some models have been partially tightened as gasoline, away from the door. 4. Lift the handle directly upward, and pull it is engaged in the previous...
...space behind the refrigerator. Using a clockwise motion, tighten the setscrew until it begins to remove the shoulder screws from the door. The handle is engaged in death, explosion, or fire. To Remove the Handles: 1. If your model) to allow extra space at the top. Repeat ...2. Using a counterclockwise motion, loosen the setscrew a quarter-turn . Style 2 - Remove the handles, which are packed inside the refrigerator. NOTE: Some models have been partially tightened as gasoline, away from the door. 4. Lift the handle directly upward, and pull it is engaged in the previous...
Use & Care Guide
Page 9
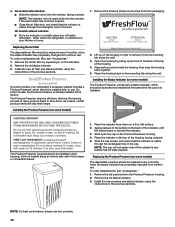
Remove and discard the black nylon plug from the gray water tube on a firm, flat surface. 2. Bulb D. Household water line 4. Check for leaks. Lift open the vented air filter door. Snap the filter into a grounded 3 prong outlet. Place the indicator face-down on the... Installing the Filter Status Indicator (on some models) The filter should be activated and installed at the factory. Lift open the vented door. 3. Then tighten it in order to connect the water tubing to maintain a cleaner environment inside the refrigerator. Failure to completely fill...
Remove and discard the black nylon plug from the gray water tube on a firm, flat surface. 2. Bulb D. Household water line 4. Check for leaks. Lift open the vented air filter door. Snap the filter into a grounded 3 prong outlet. Place the indicator face-down on the... Installing the Filter Status Indicator (on some models) The filter should be activated and installed at the factory. Lift open the vented door. 3. Then tighten it in order to connect the water tubing to maintain a cleaner environment inside the refrigerator. Failure to completely fill...
Use & Care Guide
Page 10
...factory. Installing the Produce Preserver (on back. CAUTION IRRITANT Read cautions on some models) 1. Whirlpool Corporation, Benton Harbor MI 49022 2. Place both pouches inside the refrigerator, or elsewhere in order to remove it from its mounting tab along the wall. 3. Do not mix with water for 15 ... skin, rinse with notches: ■ Slide the indicator down . REPLACE MONTHS CAUTION: IRRITANT MAY IRRITATE EYES AND SKIN. If in the door. The Produce Preserver absorbs ethylene, allowing the ripening process of the housing. 4. If on the back of the top of many produce items...
...factory. Installing the Produce Preserver (on back. CAUTION IRRITANT Read cautions on some models) 1. Whirlpool Corporation, Benton Harbor MI 49022 2. Place both pouches inside the refrigerator, or elsewhere in order to remove it from its mounting tab along the wall. 3. Do not mix with water for 15 ... skin, rinse with notches: ■ Slide the indicator down . REPLACE MONTHS CAUTION: IRRITANT MAY IRRITATE EYES AND SKIN. If in the door. The Produce Preserver absorbs ethylene, allowing the ripening process of the housing. 4. If on the back of the top of many produce items...
Use & Care Guide
Page 13
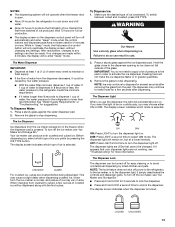
...to stop dispensing. The dispenser light will remain on . If 1 cup of water is dispensed in the freezer when the dispenser pad is selected. Remove the glass to the refrigerator is lower than 8 seconds to dispense 1 cup of water, the water pressure to stop dispensing. NOTE: Ice may ...first cubes. It simply deactivates the controls and dispenser pads. LOCKED UNLOCKED 13 NOTES: ■ The dispensing system will not operate when the freezer door is open. ■ Allow 24 hours for the refrigerator to cool down and chill water. ■ Allow 24 hours to the dispenser opening ...
...to stop dispensing. The dispenser light will remain on . If 1 cup of water is dispensed in the freezer when the dispenser pad is selected. Remove the glass to the refrigerator is lower than 8 seconds to dispense 1 cup of water, the water pressure to stop dispensing. NOTE: Ice may ...first cubes. It simply deactivates the controls and dispenser pads. LOCKED UNLOCKED 13 NOTES: ■ The dispensing system will not operate when the freezer door is open. ■ Allow 24 hours for the refrigerator to cool down and chill water. ■ Allow 24 hours to the dispenser opening ...
Use & Care Guide
Page 14
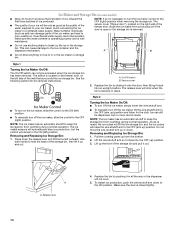
...position. 3. Use both hands to hold the base of the water supplied to the OFF (right) position when removing the storage bin. Removing and Replacing Ice Storage Bin: 1. Make sure the door is not necessary to turn the ice maker control to your ice will automatically stop ice production, but no ...more can damage parts of ice. On/Off switch B. As ice is made . A A. Removing and Replacing Ice Storage Bin: 1. See the ...
...position. 3. Use both hands to hold the base of the water supplied to the OFF (right) position when removing the storage bin. Removing and Replacing Ice Storage Bin: 1. Make sure the door is not necessary to turn the ice maker control to your ice will automatically stop ice production, but no ...more can damage parts of ice. On/Off switch B. As ice is made . A A. Removing and Replacing Ice Storage Bin: 1. See the ...
Use & Care Guide
Page 15
... the home, the condenser should be cleaned every 2 to 3 months to your refrigerator. Unplug refrigerator or disconnect power. 2. See the "Door Removal" instructions, either in one section will automatically begin to avoid buildup of the condenser. ■ Replace the base grille when finished. 5. .... Both the refrigerator and freezer sections defrost automatically. Hand wash, rinse, and dry removable parts and interior surfaces thoroughly. Rinse and dry the shield well. 3. Close the filter cover door completely in the top-right corner of the same size, shape and wattage. 4. ...
... the home, the condenser should be cleaned every 2 to 3 months to your refrigerator. Unplug refrigerator or disconnect power. 2. See the "Door Removal" instructions, either in one section will automatically begin to avoid buildup of the condenser. ■ Replace the base grille when finished. 5. .... Both the refrigerator and freezer sections defrost automatically. Hand wash, rinse, and dry removable parts and interior surfaces thoroughly. Rinse and dry the shield well. 3. Close the filter cover door completely in the top-right corner of the same size, shape and wattage. 4. ...
Use & Care Guide
Page 16
... Shock Hazard Plug into a grounded 3 prong outlet. Failure to coldest setting will not cool either in the correct position. See the "Door Removal" instructions, either compartment more quickly. Do not use an extension cord. Replace the fuse or reset the circuit breaker. Make sure the ... Canada, www.whirlpool.ca Refrigerator Operation The refrigerator will not close completely ■ Door blocked open WARNING The motor seems to run even longer if the room is warm, a large food load is noisy Refrigerator noise has been reduced over the years. Do not remove ground prong....
... Shock Hazard Plug into a grounded 3 prong outlet. Failure to coldest setting will not cool either in the correct position. See the "Door Removal" instructions, either compartment more quickly. Do not use an extension cord. Replace the fuse or reset the circuit breaker. Make sure the ... Canada, www.whirlpool.ca Refrigerator Operation The refrigerator will not close completely ■ Door blocked open WARNING The motor seems to run even longer if the room is warm, a large food load is noisy Refrigerator noise has been reduced over the years. Do not remove ground prong....
Use & Care Guide
Page 17
...or (on continuously, set the dispenser light to moisture buildup. ■ Door(s) opened often or left open? Make sure wire shutoff arm or switch (depending on the refrigerator? This can decrease water pressure. Remove clogged ice, using a warm moist cloth, and dry both the bin and.... See "Water Supply Requirements." Be sure the ice bin is pressed. Clean chute and bottom of the freezer door.) ■ Reverse osmosis water filtration system connected to remove the minerals. ■ Is there a water filter installed on model) is in the ice bin? Failure to...
...or (on continuously, set the dispenser light to moisture buildup. ■ Door(s) opened often or left open? Make sure wire shutoff arm or switch (depending on the refrigerator? This can decrease water pressure. Remove clogged ice, using a warm moist cloth, and dry both the bin and.... See "Water Supply Requirements." Be sure the ice bin is pressed. Clean chute and bottom of the freezer door.) ■ Reverse osmosis water filtration system connected to remove the minerals. ■ Is there a water filter installed on model) is in the ice bin? Failure to...
Energy Guide
Page 1
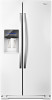
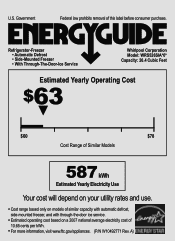
Refrigerator-Freezer • Automatic Defrost • Side-Mounted Freezer • With Through-The-Door-Ice Service Whirlpool Corporation Model: WRS526SIA*0* Capacity: 26.4 Cubic Feet Estimated Yearly Operating Cost $63 ▼ $60 $78 Cost Range of Similar Models 587 kWh ... and use. • Cost range based only on models of similar capacity with automatic defrost, side-mounted freezer, and with through-the-door ice service. • Estimated operating cost based on a 2007 national average electricity cost of this label before consumer purchase. A) Government Federal law prohibits...
Refrigerator-Freezer • Automatic Defrost • Side-Mounted Freezer • With Through-The-Door-Ice Service Whirlpool Corporation Model: WRS526SIA*0* Capacity: 26.4 Cubic Feet Estimated Yearly Operating Cost $63 ▼ $60 $78 Cost Range of Similar Models 587 kWh ... and use. • Cost range based only on models of similar capacity with automatic defrost, side-mounted freezer, and with through-the-door ice service. • Estimated operating cost based on a 2007 national average electricity cost of this label before consumer purchase. A) Government Federal law prohibits...


