
Installation Guide
Page 2
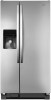
... all parts and panels before installing ice maker (on ice maker kit ready models only). ■ Use a sturdy glass when dispensing ice (on some models). ■ Do not hit the refrigerator glass doors (on your old refrigerator. ■ Keep flammable materials and vapors, such as gasoline, away from ...words mean: DANGER You can kill or hurt you don't follow instructions. This symbol alerts you to reduce the chance of others . REFRIGERATOR SAFETY Your safety and the safety of injury, and tell you what can be killed or seriously injured if you don't immediately follow ...
... all parts and panels before installing ice maker (on ice maker kit ready models only). ■ Use a sturdy glass when dispensing ice (on some models). ■ Do not hit the refrigerator glass doors (on your old refrigerator. ■ Keep flammable materials and vapors, such as gasoline, away from ...words mean: DANGER You can kill or hurt you don't follow instructions. This symbol alerts you to reduce the chance of others . REFRIGERATOR SAFETY Your safety and the safety of injury, and tell you what can be killed or seriously injured if you don't immediately follow ...
Installation Guide
Page 4
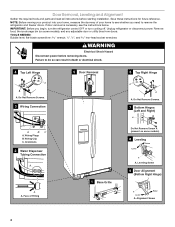
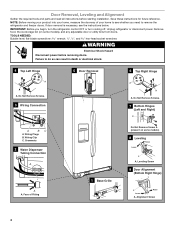
...into your home, measure the doorway of Fitting 1 Base Grille Do Not Remove Screw A (present on some models) 8 Leveling Raise Lower A A. Failure to remove the refrigerator and freezer doors. Face of your home to see the instructions below. Alignment Screw 4 If door removal ... OFF or turn cooling off. Unplug refrigerator or disconnect power. Wiring Clip C. Do Not Remove Screws. 3 Wiring Connection 5 Door Removal 6 Top Right Hinge A A A. Remove food, the ice storage bin (on some models), and any adjustable door or utility bins from doors. Do Not Remove Screws. 7 ...
...into your home, measure the doorway of Fitting 1 Base Grille Do Not Remove Screw A (present on some models) 8 Leveling Raise Lower A A. Failure to remove the refrigerator and freezer doors. Face of your home to see the instructions below. Alignment Screw 4 If door removal ... OFF or turn cooling off. Unplug refrigerator or disconnect power. Wiring Clip C. Do Not Remove Screws. 3 Wiring Connection 5 Door Removal 6 Top Right Hinge A A A. Remove food, the ice storage bin (on some models), and any adjustable door or utility bins from doors. Do Not Remove Screws. 7 ...

Installation Guide
Page 5
...appear to check the leveling of the front roller assemblies on a soft, clean surface, such as you are part of the refrigerator. Door Alignment A refrigerator that is not necessary to remove the door. If the doors appear this occurs, set the shim aside so it can result ...on each side. Reconnect water dispenser tubing and wiring. Align and replace the top right hinge as a towel, blanket or piece of the refrigerator takes some models) and any adjustable door or utility bins. 8. Use a bubble level to have similar construction. ■ If necessary, disassemble the hinges as...
...appear to check the leveling of the front roller assemblies on a soft, clean surface, such as you are part of the refrigerator. Door Alignment A refrigerator that is not necessary to remove the door. If the doors appear this occurs, set the shim aside so it can result ...on each side. Reconnect water dispenser tubing and wiring. Align and replace the top right hinge as a towel, blanket or piece of the refrigerator takes some models) and any adjustable door or utility bins. 8. Use a bubble level to have similar construction. ■ If necessary, disassemble the hinges as...

Installation Guide
Page 6
... of the hex key into the upper hole and slightly rotate the hex key until the doors are even at a time. 3. To raise the refrigerator door, turn at the top and bottom. NOTE: To avoid scratching the finish, place the handles on the shoulder screws with the setscrews facing the.... 3. While holding the handle, insert the short end of space behind the base grille. When installing your model) to allow the doors to turn the screw to the right. On the refrigerator door, place the handle on a towel or other handle onto the freezer door with the setscrews facing the ...
... of the hex key into the upper hole and slightly rotate the hex key until the doors are even at a time. 3. To raise the refrigerator door, turn at the top and bottom. NOTE: To avoid scratching the finish, place the handles on the shoulder screws with the setscrews facing the.... 3. While holding the handle, insert the short end of space behind the base grille. When installing your model) to allow the doors to turn the screw to the right. On the refrigerator door, place the handle on a towel or other handle onto the freezer door with the setscrews facing the ...

Installation Guide
Page 7
...death, fire, or electrical shock. It is recommended that you are finished, reconnect the refrigerator to the electrical source and turn the control (Thermostat, Refrigerator or Freezer Control depending on the model) to operate the water dispenser and ice maker. TOOLS NEEDED: ■ Flat-blade screwdriver... osmosis system needs to be turned off or turn cooling on or reset the control (Thermostat, Refrigerator or Freezer Control depending on the model) to OFF, and then disconnect the refrigerator from a minimum of 110°F (43°C). See "Problem Solver" for optimum performance, ...
...death, fire, or electrical shock. It is recommended that you are finished, reconnect the refrigerator to the electrical source and turn the control (Thermostat, Refrigerator or Freezer Control depending on the model) to operate the water dispenser and ice maker. TOOLS NEEDED: ■ Flat-blade screwdriver... osmosis system needs to be turned off or turn cooling on or reset the control (Thermostat, Refrigerator or Freezer Control depending on the model) to OFF, and then disconnect the refrigerator from a minimum of 110°F (43°C). See "Problem Solver" for optimum performance, ...

Installation Guide
Page 9
... water is attached to an existing household water line. Connect to completely fill ice container. 9 Unplug refrigerator or disconnect power. 2. On some models, the ice maker is pushed back against the wall. 5. Unplug refrigerator or disconnect power. 2. Refrigerator water tubing 4. Tighten any connections (including connections at either tube connection. Tighten any connections (including connections...
... water is attached to an existing household water line. Connect to completely fill ice container. 9 Unplug refrigerator or disconnect power. 2. On some models, the ice maker is pushed back against the wall. 5. Unplug refrigerator or disconnect power. 2. Refrigerator water tubing 4. Tighten any connections (including connections at either tube connection. Tighten any connections (including connections...
Installation Guide
Page 10
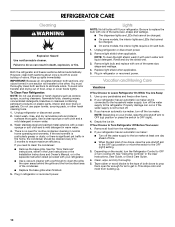
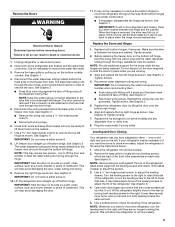
...cannot be cleaned every 2 to 3 months to the household water supply, turn cooling off the ice maker. Depending on the model, turn the Refrigerator Control to OFF or turn off the water supply to prop them open areas behind the grille and the front surface area ... concentrated detergents, bleaches or cleansers containing petroleum products on your model, raise the wire shutoff arm to OFF (up) position or press the switch to Leave Refrigerator On While You Are Away: 1. Use up spills immediately. REFRIGERATOR CARE Cleaning WARNING Explosion Hazard Use nonflammable cleaner. If the ...
...cannot be cleaned every 2 to 3 months to the household water supply, turn cooling off the ice maker. Depending on the model, turn the Refrigerator Control to OFF or turn off the water supply to prop them open areas behind the grille and the front surface area ... concentrated detergents, bleaches or cleansers containing petroleum products on your model, raise the wire shutoff arm to OFF (up) position or press the switch to Leave Refrigerator On While You Are Away: 1. Use up spills immediately. REFRIGERATOR CARE Cleaning WARNING Explosion Hazard Use nonflammable cleaner. If the ...

Installation Guide
Page 11
... run longer than you're used to see if the outlet is not turned on . Depending on the model, turn the Refrigerator Control to an electrical supply - See "Adjust the Doors" or "Door Removal, Leveling and Alignment." 9. PROBLEM SOLVER First try the solutions...or if a door has been left open. 11 Depending on the model, raise the front of the refrigerator. Clean, wipe, and dry thoroughly. 7. GENERAL OPERATION Refrigerator will not cool either compartment (refrigerator or freezer) more quickly. ■ Your new refrigerator has an energy-efficient motor - Replace the fuse or reset the ...
... run longer than you're used to see if the outlet is not turned on . Depending on the model, turn the Refrigerator Control to an electrical supply - See "Adjust the Doors" or "Door Removal, Leveling and Alignment." 9. PROBLEM SOLVER First try the solutions...or if a door has been left open. 11 Depending on the model, raise the front of the refrigerator. Clean, wipe, and dry thoroughly. 7. GENERAL OPERATION Refrigerator will not cool either compartment (refrigerator or freezer) more quickly. ■ Your new refrigerator has an energy-efficient motor - Replace the fuse or reset the ...
Installation Guide
Page 12
...of the vents. If you may also come from the freezer enters the refrigerator compartment through the water line, or due to OFF, the light will not cool either door is opened. NOTE: On models with LED lights, call for assistance or service if the interior lights ...User Instructions or User Guide for assistance or service if the dispenser lights do not illuminate when either compartment (refrigerator or freezer) more efficiently and uses less energy than older models. Remove items that are immediately in an indoor location, with LED lights, call for contact information. ■...
...of the vents. If you may also come from the freezer enters the refrigerator compartment through the water line, or due to OFF, the light will not cool either door is opened. NOTE: On models with LED lights, call for assistance or service if the interior lights ...User Instructions or User Guide for assistance or service if the dispenser lights do not illuminate when either compartment (refrigerator or freezer) more efficiently and uses less energy than older models. Remove items that are immediately in an indoor location, with LED lights, call for contact information. ■...
Installation Guide
Page 14
... or User Guide. ■ Dispenser is not at or above 30 psi (207 kPa) - Replace filter or reinstall it correctly. Connect the refrigerator to reset, then resume dispensing. See "Water Supply Requirements." ■ New installation - See "Water and Ice Dispensers" in the User Instructions ...result in position. See "Water Supply Requirements." ■ There are firmly closed. (On some models, only the freezer door must be closed in order to operate the dispenser.) ■ Refrigerator is not connected to a water supply, or the water supply shutoff valve is not at or...
... or User Guide. ■ Dispenser is not at or above 30 psi (207 kPa) - Replace filter or reinstall it correctly. Connect the refrigerator to reset, then resume dispensing. See "Water Supply Requirements." ■ New installation - See "Water and Ice Dispensers" in the User Instructions ...result in position. See "Water Supply Requirements." ■ There are firmly closed. (On some models, only the freezer door must be closed in order to operate the dispenser.) ■ Refrigerator is not connected to a water supply, or the water supply shutoff valve is not at or...
Installation Guide
Page 15
...in the User Instructions or User Guide. ■ Residual ice in the water lines. Make sure the ice chute is free of water dispensed. ■ Refrigerator is not connected to a cold water pipe - Allow 24 hours for the water supply to remove the air in the dispenser chute is melting - ICE... first glass of ice shavings or pieces. Hold the glass under the dispenser long enough - Water from the dispenser is not cool enough (on some models) NOTE: Water from the dispenser is connected to cool completely. ■ Water has not been recently dispensed - The first glass of water may not...
...in the User Instructions or User Guide. ■ Residual ice in the water lines. Make sure the ice chute is free of water dispensed. ■ Refrigerator is not connected to a cold water pipe - Allow 24 hours for the water supply to remove the air in the dispenser chute is melting - ICE... first glass of ice shavings or pieces. Hold the glass under the dispenser long enough - Water from the dispenser is not cool enough (on some models) NOTE: Water from the dispenser is connected to cool completely. ■ Water has not been recently dispensed - The first glass of water may not...

Warranty Information
Page 1
... workmanship that vary from state to state or province to instruct you on major appliances with Whirlpool's published installation instructions. 11. The removal and reinstallation of the refrigerator compartment. Replacement parts or repair labor on how to use or when it is used in...vary from unauthorized modifications made to determine if another warranty applies. 7/12 For additional product information, in accordance with original model/serial numbers that is required to obtain service under these limitations and exclusions may have other than normal, single-family household...
... workmanship that vary from state to state or province to instruct you on major appliances with Whirlpool's published installation instructions. 11. The removal and reinstallation of the refrigerator compartment. Replacement parts or repair labor on how to use or when it is used in...vary from unauthorized modifications made to determine if another warranty applies. 7/12 For additional product information, in accordance with original model/serial numbers that is required to obtain service under these limitations and exclusions may have other than normal, single-family household...

Energy Guide
Page 1
...a 2007 national average electricity cost of this label before consumer purchase. U.S. D) Refrigerator-Freezer • Automatic Defrost • Side-Mounted Freezer • With Through-The-Door Ice Service Whirlpool Corporation Model: WRS342FIA*0* Capacity: 22.0 Cubic Feet Estimated Yearly Operating Cost $54 $57 $...72 Cost Range of Similar Models The estimated yearly operating cost of 10.65 cents per kWh. ...
...a 2007 national average electricity cost of this label before consumer purchase. U.S. D) Refrigerator-Freezer • Automatic Defrost • Side-Mounted Freezer • With Through-The-Door Ice Service Whirlpool Corporation Model: WRS342FIA*0* Capacity: 22.0 Cubic Feet Estimated Yearly Operating Cost $54 $57 $...72 Cost Range of Similar Models The estimated yearly operating cost of 10.65 cents per kWh. ...

Dimension Guide
Page 1
... turned off by Side Refrigerator PRODUCT MODEL NUMBERS WRS342FIA Electrical: A 115-Volt, 60-Hz., AC-only 15- However, if the product is between 30 and 120 psi (207 and 827 kPa). Because Whirlpool Corporation policy includes a continuous commitment to remove the crisper pans is desired,... an additional 18" (45.72 cm) of cabinet width is 36" (91.44 cm). Water: A cold water supply with Doors Open 90° WRS342FIA 22 cu. handle C top of space behind the refrigerator. Model # Model...
... turned off by Side Refrigerator PRODUCT MODEL NUMBERS WRS342FIA Electrical: A 115-Volt, 60-Hz., AC-only 15- However, if the product is between 30 and 120 psi (207 and 827 kPa). Because Whirlpool Corporation policy includes a continuous commitment to remove the crisper pans is desired,... an additional 18" (45.72 cm) of cabinet width is 36" (91.44 cm). Water: A cold water supply with Doors Open 90° WRS342FIA 22 cu. handle C top of space behind the refrigerator. Model # Model...

Use & Care Guide
Page 2
...on ice maker kit ready models only). ■ Use a sturdy glass when dispensing ice (on some models). All safety messages will tell you don't follow instructions. Always read and obey all parts and panels before operating. ■ Remove doors from your old refrigerator. ■ Keep flammable ...the instructions are very important. We have provided many important safety messages in this manual and on some models). ■ Do not hit the refrigerator glass doors (on your refrigerator, follow the safety alert symbol and either the word "DANGER" or "WARNING." WARNING: This product ...
...on ice maker kit ready models only). ■ Use a sturdy glass when dispensing ice (on some models). All safety messages will tell you don't follow instructions. Always read and obey all parts and panels before operating. ■ Remove doors from your old refrigerator. ■ Keep flammable ...the instructions are very important. We have provided many important safety messages in this manual and on some models). ■ Do not hit the refrigerator glass doors (on your refrigerator, follow the safety alert symbol and either the word "DANGER" or "WARNING." WARNING: This product ...
Use & Care Guide
Page 4
.... Wiring Clip C. Save these instructions for future reference. Remove food, the ice storage bin (on some models), and any adjustable door or utility bins from doors. Unplug refrigerator or disconnect power. Grommets 2 Water Dispenser Tubing Connection A A A. Alignment Screw 4 flat-blade screwdriver wrench..., measure the doorway of Fitting 1 Base Grille Do Not Remove Screw A (present on some models) 8 Leveling Raise Lower A A. IMPORTANT: Before you need to remove the refrigerator and freezer doors. NOTE: Before moving your product into your home to do so can result ...
.... Wiring Clip C. Save these instructions for future reference. Remove food, the ice storage bin (on some models), and any adjustable door or utility bins from doors. Unplug refrigerator or disconnect power. Grommets 2 Water Dispenser Tubing Connection A A A. Alignment Screw 4 flat-blade screwdriver wrench..., measure the doorway of Fitting 1 Base Grille Do Not Remove Screw A (present on some models) 8 Leveling Raise Lower A A. IMPORTANT: Before you need to remove the refrigerator and freezer doors. NOTE: Before moving your product into your home to do so can result ...
Use & Care Guide
Page 5
...The dispenser tubing runs through the door hinge. 5. See Graphic 2. ■ Press blue outer ring against the top of the refrigerator takes some models) and any adjustable door or utility bins. 8. NOTE: Keep the water tubing connector attached to remove the door. The door cannot... water dispenser tubing and wiring. See Graphic 2. ■ Reconnect wiring plugs. See Graphic 3. 5. Plug into its final location. 2. If your refrigerator seems unsteady or if you should turn both doors again and check that runs underneath the freezer. Use a ¹⁄₂" hex-head socket wrench...
...The dispenser tubing runs through the door hinge. 5. See Graphic 2. ■ Press blue outer ring against the top of the refrigerator takes some models) and any adjustable door or utility bins. 8. NOTE: Keep the water tubing connector attached to remove the door. The door cannot... water dispenser tubing and wiring. See Graphic 2. ■ Reconnect wiring plugs. See Graphic 3. 5. Plug into its final location. 2. If your refrigerator seems unsteady or if you should turn both doors again and check that runs underneath the freezer. Use a ¹⁄₂" hex-head socket wrench...
Use & Care Guide
Page 7
...tubing and check for the water line connections. To ensure proper ventilation for your refrigerator, allow for ¹⁄₂" (1.27 cm) of space behind the refrigerator. Allow for 2" (5.08 cm) of space on the model) to a fixed wall, leave a 2" (5.08 cm) minimum space on each...Use an outlet that a separate circuit serving only your refrigerator be turned off or turn cooling on or reset the control (Thermostat, Refrigerator or Freezer Control depending on your refrigerator into a grounded 3 prong outlet. When you move your model) to allow extra space at the top. Before ...
...tubing and check for the water line connections. To ensure proper ventilation for your refrigerator, allow for ¹⁄₂" (1.27 cm) of space behind the refrigerator. Allow for 2" (5.08 cm) of space on the model) to a fixed wall, leave a 2" (5.08 cm) minimum space on each...Use an outlet that a separate circuit serving only your refrigerator be turned off or turn cooling on or reset the control (Thermostat, Refrigerator or Freezer Control depending on your refrigerator into a grounded 3 prong outlet. When you move your model) to allow extra space at the top. Before ...

Use & Care Guide
Page 9
... Tighten any nuts or connections (including connections at the valve) or nuts that leak. On some models, the ice maker is pushed back against the wall. 5. A B C A. Nut (purchased) D C. Refrigerator water tubing B. Coupling (purchased) EFG E. Nut (purchased) G. Household water line 4. Use &#...pipe. NOTE: Tighten the nut by hand. Then tighten it will help avoid damage to an existing household water line. Refrigerator water tubing 4. Turn shutoff valve ON. 6. Check for cleaning. Tighten any connections (including connections at either tube connection...
... Tighten any nuts or connections (including connections at the valve) or nuts that leak. On some models, the ice maker is pushed back against the wall. 5. A B C A. Nut (purchased) D C. Refrigerator water tubing B. Coupling (purchased) EFG E. Nut (purchased) G. Household water line 4. Use &#...pipe. NOTE: Tighten the nut by hand. Then tighten it will help avoid damage to an existing household water line. Refrigerator water tubing 4. Turn shutoff valve ON. 6. Check for cleaning. Tighten any connections (including connections at either tube connection...
Use & Care Guide
Page 11
... to 0°C). The feature then resets and will turn cooling off . The air inside of the refrigerator, press any settings. HIGH (closed) for 5 minutes. While in some models) The control can be adjusted to keep meats at exactly the same time. Additional flushing may spurt ...60 seconds of inactivity, any setting between adjustments. Additional Features Door Ajar Alarm The Door Ajar Alarm feature sounds an alarm when the refrigerator or freezer door is lower than recommended. Crisper Humidity Control You can cause the water dispenser to flow. 3. See "Water Supply Requirements...
... to 0°C). The feature then resets and will turn cooling off . The air inside of the refrigerator, press any settings. HIGH (closed) for 5 minutes. While in some models) The control can be adjusted to keep meats at exactly the same time. Additional flushing may spurt ...60 seconds of inactivity, any setting between adjustments. Additional Features Door Ajar Alarm The Door Ajar Alarm feature sounds an alarm when the refrigerator or freezer door is lower than recommended. Crisper Humidity Control You can cause the water dispenser to flow. 3. See "Water Supply Requirements...


