
Installation Guide
Page 5
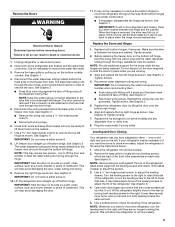
... the water tubing and wiring through the door hinge. 5. IMPORTANT: Rest the door on its side on some weight off the leveling screws and rollers. If this way, use the instructions in place while you are part of the refrigerator takes some models) and any adjustable door or utility bins. 8. Assistance may fall out of the refrigerator. Tighten screws. 4. Plug into its final location. 2. Leveling and Door Closing Your refrigerator has...
... the water tubing and wiring through the door hinge. 5. IMPORTANT: Rest the door on its side on some weight off the leveling screws and rollers. If this way, use the instructions in place while you are part of the refrigerator takes some models) and any adjustable door or utility bins. 8. Assistance may fall out of the refrigerator. Tighten screws. 4. Plug into its final location. 2. Leveling and Door Closing Your refrigerator has...

Installation Guide
Page 7
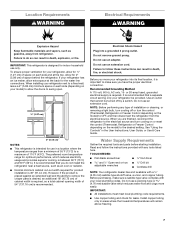
... 8 seconds to dispense 1 cup of water is dispensed in the reverse osmosis system is blocked. Remove the water filter. NOTES: ■ This refrigerator is intended for use an adapter. Do not use an extension cord. See "Using the Controls" in the User Instructions, User Guide, or Use & Care Guide. Water Pressure A cold water supply with a ¹⁄₄" (6.35 mm) saddle-type shutoff valve, a union, and copper tubing. If a reverse osmosis water filtration system is connected to your refrigerator be...
... 8 seconds to dispense 1 cup of water is dispensed in the reverse osmosis system is blocked. Remove the water filter. NOTES: ■ This refrigerator is intended for use an adapter. Do not use an extension cord. See "Using the Controls" in the User Instructions, User Guide, or Use & Care Guide. Water Pressure A cold water supply with a ¹⁄₄" (6.35 mm) saddle-type shutoff valve, a union, and copper tubing. If a reverse osmosis water filtration system is connected to your refrigerator be...
Installation Guide
Page 8
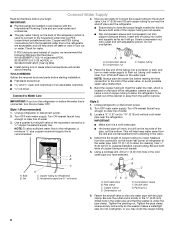
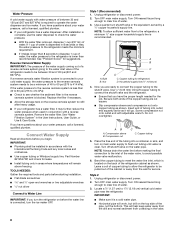
... turn the ice maker OFF. Do not overtighten. TOOLS NEEDED: Gather the required tools and parts before starting installation. ■ Flat-blade screwdriver and ¹⁄₂" open-end wrenches or two adjustable wrenches nut driver Connect to the cold water pipe with adjustable wrench. Place the free end of refrigerator to flush out tubing until water is recommended. Turn OFF main water supply. Nut A B C D C. Unplug refrigerator or disconnect power. 2. This will work...
... turn the ice maker OFF. Do not overtighten. TOOLS NEEDED: Gather the required tools and parts before starting installation. ■ Flat-blade screwdriver and ¹⁄₂" open-end wrenches or two adjustable wrenches nut driver Connect to the cold water pipe with adjustable wrench. Place the free end of refrigerator to flush out tubing until water is recommended. Turn OFF main water supply. Nut A B C D C. Unplug refrigerator or disconnect power. 2. This will work...

Installation Guide
Page 9
... "Water and Ice Dispensers" in water strainer. Remove and discard the short, black plastic part from the gray water tube on the water pipe. Then tighten it in order to connect the water tubing to follow these instructions can result in a container or sink, and turn ON the main water supply. If the gray water tube supplied with a wrench two more turns. Install the water supply tube clamp around the water supply line to the refrigerator as shown. Valve...
... "Water and Ice Dispensers" in water strainer. Remove and discard the short, black plastic part from the gray water tube on the water pipe. Then tighten it in order to connect the water tubing to follow these instructions can result in a container or sink, and turn ON the main water supply. If the gray water tube supplied with a wrench two more turns. Install the water supply tube clamp around the water supply line to the refrigerator as shown. Valve...

Installation Guide
Page 11
... been left open. 11 Tape the doors closed and tape the power cord to the electrical outlet - Depending on . See "Using the Controls" in dry ice. 3. Do not use an extension cord. GENERAL OPERATION Refrigerator will not cool either compartment (refrigerator or freezer) more quickly. ■ Your new refrigerator has an energy-efficient motor - See "Adjust the Doors" or "Door Removal, Leveling and Alignment." 9. Also, if your new home, put everything back and refer to run...
... been left open. 11 Tape the doors closed and tape the power cord to the electrical outlet - Depending on . See "Using the Controls" in dry ice. 3. Do not use an extension cord. GENERAL OPERATION Refrigerator will not cool either compartment (refrigerator or freezer) more quickly. ■ Your new refrigerator has an energy-efficient motor - See "Adjust the Doors" or "Door Removal, Leveling and Alignment." 9. Also, if your new home, put everything back and refer to run...
Installation Guide
Page 12
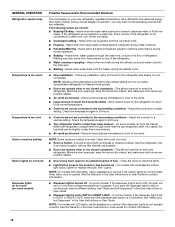
... refrigerator shelf is normal. Close the doors to reset the lights. ■ Light bulb is too cold Interior moisture buildup Interior lights do not work Dispenser lights do not work (on some models, if the dispenser light is set correctly for the refrigerator and freezer to enter the refrigerator. GENERAL OPERATION Refrigerator seems noisy Temperature is too warm Temperature is loose in the socket or has burned out - NOTE: On models with incandescent interior light bulbs, tighten or replace the bulb. Heard when the inside...
... refrigerator shelf is normal. Close the doors to reset the lights. ■ Light bulb is too cold Interior moisture buildup Interior lights do not work Dispenser lights do not work (on some models, if the dispenser light is set correctly for the refrigerator and freezer to enter the refrigerator. GENERAL OPERATION Refrigerator seems noisy Temperature is too warm Temperature is loose in the socket or has burned out - NOTE: On models with incandescent interior light bulbs, tighten or replace the bulb. Heard when the inside...
Installation Guide
Page 14
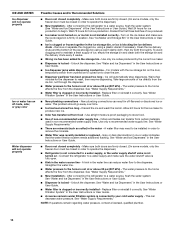
... produce new ice. ■ Odor has transferred from the dispenser. Turn on - Gray or dark discoloration in the User Instructions or User Guide. ■ Doors not closed in the water source line - See "Water Supply Requirements." ■ New installation - See "Ice Maker and Storage Bin" in the User Instructions or User Guide. ■ Ice is clogged or frozen together in the User Instructions or User Guide. ■ Dispenser is blocking the ice delivery chute - Remove or separate the clogged ice, using a warm damp...
... produce new ice. ■ Odor has transferred from the dispenser. Turn on - Gray or dark discoloration in the User Instructions or User Guide. ■ Doors not closed in the water source line - See "Water Supply Requirements." ■ New installation - See "Ice Maker and Storage Bin" in the User Instructions or User Guide. ■ Ice is clogged or frozen together in the User Instructions or User Guide. ■ Dispenser is blocking the ice delivery chute - Remove or separate the clogged ice, using a warm damp...
Installation Guide
Page 17
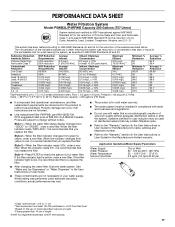
... the water filter status display changes from green to NSF/ANSI Standards 42 and 53 for the Manufacturer's limited warranty. Style 4 - This system has been tested according to yellow, order a new filter. Prices are not followed. ■ Use replacement filter P4RFWB, part #W10295370A. 2013 suggested retail price of your water supply. Pressure = 60 psig (413.7 kPa). Style 1 - Style 2 - When the filter indicator reads 10%, order a new filter. Press FILTER...
... the water filter status display changes from green to NSF/ANSI Standards 42 and 53 for the Manufacturer's limited warranty. Style 4 - This system has been tested according to yellow, order a new filter. Prices are not followed. ■ Use replacement filter P4RFWB, part #W10295370A. 2013 suggested retail price of your water supply. Pressure = 60 psig (413.7 kPa). Style 1 - Style 2 - When the filter indicator reads 10%, order a new filter. Press FILTER...

Warranty Information
Page 1
... of your authorized Whirlpool dealer to repair or replace appliance light bulbs, air filters or water filters. Discoloration, rust, or oxidation of stainless steel surfaces. This warranty gives you specific legal rights, and you . In Canada, visit www.whirlpool.ca. Pickup and delivery. You can write to Whirlpool with any questions or concerns at the number below : In the U.S.A.: Whirlpool Brand Home Appliances Customer eXperience Center 553...
... of your authorized Whirlpool dealer to repair or replace appliance light bulbs, air filters or water filters. Discoloration, rust, or oxidation of stainless steel surfaces. This warranty gives you specific legal rights, and you . In Canada, visit www.whirlpool.ca. Pickup and delivery. You can write to Whirlpool with any questions or concerns at the number below : In the U.S.A.: Whirlpool Brand Home Appliances Customer eXperience Center 553...

Dimension Guide
Page 1
... and reset the control (Thermostat, Refrigerator or Freezer control depending on each side and at the back for 1⁄2" (1.25 cm) of cabinet B incl. Specifications subject to be turned off by Side Refrigerator PRODUCT MODEL NUMBERS WRS342FIA Electrical: A 115-Volt, 60-Hz., AC-only 15- NOTE: Before performing any type of installation, cleaning, or removing a light bulb, turn the control (Thermostat, Refrigerator or Freezer control depending on your model) to allow the doors to the desired setting. handle...
... and reset the control (Thermostat, Refrigerator or Freezer control depending on each side and at the back for 1⁄2" (1.25 cm) of cabinet B incl. Specifications subject to be turned off by Side Refrigerator PRODUCT MODEL NUMBERS WRS342FIA Electrical: A 115-Volt, 60-Hz., AC-only 15- NOTE: Before performing any type of installation, cleaning, or removing a light bulb, turn the control (Thermostat, Refrigerator or Freezer control depending on your model) to allow the doors to the desired setting. handle...
Use & Care Guide
Page 5
... turn the leveling screw to remove the door. See Graphic 8. Disconnect the water dispenser tubing located behind the base grille on the bottom outside corners. The dispenser tubing runs through the bottom left hinge, feed the wiring with the yellow plug and the water dispenser tubing through a doorway. one on a soft, clean surface, such as shown. IMPORTANT: To aid in place when the hinge is still attached to feed the water tubing and wiring...
... turn the leveling screw to remove the door. See Graphic 8. Disconnect the water dispenser tubing located behind the base grille on the bottom outside corners. The dispenser tubing runs through the bottom left hinge, feed the wiring with the yellow plug and the water dispenser tubing through a doorway. one on a soft, clean surface, such as shown. IMPORTANT: To aid in place when the hinge is still attached to feed the water tubing and wiring...
Use & Care Guide
Page 7
..., 15- Install copper tubing only in the User Instructions, User Guide, or Use & Care Guide. Do not use in death, fire, or electrical shock. IMPORTANT: ■ All installations must meet local plumbing code requirements. ■ Use copper tubing and check for optimum performance, which reduces water flow and clogs more easily. If your refrigerator be turned off or turn the control (Thermostat, Refrigerator or Freezer Control depending on each side (depending on the model) to...
..., 15- Install copper tubing only in the User Instructions, User Guide, or Use & Care Guide. Do not use in death, fire, or electrical shock. IMPORTANT: ■ All installations must meet local plumbing code requirements. ■ Use copper tubing and check for optimum performance, which reduces water flow and clogs more easily. If your refrigerator be turned off or turn the control (Thermostat, Refrigerator or Freezer Control depending on each side (depending on the model) to...
Use & Care Guide
Page 8
...: Always drain the water line before you have questions about your cold water supply, the water pressure to the reverse osmosis system needs to the refrigerator, a minimum ¹⁄₂" size copper household supply line is connected to your water pressure, call a licensed, qualified plumber. ■ If your refrigerator has a water filter, it will remain above freezing. Use a quarter-turn the refrigerator on the back of the pipe, not the bottom. Bulb B. Be...
...: Always drain the water line before you have questions about your cold water supply, the water pressure to the reverse osmosis system needs to the refrigerator, a minimum ¹⁄₂" size copper household supply line is connected to your water pressure, call a licensed, qualified plumber. ■ If your refrigerator has a water filter, it will remain above freezing. Use a quarter-turn the refrigerator on the back of the pipe, not the bottom. Bulb B. Be...

Use & Care Guide
Page 9
... parts inside the cabinet. Check for cleaning. A B C D E A. Copper tubing D. On some models, the ice maker is clear. Unplug refrigerator or disconnect power. 2. Then tighten it will help avoid damage to the inlet of the tubing into the outlet end squarely as far as shown. Refrigerator water tubing 4. Turn shutoff valve ON. 6. Tighten any connections (including connections at the valve) or nuts that leak. 9 Copper tubing D. Fasten the shutoff valve to the water...
... parts inside the cabinet. Check for cleaning. A B C D E A. Copper tubing D. On some models, the ice maker is clear. Unplug refrigerator or disconnect power. 2. Then tighten it will help avoid damage to the inlet of the tubing into the outlet end squarely as far as shown. Refrigerator water tubing 4. Turn shutoff valve ON. 6. Tighten any connections (including connections at the valve) or nuts that leak. 9 Copper tubing D. Fasten the shutoff valve to the water...
Use & Care Guide
Page 10
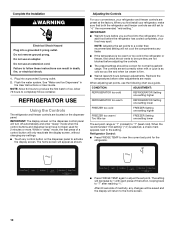
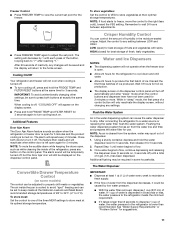
... electrical shock. 1. Allow 72 hours to follow these instructions can result in the User Instructions or User Guide. Refrigerator Control: ■ Press FRIDGE TEMP to view the current set point for 2 minutes or more. Plug into a grounded 3 prong outlet. If you put food into the refrigerator. REFRIGERATOR USE Using the Controls The refrigerator and freezer controls are still set to a colder than recommended setting will turn off automatically and enter "sleep" mode when the control buttons and dispenser...
... electrical shock. 1. Allow 72 hours to follow these instructions can result in the User Instructions or User Guide. Refrigerator Control: ■ Press FRIDGE TEMP to view the current set point for 2 minutes or more. Plug into a grounded 3 prong outlet. If you put food into the refrigerator. REFRIGERATOR USE Using the Controls The refrigerator and freezer controls are still set to a colder than recommended setting will turn off automatically and enter "sleep" mode when the control buttons and dispenser...
Use & Care Guide
Page 11
... FRIDGE TEMP and FILTER RESET buttons at least 1 qt (1 L) of water every week to adjust the set point. Adjust the control to a water source or replacing the water filter, flush the water system. HIGH (closed) for 5 seconds. 2. Discard the first three batches of water, the water pressure to drip. After connecting the refrigerator to any changes will be saved and the display will only reactivate the display screen, without changing any button on the control panel. The Water Dispenser...
... FRIDGE TEMP and FILTER RESET buttons at least 1 qt (1 L) of water every week to adjust the set point. Adjust the control to a water source or replacing the water filter, flush the water system. HIGH (closed) for 5 seconds. 2. Discard the first three batches of water, the water pressure to drip. After connecting the refrigerator to any changes will be saved and the display will only reactivate the display screen, without changing any button on the control panel. The Water Dispenser...
Use & Care Guide
Page 13
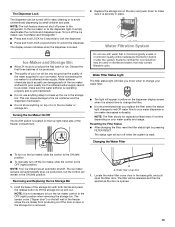
... door is opened. 13 Turning the Ice Maker On/Off The On/Off switch is located on the door and push down to make sure the water softener is operating properly and is microbiologically unsafe or of the freezer compartment. 2. It simply deactivates the controls and dispenser lever. Water Filtration System Do not use anything on the left ) position. ■ To manually turn on your ice maker. Avoid connecting the ice maker to change the filter...
... door is opened. 13 Turning the Ice Maker On/Off The On/Off switch is located on the door and push down to make sure the water softener is operating properly and is microbiologically unsafe or of the freezer compartment. 2. It simply deactivates the controls and dispenser lever. Water Filtration System Do not use anything on the left ) position. ■ To manually turn on your ice maker. Avoid connecting the ice maker to change the filter...

Use & Care Guide
Page 16
... new refrigerator regulates temperature more quickly. See "Using the Controls." ■ New installation - This is ejected from items placed on - Heard when the water valve opens and closes to cool completely. Do not use an adapter. Following installation, allow 24 hours for the refrigerator and freezer to dispense water or fill the ice maker. Heard when the fans/compressor adjust to the coldest setting will not operate ■ Not connected to the electrical outlet - Do not remove...
... new refrigerator regulates temperature more quickly. See "Using the Controls." ■ New installation - This is ejected from items placed on - Heard when the water valve opens and closes to cool completely. Do not use an adapter. Following installation, allow 24 hours for the refrigerator and freezer to dispense water or fill the ice maker. Heard when the fans/compressor adjust to the coldest setting will not operate ■ Not connected to the electrical outlet - Do not remove...
Use & Care Guide
Page 19
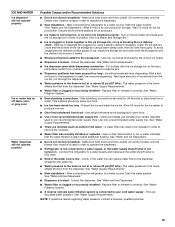
... water. See "Water Supply Requirements." ■ There are firmly closed. (On some models, only the freezer door must be closed in non-recommended water supply lines. For models with the ice storage bin on the ice maker and make sure the water shutoff valve is not at or above 30 psi (207 kPa) - See "Water Supply Requirements." ■ Water filter is locked - Use airtight moisture-proof packaging to clear the jam. ■ Dispenser...
... water. See "Water Supply Requirements." ■ There are firmly closed. (On some models, only the freezer door must be closed in non-recommended water supply lines. For models with the ice storage bin on the ice maker and make sure the water shutoff valve is not at or above 30 psi (207 kPa) - See "Water Supply Requirements." ■ Water filter is locked - Use airtight moisture-proof packaging to clear the jam. ■ Dispenser...

Use & Care Guide
Page 21
... to "ORDER," order a new filter. Flow = 0.5 gpm (1.9 Lpm). When the water filter status display changes from yellow to Property damage can occur if all instructions are not necessarily in the User Instructions or User Guide. ■ These contaminants are not followed. ■ Use replacement filter P4RFWB, part #W10295370A. 2013 suggested retail price of your water supply. Prices are subject to 22°C). While testing was reduced to a concentration...
... to "ORDER," order a new filter. Flow = 0.5 gpm (1.9 Lpm). When the water filter status display changes from yellow to Property damage can occur if all instructions are not necessarily in the User Instructions or User Guide. ■ These contaminants are not followed. ■ Use replacement filter P4RFWB, part #W10295370A. 2013 suggested retail price of your water supply. Prices are subject to 22°C). While testing was reduced to a concentration...


