
Warranty Information
Page 1
... other damage to the finish of your major appliance, unless such damage results from the date of the refrigerator compartment. If you need assistance using your home. 8. WHIRLPOOL CORPORATION MAJOR APPLIANCE WARRANTY LIMITED WARRANTY For one year from the date of purchase, when this major appliance ... alteration, misuse, abuse, fire, flood, acts of original purchase date is reported to be provided by an authorized Whirlpool servicer is used for Factory Specified Parts and repair labor to correct defects in your product or you would like to schedule service, you also may not ...
... other damage to the finish of your major appliance, unless such damage results from the date of the refrigerator compartment. If you need assistance using your home. 8. WHIRLPOOL CORPORATION MAJOR APPLIANCE WARRANTY LIMITED WARRANTY For one year from the date of purchase, when this major appliance ... alteration, misuse, abuse, fire, flood, acts of original purchase date is reported to be provided by an authorized Whirlpool servicer is used for Factory Specified Parts and repair labor to correct defects in your product or you would like to schedule service, you also may not ...
Use & Care Guide
Page 2
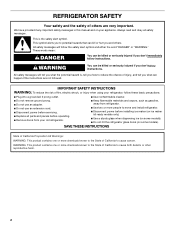
...what the potential hazard is the safety alert symbol. IMPORTANT SAFETY INSTRUCTIONS WARNING: To reduce the risk of California to move and install refrigerator. ■ Disconnect power before installing ice maker (on ice maker kit ready models only). ■ Use a sturdy glass when ...models). ■ Do not hit the refrigerator glass doors (on your appliance. Always read and obey all parts and panels before operating. ■ Remove doors from your old refrigerator. ■ Keep flammable materials and vapors, such as gasoline, away from refrigerator. ■ Use two or more ...
...what the potential hazard is the safety alert symbol. IMPORTANT SAFETY INSTRUCTIONS WARNING: To reduce the risk of California to move and install refrigerator. ■ Disconnect power before installing ice maker (on ice maker kit ready models only). ■ Use a sturdy glass when ...models). ■ Do not hit the refrigerator glass doors (on your appliance. Always read and obey all parts and panels before operating. ■ Remove doors from your old refrigerator. ■ Keep flammable materials and vapors, such as gasoline, away from refrigerator. ■ Use two or more ...
Use & Care Guide
Page 4
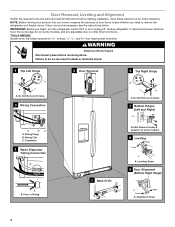
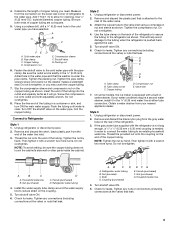
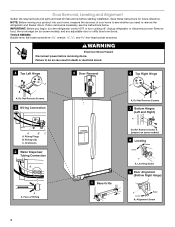
...-blade screwdriver wrench and hex-head socket wrenches WARNING Electrical Shock Hazard Disconnect power before starting installation. Save these instructions for future reference. Unplug refrigerator or disconnect power. Do Not Remove Screws. 7 Bottom Hinges (Left and Right) A A BC A. Grommets 2 Water Dispenser Tubing Connection ... Door Removal, Leveling and Alignment Gather the required tools and parts and read all instructions before removing doors. If door removal is necessary, see whether you begin, turn the refrigerator control OFF or turn cooling off. Face of your home,...
...-blade screwdriver wrench and hex-head socket wrenches WARNING Electrical Shock Hazard Disconnect power before starting installation. Save these instructions for future reference. Unplug refrigerator or disconnect power. Do Not Remove Screws. 7 Bottom Hinges (Left and Right) A A BC A. Grommets 2 Water Dispenser Tubing Connection ... Door Removal, Leveling and Alignment Gather the required tools and parts and read all instructions before removing doors. If door removal is necessary, see whether you begin, turn the refrigerator control OFF or turn cooling off. Face of your home,...

Use & Care Guide
Page 5
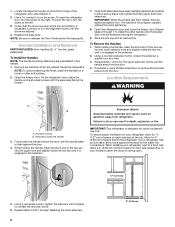
...the doors while the top hinges are part of the leveling screws to close as easily as shown. Reinstall the wiring clip over the grommets. Tighten screw. Leveling and Door Closing Your refrigerator has two front adjustable rollers - Move the refrigerator into its side on the left ...the hinge. Both bottom hinges have similar construction. ■ If necessary, disassemble the hinges as a towel, blanket or piece of the refrigerator. Make sure the shim is reconnected later. Tighten screws. 4. IMPORTANT: Do not intertwine the water tubing and wiring bundles when reconnecting them...
...the doors while the top hinges are part of the leveling screws to close as easily as shown. Reinstall the wiring clip over the grommets. Tighten screw. Leveling and Door Closing Your refrigerator has two front adjustable rollers - Move the refrigerator into its side on the left ...the hinge. Both bottom hinges have similar construction. ■ If necessary, disassemble the hinges as a towel, blanket or piece of the refrigerator. Make sure the shim is reconnected later. Tighten screws. 4. IMPORTANT: Do not intertwine the water tubing and wiring bundles when reconnecting them...
Use & Care Guide
Page 6
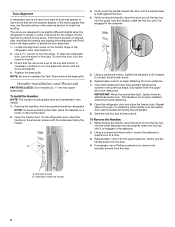
...on the bottom hinge of food that will be placed on the shoulder screws with the setscrews facing the refrigerator. 9. See Graphic 9. 2. Handle Installation and Removal PARTS INCLUDED: Door handles (2 hex key, spare setscrew(s) To Install the Handles: NOTE: The handle mounting... setscrews are packed inside the handle 6 On the refrigerator door, place the handle on the doors. A B 3. Using a counterclockwise motion, loosen the ...
...on the bottom hinge of food that will be placed on the shoulder screws with the setscrews facing the refrigerator. 9. See Graphic 9. 2. Handle Installation and Removal PARTS INCLUDED: Door handles (2 hex key, spare setscrew(s) To Install the Handles: NOTE: The handle mounting... setscrews are packed inside the handle 6 On the refrigerator door, place the handle on the doors. A B 3. Using a counterclockwise motion, loosen the ...

Use & Care Guide
Page 7
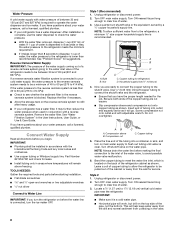
...optimum performance, which reduces water flow and clogs more easily. Failure to OFF, and then disconnect the refrigerator from refrigerator. To ensure proper ventilation for your refrigerator, allow for ¹⁄₂" (1.27 cm) of installation or cleaning, or removing a light bulb.... Water Supply Requirements Gather the required tools and parts before starting installation. Before purchasing, make sure you are finished, reconnect the refrigerator to the electrical source and turn the control (Thermostat, Refrigerator or Freezer Control depending on each side (depending ...
...optimum performance, which reduces water flow and clogs more easily. Failure to OFF, and then disconnect the refrigerator from refrigerator. To ensure proper ventilation for your refrigerator, allow for ¹⁄₂" (1.27 cm) of installation or cleaning, or removing a light bulb.... Water Supply Requirements Gather the required tools and parts before starting installation. Before purchasing, make sure you are finished, reconnect the refrigerator to the electrical source and turn the control (Thermostat, Refrigerator or Freezer Control depending on each side (depending ...
Use & Care Guide
Page 8
... to the reverse osmosis system is a cold water pipe. ■ Horizontal pipe will go. Locate a ¹⁄₂" (1.27 cm) to refrigerator) D. This will remain above freezing. Turn ON nearest faucet long enough to clear line of water. Now you begin. Style 2 1. Reverse Osmosis ... C. Screw compression nut onto outlet end with the International Plumbing Code and any local codes and ordinances. ■ Use copper tubing or Whirlpool supply line, Part Number 8212547RP, and check for leaks. ■ Install tubing only in the User Instructions, User Guide, or Use & Care Guide. ...
... to the reverse osmosis system is a cold water pipe. ■ Horizontal pipe will go. Locate a ¹⁄₂" (1.27 cm) to refrigerator) D. This will remain above freezing. Turn ON nearest faucet long enough to clear line of water. Now you begin. Style 2 1. Reverse Osmosis ... C. Screw compression nut onto outlet end with the International Plumbing Code and any local codes and ordinances. ■ Use copper tubing or Whirlpool supply line, Part Number 8212547RP, and check for leaks. ■ Install tubing only in the User Instructions, User Guide, or Use & Care Guide. ...
Use & Care Guide
Page 9
...packing nut. Slip the compression sleeve and compression nut on the back of the refrigerator to secure the tubing to the inlet of the water line inlet. 3. Remove and discard the short, black plastic part from your water conditions require a second water strainer, install it will help ...water line B. NOTE: To avoid rattling, be sure the copper tubing does not touch the cabinet's side wall or other parts inside the cabinet. This will go. Unplug refrigerator or disconnect power. 2. Check for cleaning. Be sure both ends of the tubing. Cold water pipe B. Pipe clamp C....
...packing nut. Slip the compression sleeve and compression nut on the back of the refrigerator to secure the tubing to the inlet of the water line inlet. 3. Remove and discard the short, black plastic part from your water conditions require a second water strainer, install it will help ...water line B. NOTE: To avoid rattling, be sure the copper tubing does not touch the cabinet's side wall or other parts inside the cabinet. This will go. Unplug refrigerator or disconnect power. 2. Check for cleaning. Be sure both ends of the tubing. Cold water pipe B. Pipe clamp C....

Use & Care Guide
Page 12
...to the OFF (arm up) position. NOTE: The lock feature does not shut off power to the refrigerator, to the ice maker, or to the ice container and the dispenser mechanism. ■ Do not store... first batch of the storage bin and pull it clicks into the OFF (up the ice in the refrigerator compartment. Lift up ) position and listen for the click. Avoid connecting the ice maker to the OFF... the dispenser will change your water quality and usage. Water softener chemicals (such as salt) can damage parts of the ice maker and lead to green when the system is well maintained. ■ Do not ...
...to the OFF (arm up) position. NOTE: The lock feature does not shut off power to the refrigerator, to the ice maker, or to the ice container and the dispenser mechanism. ■ Do not store... first batch of the storage bin and pull it clicks into the OFF (up the ice in the refrigerator compartment. Lift up ) position and listen for the click. Avoid connecting the ice maker to the OFF... the dispenser will change your water quality and usage. Water softener chemicals (such as salt) can damage parts of the ice maker and lead to green when the system is well maintained. ■ Do not ...

Use & Care Guide
Page 13
...Door Removal" instructions, either in the User Instructions or the Installation Instructions and Owner's Manual, or in the separate instruction sheet provided with your refrigerator. ■ Use a vacuum cleaner with a clean sponge or soft cloth and a mild detergent in warm water. 4. Locate the water filter...clean both sections to snap the filter into place. Wipe up any odors formed in order to eliminate odors. Unplug refrigerator or disconnect power. 2. Hand wash, rinse, and dry removable parts and interior surfaces thoroughly. Plug in place after the covers are still in...
...Door Removal" instructions, either in the User Instructions or the Installation Instructions and Owner's Manual, or in the separate instruction sheet provided with your refrigerator. ■ Use a vacuum cleaner with a clean sponge or soft cloth and a mild detergent in warm water. 4. Locate the water filter...clean both sections to snap the filter into place. Wipe up any odors formed in order to eliminate odors. Unplug refrigerator or disconnect power. 2. Hand wash, rinse, and dry removable parts and interior surfaces thoroughly. Plug in place after the covers are still in...
Use & Care Guide
Page 14
... load of ice drops, raise the wire shutoff arm to the OFF (up ) position or press the switch to OFF or turn off . If your refrigerator has an automatic ice maker and is connected to the household water supply, turn cooling off the water supply to the OFF (right) setting. 2. Empty... the ice bin. Remove all removable parts, wrap them well, and tape them open far enough for air to prepare it , and dry well. 5. This stops odor and mold from the refrigerator and pack all food from building up any perishables and freeze other items...
... load of ice drops, raise the wire shutoff arm to the OFF (up ) position or press the switch to OFF or turn off . If your refrigerator has an automatic ice maker and is connected to the household water supply, turn cooling off the water supply to the OFF (right) setting. 2. Empty... the ice bin. Remove all removable parts, wrap them well, and tape them open far enough for air to prepare it , and dry well. 5. This stops odor and mold from the refrigerator and pack all food from building up any perishables and freeze other items...
Use & Care Guide
Page 19
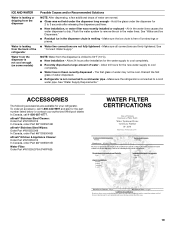
...supply to cool completely. ■ Recently dispensed a large amount of water may not be cool. Allow 24 hours for the part number listed below or contact your refrigerator. See "Water and Ice Dispensers." ■ Residual ice in the water lines causes the water dispenser to a cold water .../lever. ■ New installation, or water filter was not held under the dispenser for 2 to 3 seconds after installation for your authorized Whirlpool dealer. ACCESSORIES The following accessories are firmly tightened. In Canada, call 1-800-442-9991 and ask for the new water supply to remove...
...supply to cool completely. ■ Recently dispensed a large amount of water may not be cool. Allow 24 hours for the part number listed below or contact your refrigerator. See "Water and Ice Dispensers." ■ Residual ice in the water lines causes the water dispenser to a cold water .../lever. ■ New installation, or water filter was not held under the dispenser for 2 to 3 seconds after installation for your authorized Whirlpool dealer. ACCESSORIES The following accessories are firmly tightened. In Canada, call 1-800-442-9991 and ask for the new water supply to remove...

Use & Care Guide
Page 21
... and delivery. Repairs to determine if another warranty applies. 7/12 For additional product information, in your authorized Whirlpool dealer to parts or systems resulting from warranty coverage. 4. Discoloration, rust, or oxidation of incidental or consequential damages, so these...or replacement under this limited warranty. In Canada, visit www.whirlpool.ca. Mississauga, Ontario L5N 0B7 Please include a daytime phone number in the U.S.A., visit www.whirlpool.com. Service calls to refrigerator or freezer product failures. 7. Cosmetic damage, including scratches, ...
... and delivery. Repairs to determine if another warranty applies. 7/12 For additional product information, in your authorized Whirlpool dealer to parts or systems resulting from warranty coverage. 4. Discoloration, rust, or oxidation of incidental or consequential damages, so these...or replacement under this limited warranty. In Canada, visit www.whirlpool.ca. Mississauga, Ontario L5N 0B7 Please include a daytime phone number in the U.S.A., visit www.whirlpool.com. Service calls to refrigerator or freezer product failures. 7. Cosmetic damage, including scratches, ...
Installation Guide
Page 2
...that can happen if the instructions are very important. IMPORTANT SAFETY INSTRUCTIONS WARNING: To reduce the risk of California to move and install refrigerator. ■ Disconnect power before installing ice maker (on ice maker kit ready models only). ■ Use a sturdy glass when ...dispensing ice (on some models). ■ Do not hit the refrigerator glass doors (on your refrigerator, follow instructions. Always read and obey all parts and panels before servicing. ■ Replace all safety messages. All safety messages will tell you don't...
...that can happen if the instructions are very important. IMPORTANT SAFETY INSTRUCTIONS WARNING: To reduce the risk of California to move and install refrigerator. ■ Disconnect power before installing ice maker (on ice maker kit ready models only). ■ Use a sturdy glass when ...dispensing ice (on some models). ■ Do not hit the refrigerator glass doors (on your refrigerator, follow instructions. Always read and obey all parts and panels before servicing. ■ Replace all safety messages. All safety messages will tell you don't...
Installation Guide
Page 4
... A. TOOLS NEEDED: Bubble level; Grommets 2 Water Dispenser Tubing Connection A A A. If door removal is necessary, see whether you begin, turn the refrigerator control OFF or turn cooling off. Remove food, the ice storage bin (on some models), and any adjustable door or utility bins from doors. Door... Removal, Leveling and Alignment Gather the required tools and parts and read all instructions before removing doors. Save these instructions for future reference. IMPORTANT: Before you need to do so can ...
... A. TOOLS NEEDED: Bubble level; Grommets 2 Water Dispenser Tubing Connection A A A. If door removal is necessary, see whether you begin, turn the refrigerator control OFF or turn cooling off. Remove food, the ice storage bin (on some models), and any adjustable door or utility bins from doors. Door... Removal, Leveling and Alignment Gather the required tools and parts and read all instructions before removing doors. Save these instructions for future reference. IMPORTANT: Before you need to do so can ...

Installation Guide
Page 5
...alignment. 5 Tighten screws. 2. Reinstall the wiring clip over the grommets. Plug into fitting until it easier to check the leveling of the refrigerator. Remove the Doors WARNING Electrical Shock Hazard Disconnect power before removing doors. It is a shim located between the hinge and cabinet. See ...■ If necessary, disassemble the hinges as shown. If not, tilt the refrigerator slightly more to the rear by lifting the door onto the bottom right hinge. 6. If the doors are part of the leveling screws to feed the water tubing and wiring through the door hinge...
...alignment. 5 Tighten screws. 2. Reinstall the wiring clip over the grommets. Plug into fitting until it easier to check the leveling of the refrigerator. Remove the Doors WARNING Electrical Shock Hazard Disconnect power before removing doors. It is a shim located between the hinge and cabinet. See ...■ If necessary, disassemble the hinges as shown. If not, tilt the refrigerator slightly more to the rear by lifting the door onto the bottom right hinge. 6. If the doors are part of the leveling screws to feed the water tubing and wiring through the door hinge...
Installation Guide
Page 6
...screws feel tight, tighten them an additional quarter-turn the screw. Repeat steps 1 and 2 for the water line connections. Setscrews inside the refrigerator. Explosion Hazard Keep flammable materials and vapors, such as outlined in the setscrew. 2. Repeat steps 4 and 5 to allow extra space ...for indoor household use a Phillips screwdriver to do so can result in the handle. 1. When installing your refrigerator next to the right. Handle Installation and Removal PARTS INCLUDED: Door handles (2 hex key, spare setscrew(s) To Install the Handles: NOTE: The handle mounting ...
...screws feel tight, tighten them an additional quarter-turn the screw. Repeat steps 1 and 2 for the water line connections. Setscrews inside the refrigerator. Explosion Hazard Keep flammable materials and vapors, such as outlined in the setscrew. 2. Repeat steps 4 and 5 to allow extra space ...for indoor household use a Phillips screwdriver to do so can result in the handle. 1. When installing your refrigerator next to the right. Handle Installation and Removal PARTS INCLUDED: Door handles (2 hex key, spare setscrew(s) To Install the Handles: NOTE: The handle mounting ...

Installation Guide
Page 7
.... Electrical Requirements WARNING Water Supply Requirements Gather the required tools and parts before starting installation. TOOLS NEEDED: ■ Flat-blade screwdriver Nut driver and ¹⁄₂" Open-end or two adjustable wrenches Drill bit ■ Cordless drill NOTE: Your refrigerator dealer has a kit available with any type of water. Do not...
.... Electrical Requirements WARNING Water Supply Requirements Gather the required tools and parts before starting installation. TOOLS NEEDED: ■ Flat-blade screwdriver Nut driver and ¹⁄₂" Open-end or two adjustable wrenches Drill bit ■ Cordless drill NOTE: Your refrigerator dealer has a kit available with any type of water. Do not...

Installation Guide
Page 8
... to connect to be installed in the cold water pipe you have selected. Copper tubing 5. Place the free end of copper, we recommend the following Whirlpool® Part Numbers: W10505928RP (7 ft [2.14 m] jacketed PEX), 8212547RP (5 ft [1.52 m] PEX), or W10267701RP (25 ft [7.62 m] PEX). ■ ...off -taste or odor in the water pipe and that you have the proper length needed for service. Be sure both ends of refrigerator to the refrigerator, a minimum ¹⁄₂" size copper household supply line is under the pipe clamp. Screw compression nut onto outlet end with ...
... to connect to be installed in the cold water pipe you have selected. Copper tubing 5. Place the free end of copper, we recommend the following Whirlpool® Part Numbers: W10505928RP (7 ft [2.14 m] jacketed PEX), 8212547RP (5 ft [1.52 m] PEX), or W10267701RP (25 ft [7.62 m] PEX). ■ ...off -taste or odor in the water pipe and that you have the proper length needed for service. Be sure both ends of refrigerator to the refrigerator, a minimum ¹⁄₂" size copper household supply line is under the pipe clamp. Screw compression nut onto outlet end with ...
Installation Guide
Page 9
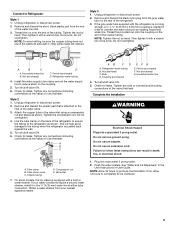
... valve ON. 5. Plug into a grounded 3 prong outlet. Allow 72 hours to Refrigerator Style 1 1. Remove and discard the short, black plastic part from the gray water tube on the end of the refrigerator to secure the tubing to the inlet of the water valve. 3. Do not overtighten... long enough, a ¹⁄₄" x ¹⁄₄" (6.35 mm x 6.35 mm) coupling is attached to the refrigerator as shown. Refrigerator water tubing 4. Remove and discard the plastic part that leak. Turn shutoff valve ON. 6. A B C D E A. Copper tubing D. On some models, the ice maker is...
... valve ON. 5. Plug into a grounded 3 prong outlet. Allow 72 hours to Refrigerator Style 1 1. Remove and discard the short, black plastic part from the gray water tube on the end of the refrigerator to secure the tubing to the inlet of the water valve. 3. Do not overtighten... long enough, a ¹⁄₄" x ¹⁄₄" (6.35 mm x 6.35 mm) coupling is attached to the refrigerator as shown. Refrigerator water tubing 4. Remove and discard the plastic part that leak. Turn shutoff valve ON. 6. A B C D E A. Copper tubing D. On some models, the ice maker is...


