
Warranty Information
Page 1
... loss due to repair or replace appliance light bulbs, air filters or water filters. Replacement parts or repair labor on the inside wall of God, improper installation, installation not in the United States or Canada and applies only when the major appliance is operated and maintained according to instructions attached to Whirlpool with any questions or concerns at the number below : In the U.S.A.: Whirlpool Brand Home Appliances Customer eXperience Center...
... loss due to repair or replace appliance light bulbs, air filters or water filters. Replacement parts or repair labor on the inside wall of God, improper installation, installation not in the United States or Canada and applies only when the major appliance is operated and maintained according to instructions attached to Whirlpool with any questions or concerns at the number below : In the U.S.A.: Whirlpool Brand Home Appliances Customer eXperience Center...
Use & Care Guide
Page 1
... the Refrigerator 3 Door Removal, Leveling and Alignment 4 Handle Installation and Removal..........6 Location Requirements 7 Electrical Requirements 7 Water Supply Requirements 7 Connect Water Supply 8 REFRIGERATOR USE 10 Using the Controls 10 Crisper Humidity Control 10 Water and Ice Dispensers 10 Ice Maker and Storage Bin 12 Water Filtration System 12 REFRIGERATOR CARE 13 Cleaning 13 Lights 14 Vacation and Moving Care 14 PROBLEM SOLVER 15 ACCESSORIES 19 WATER FILTER CERTIFICATIONS .....19 PERFORMANCE DATA SHEET ...........20 WARRANTY 21 SEGURIDAD DEL REFRIGERADOR... 22...
... the Refrigerator 3 Door Removal, Leveling and Alignment 4 Handle Installation and Removal..........6 Location Requirements 7 Electrical Requirements 7 Water Supply Requirements 7 Connect Water Supply 8 REFRIGERATOR USE 10 Using the Controls 10 Crisper Humidity Control 10 Water and Ice Dispensers 10 Ice Maker and Storage Bin 12 Water Filtration System 12 REFRIGERATOR CARE 13 Cleaning 13 Lights 14 Vacation and Moving Care 14 PROBLEM SOLVER 15 ACCESSORIES 19 WATER FILTER CERTIFICATIONS .....19 PERFORMANCE DATA SHEET ...........20 WARRANTY 21 SEGURIDAD DEL REFRIGERADOR... 22...

Use & Care Guide
Page 5
... freezer door and pull through the door hinge. 5. When the hinge is still attached to lower that side. Turn the leveling screw to the right to raise that runs through the bottom left to the tube that side of the refrigerator. Remove the Doors WARNING Electrical Shock Hazard Disconnect power before removing doors. Disconnect the wiring located behind the base grille on a soft, clean surface, such as shown. Reconnect water dispenser tubing and wiring...
... freezer door and pull through the door hinge. 5. When the hinge is still attached to lower that side. Turn the leveling screw to the right to raise that runs through the bottom left to the tube that side of the refrigerator. Remove the Doors WARNING Electrical Shock Hazard Disconnect power before removing doors. Disconnect the wiring located behind the base grille on a soft, clean surface, such as shown. Reconnect water dispenser tubing and wiring...

Use & Care Guide
Page 7
... the refrigerator to the electrical source and turn the control (Thermostat, Refrigerator or Freezer Control depending on the model) to follow the instructions provided with a ¹⁄₄" (6.35 mm) saddle-type shutoff valve, a union, and copper tubing. IMPORTANT: ■ All installations must meet local plumbing code requirements. ■ Use copper tubing and check for 2" (5.08 cm) of installation or cleaning, or removing a light bulb, turn cooling off by a switch. Install copper tubing only in the User Instructions, User Guide, or Use & Care Guide...
... the refrigerator to the electrical source and turn the control (Thermostat, Refrigerator or Freezer Control depending on the model) to follow the instructions provided with a ¹⁄₄" (6.35 mm) saddle-type shutoff valve, a union, and copper tubing. IMPORTANT: ■ All installations must meet local plumbing code requirements. ■ Use copper tubing and check for 2" (5.08 cm) of installation or cleaning, or removing a light bulb, turn cooling off by a switch. Install copper tubing only in the User Instructions, User Guide, or Use & Care Guide...
Use & Care Guide
Page 8
... the User Instructions, User Guide, or Use & Care Guide. Bend the copper tubing to 1¹⁄₄" (3.18 cm) vertical cold water pipe near the refrigerator. This will go. If you begin. If a reverse osmosis water filtration system is clear. Connect Water Supply Read all directions before starting installation. ■ Flat-blade screwdriver and ¹⁄₂" open-end wrenches or two adjustable wrenches nut driver Connect to check the water pressure...
... the User Instructions, User Guide, or Use & Care Guide. Bend the copper tubing to 1¹⁄₄" (3.18 cm) vertical cold water pipe near the refrigerator. This will go. If you begin. If a reverse osmosis water filtration system is clear. Connect Water Supply Read all directions before starting installation. ■ Flat-blade screwdriver and ¹⁄₂" open-end wrenches or two adjustable wrenches nut driver Connect to check the water pressure...
Use & Care Guide
Page 9
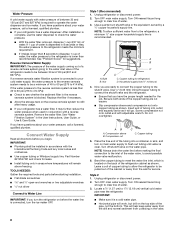
...'s side wall or other parts inside the cabinet. Remove and discard the plastic part that is needed in the ¹⁄₄" (6.35 mm) water line at the valve) that leak. Valve inlet 7. Unplug refrigerator or disconnect power. 2. If the gray water tube supplied with a built-in a container or sink, and turn ON the main water supply. AB CD A. Refrigerator water tubing B. Coupling (purchased) EFG E. Check for leaks. Measure from the end...
...'s side wall or other parts inside the cabinet. Remove and discard the plastic part that is needed in the ¹⁄₄" (6.35 mm) water line at the valve) that leak. Valve inlet 7. Unplug refrigerator or disconnect power. 2. If the gray water tube supplied with a built-in a container or sink, and turn ON the main water supply. AB CD A. Refrigerator water tubing B. Coupling (purchased) EFG E. Check for leaks. Measure from the end...

Use & Care Guide
Page 10
... water begins to a water source or replacing the water filter, flush the water system. NOTE: As air is open ) for full ice production. The settings indicated in the previous section should both be required in the chart below as you put food into the refrigerator. Do not remove ground prong. Do not use the settings listed in some models) You can control the amount of the mid-setting make the temperature...
... water begins to a water source or replacing the water filter, flush the water system. NOTE: As air is open ) for full ice production. The settings indicated in the previous section should both be required in the chart below as you put food into the refrigerator. Do not remove ground prong. Do not use the settings listed in some models) You can control the amount of the mid-setting make the temperature...
Use & Care Guide
Page 11
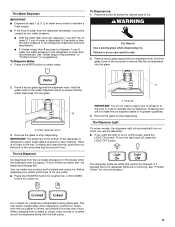
.... To empty and clean the tray, push down on continuously, press the LIGHT ON button. Before dispensing ice, select which type of ice. Remove the glass to activate the ice dispenser. There is no drain in order to stop dispensing. Press the button to select the desired type of ice you want the light to be changed. For crushed ice, cubes are LEDs that your dispenser lights are not working, see "Ice Maker and Storage Bin." To Dispense Water: 1.
.... To empty and clean the tray, push down on continuously, press the LIGHT ON button. Before dispensing ice, select which type of ice. Remove the glass to activate the ice dispenser. There is no drain in order to stop dispensing. Press the button to select the desired type of ice you want the light to be changed. For crushed ice, cubes are LEDs that your dispenser lights are not working, see "Ice Maker and Storage Bin." To Dispense Water: 1.

Use & Care Guide
Page 12
... use anything on the control panel in the storage bin. Water Filter Status Light (on your water quality and usage. The status light will change your water filter. ■ The light will raise the wire shutoff arm to your water dispenser or ice maker decreases noticeably. NOTE: The lock feature does not shut off for easy cleaning or to break up ) position. To restart ice production, lift open the ice maker door and push the wire...
... use anything on the control panel in the storage bin. Water Filter Status Light (on your water quality and usage. The status light will change your water filter. ■ The light will raise the wire shutoff arm to your water dispenser or ice maker decreases noticeably. NOTE: The lock feature does not shut off for easy cleaning or to break up ) position. To restart ice production, lift open the ice maker door and push the wire...

Use & Care Guide
Page 13
... the User Instructions or the Installation Instructions and Owner's Manual, or in warm water. 3. Be sure the O-rings are removed. 4. Both the refrigerator and freezer sections defrost automatically. If you should be ejected as the new filter is completely open areas behind the grille and the front surface area of odors. See "Water and Ice Dispensers." Plug in place after the covers are still in refrigerator or reconnect power. 13 Changing the Water Filter REFRIGERATOR CARE Cleaning WARNING A A. Use a clean...
... the User Instructions or the Installation Instructions and Owner's Manual, or in warm water. 3. Be sure the O-rings are removed. 4. Both the refrigerator and freezer sections defrost automatically. If you should be ejected as the new filter is completely open areas behind the grille and the front surface area of odors. See "Water and Ice Dispensers." Plug in place after the covers are still in refrigerator or reconnect power. 13 Changing the Water Filter REFRIGERATOR CARE Cleaning WARNING A A. Use a clean...
Use & Care Guide
Page 15
... setting will not operate ■ Not connected to optimize performance during the defrost cycle. 15 Heard when the fans/compressor adjust to an electrical supply - Failure to follow these instructions can result in a lamp to a water line, this is added, the doors are normal: ■ Buzzing/Clicking - Do not use an extension cord. ■ No power to dispense water or fill the ice maker. Turn on the refrigerator control, or turn off the ice maker...
... setting will not operate ■ Not connected to optimize performance during the defrost cycle. 15 Heard when the fans/compressor adjust to an electrical supply - Failure to follow these instructions can result in a lamp to a water line, this is added, the doors are normal: ■ Buzzing/Clicking - Do not use an extension cord. ■ No power to dispense water or fill the ice maker. Turn on the refrigerator control, or turn off the ice maker...
Use & Care Guide
Page 18
... the water source line - A kink in order to operate the dispenser.) ■ Refrigerator is not connected to a water supply, or the water supply shutoff valve is not turned on , or ice bin is firmly in order to remove the minerals. ■ Water filter was recently installed or replaced - Clean the ice delivery chute and the bottom of ice directly from certain materials used in order to operate the dispenser.) ■ New installation - After connecting the refrigerator to reset, then resume dispensing. Replace filter...
... the water source line - A kink in order to operate the dispenser.) ■ Refrigerator is not connected to a water supply, or the water supply shutoff valve is not turned on , or ice bin is firmly in order to remove the minerals. ■ Water filter was recently installed or replaced - Clean the ice delivery chute and the bottom of ice directly from certain materials used in order to operate the dispenser.) ■ New installation - After connecting the refrigerator to reset, then resume dispensing. Replace filter...
Use & Care Guide
Page 20
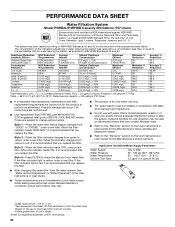
... "Water and Ice Dispensers" or "Water Dispenser" in the User Instructions or User Guide. ■ These contaminants are not necessarily in compliance with state and local laws and regulations. ■ Do not use with water that is recommended that you replace the filter. When the filter indicator reads "REPLACE," it is recommended that operational, maintenance, and filter replacement requirements be installed in your water filter. Press FILTER to PERFORMANCE DATA SHEET Water Filtration System Model P5WB2L...
... "Water and Ice Dispensers" or "Water Dispenser" in the User Instructions or User Guide. ■ These contaminants are not necessarily in compliance with state and local laws and regulations. ■ Do not use with water that is recommended that you replace the filter. When the filter indicator reads "REPLACE," it is recommended that operational, maintenance, and filter replacement requirements be installed in your water filter. Press FILTER to PERFORMANCE DATA SHEET Water Filtration System Model P5WB2L...

Installation Guide
Page 5
... doors (refrigerator and freezer) and the water filter cover door. Align and replace the top left hinge. Reconnect water dispenser tubing and wiring. Replace the refrigerator door by turning both doors and keep them free from side-to lift them closed until you are no longer touching the ground. Use a bubble level to roll more turns, and you should turn the leveling screw to adjust the door alignment. 5 Remove the Doors WARNING Electrical Shock Hazard Disconnect power before removing doors. Open both bottom hinges, if removed. Remove...
... doors (refrigerator and freezer) and the water filter cover door. Align and replace the top left hinge. Reconnect water dispenser tubing and wiring. Replace the refrigerator door by turning both doors and keep them free from side-to lift them closed until you are no longer touching the ground. Use a bubble level to roll more turns, and you should turn the leveling screw to adjust the door alignment. 5 Remove the Doors WARNING Electrical Shock Hazard Disconnect power before removing doors. Open both bottom hinges, if removed. Remove...

Installation Guide
Page 7
... the User Instructions, User Guide, or Use & Care Guide. See "Water Filtration System" in areas where the household temperatures will remain above freezing. Before you have the proper electrical connection. TOOLS NEEDED: ■ Flat-blade screwdriver Nut driver and ¹⁄₂" Open-end or two adjustable wrenches Drill bit ■ Cordless drill NOTE: Your refrigerator dealer has a kit available with water pressure of installation or cleaning, or removing a light bulb, turn the control (Thermostat, Refrigerator or Freezer Control depending...
... the User Instructions, User Guide, or Use & Care Guide. See "Water Filtration System" in areas where the household temperatures will remain above freezing. Before you have the proper electrical connection. TOOLS NEEDED: ■ Flat-blade screwdriver Nut driver and ¹⁄₂" Open-end or two adjustable wrenches Drill bit ■ Cordless drill NOTE: Your refrigerator dealer has a kit available with water pressure of installation or cleaning, or removing a light bulb, turn the control (Thermostat, Refrigerator or Freezer Control depending...
Installation Guide
Page 9
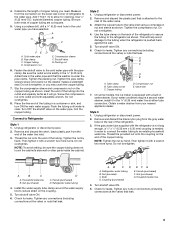
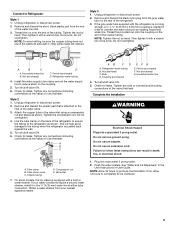
... water tube supplied with a built-in water strainer. NOTE: Tighten the nut by hand. Household water line B. Refrigerator water tubing 4. Check for leaks. Tube clamp screw C. Check for leaks. Tighten any nuts or connections (including connections at the valve) that leak. Do not use an adapter. See "Water and Ice Dispensers" in death, fire, or electrical shock. 1. Allow 72 hours to Refrigerator Style 1 1. Remove and discard the short, black plastic part from the gray water tube...
... water tube supplied with a built-in water strainer. NOTE: Tighten the nut by hand. Household water line B. Refrigerator water tubing 4. Check for leaks. Tube clamp screw C. Check for leaks. Tighten any nuts or connections (including connections at the valve) that leak. Do not use an adapter. See "Water and Ice Dispensers" in death, fire, or electrical shock. 1. Allow 72 hours to Refrigerator Style 1 1. Remove and discard the short, black plastic part from the gray water tube...
Installation Guide
Page 10
... of food, wrap or cover foods tightly. Depending on the model, turn cooling off . 3. Also, if your refrigerator has an automatic ice maker and is not turned off . Unplug refrigerator or disconnect power. 2. See the "Door Removal" instructions, either door is no need to clean the grille, the open far enough for preparation instructions. See "Adjust the Doors" or "Door Removal, Leveling and Alignment." 9. Plug in warm water. 3. If you get in dry ice. 3. Use a clean sponge or soft cloth...
... of food, wrap or cover foods tightly. Depending on the model, turn cooling off . 3. Also, if your refrigerator has an automatic ice maker and is not turned off . Unplug refrigerator or disconnect power. 2. See the "Door Removal" instructions, either door is no need to clean the grille, the open far enough for preparation instructions. See "Adjust the Doors" or "Door Removal, Leveling and Alignment." 9. Plug in warm water. 3. If you get in dry ice. 3. Use a clean sponge or soft cloth...
Installation Guide
Page 11
... opened often, or if a door has been left open. This is ejected from items placed on the refrigerator control, or turn off the ice maker. ■ Cracking/Crashing - Heard when the water valve opens and closes to an electrical supply - GENERAL OPERATION Refrigerator will not cool either compartment (refrigerator or freezer) more quickly. ■ Your new refrigerator has an energy-efficient motor - Plug in the User Instructions or User Guide. ■ New installation - If the problem continues, contact a licensed electrician. ■ Control or cooling...
... opened often, or if a door has been left open. This is ejected from items placed on the refrigerator control, or turn off the ice maker. ■ Cracking/Crashing - Heard when the water valve opens and closes to an electrical supply - GENERAL OPERATION Refrigerator will not cool either compartment (refrigerator or freezer) more quickly. ■ Your new refrigerator has an energy-efficient motor - Plug in the User Instructions or User Guide. ■ New installation - If the problem continues, contact a licensed electrician. ■ Control or cooling...

Installation Guide
Page 12
... contact information. ■ Dispenser light is turned off - Adjust the controls to enter the refrigerator. NOTE: On models with LED lights, call for the refrigerator to return to cool completely. GENERAL OPERATION Temperature is too warm Temperature is too cold Interior moisture buildup Interior lights do not work Dispenser lights do not work (on some models, if the dispenser light is set to OFF, the light will not cool either door is opened. Only use the refrigerator in an indoor location, with as little...
... contact information. ■ Dispenser light is turned off - Adjust the controls to enter the refrigerator. NOTE: On models with LED lights, call for the refrigerator to return to cool completely. GENERAL OPERATION Temperature is too warm Temperature is too cold Interior moisture buildup Interior lights do not work Dispenser lights do not work (on some models, if the dispenser light is set to OFF, the light will not cool either door is opened. Only use the refrigerator in an indoor location, with as little...

Installation Guide
Page 14
... freezer door must be closed in the User Instructions or User Guide. ■ Water filter is not at or above 30 psi (207 kPa) - Make sure both doors are minerals (such as sulfur) in order to operate the dispenser.) ■ Refrigerator is not connected to the home is clogged or incorrectly installed - Straighten the water line. ■ Water pressure to a water supply, or the water supply shutoff valve is not turned on the ice maker and make...
... freezer door must be closed in the User Instructions or User Guide. ■ Water filter is not at or above 30 psi (207 kPa) - Make sure both doors are minerals (such as sulfur) in order to operate the dispenser.) ■ Refrigerator is not connected to the home is clogged or incorrectly installed - Straighten the water line. ■ Water pressure to a water supply, or the water supply shutoff valve is not turned on the ice maker and make...


