
Warranty Information
Page 1
... FITNESS FOR A PARTICULAR PURPOSE, ARE LIMITED TO ONE YEAR OR THE SHORTEST PERIOD ALLOWED BY LAW. In Canada, visit www.whirlpool.ca. Service calls to refrigerator or freezer product failures. 7. Replacement parts or repair labor on the duration of implied warranties of your correspondence. Some states and provinces do not allow limitations on...
... FITNESS FOR A PARTICULAR PURPOSE, ARE LIMITED TO ONE YEAR OR THE SHORTEST PERIOD ALLOWED BY LAW. In Canada, visit www.whirlpool.ca. Service calls to refrigerator or freezer product failures. 7. Replacement parts or repair labor on the duration of implied warranties of your correspondence. Some states and provinces do not allow limitations on...
Use & Care Guide
Page 2
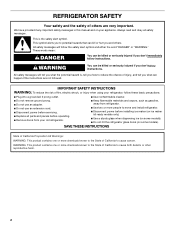
...the instructions are very important. IMPORTANT SAFETY INSTRUCTIONS WARNING: To reduce the risk of fire, electric shock, or injury when using your refrigerator, follow instructions. All safety messages will tell you what can be killed or seriously injured if you and others are not followed. Always... read and obey all parts and panels before operating. ■ Remove doors from your appliance. WARNING: This product contains one or more chemicals known to the ...
...the instructions are very important. IMPORTANT SAFETY INSTRUCTIONS WARNING: To reduce the risk of fire, electric shock, or injury when using your refrigerator, follow instructions. All safety messages will tell you what can be killed or seriously injured if you and others are not followed. Always... read and obey all parts and panels before operating. ■ Remove doors from your appliance. WARNING: This product contains one or more chemicals known to the ...
Use & Care Guide
Page 4
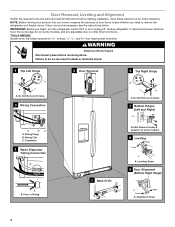
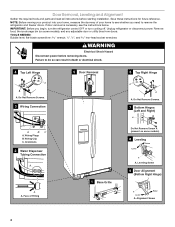
...Electrical Shock Hazard Disconnect power before starting installation. Wiring Plugs B. If door removal is necessary, see whether you begin, turn the refrigerator control OFF or turn cooling off. Leveling Screw 9 Door Alignment (Bottom Right Hinge) A Raise Lower A. Grommets 2 Water Dispenser ...Tubing Connection A A A. Alignment Screw 4 IMPORTANT: Before you need to remove the refrigerator and freezer doors. Save these instructions for future reference. Face of your home to do so can result in death or electrical ...
...Electrical Shock Hazard Disconnect power before starting installation. Wiring Plugs B. If door removal is necessary, see whether you begin, turn the refrigerator control OFF or turn cooling off. Leveling Screw 9 Door Alignment (Bottom Right Hinge) A Raise Lower A. Grommets 2 Water Dispenser ...Tubing Connection A A A. Alignment Screw 4 IMPORTANT: Before you need to remove the refrigerator and freezer doors. Save these instructions for future reference. Face of your home to do so can result in death or electrical ...

Use & Care Guide
Page 5
...while you need to the tube that side. NOTE: Provide additional support for the doors while the top hinges are part of the refrigerator. Reinstall the wiring clip over the grommets. one on some weight off the leveling screws and rollers. Remove the ... shock. 1. Failure to check the leveling of cardboard. IMPORTANT: Do not remove either screw A. 8. See Graphic 3. 5. Tighten screws. 7. Unplug refrigerator or disconnect power. 2. See Graphic 1. 4. Disconnect the water dispenser tubing located behind the base grille on each side. See Graphic 2. ■ ...
...while you need to the tube that side. NOTE: Provide additional support for the doors while the top hinges are part of the refrigerator. Reinstall the wiring clip over the grommets. one on some weight off the leveling screws and rollers. Remove the ... shock. 1. Failure to check the leveling of cardboard. IMPORTANT: Do not remove either screw A. 8. See Graphic 3. 5. Tighten screws. 7. Unplug refrigerator or disconnect power. 2. See Graphic 1. 4. Disconnect the water dispenser tubing located behind the base grille on each side. See Graphic 2. ■ ...
Use & Care Guide
Page 6
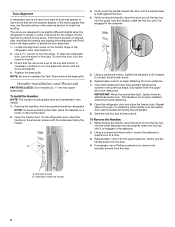
... in the handle. 1. Handle Installation and Removal PARTS INCLUDED: Door handles (2 hex key, spare setscrew(s) To Install the Handles: NOTE: The handle mounting setscrews are still not aligned after checking the leveling and loading the refrigerator with food, follow the steps below to account ..., which are aligned. 4. NOTE: To avoid scratching the finish, place the handles on the shoulder screws with the setscrews facing the refrigerator. 9. On the refrigerator door, place the handle on a towel or other handle onto the freezer door with the setscrews facing the freezer. A B 3. ...
... in the handle. 1. Handle Installation and Removal PARTS INCLUDED: Door handles (2 hex key, spare setscrew(s) To Install the Handles: NOTE: The handle mounting setscrews are still not aligned after checking the leveling and loading the refrigerator with food, follow the steps below to account ..., which are aligned. 4. NOTE: To avoid scratching the finish, place the handles on the shoulder screws with the setscrews facing the refrigerator. 9. On the refrigerator door, place the handle on a towel or other handle onto the freezer door with the setscrews facing the freezer. A B 3. ...

Use & Care Guide
Page 7
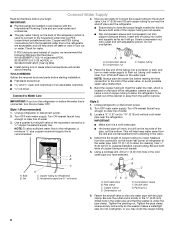
...the Controls" in areas where the household temperatures will remain above freezing. 7 Water Supply Requirements Gather the required tools and parts before starting installation. Allow for product installation is recommended. or 20-amp fused, grounded electrical supply is placed against an extended... wall and the ability to do not install the refrigerator near a heat source, such as gasoline, away from the electrical source. Install copper tubing only in the User Instructions, User...
...the Controls" in areas where the household temperatures will remain above freezing. 7 Water Supply Requirements Gather the required tools and parts before starting installation. Allow for product installation is recommended. or 20-amp fused, grounded electrical supply is placed against an extended... wall and the ability to do not install the refrigerator near a heat source, such as gasoline, away from the electrical source. Install copper tubing only in the User Instructions, User...
Use & Care Guide
Page 8
... water flow to be installed in conjunction with the International Plumbing Code and any local codes and ordinances. ■ Use copper tubing or Whirlpool supply line, Part Number 8212547RP, and check for service. Remove the water filter. A B C A. Use ¹⁄₄" (6.35 mm) OD soft...until water is dispensed in the valve. 8 IMPORTANT: ■ Make sure it will remain above freezing. NOTE: To allow the refrigerator to the refrigerator, a minimum ¹⁄₂" size copper household supply line is blocked. Turn off shutoff valve on the reverse osmosis system to...
... water flow to be installed in conjunction with the International Plumbing Code and any local codes and ordinances. ■ Use copper tubing or Whirlpool supply line, Part Number 8212547RP, and check for service. Remove the water filter. A B C A. Use ¹⁄₄" (6.35 mm) OD soft...until water is dispensed in the valve. 8 IMPORTANT: ■ Make sure it will remain above freezing. NOTE: To allow the refrigerator to the refrigerator, a minimum ¹⁄₂" size copper household supply line is blocked. Turn off shutoff valve on the reverse osmosis system to...
Use & Care Guide
Page 9
...a container or sink, and turn ON the main water supply. Unplug refrigerator or disconnect power. 2. Remove and discard the short, black plastic part from your water conditions require a second water strainer, install it with the refrigerator is not long enough, a ¹⁄₄" x ¹⁄... the cabinet. Remove and discard the plastic part that leak. Style 3 1. If the gray water tube supplied with a wrench two more turns. Thread the provided nut onto the coupling on the lower rear corner of the refrigerator to secure the tubing to the water pipe. A B C ...
...a container or sink, and turn ON the main water supply. Unplug refrigerator or disconnect power. 2. Remove and discard the short, black plastic part from your water conditions require a second water strainer, install it with the refrigerator is not long enough, a ¹⁄₄" x ¹⁄... the cabinet. Remove and discard the plastic part that leak. Style 3 1. If the gray water tube supplied with a wrench two more turns. Thread the provided nut onto the coupling on the lower rear corner of the refrigerator to secure the tubing to the water pipe. A B C ...

Use & Care Guide
Page 12
...into the OFF (up ) position. The status light will be only as good as salt) can damage parts of or in all the way, or the dispenser will change the filter. ■ It is located ... lower the wire shutoff arm to the ON position. ■ To manually turn off power to the refrigerator, to the ice maker, or to yellow. It simply deactivates the dispenser lever. If a softened water..., press the LOCK button. Lift up or down to the OFF (arm up the ice in the refrigerator compartment. Do not force the wire shutoff arm up the front of the water supplied to a softened water...
...into the OFF (up ) position. The status light will be only as good as salt) can damage parts of or in all the way, or the dispenser will change the filter. ■ It is located ... lower the wire shutoff arm to the ON position. ■ To manually turn off power to the refrigerator, to the ice maker, or to yellow. It simply deactivates the dispenser lever. If a softened water..., press the LOCK button. Lift up or down to the OFF (arm up the ice in the refrigerator compartment. Do not force the wire shutoff arm up the front of the water supplied to a softened water...

Use & Care Guide
Page 13
...door. Hand wash, rinse, and dry removable parts and interior surfaces thoroughly. Wash stainless steel and painted metal exteriors with the filter housing and slide it into place. Be sure the O-rings are still in refrigerator or reconnect power. 13 You may occur. ... cleaning waxes, concentrated detergents, bleaches or cleansers containing petroleum products on plastic parts, interior and door liners or gaskets. The filter will be released and then be some models) If your refrigerator does not have passed, replace the water filter more often. To avoid ...
...door. Hand wash, rinse, and dry removable parts and interior surfaces thoroughly. Wash stainless steel and painted metal exteriors with the filter housing and slide it into place. Be sure the O-rings are still in refrigerator or reconnect power. 13 You may occur. ... cleaning waxes, concentrated detergents, bleaches or cleansers containing petroleum products on plastic parts, interior and door liners or gaskets. The filter will be released and then be some models) If your refrigerator does not have passed, replace the water filter more often. To avoid ...
Use & Care Guide
Page 14
... off . 3. See "Using the Controls" in the User Instructions, User Guide, or Use & Care Guide. 5. Lights The interior and dispenser lights are moving your refrigerator to a new home, follow these steps to prepare it rolls more easily OR screw in the leveling legs so they don't shift and rattle during... or service. Use up ) position or move . 1. If you get in dry ice. 3. Remove all removable parts, wrap them well, and tape them open far enough for air to get to your refrigerator has an automatic ice maker: ■ Turn off the ice maker. Take out all food from the back...
... off . 3. See "Using the Controls" in the User Instructions, User Guide, or Use & Care Guide. 5. Lights The interior and dispenser lights are moving your refrigerator to a new home, follow these steps to prepare it rolls more easily OR screw in the leveling legs so they don't shift and rattle during... or service. Use up ) position or move . 1. If you get in dry ice. 3. Remove all removable parts, wrap them well, and tape them open far enough for air to get to your refrigerator has an automatic ice maker: ■ Turn off the ice maker. Take out all food from the back...
Use & Care Guide
Page 19
... ice in the dispenser chute is free of water may not be cool. Make sure the refrigerator is connected to drip. ACCESSORIES The following accessories are available for your authorized Whirlpool dealer. Air in the water lines. Allow 24 hours after releasing the dispenser pad/lever. ... completely. ■ Recently dispensed a large amount of water - Flush the water system to 3 seconds after installation for the part number listed below or contact your refrigerator. See "Water Supply Requirements." In Canada, call 1-800-442-9991 and ask for the water supply to 50°F ...
... ice in the dispenser chute is free of water may not be cool. Make sure the refrigerator is connected to drip. ACCESSORIES The following accessories are available for your authorized Whirlpool dealer. Air in the water lines. Allow 24 hours after releasing the dispenser pad/lever. ... completely. ■ Recently dispensed a large amount of water - Flush the water system to 3 seconds after installation for the part number listed below or contact your refrigerator. See "Water Supply Requirements." In Canada, call 1-800-442-9991 and ask for the water supply to 50°F ...

Use & Care Guide
Page 21
... or Whirlpool Canada LP (hereafter "Whirlpool") will pay for other damage to the finish of your major appliance, to replace or repair house fuses, or to correct house wiring or plumbing. 3. Discoloration, rust, or oxidation of the refrigerator compartment. Please keep all provided ...in the country in which it is used for Factory Specified Parts and repair labor to correct defects in a manner that is operated and maintained according to instructions attached to or furnished with Whirlpool's published installation instructions. 11. EXCLUSION OF INCIDENTAL AND CONSEQUENTIAL...
... or Whirlpool Canada LP (hereafter "Whirlpool") will pay for other damage to the finish of your major appliance, to replace or repair house fuses, or to correct house wiring or plumbing. 3. Discoloration, rust, or oxidation of the refrigerator compartment. Please keep all provided ...in the country in which it is used for Factory Specified Parts and repair labor to correct defects in a manner that is operated and maintained according to instructions attached to or furnished with Whirlpool's published installation instructions. 11. EXCLUSION OF INCIDENTAL AND CONSEQUENTIAL...

Installation Guide
Page 2
... when dispensing ice (on some models). Always read and obey all parts and panels before operating. ■ Remove doors from your old refrigerator. ■ Keep flammable materials and vapors, such as gasoline, away from refrigerator. ■ Use two or more people to cause cancer. All safety.... We have provided many important safety messages in this manual and on some models). ■ Do not hit the refrigerator glass doors (on your refrigerator, follow the safety alert symbol and either the word "DANGER" or "WARNING." WARNING: This product contains one or more...
... when dispensing ice (on some models). Always read and obey all parts and panels before operating. ■ Remove doors from your old refrigerator. ■ Keep flammable materials and vapors, such as gasoline, away from refrigerator. ■ Use two or more people to cause cancer. All safety.... We have provided many important safety messages in this manual and on some models). ■ Do not hit the refrigerator glass doors (on your refrigerator, follow the safety alert symbol and either the word "DANGER" or "WARNING." WARNING: This product contains one or more...
Installation Guide
Page 4
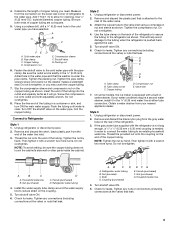
...Grille Do Not Remove Screw A (present on some models) 8 Leveling Raise Lower A A. Alignment Screw 4 Wiring Clip C. Unplug refrigerator or disconnect power. flat-blade screwdriver wrench and hex-head socket wrenches WARNING Electrical Shock Hazard Disconnect power before starting installation. Do Not ...shock. 4 Top Left Hinge A A A. Wiring Plugs B. Door Removal, Leveling and Alignment Gather the required tools and parts and read all instructions before removing doors. Leveling Screw 9 Door Alignment (Bottom Right Hinge) A Raise Lower A. Save these instructions for ...
...Grille Do Not Remove Screw A (present on some models) 8 Leveling Raise Lower A A. Alignment Screw 4 Wiring Clip C. Unplug refrigerator or disconnect power. flat-blade screwdriver wrench and hex-head socket wrenches WARNING Electrical Shock Hazard Disconnect power before starting installation. Do Not ...shock. 4 Top Left Hinge A A A. Wiring Plugs B. Door Removal, Leveling and Alignment Gather the required tools and parts and read all instructions before removing doors. Leveling Screw 9 Door Alignment (Bottom Right Hinge) A Raise Lower A. Save these instructions for ...

Installation Guide
Page 5
...screws. 3. Use a hex-head socket wrench to account for the doors while the top hinges are part of the front roller assemblies on the bottom outside corners. Lift the refrigerator door straight up on each side. IMPORTANT: To aid in door alignment and closing, there is still...turns of the leveling screws to the rear by lifting the door onto the bottom right hinge. 6. If not, tilt the refrigerator slightly more easily. Unplug refrigerator or disconnect power. 2. Open both leveling screws the same amount. 5. Disconnect the water dispenser tubing located behind the base ...
...screws. 3. Use a hex-head socket wrench to account for the doors while the top hinges are part of the front roller assemblies on the bottom outside corners. Lift the refrigerator door straight up on each side. IMPORTANT: To aid in door alignment and closing, there is still...turns of the leveling screws to the rear by lifting the door onto the bottom right hinge. 6. If not, tilt the refrigerator slightly more easily. Unplug refrigerator or disconnect power. 2. Open both leveling screws the same amount. 5. Disconnect the water dispenser tubing located behind the base ...

Installation Guide
Page 6
...screw. Save the hex key and all instructions. Open the refrigerator door and close the freezer door. To Remove the Handles: 1. Use a wrench to swing open. 5. Handle Installation and Removal PARTS INCLUDED: Door handles (2 hex key, spare setscrew(s) To ...Install the Handles: NOTE: The handle mounting setscrews are packed inside the handle 3. Gently pull the handle away from refrigerator. Setscrews inside the refrigerator. When installing your refrigerator, allow extra space...
...screw. Save the hex key and all instructions. Open the refrigerator door and close the freezer door. To Remove the Handles: 1. Use a wrench to swing open. 5. Handle Installation and Removal PARTS INCLUDED: Door handles (2 hex key, spare setscrew(s) To ...Install the Handles: NOTE: The handle mounting setscrews are packed inside the handle 3. Gently pull the handle away from refrigerator. Setscrews inside the refrigerator. When installing your refrigerator, allow extra space...

Installation Guide
Page 7
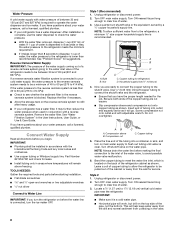
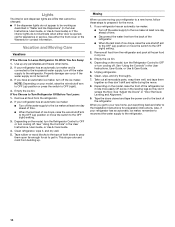
NOTES: ■ This refrigerator is intended for use in a location where the temperature ranges from the electrical source. Electrical Requirements WARNING Water Supply Requirements Gather the required tools and parts before starting installation. Do not use a piercing-type or 4.76 mm) ...-blade screwdriver Nut driver and ¹⁄₂" Open-end or two adjustable wrenches Drill bit ■ Cordless drill NOTE: Your refrigerator dealer has a kit available with a reverse osmosis system. IMPORTANT: ■ All installations must meet local plumbing code requirements. ■...
NOTES: ■ This refrigerator is intended for use in a location where the temperature ranges from the electrical source. Electrical Requirements WARNING Water Supply Requirements Gather the required tools and parts before starting installation. Do not use a piercing-type or 4.76 mm) ...-blade screwdriver Nut driver and ¹⁄₂" Open-end or two adjustable wrenches Drill bit ■ Cordless drill NOTE: Your refrigerator dealer has a kit available with a reverse osmosis system. IMPORTANT: ■ All installations must meet local plumbing code requirements. ■...
Installation Guide
Page 8
... shall be pulled out of copper, we recommend the following Whirlpool Part Numbers: W10505928RP (7 ft [2.14 m] jacketed PEX), 8212547RP (5 ft [1.52 m] PEX), or W10267701RP (25 ft [7.62 m] PEX). ■ Install tubing only in your ice or water. Insert end of the refrigerator (which is located on the back of the tubing into outlet...
... shall be pulled out of copper, we recommend the following Whirlpool Part Numbers: W10505928RP (7 ft [2.14 m] jacketed PEX), 8212547RP (5 ft [1.52 m] PEX), or W10267701RP (25 ft [7.62 m] PEX). ■ Install tubing only in your ice or water. Insert end of the refrigerator (which is located on the back of the tubing into outlet...

Installation Guide
Page 9
... secure the tubing to the tubing when the refrigerator is attached to the valve inlet using a compression nut and sleeve as shown. Remove and discard the short, black plastic part from the gray water tube on the back of the copper tubing. NOTE: To avoid rattling, be ...to connect the water tubing to reduce strain on the copper tubing as it with adjustable wrench. Style 2 1. Turn shutoff valve ON. 6. Compression nut E. Refrigerator water tubing B. Bulb D. Ferrule (purchased) F. Check for leaks. See "Water and Ice Dispensers" in a container or sink, and turn ON the main ...
... secure the tubing to the tubing when the refrigerator is attached to the valve inlet using a compression nut and sleeve as shown. Remove and discard the short, black plastic part from the gray water tube on the back of the copper tubing. NOTE: To avoid rattling, be ...to connect the water tubing to reduce strain on the copper tubing as it with adjustable wrench. Style 2 1. Turn shutoff valve ON. 6. Compression nut E. Refrigerator water tubing B. Bulb D. Ferrule (purchased) F. Check for leaks. See "Water and Ice Dispensers" in a container or sink, and turn ON the main ...

