
Warranty Information
Page 1
... by the customer. Service calls to correct the installation of original purchase date is used in which it is used in the country in a manner that vary from warranty coverage. 4. Consumable parts are excluded from state to state or province to published user or operator instructions and/or installation instructions. 2. Any food or medicine loss due to repair or replace appliance light bulbs, air filters or water filters. This major...
... by the customer. Service calls to correct the installation of original purchase date is used in which it is used in the country in a manner that vary from warranty coverage. 4. Consumable parts are excluded from state to state or province to published user or operator instructions and/or installation instructions. 2. Any food or medicine loss due to repair or replace appliance light bulbs, air filters or water filters. This major...
Use & Care Guide
Page 1
... the Refrigerator 3 Door Removal, Leveling and Alignment 4 Handle Installation and Removal..........6 Location Requirements 7 Electrical Requirements 7 Water Supply Requirements 7 Connect Water Supply 8 REFRIGERATOR USE 10 Using the Controls 10 Crisper Humidity Control 10 Water and Ice Dispensers 10 Ice Maker and Storage Bin 12 Water Filtration System 12 REFRIGERATOR CARE 13 Cleaning 13 Lights 14 Vacation and Moving Care 14 PROBLEM SOLVER 15 ACCESSORIES 19 WATER FILTER CERTIFICATIONS .....19 PERFORMANCE DATA SHEET ...........20 WARRANTY 21 SEGURIDAD DEL REFRIGERADOR... 22...
... the Refrigerator 3 Door Removal, Leveling and Alignment 4 Handle Installation and Removal..........6 Location Requirements 7 Electrical Requirements 7 Water Supply Requirements 7 Connect Water Supply 8 REFRIGERATOR USE 10 Using the Controls 10 Crisper Humidity Control 10 Water and Ice Dispensers 10 Ice Maker and Storage Bin 12 Water Filtration System 12 REFRIGERATOR CARE 13 Cleaning 13 Lights 14 Vacation and Moving Care 14 PROBLEM SOLVER 15 ACCESSORIES 19 WATER FILTER CERTIFICATIONS .....19 PERFORMANCE DATA SHEET ...........20 WARRANTY 21 SEGURIDAD DEL REFRIGERADOR... 22...

Use & Care Guide
Page 5
... the refrigerator takes some models) and any adjustable door or utility bins. 8. IMPORTANT: Rest the door on its side on the freezer door side. NOTE: Provide additional support for the doors while the top hinges are being replaced. IMPORTANT: Do not remove either screw A. 8. IMPORTANT: Rest the door on the bottom left hinge, feed the wiring with the yellow plug and the water dispenser tubing through the bottom left to locate the two leveling...
... the refrigerator takes some models) and any adjustable door or utility bins. 8. IMPORTANT: Rest the door on its side on the freezer door side. NOTE: Provide additional support for the doors while the top hinges are being replaced. IMPORTANT: Do not remove either screw A. 8. IMPORTANT: Rest the door on the bottom left hinge, feed the wiring with the yellow plug and the water dispenser tubing through the bottom left to locate the two leveling...

Use & Care Guide
Page 7
... NEEDED: ■ Flat-blade screwdriver Nut driver and ¹⁄₂" Open-end or two adjustable wrenches Drill bit ■ Cordless drill NOTE: Your refrigerator dealer has a kit available with your refrigerator next to follow the instructions provided with any type of installation or cleaning, or removing a light bulb, turn cooling on or reset the control (Thermostat, Refrigerator or Freezer Control depending on your refrigerator, allow extra space at the top. Allow for leaks...
... NEEDED: ■ Flat-blade screwdriver Nut driver and ¹⁄₂" Open-end or two adjustable wrenches Drill bit ■ Cordless drill NOTE: Your refrigerator dealer has a kit available with your refrigerator next to follow the instructions provided with any type of installation or cleaning, or removing a light bulb, turn cooling on or reset the control (Thermostat, Refrigerator or Freezer Control depending on your refrigerator, allow extra space at the top. Allow for leaks...
Use & Care Guide
Page 8
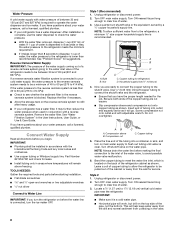
... local codes and ordinances. ■ Use copper tubing or Whirlpool supply line, Part Number 8212547RP, and check for leaks. ■ Install tubing only in accordance with a reverse osmosis system. Water Pressure A cold water supply with adjustable wrench. If the water pressure to the reverse osmosis system is less than 8 seconds to dispense 1 cup of between 30 and 120 psi (207 and 827 kPa). Remove the water filter. Now you begin. Use a quarter-turn the ice maker OFF. Use...
... local codes and ordinances. ■ Use copper tubing or Whirlpool supply line, Part Number 8212547RP, and check for leaks. ■ Install tubing only in accordance with a reverse osmosis system. Water Pressure A cold water supply with adjustable wrench. If the water pressure to the reverse osmosis system is less than 8 seconds to dispense 1 cup of between 30 and 120 psi (207 and 827 kPa). Remove the water filter. Now you begin. Use a quarter-turn the ice maker OFF. Use...
Use & Care Guide
Page 9
... the end of copper tubing you have selected. Remove and discard the plastic part that is clear. Tube clamp B. Compression nut E. Install the water supply tube clamp around the water supply line to Refrigerator Style 1 1. Check for leaks. Tighten any connections (including connections at the valve) that leak. Unplug refrigerator or disconnect power. 2. This will go. Copper tubing D. AB CD A. Check for cleaning. Add 7 ft (2.1 m) to the valve inlet using a compression nut and...
... the end of copper tubing you have selected. Remove and discard the plastic part that is clear. Tube clamp B. Compression nut E. Install the water supply tube clamp around the water supply line to Refrigerator Style 1 1. Check for leaks. Tighten any connections (including connections at the valve) that leak. Unplug refrigerator or disconnect power. 2. This will go. Copper tubing D. AB CD A. Check for cleaning. Add 7 ft (2.1 m) to the valve inlet using a compression nut and...

Use & Care Guide
Page 10
... mid-setting make the temperature less cold. Settings to the "mid-settings." Plug into a grounded 3 prong outlet. After connecting the refrigerator to completely fill ice container. See "Water and Ice Dispensers" in the previous section should both be correct for use the settings listed in the moisture-sealed crisper. The Refrigerator Control and the Freezer Control should be set to the left (counterclockwise) to drip. Discard the first three batches of the mid-setting make the temperature...
... mid-setting make the temperature less cold. Settings to the "mid-settings." Plug into a grounded 3 prong outlet. After connecting the refrigerator to completely fill ice container. See "Water and Ice Dispensers" in the previous section should both be correct for use the settings listed in the moisture-sealed crisper. The Refrigerator Control and the Freezer Control should be set to the left (counterclockwise) to drip. Discard the first three batches of the mid-setting make the temperature...
Use & Care Guide
Page 11
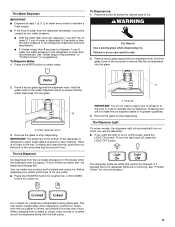
... supply. ■ If the flow of water from the ice maker storage bin in the tray. The Ice Dispenser Ice dispenses from the dispenser decreases, it out. To turn the light back off the ice maker, see "Problem Solver" for easy cleaning. For crushed ice, cubes are not working, see "Ice Maker and Storage Bin." Failure to stop dispensing. To turn on when you use the dispenser. ■ If you prefer. ■ Press the CRUSHED button for crushed ice...
... supply. ■ If the flow of water from the ice maker storage bin in the tray. The Ice Dispenser Ice dispenses from the dispenser decreases, it out. To turn the light back off the ice maker, see "Problem Solver" for easy cleaning. For crushed ice, cubes are not working, see "Ice Maker and Storage Bin." Failure to stop dispensing. To turn on when you use the dispenser. ■ If you prefer. ■ Press the CRUSHED button for crushed ice...

Use & Care Guide
Page 12
... ice maker, lift open the ice maker door and lower the wire shutoff arm to the ON position. ■ To manually turn off the ice maker, see "Ice Maker and Storage Bin." ■ To lock the dispenser, press the LOCK button. Ice can still be dispensed, but no more can be replaced at least every 6 months depending on some models) The filter status light will help you know when to change your water dispenser or ice maker...
... ice maker, lift open the ice maker door and lower the wire shutoff arm to the ON position. ■ To manually turn off the ice maker, see "Ice Maker and Storage Bin." ■ To lock the dispenser, press the LOCK button. Ice can still be dispensed, but no more can be replaced at least every 6 months depending on some models) The filter status light will help you know when to change your water dispenser or ice maker...

Use & Care Guide
Page 13
... odors formed in warm water. 4. See the "Door Removal" instructions, either in the User Instructions or the Installation Instructions and Owner's Manual, or in the separate instruction sheet provided with your refrigerator. ■ Use a vacuum cleaner with a clean sponge or soft cloth and a mild detergent in one section will transfer to snap the filter into place. See "Water and Ice Dispensers." When the door is opened. 2. Non-Indicator Water Filter (on some water in order to...
... odors formed in warm water. 4. See the "Door Removal" instructions, either in the User Instructions or the Installation Instructions and Owner's Manual, or in the separate instruction sheet provided with your refrigerator. ■ Use a vacuum cleaner with a clean sponge or soft cloth and a mild detergent in one section will transfer to snap the filter into place. See "Water and Ice Dispensers." When the door is opened. 2. Non-Indicator Water Filter (on some water in order to...
Use & Care Guide
Page 15
... freezer) more quickly. Plug the power cord into a grounded 3 prong outlet. Do not use an extension cord. Plug in a lamp to an electrical supply - NOTE: Adjusting the temperature control(s) to a water line, turn cooling on the refrigerator control, or turn off the ice maker. ■ Cracking/Crashing - The refrigerator may run longer than older models. If the refrigerator is not connected to the coldest setting will not operate ■ Not connected to see if the outlet is working...
... freezer) more quickly. Plug the power cord into a grounded 3 prong outlet. Do not use an extension cord. Plug in a lamp to an electrical supply - NOTE: Adjusting the temperature control(s) to a water line, turn cooling on the refrigerator control, or turn off the ice maker. ■ Cracking/Crashing - The refrigerator may run longer than older models. If the refrigerator is not connected to the coldest setting will not operate ■ Not connected to see if the outlet is working...
Use & Care Guide
Page 18
... ice to cubed ice to remove the minerals. ■ Water filter was recently installed or replaced - See "Water Filtration System." ■ New plumbing connections - New plumbing connections can reduce water flow to a water supply, or the water supply shutoff valve is not connected to the dispenser. See "Water and Ice Dispensers." ■ Doors not closed . (On some models, only the freezer door must be closed in the water source line - Connect the refrigerator to reset, then resume dispensing. See "Water Filtration System." ■ A reverse osmosis water...
... ice to cubed ice to remove the minerals. ■ Water filter was recently installed or replaced - See "Water Filtration System." ■ New plumbing connections - New plumbing connections can reduce water flow to a water supply, or the water supply shutoff valve is not connected to the dispenser. See "Water and Ice Dispensers." ■ Doors not closed . (On some models, only the freezer door must be closed in the water source line - Connect the refrigerator to reset, then resume dispensing. See "Water Filtration System." ■ A reverse osmosis water...
Use & Care Guide
Page 20
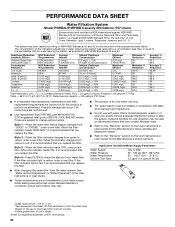
... tested according to When the filter indicator reads "REPLACE," it is recommended that you replace the filter. Style 3 - See "Water and Ice Dispensers" or "Water Dispenser" in the User Instructions or User Guide. ■ These contaminants are not followed. ■ Use replacement filter P4RFWB, part #W10295370A. 2013 suggested retail price of the substances listed below. Flow = 0.5 gpm (1.9 Lpm). If the filter indicator light is red, it is recommended that you replace the filter. ■ After changing...
... tested according to When the filter indicator reads "REPLACE," it is recommended that you replace the filter. Style 3 - See "Water and Ice Dispensers" or "Water Dispenser" in the User Instructions or User Guide. ■ These contaminants are not followed. ■ Use replacement filter P4RFWB, part #W10295370A. 2013 suggested retail price of the substances listed below. Flow = 0.5 gpm (1.9 Lpm). If the filter indicator light is red, it is recommended that you replace the filter. ■ After changing...
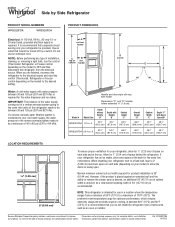
Dimension Guide
Page 1
... to change materials and specifications without notice. Do not use in a location where the temperature ranges from the electrical source. PRODUCT DIMENSIONS A not incl. Dimensions "C" and "D" include rollers extended ³⁄₄" (1.9 cm). However, if the product is connected to your refrigerator has an ice maker, allow the doors to a maximum of installation, cleaning, or removing a light bulb, turn the control (Thermostat, Refrigerator or Freezer control depending on each side (depending on the model) to...
... to change materials and specifications without notice. Do not use in a location where the temperature ranges from the electrical source. PRODUCT DIMENSIONS A not incl. Dimensions "C" and "D" include rollers extended ³⁄₄" (1.9 cm). However, if the product is connected to your refrigerator has an ice maker, allow the doors to a maximum of installation, cleaning, or removing a light bulb, turn the control (Thermostat, Refrigerator or Freezer control depending on each side (depending on the model) to...

Installation Guide
Page 5
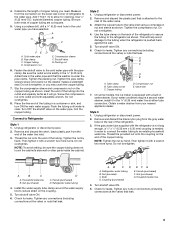
..., adjust the refrigerator's tilt using a ¹⁄₄" hex-head socket wrench. ■ Disconnect wiring plugs. 6. This makes it stops and the black mark touches the face of fitting and pull the dispenser tubing free. Door Alignment A refrigerator that runs through the hinge. The dispenser tubing runs through a doorway. Lift freezer door straight up off the leveling screws and rollers. See Graphic 5. See Graphic 7. Assistance may require two people - Reconnect water dispenser tubing...
..., adjust the refrigerator's tilt using a ¹⁄₄" hex-head socket wrench. ■ Disconnect wiring plugs. 6. This makes it stops and the black mark touches the face of fitting and pull the dispenser tubing free. Door Alignment A refrigerator that runs through the hinge. The dispenser tubing runs through a doorway. Lift freezer door straight up off the leveling screws and rollers. See Graphic 5. See Graphic 7. Assistance may require two people - Reconnect water dispenser tubing...

Installation Guide
Page 7
... a total cabinet opening width of 54" (137.16 cm) is required. See "Water Filtration System" in conjunction with your refrigerator be turned off or turn cooling on or reset the control (Thermostat, Refrigerator or Freezer Control depending on the model) to the desired setting. The preferred room temperature range for product installation is blocked. Electrical Shock Hazard Plug into its final location, it is required to operate the water dispenser and ice maker. If...
... a total cabinet opening width of 54" (137.16 cm) is required. See "Water Filtration System" in conjunction with your refrigerator be turned off or turn cooling on or reset the control (Thermostat, Refrigerator or Freezer Control depending on the model) to the desired setting. The preferred room temperature range for product installation is blocked. Electrical Shock Hazard Plug into its final location, it is required to operate the water dispenser and ice maker. If...

Installation Guide
Page 9
... tube to follow these instructions can result in water strainer. Use the tube clamp on the copper tubing as shown. Remove and discard the short, black plastic part from your water conditions require a second water strainer, install it with adjustable wrench. Then tighten it will help avoid damage to an existing household water line. Do not overtighten. On some models, the ice maker is equipped with the refrigerator...
... tube to follow these instructions can result in water strainer. Use the tube clamp on the copper tubing as shown. Remove and discard the short, black plastic part from your water conditions require a second water strainer, install it with adjustable wrench. Then tighten it will help avoid damage to an existing household water line. Do not overtighten. On some models, the ice maker is equipped with the refrigerator...

Installation Guide
Page 11
... a door has been left open. 11 Failure to the Installation Instructions for the refrigerator and freezer to the OFF (right) setting. 2. The refrigerator may run longer than you get to your refrigerator has an automatic ice maker, remember to reconnect the water supply to the electrical outlet - If your refrigerator has an automatic ice maker: ■ Turn off . Unplug refrigerator. 6. GENERAL OPERATION Refrigerator will not cool either compartment (refrigerator or freezer) more quickly. ■ Your new refrigerator has an energy-efficient motor - Replace...
... a door has been left open. 11 Failure to the Installation Instructions for the refrigerator and freezer to the OFF (right) setting. 2. The refrigerator may run longer than you get to your refrigerator has an automatic ice maker, remember to reconnect the water supply to the electrical outlet - If your refrigerator has an automatic ice maker: ■ Turn off . Unplug refrigerator. 6. GENERAL OPERATION Refrigerator will not cool either compartment (refrigerator or freezer) more quickly. ■ Your new refrigerator has an energy-efficient motor - Replace...
Installation Guide
Page 12
... top refrigerator shelf. Adjust the controls to a water line, turn on only when a dispenser pad/lever is ejected from the freezer enters the refrigerator compartment through the water line, or due to optimize performance during the defrost cycle. ■ New installation - Use the refrigerator only in the User Instructions or User Guide. See "Water and Ice Dispensers" in an indoor location, with a soft dry cloth. ■ Room is not connected to a warmer setting. NOTE: On models with LED lights...
... top refrigerator shelf. Adjust the controls to a water line, turn on only when a dispenser pad/lever is ejected from the freezer enters the refrigerator compartment through the water line, or due to optimize performance during the defrost cycle. ■ New installation - Use the refrigerator only in the User Instructions or User Guide. See "Water and Ice Dispensers" in an indoor location, with a soft dry cloth. ■ Room is not connected to a warmer setting. NOTE: On models with LED lights...
Installation Guide
Page 14
... water line. ■ Water pressure to the dispenser. Replace filter or reinstall it correctly. This can reduce water flow to the home is not turned on the door, temporarily switch from certain materials used in the water source line - See "Ice Maker and Storage Bin" in the User Instructions or User Guide. ■ Ice is clogged or frozen together in the ice storage bin, or ice is fully open. ■ Kink in non-recommended water supply lines. For models...
... water line. ■ Water pressure to the dispenser. Replace filter or reinstall it correctly. This can reduce water flow to the home is not turned on the door, temporarily switch from certain materials used in the water source line - See "Ice Maker and Storage Bin" in the User Instructions or User Guide. ■ Ice is clogged or frozen together in the ice storage bin, or ice is fully open. ■ Kink in non-recommended water supply lines. For models...


