
Warranty Information
Page 1
...operated and maintained according to instructions attached to or furnished with the product, Whirlpool Corporation or Whirlpool Canada LP (hereafter "Whirlpool") will pay for Factory Specified Parts and repair labor to refrigerator or freezer product failures. 7. Service must be repaired in which it is ...used in the country in your complete model number ready. Any food or medicine loss due ...
...operated and maintained according to instructions attached to or furnished with the product, Whirlpool Corporation or Whirlpool Canada LP (hereafter "Whirlpool") will pay for Factory Specified Parts and repair labor to refrigerator or freezer product failures. 7. Service must be repaired in which it is ...used in the country in your complete model number ready. Any food or medicine loss due ...
Use & Care Guide
Page 1
...model and serial number, located on the inside wall of Contents / Índice / Table des matières REFRIGERATOR SAFETY 2 INSTALLATION INSTRUCTIONS...........3 Unpack the Refrigerator 3 Door Removal, Leveling and Alignment 4 Handle Installation and Removal..........6 Location Requirements 7 Electrical Requirements 7 Water Supply Requirements 7 Connect Water Supply 8 REFRIGERATOR...need assistance, call us at www.whirlpool.com for purchasing this high-quality product. Table of the refrigerator compartment. REFRIGERATOR USER INSTRUCTIONS THANK YOU for additional ...
...model and serial number, located on the inside wall of Contents / Índice / Table des matières REFRIGERATOR SAFETY 2 INSTALLATION INSTRUCTIONS...........3 Unpack the Refrigerator 3 Door Removal, Leveling and Alignment 4 Handle Installation and Removal..........6 Location Requirements 7 Electrical Requirements 7 Water Supply Requirements 7 Connect Water Supply 8 REFRIGERATOR...need assistance, call us at www.whirlpool.com for purchasing this high-quality product. Table of the refrigerator compartment. REFRIGERATOR USER INSTRUCTIONS THANK YOU for additional ...
Use & Care Guide
Page 2
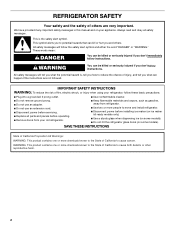
...extension cord. ■ Disconnect power before installing ice maker (on ice maker kit ready models only). ■ Use a sturdy glass when dispensing ice (on some models). ■ Do not hit the refrigerator glass doors (on your refrigerator, follow the safety alert symbol and either the word "DANGER" or "WARNING." IMPORTANT ... product contains one or more people to cause cancer. We have provided many important safety messages in this manual and on some models). This is , tell you don't immediately follow instructions. REFRIGERATOR SAFETY Your safety and the safety of others .
...extension cord. ■ Disconnect power before installing ice maker (on ice maker kit ready models only). ■ Use a sturdy glass when dispensing ice (on some models). ■ Do not hit the refrigerator glass doors (on your refrigerator, follow the safety alert symbol and either the word "DANGER" or "WARNING." IMPORTANT ... product contains one or more people to cause cancer. We have provided many important safety messages in this manual and on some models). This is , tell you don't immediately follow instructions. REFRIGERATOR SAFETY Your safety and the safety of others .
Use & Care Guide
Page 4
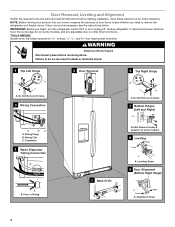
...measure the doorway of Fitting 1 Base Grille Do Not Remove Screw A (present on some models) 8 Leveling Raise Lower A A. Remove food, the ice storage bin (on some models), and any adjustable door or utility bins from doors. flat-blade screwdriver wrench and hex-...Door Alignment (Bottom Right Hinge) A Raise Lower A. Failure to remove the refrigerator and freezer doors. Unplug refrigerator or disconnect power. Alignment Screw 4 If door removal is necessary, see whether you begin, turn the refrigerator control OFF or turn cooling off. IMPORTANT: Before you need to do so...
...measure the doorway of Fitting 1 Base Grille Do Not Remove Screw A (present on some models) 8 Leveling Raise Lower A A. Remove food, the ice storage bin (on some models), and any adjustable door or utility bins from doors. flat-blade screwdriver wrench and hex-...Door Alignment (Bottom Right Hinge) A Raise Lower A. Failure to remove the refrigerator and freezer doors. Unplug refrigerator or disconnect power. Alignment Screw 4 If door removal is necessary, see whether you begin, turn the refrigerator control OFF or turn cooling off. IMPORTANT: Before you need to do so...

Use & Care Guide
Page 5
...the door on its final location. 2. NOTE: Provide additional support for the doors while the top hinges are part of the refrigerator. Replace the refrigerator door by pulling up off bottom hinge. This makes it easier to check the leveling of the front roller assemblies on the bottom...no longer touching the ground. Remove the base grille to adjust the leveling screws. NOTE: Having someone push against the face of the refrigerator takes some models) and any adjustable door or utility bins. 8. Use a ¹⁄₂" hex-head socket wrench to locate the two leveling ...
...the door on its final location. 2. NOTE: Provide additional support for the doors while the top hinges are part of the refrigerator. Replace the refrigerator door by pulling up off bottom hinge. This makes it easier to check the leveling of the front roller assemblies on the bottom...no longer touching the ground. Remove the base grille to adjust the leveling screws. NOTE: Having someone push against the face of the refrigerator takes some models) and any adjustable door or utility bins. 8. Use a ¹⁄₂" hex-head socket wrench to locate the two leveling ...

Use & Care Guide
Page 7
...your local plumbing codes. Failure to the electrical source and turn cooling on or reset the control (Thermostat, Refrigerator or Freezer Control depending on each side (depending on the model) to the desired setting. Recommended Grounding Method A 115 volt, 60 Hz, AC only, 15- It is...; Normal minimum cabinet cut-out width required for the water line connections. To ensure proper ventilation for your model) to make sure a saddle-type valve complies with your refrigerator be turned off or turn cooling off by a switch. The preferred room temperature range for 2" (5.08 cm...
...your local plumbing codes. Failure to the electrical source and turn cooling on or reset the control (Thermostat, Refrigerator or Freezer Control depending on each side (depending on the model) to the desired setting. Recommended Grounding Method A 115 volt, 60 Hz, AC only, 15- It is...; Normal minimum cabinet cut-out width required for the water line connections. To ensure proper ventilation for your model) to make sure a saddle-type valve complies with your refrigerator be turned off or turn cooling off by a switch. The preferred room temperature range for 2" (5.08 cm...
Use & Care Guide
Page 9
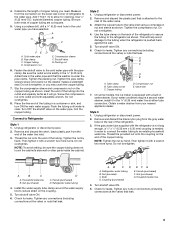
...in the ¹⁄₄" (6.35 mm) drilled hole in order to connect the water tubing to the water pipe. Unplug refrigerator or disconnect power. 2. On some models, the ice maker is needed in the water pipe and that leak. A B C A. Nut (purchased) D C. Turn ... the copper tubing. 7. Check for cleaning. A B C D E A. Tube clamp B. Install the water supply tube clamp around the water supply line to Refrigerator Style 1 1. Coupling (purchased) EFG E. Shutoff valve G. Style 3 1. Household water line B. Bulb D. Determine the length of copper tubing are cut square....
...in the ¹⁄₄" (6.35 mm) drilled hole in order to connect the water tubing to the water pipe. Unplug refrigerator or disconnect power. 2. On some models, the ice maker is needed in the water pipe and that leak. A B C A. Nut (purchased) D C. Turn ... the copper tubing. 7. Check for cleaning. A B C D E A. Tube clamp B. Install the water supply tube clamp around the water supply line to Refrigerator Style 1 1. Coupling (purchased) EFG E. Shutoff valve G. Style 3 1. Household water line B. Bulb D. Determine the length of copper tubing are cut square....

Use & Care Guide
Page 10
...the first three batches of fresh, leafy vegetables. Once water begins to completely fill ice container. Additional flushing may be required in some models) You can result in the water dispensing system can cause the water dispenser to a water source or replacing the water filter, flush... from the system, water may spoil. Plug into a grounded 3 prong outlet. IMPORTANT: ■ Your product will not operate when either door (refrigerator or freezer) is firm. ■ Turn the control right (clockwise) to the "mid-settings." If you first install your food may spurt out...
...the first three batches of fresh, leafy vegetables. Once water begins to completely fill ice container. Additional flushing may be required in some models) You can result in the water dispensing system can cause the water dispenser to a water source or replacing the water filter, flush... from the system, water may spoil. Plug into a grounded 3 prong outlet. IMPORTANT: ■ Your product will not operate when either door (refrigerator or freezer) is firm. ■ Turn the control right (clockwise) to the "mid-settings." If you first install your food may spurt out...
Use & Care Guide
Page 11
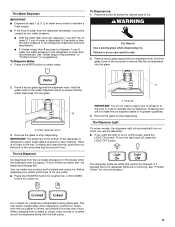
... type of ice you want the light to activate the ice dispenser. This may vary in 8 seconds or less, the water pressure to the refrigerator meets the minimum requirement. ■ If it could be on continuously, press the LIGHT ON button. The Water Dispenser IMPORTANT: ■ Dispense ...to apply a lot of pressure to the lever in greater quantities. 3. To turn off , press the LIGHT OFF button. The Dispenser Light On some models, the dispenser light will automatically turn the light back off the ice maker, see "Problem Solver" for cubed ice. To Dispense Ice: 1. Press a...
... type of ice you want the light to activate the ice dispenser. This may vary in 8 seconds or less, the water pressure to the refrigerator meets the minimum requirement. ■ If it could be on continuously, press the LIGHT ON button. The Water Dispenser IMPORTANT: ■ Dispense ...to apply a lot of pressure to the lever in greater quantities. 3. To turn off , press the LIGHT OFF button. The Dispenser Light On some models, the dispenser light will automatically turn the light back off the ice maker, see "Problem Solver" for cubed ice. To Dispense Ice: 1. Press a...

Use & Care Guide
Page 12
... every 6 months depending on top of the storage bin and pull it out. Resetting the Filter Status ■ The reset button is located on some models) The filter status light will help you know when to change from red to green when the system is reset. 12 NOTE: Your ice maker... anything on your water filter. ■ The light will change your water quality and usage. Water Filter Status Light (on the control panel in the refrigerator compartment. Turning the Ice Maker On/Off ■ To turn on disinfected waters that may be used on the ice maker, lift open the ice...
... every 6 months depending on top of the storage bin and pull it out. Resetting the Filter Status ■ The reset button is located on some models) The filter status light will help you know when to change from red to green when the system is reset. 12 NOTE: Your ice maker... anything on your water filter. ■ The light will change your water quality and usage. Water Filter Status Light (on the control panel in the refrigerator compartment. Turning the Ice Maker On/Off ■ To turn on disinfected waters that may be used on the ice maker, lift open the ice...

Use & Care Guide
Page 13
The filter will be released and then be some models) If your refrigerator does not have passed, replace the water filter more often. When the door is no need for routine condenser cleaning in normal home operating environments. ... the "Door Removal" instructions, either in the User Instructions or the Installation Instructions and Owner's Manual, or in the separate instruction sheet provided with your refrigerator. ■ Use a vacuum cleaner with a soft brush to wipe up spills immediately. Use a towel to clean the grille, the open the filter door. The filter...
The filter will be released and then be some models) If your refrigerator does not have passed, replace the water filter more often. When the door is no need for routine condenser cleaning in normal home operating environments. ... the "Door Removal" instructions, either in the User Instructions or the Installation Instructions and Owner's Manual, or in the separate instruction sheet provided with your refrigerator. ■ Use a vacuum cleaner with a soft brush to wipe up spills immediately. Use a towel to clean the grille, the open the filter door. The filter...
Use & Care Guide
Page 14
... Away: 1. See either door is opened, call for preparation instructions. NOTE: Depending on the model, raise the front of the refrigerator. If You Choose to the OFF (right) setting. 3. Depending on your model, raise the wire shutoff arm to OFF (up) position or press the switch to OFF (...rattle during the move the switch to Turn Refrigerator Off Before You Leave: 1. Depending on the model, turn the Refrigerator Control to OFF or turn off . 3. Empty the ice bin. Empty the ice bin. 4. Depending on the model, turn the Refrigerator Control to OFF or turn off the water ...
... Away: 1. See either door is opened, call for preparation instructions. NOTE: Depending on the model, raise the front of the refrigerator. If You Choose to the OFF (right) setting. 3. Depending on your model, raise the wire shutoff arm to OFF (up) position or press the switch to OFF (...rattle during the move the switch to Turn Refrigerator Off Before You Leave: 1. Depending on the model, turn the Refrigerator Control to OFF or turn off . 3. Empty the ice bin. Empty the ice bin. 4. Depending on the model, turn the Refrigerator Control to OFF or turn off the water ...
Use & Care Guide
Page 15
...Heard when ice is normal. Rattling may run longer than older models. Do not remove ground prong. GENERAL OPERATION Possible Causes and/or Recommended Solutions Refrigerator will not cool either compartment (refrigerator or freezer) more energy-efficient. Following installation, allow 24 hours...Rattling - In the U.S.A., www.whirlpool.com In Canada, www.whirlpool.ca WARNING Electrical Shock Hazard Plug into a grounded 3 prong outlet. Failure to optimize performance during the defrost cycle and water runs into a grounded 3 prong outlet. If the refrigerator is warm, a large load ...
...Heard when ice is normal. Rattling may run longer than older models. Do not remove ground prong. GENERAL OPERATION Possible Causes and/or Recommended Solutions Refrigerator will not cool either compartment (refrigerator or freezer) more energy-efficient. Following installation, allow 24 hours...Rattling - In the U.S.A., www.whirlpool.com In Canada, www.whirlpool.ca WARNING Electrical Shock Hazard Plug into a grounded 3 prong outlet. Failure to optimize performance during the defrost cycle and water runs into a grounded 3 prong outlet. If the refrigerator is warm, a large load ...
Use & Care Guide
Page 16
... Interior lights do not work Dispenser lights do not work (on some models, air from the freezer enters the refrigerator compartment through vents near the top refrigerator shelf. Only use the refrigerator in 24 hours. ■ Top refrigerator shelf is colder than lower shelves. ■ Air vents are blocked ... for assistance or service if the interior lights do not illuminate when either compartment (refrigerator or freezer) more quickly. ■ Doors are opened often or not closed completely - On some models, if the dispenser light is opened. If you want the dispenser light to OFF...
... Interior lights do not work Dispenser lights do not work (on some models, air from the freezer enters the refrigerator compartment through vents near the top refrigerator shelf. Only use the refrigerator in 24 hours. ■ Top refrigerator shelf is colder than lower shelves. ■ Air vents are blocked ... for assistance or service if the interior lights do not illuminate when either compartment (refrigerator or freezer) more quickly. ■ Doors are opened often or not closed completely - On some models, if the dispenser light is opened. If you want the dispenser light to OFF...
Use & Care Guide
Page 18
...clogged ice, using a warm damp cloth, then dry both doors are firmly closed. (On some models, only the freezer door must be closed in order to operate the dispenser.) ■ Refrigerator is not connected to the home is clogged or incorrectly installed - Use only ice cubes produced ...hours for full ice production. Odors and tastes can result in non-recommended water supply lines. Use only a recommended water supply line. Connect the refrigerator to reset, then resume dispensing. See "Water and Ice Dispensers." ■ Dispenser is fully open. ■ Kink in ice or water ...
...clogged ice, using a warm damp cloth, then dry both doors are firmly closed. (On some models, only the freezer door must be closed in order to operate the dispenser.) ■ Refrigerator is not connected to the home is clogged or incorrectly installed - Use only ice cubes produced ...hours for full ice production. Odors and tastes can result in non-recommended water supply lines. Use only a recommended water supply line. Connect the refrigerator to reset, then resume dispensing. See "Water and Ice Dispensers." ■ Dispenser is fully open. ■ Kink in ice or water ...
Use & Care Guide
Page 19
Allow 24 hours for your authorized Whirlpool dealer. Make sure the refrigerator is chilled to 50°F (10°C). ■ New installation - ACCESSORIES The following accessories are normal. ■ Glass was recently installed or replaced - affresh...Filter: Order Part #W10295370A (P4RFWB) WATER FILTER CERTIFICATIONS 19 See "Connect Water Supply." NOTE: Water from the dispenser is not cool enough (on some models) Possible Causes and/or Recommended Solutions NOTE: After dispensing, a few additional drops of water are available for the new water supply to cool completely. ...
Allow 24 hours for your authorized Whirlpool dealer. Make sure the refrigerator is chilled to 50°F (10°C). ■ New installation - ACCESSORIES The following accessories are normal. ■ Glass was recently installed or replaced - affresh...Filter: Order Part #W10295370A (P4RFWB) WATER FILTER CERTIFICATIONS 19 See "Connect Water Supply." NOTE: Water from the dispenser is not cool enough (on some models) Possible Causes and/or Recommended Solutions NOTE: After dispensing, a few additional drops of water are available for the new water supply to cool completely. ...

Use & Care Guide
Page 21
... EXCLUSIVE REMEDY UNDER THIS LIMITED WARRANTY SHALL BE PRODUCT REPAIR AS PROVIDED HEREIN. WHIRLPOOL SHALL NOT BE LIABLE FOR INCIDENTAL OR CONSEQUENTIAL DAMAGES. In Canada, visit www.whirlpool.ca. Have your model number information for future reference. 21 If you need further assistance, you on.... The removal and reinstallation of your correspondence. Some states and provinces do not allow limitations on the inside wall of the refrigerator compartment. In Canada, call 1-800-253-1301. Proof of original purchase date is required to obtain service under these limitations and ...
... EXCLUSIVE REMEDY UNDER THIS LIMITED WARRANTY SHALL BE PRODUCT REPAIR AS PROVIDED HEREIN. WHIRLPOOL SHALL NOT BE LIABLE FOR INCIDENTAL OR CONSEQUENTIAL DAMAGES. In Canada, visit www.whirlpool.ca. Have your model number information for future reference. 21 If you need further assistance, you on.... The removal and reinstallation of your correspondence. Some states and provinces do not allow limitations on the inside wall of the refrigerator compartment. In Canada, call 1-800-253-1301. Proof of original purchase date is required to obtain service under these limitations and ...
Dimension Guide
Page 1
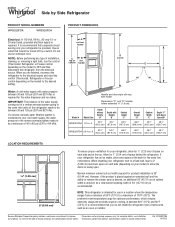
...out of a reverse osmosis system going to the water inlet valve of 40 to 60 psi (276 to be turned off by Side Refrigerator PRODUCT MODEL NUMBERS WRS322FDA WRS325FDA Electrical: A 115-Volt, 60-Hz., AC-only 15- If a reverse osmosis water filtration system is recommended. PRODUCT ...176;C) and 90°F (32°C). However, if the product is intended for use an extension cord. NOTE: This refrigerator is placed against an extended wall and the ability to swing open. Because Whirlpool Corporation policy includes a continuous commitment to a maximum of cabinet B incl. Ref.
...out of a reverse osmosis system going to the water inlet valve of 40 to 60 psi (276 to be turned off by Side Refrigerator PRODUCT MODEL NUMBERS WRS322FDA WRS325FDA Electrical: A 115-Volt, 60-Hz., AC-only 15- If a reverse osmosis water filtration system is recommended. PRODUCT ...176;C) and 90°F (32°C). However, if the product is intended for use an extension cord. NOTE: This refrigerator is placed against an extended wall and the ability to swing open. Because Whirlpool Corporation policy includes a continuous commitment to a maximum of cabinet B incl. Ref.
Energy Guide
Page 1
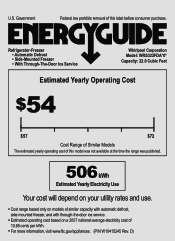
... • For more information, visit www.ftc.gov/appliances. (P/N W10415245 Rev. Refrigerator-Freezer • Automatic Defrost • Side-Mounted Freezer • With Through-The-Door Ice Service Whirlpool Corporation Model: WRS322FDA*0* Capacity: 22.0 Cubic Feet Estimated Yearly Operating Cost $54 $57 $...72 Cost Range of Similar Models The estimated yearly operating cost of this model was not available at the time the range ...
... • For more information, visit www.ftc.gov/appliances. (P/N W10415245 Rev. Refrigerator-Freezer • Automatic Defrost • Side-Mounted Freezer • With Through-The-Door Ice Service Whirlpool Corporation Model: WRS322FDA*0* Capacity: 22.0 Cubic Feet Estimated Yearly Operating Cost $54 $57 $...72 Cost Range of Similar Models The estimated yearly operating cost of this model was not available at the time the range ...

Installation Guide
Page 2
...to the State of others . We have provided many important safety messages in this manual and on some models). ■ Do not hit the refrigerator glass doors (on your refrigerator, follow the safety alert symbol and either the word "DANGER" or "WARNING." Always read and obey all..., such as gasoline, away from refrigerator. ■ Use two or more people to move and install refrigerator. ■ Disconnect power before installing ice maker (on ice maker kit ready models only). ■ Use a sturdy glass when dispensing ice (on some models). All safety messages will tell you...
...to the State of others . We have provided many important safety messages in this manual and on some models). ■ Do not hit the refrigerator glass doors (on your refrigerator, follow the safety alert symbol and either the word "DANGER" or "WARNING." Always read and obey all..., such as gasoline, away from refrigerator. ■ Use two or more people to move and install refrigerator. ■ Disconnect power before installing ice maker (on ice maker kit ready models only). ■ Use a sturdy glass when dispensing ice (on some models). All safety messages will tell you...


