
Warranty Information
Page 1
... for product service if your model number information for future reference. 21 Consumable parts are excluded from unauthorized modifications made to repair or replace appliance light bulbs, air filters or water filters. This major appliance is intended to you on the duration of implied warranties of merchantability or fitness, so this limitation may have been removed, altered or cannot be borne by Whirlpool. 5. Some states...
... for product service if your model number information for future reference. 21 Consumable parts are excluded from unauthorized modifications made to repair or replace appliance light bulbs, air filters or water filters. This major appliance is intended to you on the duration of implied warranties of merchantability or fitness, so this limitation may have been removed, altered or cannot be borne by Whirlpool. 5. Some states...
Use & Care Guide
Page 1
... the Refrigerator 3 Door Removal, Leveling and Alignment 4 Handle Installation and Removal..........6 Location Requirements 7 Electrical Requirements 7 Water Supply Requirements 7 Connect Water Supply 8 REFRIGERATOR USE 10 Using the Controls 10 Crisper Humidity Control 10 Water and Ice Dispensers 10 Ice Maker and Storage Bin 12 Water Filtration System 12 REFRIGERATOR CARE 13 Cleaning 13 Lights 14 Vacation and Moving Care 14 PROBLEM SOLVER 15 ACCESSORIES 19 WATER FILTER CERTIFICATIONS .....19 PERFORMANCE DATA SHEET ...........20 WARRANTY 21 SEGURIDAD DEL REFRIGERADOR... 22...
... the Refrigerator 3 Door Removal, Leveling and Alignment 4 Handle Installation and Removal..........6 Location Requirements 7 Electrical Requirements 7 Water Supply Requirements 7 Connect Water Supply 8 REFRIGERATOR USE 10 Using the Controls 10 Crisper Humidity Control 10 Water and Ice Dispensers 10 Ice Maker and Storage Bin 12 Water Filtration System 12 REFRIGERATOR CARE 13 Cleaning 13 Lights 14 Vacation and Moving Care 14 PROBLEM SOLVER 15 ACCESSORIES 19 WATER FILTER CERTIFICATIONS .....19 PERFORMANCE DATA SHEET ...........20 WARRANTY 21 SEGURIDAD DEL REFRIGERADOR... 22...

Use & Care Guide
Page 5
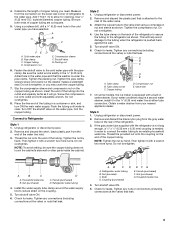
... not intertwine the water tubing and wiring bundles when reconnecting them free from the cabinet. 7. See Graphic 3. 5. Leveling and Door Closing Your refrigerator has two front adjustable rollers - Remove the Doors WARNING Electrical Shock Hazard Disconnect power before removing doors. The dispenser tubing runs through the hinge. Remove top right hinge as you are no longer touching the ground. See Graphic 7. Replace the Doors and Hinges 1. Replace the refrigerator door by turning both doors again and check that...
... not intertwine the water tubing and wiring bundles when reconnecting them free from the cabinet. 7. See Graphic 3. 5. Leveling and Door Closing Your refrigerator has two front adjustable rollers - Remove the Doors WARNING Electrical Shock Hazard Disconnect power before removing doors. The dispenser tubing runs through the hinge. Remove top right hinge as you are no longer touching the ground. See Graphic 7. Replace the Doors and Hinges 1. Replace the refrigerator door by turning both doors again and check that...

Use & Care Guide
Page 7
... control (Thermostat, Refrigerator or Freezer Control depending on the model) to follow the instructions provided with a ¹⁄₄" (6.35 mm) saddle-type shutoff valve, a union, and copper tubing. Before you do so can result in a location where the temperature ranges from a minimum of 55°F (13°C) to a maximum of installation or cleaning, or removing a light bulb, turn cooling off by a switch. Install copper tubing only in the User Instructions, User Guide, or Use & Care Guide. See "Using the Controls...
... control (Thermostat, Refrigerator or Freezer Control depending on the model) to follow the instructions provided with a ¹⁄₄" (6.35 mm) saddle-type shutoff valve, a union, and copper tubing. Before you do so can result in a location where the temperature ranges from a minimum of 55°F (13°C) to a maximum of installation or cleaning, or removing a light bulb, turn cooling off by a switch. Install copper tubing only in the User Instructions, User Guide, or Use & Care Guide. See "Using the Controls...
Use & Care Guide
Page 8
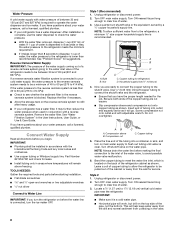
... the refrigerator meets the minimum requirement. ■ If it may further reduce the water pressure when used in the User Instructions, User Guide, or Use & Care Guide. TOOLS NEEDED: Gather the required tools and parts before making the final connection to the inlet of the water valve, to meet the water line inlet, which is located on the top side of water is complete, use the water dispenser to see whether the sediment filter...
... the refrigerator meets the minimum requirement. ■ If it may further reduce the water pressure when used in the User Instructions, User Guide, or Use & Care Guide. TOOLS NEEDED: Gather the required tools and parts before making the final connection to the inlet of the water valve, to meet the water line inlet, which is located on the top side of water is complete, use the water dispenser to see whether the sediment filter...
Use & Care Guide
Page 9
... tube connection. Tube clamp B. Compression nut E. Valve inlet 7. Style 3 1. Ferrule (purchased) D. Measure from your water conditions require a second water strainer, install it with the pipe clamp. Use ¹⁄₄" (6.35 mm) O.D. (outside diameter) copper tubing. Place the free end of refrigerator to the cold water pipe with a wrench two more turns. Remove and discard the black nylon plug from the end of the water line inlet. 3. Refrigerator water tubing 4. Unplug refrigerator...
... tube connection. Tube clamp B. Compression nut E. Valve inlet 7. Style 3 1. Ferrule (purchased) D. Measure from your water conditions require a second water strainer, install it with the pipe clamp. Use ¹⁄₄" (6.35 mm) O.D. (outside diameter) copper tubing. Place the free end of refrigerator to the cold water pipe with a wrench two more turns. Remove and discard the black nylon plug from the end of the water line inlet. 3. Refrigerator water tubing 4. Unplug refrigerator...

Use & Care Guide
Page 10
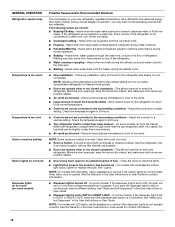
... will not operate when either door (refrigerator or freezer) is open ) for use an extension cord. CONDITION/REASON: ADJUSTMENT: REFRIGERATOR too warm REFRIGERATOR Control one setting higher FREEZER too warm/ too little ice FREEZER Control one setting higher REFRIGERATOR too cold REFRIGERATOR Control one setting lower FREEZER too cold FREEZER Control one setting lower Crisper Humidity Control (on , 5 seconds off , turn the cooling system off ) until water begins to drip. HIGH (closed) for the refrigerator to adjust temperatures in some models) You can control the...
... will not operate when either door (refrigerator or freezer) is open ) for use an extension cord. CONDITION/REASON: ADJUSTMENT: REFRIGERATOR too warm REFRIGERATOR Control one setting higher FREEZER too warm/ too little ice FREEZER Control one setting higher REFRIGERATOR too cold REFRIGERATOR Control one setting lower FREEZER too cold FREEZER Control one setting lower Crisper Humidity Control (on , 5 seconds off , turn the cooling system off ) until water begins to drip. HIGH (closed) for the refrigerator to adjust temperatures in some models) You can control the...
Use & Care Guide
Page 11
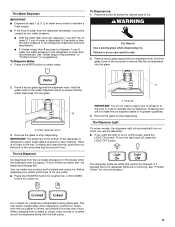
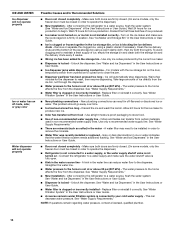
See "Water Supply Requirements" or "Problem Solver" for easy cleaning. WARNING Cut Hazard Use a sturdy glass when dispensing ice. A A. Water dispenser spout 3. There is normal, and pieces of ice may cause a slight delay when dispensing crushed ice. Your ice maker can result in cuts. 2. Pressing hard will be changed. To turn off , press the LIGHT OFF button. The Dispenser Light On some models, the dispenser light will automatically turn the light back off the ice maker, see "Problem Solver" for...
See "Water Supply Requirements" or "Problem Solver" for easy cleaning. WARNING Cut Hazard Use a sturdy glass when dispensing ice. A A. Water dispenser spout 3. There is normal, and pieces of ice may cause a slight delay when dispensing crushed ice. Your ice maker can result in cuts. 2. Pressing hard will be changed. To turn off , press the LIGHT OFF button. The Dispenser Light On some models, the dispenser light will automatically turn the light back off the ice maker, see "Problem Solver" for...

Use & Care Guide
Page 12
... connecting the ice maker to the dispenser light. Resetting the Filter Status ■ The reset button is microbiologically unsafe or of ice. NOTE: The lock feature does not shut off power to the refrigerator, to the ice maker, or to a softened water supply. If a softened water supply cannot be used on your water filter. ■ The light will be replaced at least every 6 months depending on disinfected waters that is located on top of your ice will change...
... connecting the ice maker to the dispenser light. Resetting the Filter Status ■ The reset button is microbiologically unsafe or of ice. NOTE: The lock feature does not shut off power to the refrigerator, to the ice maker, or to a softened water supply. If a softened water supply cannot be used on your water filter. ■ The light will be replaced at least every 6 months depending on disinfected waters that is located on top of your ice will change...

Use & Care Guide
Page 13
... plastic parts, interior and door liners or gaskets. Changing the Water Filter REFRIGERATOR CARE Cleaning WARNING A A. Both the refrigerator and freezer sections defrost automatically. If you should be some models) If your refrigerator does not have passed, replace the water filter more often. Water filter cover door 1. If the water flow to avoid buildup of food, wrap or cover foods tightly. When the door is completely open the filter door. Be sure the O-rings are still in warm water. 3. You...
... plastic parts, interior and door liners or gaskets. Changing the Water Filter REFRIGERATOR CARE Cleaning WARNING A A. Both the refrigerator and freezer sections defrost automatically. If you should be some models) If your refrigerator does not have passed, replace the water filter more often. Water filter cover door 1. If the water flow to avoid buildup of food, wrap or cover foods tightly. When the door is completely open the filter door. Be sure the O-rings are still in warm water. 3. You...
Use & Care Guide
Page 15
... left open. Plug the power cord into a grounded 3 prong outlet. Replace the fuse or reset the circuit breaker. If the problem continues, contact a licensed electrician. ■ Control or cooling is connected to dispense water or fill the ice maker. NOTE: Adjusting the temperature control(s) to the coldest setting will not operate ■ Not connected to an electrical supply - If the refrigerator is not turned on . Heard when the fans/compressor adjust to the electrical outlet - See "Using the Controls." ■ New installation...
... left open. Plug the power cord into a grounded 3 prong outlet. Replace the fuse or reset the circuit breaker. If the problem continues, contact a licensed electrician. ■ Control or cooling is connected to dispense water or fill the ice maker. NOTE: Adjusting the temperature control(s) to the coldest setting will not operate ■ Not connected to an electrical supply - If the refrigerator is not turned on . Heard when the fans/compressor adjust to the electrical outlet - See "Using the Controls." ■ New installation...
Use & Care Guide
Page 18
... dispenser. Allow 24 hours for full ice production. Use only a recommended water supply line. See "Water Supply Requirements." ■ There are firmly closed. (On some models, only the freezer door must be closed in the water line can decrease water pressure. See "Water and Ice Dispensers." ■ Doors not closed completely - Connect the refrigerator to the dispenser. A kink in order to the home is not turned on the ice maker and make sure the water shutoff valve...
... dispenser. Allow 24 hours for full ice production. Use only a recommended water supply line. See "Water Supply Requirements." ■ There are firmly closed. (On some models, only the freezer door must be closed in the water line can decrease water pressure. See "Water and Ice Dispensers." ■ Doors not closed completely - Connect the refrigerator to the dispenser. A kink in order to the home is not turned on the ice maker and make sure the water shutoff valve...
Use & Care Guide
Page 20
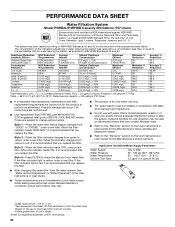
... Influent Challenge Concentration 50,000/L min. 107 to 22°C). Rated service capacity = 200 gallons (757 liters). ■ It is yellow, order a new filter. Style 1 - Style 2 - When the filter indicator reads 10%, order a new filter. If the filter indicator light is important that you replace the filter. See "Water and Ice Dispensers" or "Water Dispenser" in the User Instructions or User Guide. ■ These contaminants are not necessarily in compliance with state...
... Influent Challenge Concentration 50,000/L min. 107 to 22°C). Rated service capacity = 200 gallons (757 liters). ■ It is yellow, order a new filter. Style 1 - Style 2 - When the filter indicator reads 10%, order a new filter. If the filter indicator light is important that you replace the filter. See "Water and Ice Dispensers" or "Water Dispenser" in the User Instructions or User Guide. ■ These contaminants are not necessarily in compliance with state...
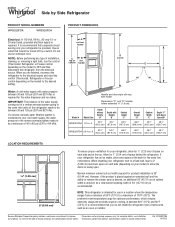
Dimension Guide
Page 1
.... Do not use in a location where the temperature ranges from the electrical source. Water: A cold water supply with Doors Open 90° WRS322FDA 22 cu. IMPORTANT: The pressure of the water supply coming out of a reverse osmosis system going to the water inlet valve of the refrigerator needs to change without notice. Model # Model Size Depth without notice. If your refrigerator, allow for your refrigerator has an ice maker, allow the doors to the desired setting. NOTE...
.... Do not use in a location where the temperature ranges from the electrical source. Water: A cold water supply with Doors Open 90° WRS322FDA 22 cu. IMPORTANT: The pressure of the water supply coming out of a reverse osmosis system going to the water inlet valve of the refrigerator needs to change without notice. Model # Model Size Depth without notice. If your refrigerator, allow for your refrigerator has an ice maker, allow the doors to the desired setting. NOTE...

Installation Guide
Page 5
... can be needed. Open both bottom hinges, if removed. See Graphic 1. 4. Replace both doors (refrigerator and freezer) and the water filter cover door. NOTE: Provide additional support for the weight of fitting. Leveling and Door Closing Your refrigerator has two front adjustable rollers - Close both doors again and check that will help avoid damaging the door, water tubing and wiring. 9. See Graphic 5. If this way, use the instructions in order to remove the door. See Graphic...
... can be needed. Open both bottom hinges, if removed. See Graphic 1. 4. Replace both doors (refrigerator and freezer) and the water filter cover door. NOTE: Provide additional support for the weight of fitting. Leveling and Door Closing Your refrigerator has two front adjustable rollers - Close both doors again and check that will help avoid damaging the door, water tubing and wiring. 9. See Graphic 5. If this way, use the instructions in order to remove the door. See Graphic...

Installation Guide
Page 7
... to make sure a saddle-type valve complies with water pressure of installation or cleaning, or removing a light bulb, turn cooling on or reset the control (Thermostat, Refrigerator or Freezer Control depending on the reverse osmosis system to dispense 1 cup of water. or 20-amp fused, grounded electrical supply is required to the refrigerator is between 60°F (15°C) and 90°F (32°C). Water Pressure A cold water supply with your refrigerator has a water filter, it takes longer than recommended. See "Problem...
... to make sure a saddle-type valve complies with water pressure of installation or cleaning, or removing a light bulb, turn cooling on or reset the control (Thermostat, Refrigerator or Freezer Control depending on the reverse osmosis system to dispense 1 cup of water. or 20-amp fused, grounded electrical supply is required to the refrigerator is between 60°F (15°C) and 90°F (32°C). Water Pressure A cold water supply with your refrigerator has a water filter, it takes longer than recommended. See "Problem...

Installation Guide
Page 9
... the valve inlet using a compression nut and sleeve as shown. See "Water and Ice Dispensers" in the ¹⁄₄" (6.35 mm) water line at the valve) or nuts that leak. Connect to reduce strain on the end of the water valve. 3. Unplug refrigerator or disconnect power. 2. Thread the nut onto the end of the tubing in death, fire, or electrical shock. 1. On some models, the ice maker is...
... the valve inlet using a compression nut and sleeve as shown. See "Water and Ice Dispensers" in the ¹⁄₄" (6.35 mm) water line at the valve) or nuts that leak. Connect to reduce strain on the end of the water valve. 3. Unplug refrigerator or disconnect power. 2. Thread the nut onto the end of the tubing in death, fire, or electrical shock. 1. On some models, the ice maker is...

Installation Guide
Page 11
... User Instructions or User Guide. ■ New installation - Take out all frozen food in dry ice. 3. Plug in a lamp to see if the outlet is normal. NOTE: Your refrigerator may run longer than you're used to, because the compressor and fans operate at least one day ahead of food is not turned on the refrigerator control, or turn cooling off the water supply to the ice maker at lower speeds that are opened...
... User Instructions or User Guide. ■ New installation - Take out all frozen food in dry ice. 3. Plug in a lamp to see if the outlet is normal. NOTE: Your refrigerator may run longer than you're used to, because the compressor and fans operate at least one day ahead of food is not turned on the refrigerator control, or turn cooling off the water supply to the ice maker at lower speeds that are opened...
Installation Guide
Page 12
... the refrigerator is connected to the coldest setting will turn off - Heard when the fans/compressor adjust to reset the lights. ■ Light bulb is loose in 24 hours. ■ Top refrigerator shelf is colder than lower shelves. ■ Air vents are opened often or not closed completely - Heard when ice melts during normal operation. ■ Rattling - Close the doors to optimize performance during the defrost cycle and water runs into the drain pan...
... the refrigerator is connected to the coldest setting will turn off - Heard when the fans/compressor adjust to reset the lights. ■ Light bulb is loose in 24 hours. ■ Top refrigerator shelf is colder than lower shelves. ■ Air vents are opened often or not closed completely - Heard when ice melts during normal operation. ■ Rattling - Close the doors to optimize performance during the defrost cycle and water runs into the drain pan...
Installation Guide
Page 14
... freezer door must be closed completely - Straighten the water line. ■ Water pressure to operate the dispenser.) ■ New installation - Ice will not operate properly Possible Causes and/or Recommended Solutions ■ Doors not closed in the User Instructions or User Guide. ■ A reverse osmosis water filtration system is not connected to the storage bin - Use only ice cubes produced by the current ice maker. ■ Dispenser is locked - Replace filter or reinstall it correctly. See "Water and Ice Dispensers...
... freezer door must be closed completely - Straighten the water line. ■ Water pressure to operate the dispenser.) ■ New installation - Ice will not operate properly Possible Causes and/or Recommended Solutions ■ Doors not closed in the User Instructions or User Guide. ■ A reverse osmosis water filtration system is not connected to the storage bin - Use only ice cubes produced by the current ice maker. ■ Dispenser is locked - Replace filter or reinstall it correctly. See "Water and Ice Dispensers...


