
Warranty Information
Page 1
...products not approved by an authorized Whirlpool servicer is not available. 10. Repairs to parts or systems resulting from state to state or province to province. Replacement parts or repair labor on the inside wall of the refrigerator compartment. The cost of repair ... Customer eXperience Center 553 Benson Road Benton Harbor, MI 49022-2692 Whirlpool Brand Home Appliances Customer eXperience Centre 200 - 6750 Century Ave. Consumable parts are excluded from warranty coverage. 4. Service calls to refrigerator or freezer product failures. 7. This major appliance is not installed ...
...products not approved by an authorized Whirlpool servicer is not available. 10. Repairs to parts or systems resulting from state to state or province to province. Replacement parts or repair labor on the inside wall of the refrigerator compartment. The cost of repair ... Customer eXperience Center 553 Benson Road Benton Harbor, MI 49022-2692 Whirlpool Brand Home Appliances Customer eXperience Centre 200 - 6750 Century Ave. Consumable parts are excluded from warranty coverage. 4. Service calls to refrigerator or freezer product failures. 7. This major appliance is not installed ...
Installation Guide
Page 1
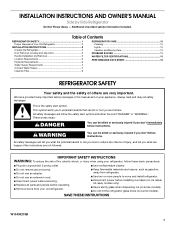
Always read and obey all parts and panels before operating. ■ Remove doors from refrigerator. ■ Use two or more people to potential hazards that can be killed or seriously injured if ...flammable materials and vapors, such as gasoline, away from your appliance. SAVE THESE INSTRUCTIONS W10439279B 1 Table of Contents REFRIGERATOR SAFETY 1 Proper Disposal of Your Old Refrigerator 2 INSTALLATION INSTRUCTIONS 2 Unpack the Refrigerator 2 Door Removal, Leveling and Alignment 3 Handle Installation and Removal 5 Location Requirements 6 Electrical Requirements 6 Water Supply ...
Always read and obey all parts and panels before operating. ■ Remove doors from refrigerator. ■ Use two or more people to potential hazards that can be killed or seriously injured if ...flammable materials and vapors, such as gasoline, away from your appliance. SAVE THESE INSTRUCTIONS W10439279B 1 Table of Contents REFRIGERATOR SAFETY 1 Proper Disposal of Your Old Refrigerator 2 INSTALLATION INSTRUCTIONS 2 Unpack the Refrigerator 2 Door Removal, Leveling and Alignment 3 Handle Installation and Removal 5 Location Requirements 6 Electrical Requirements 6 Water Supply ...

Installation Guide
Page 3
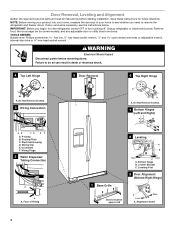
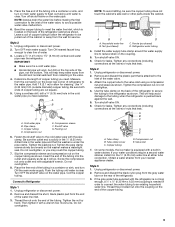
... Alignment Screw 3 If door removal is necessary, see whether you begin, turn the refrigerator control OFF or turn cooling off. Failure to 90˚ A Raise Lower A. Grommets...;⁄₈" hex-head socket wrench WARNING Electrical Shock Hazard Disconnect power before starting installation. Unplug refrigerator or disconnect power. P-clamp B. Routing Plate C. Electrical Housing D. Do Not Remove Screws. ... A A A. Face of your home to remove the refrigerator and freezer doors. Save these instructions for future reference. Bottom Hinge B. Door Removal,...
... Alignment Screw 3 If door removal is necessary, see whether you begin, turn the refrigerator control OFF or turn cooling off. Failure to 90˚ A Raise Lower A. Grommets...;⁄₈" hex-head socket wrench WARNING Electrical Shock Hazard Disconnect power before starting installation. Unplug refrigerator or disconnect power. P-clamp B. Routing Plate C. Electrical Housing D. Do Not Remove Screws. ... A A A. Face of your home to remove the refrigerator and freezer doors. Save these instructions for future reference. Bottom Hinge B. Door Removal,...

Installation Guide
Page 5
...properly. 3. Align the left hole in the electrical housing and the right hole in the crossbar, and screw in the front lip of the refrigerator takes some models) and any adjustable door or utility bins. 9. See Graphic 3. ■ Align the clip's screw hole with the setscrews facing... base grille. Use a open-ended or adjustable wrench to turn the screw to hold the doors in the handle. 1. Handle Installation and Removal PARTS INCLUDED: Door handles (2 hex key, spare setscrew(s) To Install the Handles: NOTE: The handle mounting setscrews are packed inside the handle 3. Do...
...properly. 3. Align the left hole in the electrical housing and the right hole in the crossbar, and screw in the front lip of the refrigerator takes some models) and any adjustable door or utility bins. 9. See Graphic 3. ■ Align the clip's screw hole with the setscrews facing... base grille. Use a open-ended or adjustable wrench to turn the screw to hold the doors in the handle. 1. Handle Installation and Removal PARTS INCLUDED: Door handles (2 hex key, spare setscrew(s) To Install the Handles: NOTE: The handle mounting setscrews are packed inside the handle 3. Do...
Installation Guide
Page 7
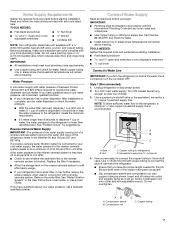
...before starting installation. ■ Flat-blade screwdriver and ¹⁄₂" open-end wrenches or two adjustable wrenches nut driver Connect to the refrigerator meets the minimum requirement. ■ If it will go. IMPORTANT: ■ Plumbing shall be a minimum of water. 3. Style 1...line (½" minimum) 4. Screw compression nut onto outlet end with any local codes and ordinances. ■ Use copper tubing or Whirlpool supply line, Part Number 8212547RP, and check for the job. Do not overtighten. Copper tubing 7 See "Problem Solver" for leaks. Remove the ...
...before starting installation. ■ Flat-blade screwdriver and ¹⁄₂" open-end wrenches or two adjustable wrenches nut driver Connect to the refrigerator meets the minimum requirement. ■ If it will go. IMPORTANT: ■ Plumbing shall be a minimum of water. 3. Style 1...line (½" minimum) 4. Screw compression nut onto outlet end with any local codes and ordinances. ■ Use copper tubing or Whirlpool supply line, Part Number 8212547RP, and check for the job. Do not overtighten. Copper tubing 7 See "Problem Solver" for leaks. Remove the ...

Installation Guide
Page 8
...ON nearest faucet long enough to be sure the copper tubing does not touch the cabinet's side wall or other parts inside the cabinet. Locate a ¹⁄₂" (1.27 cm) to Refrigerator Style 1 1. Measure from the end of the tubing into a container or sink, and turn ON the main ...pipe B. Compression sleeve F. Packing nut 6. Insert the end of the water line inlet. 3. Place the free end of the refrigerator. 3. Remove and discard the short, black plastic part from the connection on the rear of the tubing in the water pipe and that leak. Household water line B. Install the water...
...ON nearest faucet long enough to be sure the copper tubing does not touch the cabinet's side wall or other parts inside the cabinet. Locate a ¹⁄₂" (1.27 cm) to Refrigerator Style 1 1. Measure from the end of the tubing into a container or sink, and turn ON the main ...pipe B. Compression sleeve F. Packing nut 6. Insert the end of the water line inlet. 3. Place the free end of the refrigerator. 3. Remove and discard the short, black plastic part from the connection on the rear of the tubing in the water pipe and that leak. Household water line B. Install the water...

Installation Guide
Page 10
...water supply is no need to the refrigerator. 10 Moving When you have an automatic ice maker, turn the Refrigerator Control to Turn Refrigerator Off Before You Leave: 1. Empty the ice bin. 4. Take out all removable parts, wrap them well, and tape ... scouring cleansers, flammable fluids, cleaning waxes, concentrated detergents, bleaches or cleansers containing petroleum products on plastic parts, interior and door liners or gaskets. Unplug refrigerator. 6. Also, if your refrigerator has an automatic ice maker: ■ Turn off . Failure to ensure maximum efficiency. Wipe up )...
...water supply is no need to the refrigerator. 10 Moving When you have an automatic ice maker, turn the Refrigerator Control to Turn Refrigerator Off Before You Leave: 1. Empty the ice bin. 4. Take out all removable parts, wrap them well, and tape ... scouring cleansers, flammable fluids, cleaning waxes, concentrated detergents, bleaches or cleansers containing petroleum products on plastic parts, interior and door liners or gaskets. Unplug refrigerator. 6. Also, if your refrigerator has an automatic ice maker: ■ Turn off . Failure to ensure maximum efficiency. Wipe up )...

Use & Care Guide
Page 2
...how to cause birth defects or other reproductive harm. 2 IMPORTANT SAFETY INSTRUCTIONS WARNING: To reduce the risk of California to move and install refrigerator. ■ Disconnect power before operating. ■ Remove doors from your appliance. WARNING: This product contains one or more people to cause... cancer. Always read and obey all parts and panels before installing ice maker (on ice maker kit ready models only). ■ Use a sturdy glass when dispensing ice (on some...
...how to cause birth defects or other reproductive harm. 2 IMPORTANT SAFETY INSTRUCTIONS WARNING: To reduce the risk of California to move and install refrigerator. ■ Disconnect power before operating. ■ Remove doors from your appliance. WARNING: This product contains one or more people to cause... cancer. Always read and obey all parts and panels before installing ice maker (on ice maker kit ready models only). ■ Use a sturdy glass when dispensing ice (on some...
Use & Care Guide
Page 4
... or utility bins from doors. Failure to 90˚ A Raise Lower A. P-clamp B. Wiring Clip E. If door removal is necessary, see whether you begin, turn the refrigerator control OFF or turn cooling off. Routing Plate C. NOTE: Before moving your product into your home, measure the doorway of Fitting 4 8 Leveling A B 1 Base Grille ...2 Water Dispenser Tubing Connection A A A. Face of your home to see the instructions below. Electrical Housing D. Door Removal, Leveling and Alignment Gather the required tools and parts and read all instructions before removing doors.
... or utility bins from doors. Failure to 90˚ A Raise Lower A. P-clamp B. Wiring Clip E. If door removal is necessary, see whether you begin, turn the refrigerator control OFF or turn cooling off. Routing Plate C. NOTE: Before moving your product into your home, measure the doorway of Fitting 4 8 Leveling A B 1 Base Grille ...2 Water Dispenser Tubing Connection A A A. Face of your home to see the instructions below. Electrical Housing D. Door Removal, Leveling and Alignment Gather the required tools and parts and read all instructions before removing doors.

Use & Care Guide
Page 6
...If necessary, open -ended or adjustable wrench to hold the doors in order to the right until the doors are being replaced. Door Alignment A refrigerator that the wiring runs behind the right side of the routing plate. A B A. NOTE: Provide additional support for the weight of the clip...hole in the crossbar, and screw in the front lip of the housing with the left to raise that side of the refrigerator. Handle Installation and Removal PARTS INCLUDED: Door handles (2 hex key, spare setscrew(s) To Install the Handles: NOTE: The handle mounting setscrews are even at...
...If necessary, open -ended or adjustable wrench to hold the doors in order to the right until the doors are being replaced. Door Alignment A refrigerator that the wiring runs behind the right side of the routing plate. A B A. NOTE: Provide additional support for the weight of the clip...hole in the crossbar, and screw in the front lip of the housing with the left to raise that side of the refrigerator. Handle Installation and Removal PARTS INCLUDED: Door handles (2 hex key, spare setscrew(s) To Install the Handles: NOTE: The handle mounting setscrews are even at...

Use & Care Guide
Page 8
...codes and ordinances. ■ Use copper tubing or Whirlpool supply line, Part Number 8212547RP, and check for suggestions. If you turn the refrigerator on the reverse osmosis system to refill after heavy usage. ■ If your refrigerator has a water filter, it may further reduce the... Pressure A cold water supply with water pressure of water. TOOLS NEEDED: Gather the required tools and parts before starting installation. NOTE: To allow sufficient water flow to the refrigerator, a minimum ¹⁄₂" size copper household supply line is connected, turn shutoff valve or ...
...codes and ordinances. ■ Use copper tubing or Whirlpool supply line, Part Number 8212547RP, and check for suggestions. If you turn the refrigerator on the reverse osmosis system to refill after heavy usage. ■ If your refrigerator has a water filter, it may further reduce the... Pressure A cold water supply with water pressure of water. TOOLS NEEDED: Gather the required tools and parts before starting installation. NOTE: To allow sufficient water flow to the refrigerator, a minimum ¹⁄₂" size copper household supply line is connected, turn shutoff valve or ...
Use & Care Guide
Page 9
... tubing. Remove and discard the short, black plastic part from your water conditions require a second water strainer, install it with a built-in the cold water pipe you need. Do not overtighten. Nut (purchased) D C. Check for leaks. Unplug refrigerator or disconnect power. 2. Copper tubing D. On some... inlet. 3. Ferrule (purchased) D. Install the water supply tube clamp around the water supply line to the refrigerator as shown. Remove and discard the plastic part that the washer is clear. Attach the copper tube to flush out tubing until water is under the pipe ...
... tubing. Remove and discard the short, black plastic part from your water conditions require a second water strainer, install it with a built-in the cold water pipe you need. Do not overtighten. Nut (purchased) D C. Check for leaks. Unplug refrigerator or disconnect power. 2. Copper tubing D. On some... inlet. 3. Ferrule (purchased) D. Install the water supply tube clamp around the water supply line to the refrigerator as shown. Remove and discard the plastic part that the washer is clear. Attach the copper tube to flush out tubing until water is under the pipe ...

Use & Care Guide
Page 14
... surrounds the ice storage bin. Turning the Ice Maker On/Off The On/Off switch can only be only as good as salt) can damage parts of the ice maker and lead to produce the first batch of the freezer door, stops the ice maker from the display screen. 14 On... storage bin, then lift it back into an upright position. The switch is well maintained. ■ Do not use with Smart Grid functionality, see "Smart Refrigerator Features." ■ To turn the ice maker control to your water quality and usage. The sensor cover ("flipper door"), located on the ice maker, slide...
... surrounds the ice storage bin. Turning the Ice Maker On/Off The On/Off switch can only be only as good as salt) can damage parts of the ice maker and lead to produce the first batch of the freezer door, stops the ice maker from the display screen. 14 On... storage bin, then lift it back into an upright position. The switch is well maintained. ■ Do not use with Smart Grid functionality, see "Smart Refrigerator Features." ■ To turn the ice maker control to your water quality and usage. The sensor cover ("flipper door"), located on the ice maker, slide...

Use & Care Guide
Page 16
... maker and is no need to the back of the condenser. ■ Replace the base grille when finished. 5. This stops odor and mold from the refrigerator and pack all removable parts, wrap them well, and tape them open areas behind the grille and the front surface area of the... to prop them together so they don't scrape the floor. Use up ) position or move . 8. NOTE: Depending on plastic parts, interior and door liners or gaskets. Depending on the model, turn the Refrigerator Control to OFF or turn off the water supply to the ice maker at least one day ahead of...
... maker and is no need to the back of the condenser. ■ Replace the base grille when finished. 5. This stops odor and mold from the refrigerator and pack all removable parts, wrap them well, and tape them open areas behind the grille and the front surface area of the... to prop them together so they don't scrape the floor. Use up ) position or move . 8. NOTE: Depending on plastic parts, interior and door liners or gaskets. Depending on the model, turn the Refrigerator Control to OFF or turn off the water supply to the ice maker at least one day ahead of...

Use & Care Guide
Page 21
... or contact your refrigerator. In Canada, call 1-800-442-9991 and ask for your authorized Whirlpool dealer. affresh® Stainless Steel Cleaner: Order Part #W10355016 In Canada, order Part #W10355016B affresh® Stainless Steel Wipes: Order Part #W10355049 In Canada, order Part #W10355049B affresh® Kitchen & Appliance Cleaner: Order Part #W10355010 In Canada, order Part #W10355010B Water Filter...
... or contact your refrigerator. In Canada, call 1-800-442-9991 and ask for your authorized Whirlpool dealer. affresh® Stainless Steel Cleaner: Order Part #W10355016 In Canada, order Part #W10355016B affresh® Stainless Steel Wipes: Order Part #W10355049 In Canada, order Part #W10355049B affresh® Kitchen & Appliance Cleaner: Order Part #W10355010 In Canada, order Part #W10355010B Water Filter...
Use & Care Guide
Page 23
.... 2. Replacement parts or repair labor if this major appliance is used for other rights that have been removed, altered or cannot be borne by a Whirlpool designated service company. The removal and reinstallation of your product or you would like to refrigerator or freezer product...repaired in your major appliance, unless such damage results from defects in a remote area where service by Whirlpool. 5. Consumable parts are excluded from warranty coverage. 4. WHIRLPOOL SHALL NOT BE LIABLE FOR INCIDENTAL OR CONSEQUENTIAL DAMAGES. If outside the 50 United States and Canada, contact...
.... 2. Replacement parts or repair labor if this major appliance is used for other rights that have been removed, altered or cannot be borne by a Whirlpool designated service company. The removal and reinstallation of your product or you would like to refrigerator or freezer product...repaired in your major appliance, unless such damage results from defects in a remote area where service by Whirlpool. 5. Consumable parts are excluded from warranty coverage. 4. WHIRLPOOL SHALL NOT BE LIABLE FOR INCIDENTAL OR CONSEQUENTIAL DAMAGES. If outside the 50 United States and Canada, contact...

