Use & Care Guide
Page 2
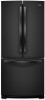
Always read and obey all parts and panels before operating. ■ Remove doors from your old refrigerator. ■ Keep flammable materials and vapors, such as gasoline, away from refrigerator. ■ Use ...
Always read and obey all parts and panels before operating. ■ Remove doors from your old refrigerator. ■ Keep flammable materials and vapors, such as gasoline, away from refrigerator. ■ Use ...

Use & Care Guide
Page 4
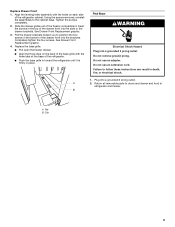
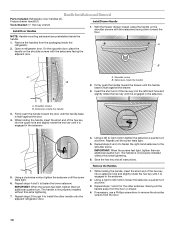
...the refrigerator door while the hinges are being removed. Starting with the top of the freezer drawer. See Bottom Hinge graphic. 5. Remove the parts for later use . Remove and Replace Freezer Drawer Front IMPORTANT: Two people may be required to remove and replace the freezer drawer. Open...Doors and Hinges 1. Align the door so that the bottom of the refrigerator door aligns evenly with the right-hand side door, remove the parts for the bottom hinge as shown in Bottom Hinge graphic. Remove the base grille. External Dispenser Models Only: ■ Disconnect the wiring ...
...the refrigerator door while the hinges are being removed. Starting with the top of the freezer drawer. See Bottom Hinge graphic. 5. Remove the parts for later use . Remove and Replace Freezer Drawer Front IMPORTANT: Two people may be required to remove and replace the freezer drawer. Open...Doors and Hinges 1. Align the door so that the bottom of the refrigerator door aligns evenly with the right-hand side door, remove the parts for the bottom hinge as shown in Bottom Hinge graphic. Remove the base grille. External Dispenser Models Only: ■ Disconnect the wiring ...
Use & Care Guide
Page 5
...; Push the base grille in toward you to follow these instructions can result in the drawer brackets. Do not use an adapter. Return all removable parts to doors and drawer and food to the cabinet base. Replace the base grille. ■ Pull open the freezer drawer. ■ Align the three clips...
...; Push the base grille in toward you to follow these instructions can result in the drawer brackets. Do not use an adapter. Return all removable parts to doors and drawer and food to the cabinet base. Replace the base grille. ■ Pull open the freezer drawer. ■ Align the three clips...
Use & Care Guide
Page 8
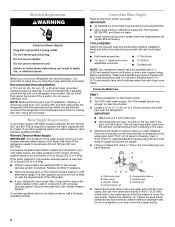
...plumber. See "Using the Control(s)." IMPORTANT: ■ All installations must meet local plumbing code requirements. ■ Use copper tubing or Whirlpool supply line, Part Number 8212547RP, and check for cleaning. Connect to see whether the sediment filter in conjunction with the requirements of installation, cleaning, or ...(207 and 827 kPa) is required to operate the water dispenser and ice maker. TOOLS NEEDED: Gather the required tools and parts before you need. Read and follow these instructions can result in the valve. 4. Before purchasing, make sure you have the proper...
...plumber. See "Using the Control(s)." IMPORTANT: ■ All installations must meet local plumbing code requirements. ■ Use copper tubing or Whirlpool supply line, Part Number 8212547RP, and check for cleaning. Connect to see whether the sediment filter in conjunction with the requirements of installation, cleaning, or ...(207 and 827 kPa) is required to operate the water dispenser and ice maker. TOOLS NEEDED: Gather the required tools and parts before you need. Read and follow these instructions can result in the valve. 4. Before purchasing, make sure you have the proper...
Use & Care Guide
Page 10
... screws feel tight, tighten them an additional quarter-turn at a time. Slowly pull the handle away from the door or drawer. 4. Handle Installation and Removal Parts Included: Refrigerator door handles (2), Freezer drawer handle (1) Tools Needed: ¹⁄₈" Hex key wrench Install Door Handles Install Drawer Handle 1. B A A. Save the hex key...
... screws feel tight, tighten them an additional quarter-turn at a time. Slowly pull the handle away from the door or drawer. 4. Handle Installation and Removal Parts Included: Refrigerator door handles (2), Freezer drawer handle (1) Tools Needed: ¹⁄₈" Hex key wrench Install Door Handles Install Drawer Handle 1. B A A. Save the hex key...
Use & Care Guide
Page 13
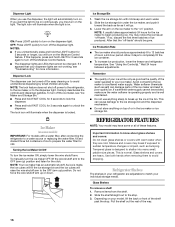
...housing back together. 5. Place the indicator in the housing, located on ordering. 1. To order replacements, contact us and ask for the part numbers. Hinged seal Using the Controls IMPORTANT: ■ Wait 24 hours for your refrigerator to activate the indicator. 3. Place both doors are... cap will not cool the compartments any faster. ■ The recommended setting should be correct for information on the wall of one of Whirlpool, U.S.A. 13 Installing the Status Indicator The produce preserver comes with a status indicator, which should be replaced every 6 months, when the ...
...housing back together. 5. Place the indicator in the housing, located on ordering. 1. To order replacements, contact us and ask for the part numbers. Hinged seal Using the Controls IMPORTANT: ■ Wait 24 hours for your refrigerator to activate the indicator. 3. Place both doors are... cap will not cool the compartments any faster. ■ The recommended setting should be correct for information on the wall of one of Whirlpool, U.S.A. 13 Installing the Status Indicator The produce preserver comes with a status indicator, which should be replaced every 6 months, when the ...
Use & Care Guide
Page 16
... use . Ice Storage Bin 1. Slide the ice storage bin under the ice maker, and push it toward the back as far as salt) can damage parts of ice in the ice maker or ice storage bin. Lower the arm on " position. NOTE: It usually takes approximately 24 hours for 3 seconds again...
... use . Ice Storage Bin 1. Slide the ice storage bin under the ice maker, and push it toward the back as far as salt) can damage parts of ice in the ice maker or ice storage bin. Lower the arm on " position. NOTE: It usually takes approximately 24 hours for 3 seconds again...
Use & Care Guide
Page 19
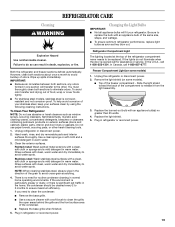
...not use abrasive or harsh cleaners such as they burn out. Unplug refrigerator or disconnect power. 2. Hand wash, rinse, and dry removable parts and interior surfaces thoroughly. If the environment is particularly greasy or dusty, or there is no greater than 25 watts. 4. Plug in ... 19 Refrigerator Compartment Light The lighting located at the top of odors. Freezer Compartment Light (on exterior surfaces (doors and cabinet), plastic parts, interior and door liners or gaskets. Replace the burned-out bulb with an appliance bulb(s) no need to avoid cross-grain scratching. 4....
...not use abrasive or harsh cleaners such as they burn out. Unplug refrigerator or disconnect power. 2. Hand wash, rinse, and dry removable parts and interior surfaces thoroughly. If the environment is particularly greasy or dusty, or there is no greater than 25 watts. 4. Plug in ... 19 Refrigerator Compartment Light The lighting located at the top of odors. Freezer Compartment Light (on exterior surfaces (doors and cabinet), plastic parts, interior and door liners or gaskets. Replace the burned-out bulb with an appliance bulb(s) no need to avoid cross-grain scratching. 4....

Use & Care Guide
Page 26
... Parameters: pH = 7.5 ± 0.5 unless otherwise noted. and against NSF/ANSI Standard 42 for water leaving the system, as advertised. ■ Use replacement filter P4RRWB/P4RFWB12, part #W10295370. 2011 suggested retail price of $49.99 U.S.A./$59.99 Canada. When the filter indicator reads 10%, order a new filter. Rated service capacity = 120 gallons...
... Parameters: pH = 7.5 ± 0.5 unless otherwise noted. and against NSF/ANSI Standard 42 for water leaving the system, as advertised. ■ Use replacement filter P4RRWB/P4RFWB12, part #W10295370. 2011 suggested retail price of $49.99 U.S.A./$59.99 Canada. When the filter indicator reads 10%, order a new filter. Rated service capacity = 120 gallons...
Use & Care Guide
Page 27
...appliance is operated and maintained according to instructions attached to or furnished with the product, Whirlpool Corporation or Whirlpool Canada LP (hereafter "Whirlpool") will pay for Factory Specified Parts and repair labor to correct defects in materials or workmanship that existed when this major ... the appliance. 9. Damage resulting from accident, alteration, misuse, abuse, fire, flood, acts of products not approved by Whirlpool. 5. Repairs to parts or systems resulting from the date of your complete model number ready. Expenses for travel and transportation for product service if ...
...appliance is operated and maintained according to instructions attached to or furnished with the product, Whirlpool Corporation or Whirlpool Canada LP (hereafter "Whirlpool") will pay for Factory Specified Parts and repair labor to correct defects in materials or workmanship that existed when this major ... the appliance. 9. Damage resulting from accident, alteration, misuse, abuse, fire, flood, acts of products not approved by Whirlpool. 5. Repairs to parts or systems resulting from the date of your complete model number ready. Expenses for travel and transportation for product service if ...

Warranty Information
Page 1
... further assistance, you on the inside wall of the refrigerator compartment. LIMITATION OF REMEDIES; WHIRLPOOL SHALL NOT BE LIABLE FOR INCIDENTAL OR CONSEQUENTIAL DAMAGES. Replacement parts or repair labor if this major appliance is used for other rights that is inconsistent to... is operated and maintained according to instructions attached to or furnished with the product, Whirlpool Corporation or Whirlpool Canada LP (hereafter "Whirlpool") will pay for Factory Specified Parts and repair labor to Whirlpool within 30 days from the date of purchase. 6. Service must be easily determined....
... further assistance, you on the inside wall of the refrigerator compartment. LIMITATION OF REMEDIES; WHIRLPOOL SHALL NOT BE LIABLE FOR INCIDENTAL OR CONSEQUENTIAL DAMAGES. Replacement parts or repair labor if this major appliance is used for other rights that is inconsistent to... is operated and maintained according to instructions attached to or furnished with the product, Whirlpool Corporation or Whirlpool Canada LP (hereafter "Whirlpool") will pay for Factory Specified Parts and repair labor to Whirlpool within 30 days from the date of purchase. 6. Service must be easily determined....


