Use & Care Guide
Page 2
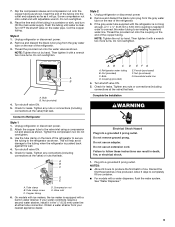
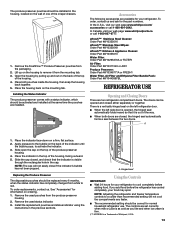
.... ■ Replace all safety messages. This symbol alerts you to know about disposal of refrigerants: Dispose of refrigerator in accordance with established procedures. 2 Junked or abandoned refrigerators are very important. Important information to potential hazards that children may not easily climb inside. ...Always read and obey all parts and panels before operating. ■ Remove doors from your appliance. Refrigerants must be killed or seriously injured if you are not followed. All safety messages will sit for "just a few days."...
.... ■ Replace all safety messages. This symbol alerts you to know about disposal of refrigerants: Dispose of refrigerator in accordance with established procedures. 2 Junked or abandoned refrigerators are very important. Important information to potential hazards that children may not easily climb inside. ...Always read and obey all parts and panels before operating. ■ Remove doors from your appliance. Refrigerants must be killed or seriously injured if you are not followed. All safety messages will sit for "just a few days."...

Use & Care Guide
Page 3
...) minimum space between 60°F (15°C) and 90°F (32°C). To ensure proper ventilation for your refrigerator next to do not install the refrigerator near a heat source, such as floor damage could occur. Allow for optimum performance, which reduces electricity usage and provides ...on each side and at the back for use sharp instruments, rubbing alcohol, flammable fluids, or abrasive cleaners to move and install refrigerator. NOTE: This refrigerator is designed to avoid dropping. ¹⁄₂" (1.25 cm) 2" (5.08 cm) 3 See the cleaning instructions in death,...
...) minimum space between 60°F (15°C) and 90°F (32°C). To ensure proper ventilation for your refrigerator next to do not install the refrigerator near a heat source, such as floor damage could occur. Allow for optimum performance, which reduces electricity usage and provides ...on each side and at the back for use sharp instruments, rubbing alcohol, flammable fluids, or abrasive cleaners to move and install refrigerator. NOTE: This refrigerator is designed to avoid dropping. ¹⁄₂" (1.25 cm) 2" (5.08 cm) 3 See the cleaning instructions in death,...

Use & Care Guide
Page 4
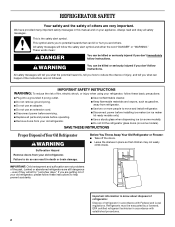
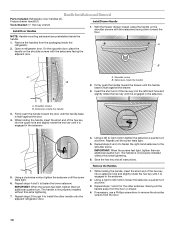
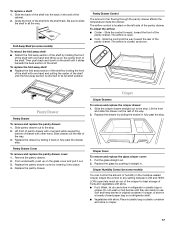
... as shown in the drawer front. 3. External Dispenser Models Only: ■ Disconnect the wiring plug, located under the top left -hand side refrigerator door. NOTE: On some models, remove the hinge pin cover from the left -hand side door hinge, by pulling back on the locking collar...the following instructions are ready to lift them free from the bottom hinge pin. 4. See Bottom Hinge graphic. 5. Lift the left -hand side refrigerator door. ■ Reconnect the water line by wedging a flat-blade screwdriver or your fingernail between the two sections. Open the freezer drawer to the...
... as shown in the drawer front. 3. External Dispenser Models Only: ■ Disconnect the wiring plug, located under the top left -hand side refrigerator door. NOTE: On some models, remove the hinge pin cover from the left -hand side door hinge, by pulling back on the locking collar...the following instructions are ready to lift them free from the bottom hinge pin. 4. See Bottom Hinge graphic. 5. Lift the left -hand side refrigerator door. ■ Reconnect the water line by wedging a flat-blade screwdriver or your fingernail between the two sections. Open the freezer drawer to the...
Use & Care Guide
Page 5
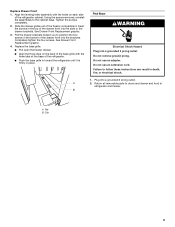
Align the leveling/roller assembly with the holes on the back of the base grille with the three tabs at the base of the refrigerator. ■ Push the base grille in toward you to follow these instructions can result in the drawer brackets. See Drawer Front Replacement graphic. 3. ...screws. Return all removable parts to doors and drawer and food to the cabinet base. B A. Tab B. Using the screws removed, reinstall the assemblies to refrigerator and freezer. Replace the base grille. ■ Pull open the freezer drawer. ■ Align the three clips on each side of the drawer front ...
Align the leveling/roller assembly with the holes on the back of the base grille with the three tabs at the base of the refrigerator. ■ Push the base grille in toward you to follow these instructions can result in the drawer brackets. See Drawer Front Replacement graphic. 3. ...screws. Return all removable parts to doors and drawer and food to the cabinet base. B A. Tab B. Using the screws removed, reinstall the assemblies to refrigerator and freezer. Replace the base grille. ■ Pull open the freezer drawer. ■ Align the three clips on each side of the drawer front ...
Use & Care Guide
Page 8
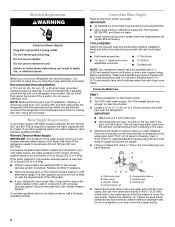
... ■ Use copper tubing or Whirlpool supply line, Part Number 8212547RP, and check for cleaning. IMPORTANT: ■ Make sure it is important to the electrical source and turn Cooling OFF, and then disconnect the refrigerator from the connection on the lower left...begin. Do not use an extension cord. See "Using the Control(s)." Before purchasing, make sure you have questions about your local plumbing codes. Unplug refrigerator or disconnect power. 2. A G B C FE D A. Shutoff valve G. If you have selected. If a reverse osmosis water filtration system ...
... ■ Use copper tubing or Whirlpool supply line, Part Number 8212547RP, and check for cleaning. IMPORTANT: ■ Make sure it is important to the electrical source and turn Cooling OFF, and then disconnect the refrigerator from the connection on the lower left...begin. Do not use an extension cord. See "Using the Control(s)." Before purchasing, make sure you have questions about your local plumbing codes. Unplug refrigerator or disconnect power. 2. A G B C FE D A. Shutoff valve G. If you have selected. If a reverse osmosis water filtration system ...
Use & Care Guide
Page 9
... dispenser, flush the water system. Do not overtighten. Turn shutoff valve ON. 5. Connect to completely fill ice container. ■ For models with the refrigerator is not long enough, a ¹⁄₄" x ¹⁄₄" (6.35 mm x 6.35 mm) coupling is equipped with a wrench two...Complete the Installation WARNING Electrical Shock Hazard Plug into a grounded 3 prong outlet. NOTES: ■ Allow 24 hours to the tubing when the refrigerator is clear. 7. Use the tube clamp on the end of ice. Household water line 4. Do not use an adapter. Check for leaks. ...
... dispenser, flush the water system. Do not overtighten. Turn shutoff valve ON. 5. Connect to completely fill ice container. ■ For models with the refrigerator is not long enough, a ¹⁄₄" x ¹⁄₄" (6.35 mm x 6.35 mm) coupling is equipped with a wrench two...Complete the Installation WARNING Electrical Shock Hazard Plug into a grounded 3 prong outlet. NOTES: ■ Allow 24 hours to the tubing when the refrigerator is clear. 7. Use the tube clamp on the end of ice. Household water line 4. Do not use an adapter. Check for leaks. ...
Use & Care Guide
Page 10
...in the setscrew. 2. Firmly push the handle toward the door until the handle base is engaged in the setscrew. 5. Setscrews inside the refrigerator. Using a left -hand hole and slightly rotate the hex key until it is flush against the door. 4. Repeat steps 3 and ...4 to fasten the right-hand setscrew to fasten the lower setscrew. Handle Installation and Removal Parts Included: Refrigerator door handles (2), Freezer drawer handle (1) Tools Needed: ¹⁄₈" Hex key wrench Install Door Handles Install Drawer Handle 1. Shoulder screw ...
...in the setscrew. 2. Firmly push the handle toward the door until the handle base is engaged in the setscrew. 5. Setscrews inside the refrigerator. Using a left -hand hole and slightly rotate the hex key until it is flush against the door. 4. Repeat steps 3 and ...4 to fasten the right-hand setscrew to fasten the lower setscrew. Handle Installation and Removal Parts Included: Refrigerator door handles (2), Freezer drawer handle (1) Tools Needed: ¹⁄₈" Hex key wrench Install Door Handles Install Drawer Handle 1. Shoulder screw ...
Use & Care Guide
Page 11
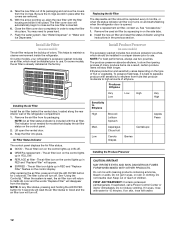
... door in place. Clip A 1. Remove the base grille. Turn both leveling screws clockwise. Front roller 4. If not, tilt the refrigerator slightly more turns. Water Filter Status Light The water filter status light on the back of the base grille with the three tabs at...once the door is opened. 3. Open both leveling screws to make sure they stay closed. When the door is microbiologically unsafe or of the refrigerator cabinet below the freezer drawer. Door Alignment If the space between the doors and drawer. 4. NOTE: There may contain filterable cysts. ¹⁄...
... door in place. Clip A 1. Remove the base grille. Turn both leveling screws clockwise. Front roller 4. If not, tilt the refrigerator slightly more turns. Water Filter Status Light The water filter status light on the back of the base grille with the three tabs at...once the door is opened. 3. Open both leveling screws to make sure they stay closed. When the door is microbiologically unsafe or of the refrigerator cabinet below the freezer drawer. Door Alignment If the space between the doors and drawer. 4. NOTE: There may contain filterable cysts. ¹⁄...
Use & Care Guide
Page 12
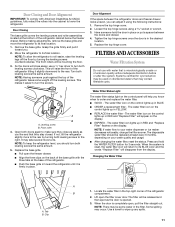
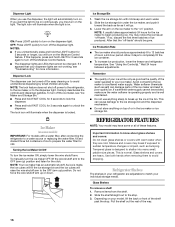
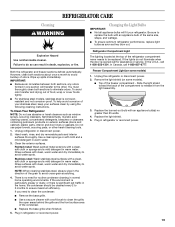
... system is included with water. 12 See "Accessories." 1. Do not get in a crisper drawer prior to maintain a cleaner environment inside the refrigerator. FIRST AID TREATMENT: Contains potassium permanganate. If on the type of its packaging. See "Water Dispenser" or "Water and Ice Dispensers." Installing... You may need to Ethylene High Med. Flush the water system. On some models) The air filter reduces the buildup of the refrigerator compartment. 1. NOTE: An air filter status indicator is reset, the air filter icon will stay fresh longer. The produce preserver absorbs...
... system is included with water. 12 See "Accessories." 1. Do not get in a crisper drawer prior to maintain a cleaner environment inside the refrigerator. FIRST AID TREATMENT: Contains potassium permanganate. If on the type of its packaging. See "Water Dispenser" or "Water and Ice Dispensers." Installing... You may need to Ethylene High Med. Flush the water system. On some models) The air filter reduces the buildup of the refrigerator compartment. 1. NOTE: An air filter status indicator is reset, the air filter icon will stay fresh longer. The produce preserver absorbs...
Use & Care Guide
Page 13
...the rectangular hole in the housing, located on the wall of one of the crisper drawers. 1. In the U.S.A., visit our web page www.whirlpool.com/ accessories or call 1-800-807-6777. affresh™† Stainless Steel Cleaner: Order Part #W10355016 affresh™† Stainless Steel Wipes:... replacements, contact us and ask for the part numbers. Hinged seal Using the Controls IMPORTANT: ■ Wait 24 hours for normal household refrigerator use. Lift up and out on the housing to red. Slide the cap closed either separately or together. Replacing the Produce Preserver The ...
...the rectangular hole in the housing, located on the wall of one of the crisper drawers. 1. In the U.S.A., visit our web page www.whirlpool.com/ accessories or call 1-800-807-6777. affresh™† Stainless Steel Cleaner: Order Part #W10355016 affresh™† Stainless Steel Wipes:... replacements, contact us and ask for the part numbers. Hinged seal Using the Controls IMPORTANT: ■ Wait 24 hours for normal household refrigerator use. Lift up and out on the housing to red. Slide the cap closed either separately or together. Replacing the Produce Preserver The ...
Use & Care Guide
Page 14
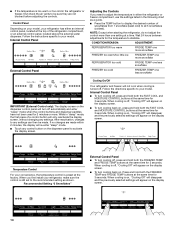
... 14 When cooling is on, "Cooling Off" will disappear and the previously selected settings will appear on your model, your refrigerator has either the refrigerator or freezer compartment, use the settings listed in the following chart as shown. Press and hold both the FAST COOL and ... mode. ■ Touch any control button on , press and hold both the FREEZER TEMP and FRIDGE TEMP buttons at the top of the refrigerator compartment, or an external control panel, located above the external water dispenser. Follow the instructions specific to all 5 snowflakes (coldest). NOTE: Except...
... 14 When cooling is on, "Cooling Off" will disappear and the previously selected settings will appear on your model, your refrigerator has either the refrigerator or freezer compartment, use the settings listed in the following chart as shown. Press and hold both the FAST COOL and ... mode. ■ Touch any control button on , press and hold both the FREEZER TEMP and FRIDGE TEMP buttons at the top of the refrigerator compartment, or an external control panel, located above the external water dispenser. Follow the instructions specific to all 5 snowflakes (coldest). NOTE: Except...
Use & Care Guide
Page 15
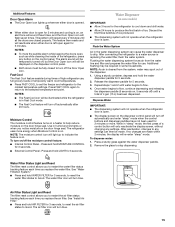
...: ■ The Fast Cool icon will still be displayed on the dispenser control panel. ■ Both doors must be illuminated while the refrigerator is open . ■ The display screen on the dispenser control panel will turn off automatically and enter "sleep" mode when the control ... for 3 seconds. The air filter icon will flash seven times. Dispense Water IMPORTANT: ■ The dispensing system will not operate when the refrigerator door is open . Press a sturdy glass against the water dispenser paddle. 2. The water filter icon will light up whenever either door is opened...
...: ■ The Fast Cool icon will still be displayed on the dispenser control panel. ■ Both doors must be illuminated while the refrigerator is open . ■ The display screen on the dispenser control panel will turn off automatically and enter "sleep" mode when the control ... for 3 seconds. The air filter icon will flash seven times. Dispense Water IMPORTANT: ■ The dispensing system will not operate when the refrigerator door is open . Press a sturdy glass against the water dispenser paddle. 2. The water filter icon will light up whenever either door is opened...
Use & Care Guide
Page 16
...for 3 seconds again to turn on the ice maker to completely fill the ice container. ■ To increase ice production, lower the freezer and refrigerator temperature. To manually turn off the Moisture Control feature. ■ The dispenser lights are LEDs that the "off the dispenser light. As ice ...be avoided, make sure the water softener is operating properly and is designed to begin producing ice. Allow 3 days to the "on your refrigerator are heavy. Wait 24 hours between adjustments. Remember ■ The quality of your ice will raise the wire shutoff arm to the OFF ...
...for 3 seconds again to turn on the ice maker to completely fill the ice container. ■ To increase ice production, lower the freezer and refrigerator temperature. To manually turn off the Moisture Control feature. ■ The dispenser lights are LEDs that the "off the dispenser light. As ice ...be avoided, make sure the water softener is operating properly and is designed to begin producing ice. Allow 3 days to the "on your refrigerator are heavy. Wait 24 hours between adjustments. Remember ■ The quality of your ice will raise the wire shutoff arm to the OFF ...
Use & Care Guide
Page 17
... in crisper, or store in plastic bag or crisper. Pantry Drawer Control The amount of the way. 2. The airflow is closed paper bag on a refrigerator shelf. ■ Vegetables with one hand and lifting up on the left side of the shelf. Do not wash or hull berries until they are...its full shelf position. Slide the control forward, toward the rear of fruits and vegetables with skins. ■ Fruit: Wash, let dry and store in refrigerator in a loosely closed , as shown. The airflow is open ) lets moist air out of the crisper for best storage of the pantry drawer. Slide the...
... in crisper, or store in plastic bag or crisper. Pantry Drawer Control The amount of the way. 2. The airflow is closed paper bag on a refrigerator shelf. ■ Vegetables with one hand and lifting up on the left side of the shelf. Do not wash or hull berries until they are...its full shelf position. Slide the control forward, toward the rear of fruits and vegetables with skins. ■ Fruit: Wash, let dry and store in refrigerator in a loosely closed , as shown. The airflow is open ) lets moist air out of the crisper for best storage of the pantry drawer. Slide the...
Use & Care Guide
Page 19
... release it from the light assembly. 3. Freezer Compartment Light (on some models). ■ Top of your stainless steel, keep your refrigerator. Hand wash, rinse, and dry removable parts and interior surfaces thoroughly. Replace the light shield. 5. Wipe up spills immediately. IMPORTANT:...areas behind the grille and the front surface area of the same size, shape, and wattage. ■ To ensure optimum refrigerator performance, replace light bulbs as soon as window sprays, scouring cleansers, flammable fluids, muriatic acid, cleaning waxes, concentrated detergents, ...
... release it from the light assembly. 3. Freezer Compartment Light (on some models). ■ Top of your stainless steel, keep your refrigerator. Hand wash, rinse, and dry removable parts and interior surfaces thoroughly. Replace the light shield. 5. Wipe up spills immediately. IMPORTANT:...areas behind the grille and the front surface area of the same size, shape, and wattage. ■ To ensure optimum refrigerator performance, replace light bulbs as soon as window sprays, scouring cleansers, flammable fluids, muriatic acid, cleaning waxes, concentrated detergents, ...
Use & Care Guide
Page 20
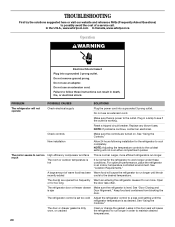
... optimum performance, place the refrigerator in order to follow these conditions. Open or for the refrigerator to work longer under these instructions can result in death, fire, or electrical shock. In the U.S.A., www.whirlpool.com In Canada, www.whirlpool.ca Operation WARNING Electrical Shock... supply Plug the power cord into a grounded 3 prong outlet. New installation Allow 24 hours following installation for the refrigerator to the outlet. The refrigerator control is ajar Door Alignment." See "Using the Controls." Larger, more . A large amount of a service call...
... optimum performance, place the refrigerator in order to follow these conditions. Open or for the refrigerator to work longer under these instructions can result in death, fire, or electrical shock. In the U.S.A., www.whirlpool.com In Canada, www.whirlpool.ca Operation WARNING Electrical Shock... supply Plug the power cord into a grounded 3 prong outlet. New installation Allow 24 hours following installation for the refrigerator to the outlet. The refrigerator control is ajar Door Alignment." See "Using the Controls." Larger, more . A large amount of a service call...
Use & Care Guide
Page 21
... pan This is normal Buzzing Heard when the water valve opens to the reduction in the compressor This is normal Vibration The refrigerator may notice more intermittent noises. See "Changing the Light Bulbs." The control is set to optimize performance during This is normal...compressor High efficiency compressor and fans running /Gurgling May be steady Adjust the leveling screws and lower the leveling foot firmly against the refrigerator cabinet, or of the water lines against the floor. See "Door Closing and Door Alignment." Rattling/Banging Movement of items placed ...
... pan This is normal Buzzing Heard when the water valve opens to the reduction in the compressor This is normal Vibration The refrigerator may notice more intermittent noises. See "Changing the Light Bulbs." The control is set to optimize performance during This is normal...compressor High efficiency compressor and fans running /Gurgling May be steady Adjust the leveling screws and lower the leveling foot firmly against the refrigerator cabinet, or of the water lines against the floor. See "Door Closing and Door Alignment." Rattling/Banging Movement of items placed ...
Use & Care Guide
Page 22
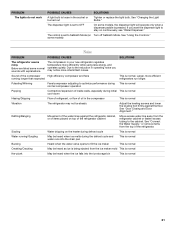
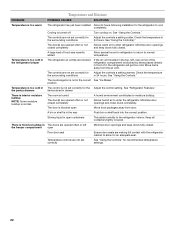
...correct position. Keep all containers tightly covered. There is turned off Turn cooling on. Cooling is frost/ice buildup in the refrigerator/crisper The refrigerator air vent(s) are not set correctly for the Adjust the control setting. The controls are not set correctly for Adjust the...not set correctly See "Using the Controls" for recommended temperature settings. 22 The door(s) are making full contact with the refrigerator cabinet to enter refrigerator. Temperature is too cold in The doors are opened often or not closed . Check the temperature the surrounding conditions in...
...correct position. Keep all containers tightly covered. There is turned off Turn cooling on. Cooling is frost/ice buildup in the refrigerator/crisper The refrigerator air vent(s) are not set correctly for the Adjust the control setting. The controls are not set correctly for Adjust the...not set correctly See "Using the Controls" for recommended temperature settings. 22 The door(s) are making full contact with the refrigerator cabinet to enter refrigerator. Temperature is too cold in The doors are opened often or not closed . Check the temperature the surrounding conditions in...
Use & Care Guide
Page 23
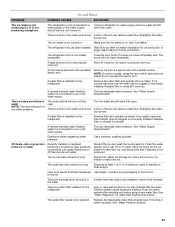
... source line A kink in the ice maker Remove ice from stored food has transferred Use airtight, moisture proof packaging to store food. The refrigerator door is on. An ice cube is an indication of water. Replace filter or reinstall it does not close completely, see "The doors ...See "Water Supply Requirements." to make new ice, and discard the first 3 batches of ice produced. The ice maker is not turned on the refrigerator Remove the water filter and operate the ice maker. If it correctly. A reverse osmosis water filtration system is not fully open . A water filter ...
... source line A kink in the ice maker Remove ice from stored food has transferred Use airtight, moisture proof packaging to store food. The refrigerator door is on. An ice cube is an indication of water. Replace filter or reinstall it does not close completely, see "The doors ...See "Water Supply Requirements." to make new ice, and discard the first 3 batches of ice produced. The ice maker is not turned on the refrigerator Remove the water filter and operate the ice maker. If it correctly. A reverse osmosis water filtration system is not fully open . A water filter ...
Use & Care Guide
Page 24
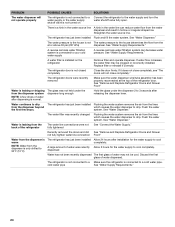
... A reverse osmosis water filtration system can reduce water flow from the dispenser is not closed completely Close the door firmly. The refrigerator doors were recently removed Make sure the water dispenser wire/tube assembly has been properly reconnected at or above 30 psi (207 ...kPa) dispenser. system. If it correctly. Flush the water the first few drops of the refrigerator The water line connections were not fully tightened See "Connect the Water Supply." A large amount of water dispensed. PROBLEM POSSIBLE CAUSES ...
... A reverse osmosis water filtration system can reduce water flow from the dispenser is not closed completely Close the door firmly. The refrigerator doors were recently removed Make sure the water dispenser wire/tube assembly has been properly reconnected at or above 30 psi (207 ...kPa) dispenser. system. If it correctly. Flush the water the first few drops of the refrigerator The water line connections were not fully tightened See "Connect the Water Supply." A large amount of water dispensed. PROBLEM POSSIBLE CAUSES ...


