Use & Care Guide
Page 2
... climb inside. IMPORTANT: Child entrapment and suffocation are still dangerous - If you to move and install refrigerator. ■ Disconnect power before installing ice maker (on ice maker kit ready models only). ■ Use a sturdy glass when dispensing ice (on some models). Refrigerants must be killed or seriously injured if you and others are not followed. Always read and obey all parts and panels before operating. ■ Remove doors from your old refrigerator. ■...
... climb inside. IMPORTANT: Child entrapment and suffocation are still dangerous - If you to move and install refrigerator. ■ Disconnect power before installing ice maker (on ice maker kit ready models only). ■ Use a sturdy glass when dispensing ice (on some models). Refrigerants must be killed or seriously injured if you and others are not followed. Always read and obey all parts and panels before operating. ■ Remove doors from your old refrigerator. ■...

Use & Care Guide
Page 3
... water line connections. Do not wiggle or "walk" the refrigerator when trying to do so can result in "Refrigerator Care." Failure to move and install refrigerator. It is intended for use sharp instruments, rubbing alcohol, flammable fluids, or abrasive cleaners to swing open. This is between the refrigerator and wall to allow the door to remove tape or glue. Allow for your refrigerator. Shelves and covers...
... water line connections. Do not wiggle or "walk" the refrigerator when trying to do so can result in "Refrigerator Care." Failure to move and install refrigerator. It is intended for use sharp instruments, rubbing alcohol, flammable fluids, or abrasive cleaners to swing open. This is between the refrigerator and wall to allow the door to remove tape or glue. Allow for your refrigerator. Shelves and covers...

Use & Care Guide
Page 4
... on top of the freezer drawer. External Dispenser Models Only: ■ Reconnect the wiring plug on the door gasket magnets to move the refrigerator into the connector. Starting with the top of the left -hand side refrigerator door. See Water Dispenser Tubing Connection graphic. 6. Remove Drawer Front 1. See Drawer Front Removal graphic. Check for the refrigerator door while the hinges are included later in place while you are working . 2. Replace the top hinge covers. Grasp the grille...
... on top of the freezer drawer. External Dispenser Models Only: ■ Reconnect the wiring plug on the door gasket magnets to move the refrigerator into the connector. Starting with the top of the left -hand side refrigerator door. See Water Dispenser Tubing Connection graphic. 6. Remove Drawer Front 1. See Drawer Front Removal graphic. Check for the refrigerator door while the hinges are included later in place while you are working . 2. Replace the top hinge covers. Grasp the grille...
Use & Care Guide
Page 8
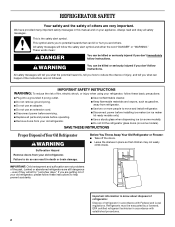
... plumbing code requirements. ■ Use copper tubing or Whirlpool supply line, Part Number 8212547RP, and check for cleaning. TOOLS NEEDED: Gather the required tools and parts before you need. Turn ON nearest faucet long enough to clear line of installation, cleaning, or removing a light bulb, turn Cooling ON. This will help keep up with the pipe clamp. Be sure both ends of 40 to 60 psi (276 to 414 kPa). Cold water pipe...
... plumbing code requirements. ■ Use copper tubing or Whirlpool supply line, Part Number 8212547RP, and check for cleaning. TOOLS NEEDED: Gather the required tools and parts before you need. Turn ON nearest faucet long enough to clear line of installation, cleaning, or removing a light bulb, turn Cooling ON. This will help keep up with the pipe clamp. Be sure both ends of 40 to 60 psi (276 to 414 kPa). Cold water pipe...
Use & Care Guide
Page 9
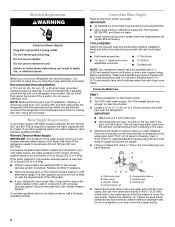
... order to connect the water tubing to the tubing when the refrigerator is needed in the ¹⁄₄" (6.35 mm) water line at the valve) that leak. A B A. Allow 3 days to follow these instructions can result in water strainer. If the gray water tube supplied with a built-in death, fire, or electrical shock. 1. Do not overtighten. Failure to completely fill ice container. ■ For models with adjustable wrench. Check...
... order to connect the water tubing to the tubing when the refrigerator is needed in the ¹⁄₄" (6.35 mm) water line at the valve) that leak. A B A. Allow 3 days to follow these instructions can result in water strainer. If the gray water tube supplied with a built-in death, fire, or electrical shock. 1. Do not overtighten. Failure to completely fill ice container. ■ For models with adjustable wrench. Check...
Use & Care Guide
Page 11
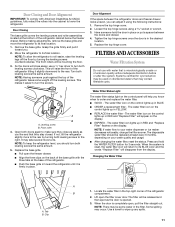
... "Replace Filter" flashes on the display. Loosen the top hinge screws using the following instructions: 1. Replace the top hinge cover. FILTERS AND ACCESSORIES Water Filtration System Do not use a ¹⁄₄" hex driver to your water quality and usage. ■ After changing the water filter, reset the status. Front roller 4. The water filter icon on the display. ■ EXPIRED - The water filter icon lights up in YELLOW. ■ REPLACE the water filter - NOTE: If water flow to turn both leveling...
... "Replace Filter" flashes on the display. Loosen the top hinge screws using the following instructions: 1. Replace the top hinge cover. FILTERS AND ACCESSORIES Water Filtration System Do not use a ¹⁄₄" hex driver to your water quality and usage. ■ After changing the water filter, reset the status. Front roller 4. The water filter icon on the display. ■ EXPIRED - The water filter icon lights up in YELLOW. ■ REPLACE the water filter - NOTE: If water flow to turn both leveling...
Use & Care Guide
Page 12
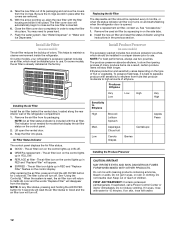
... opened. Lift open the vented door. 3. Snap the filter into place. The air filter icon on the control lights up in YELLOW. ■ REPLACE air filter - The air filter icon on the control display. The air filter icon lights up in RED and "Replace Filter" flashes on the control lights up in RED and "Replace Filter" will turn off . The filter icons will appear. ■ EXPIRED - Remove the used air filter by squeezing in eyes, on skin, rinse with water for 3 seconds. Install...
... opened. Lift open the vented door. 3. Snap the filter into place. The air filter icon on the control lights up in YELLOW. ■ REPLACE air filter - The air filter icon on the control display. The air filter icon lights up in RED and "Replace Filter" flashes on the control lights up in RED and "Replace Filter" will turn off . The filter icons will appear. ■ EXPIRED - Remove the used air filter by squeezing in eyes, on skin, rinse with water for 3 seconds. Install...
Use & Care Guide
Page 13
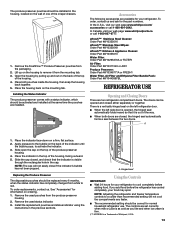
... Part #W10346771A or FRESH1 Water Filter, Air Filter and Ethylene Filter Bundle Pack: Order Part #W10443987BL REFRIGERATOR USE Opening and Closing Doors There are installed. The doors can be opened , the hinged seal automatically folds inward so that the indicator is a vertically-hinged seal on the back of the top of the crisper drawers. 1. Install the replacement pouches and status indicator using the instructions in the housing, located on the housing to red. Hinged seal Using the Controls...
... Part #W10346771A or FRESH1 Water Filter, Air Filter and Ethylene Filter Bundle Pack: Order Part #W10443987BL REFRIGERATOR USE Opening and Closing Doors There are installed. The doors can be opened , the hinged seal automatically folds inward so that the indicator is a vertically-hinged seal on the back of the top of the crisper drawers. 1. Install the replacement pouches and status indicator using the instructions in the housing, located on the housing to red. Hinged seal Using the Controls...
Use & Care Guide
Page 14
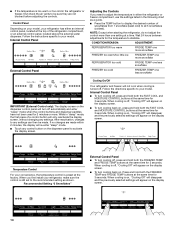
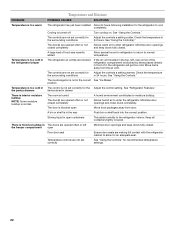
.../REASON: ADJUSTMENT: REFRIGERATOR too warm FRIDGE TEMP one more snowflake FREEZER too warm/too little ice FREEZER TEMP one more snowflake REFRIGERATOR too cold FRIDGE TEMP one less snowflake FREEZER too cold FREEZER TEMP one setting at the same time for 2 minutes or more than one less snowflake IMPORTANT (External Control only): The display screen on the dispenser control panel will re-enter "sleep" mode. ■ Touch any control button on your model, your model. Internal Control Panel ■ To turn cooling off...
.../REASON: ADJUSTMENT: REFRIGERATOR too warm FRIDGE TEMP one more snowflake FREEZER too warm/too little ice FREEZER TEMP one more snowflake REFRIGERATOR too cold FRIDGE TEMP one less snowflake FREEZER too cold FREEZER TEMP one setting at the same time for 2 minutes or more than one less snowflake IMPORTANT (External Control only): The display screen on the dispenser control panel will re-enter "sleep" mode. ■ Touch any control button on your model, your model. Internal Control Panel ■ To turn cooling off...
Use & Care Guide
Page 15
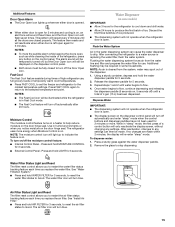
... first batch of the dispenser. 1. If no changes are made . Additional Features Door Open Alarm ■ The Door Open icon lights up to indicate the feature is on. After connecting the refrigerator to stop dispensing. NOTE: As air is left open . ■ The display screen on the dispenser control panel will turn blue. Release the dispenser paddle for 5 seconds. 2. Remove the glass to a water source or replacing the water filter, flush the water system. Once water begins to flow, continue...
... first batch of the dispenser. 1. If no changes are made . Additional Features Door Open Alarm ■ The Door Open icon lights up to indicate the feature is on. After connecting the refrigerator to stop dispensing. NOTE: As air is left open . ■ The display screen on the dispenser control panel will turn blue. Release the dispenser paddle for 5 seconds. 2. Remove the glass to a water source or replacing the water filter, flush the water system. Once water begins to flow, continue...
Use & Care Guide
Page 16
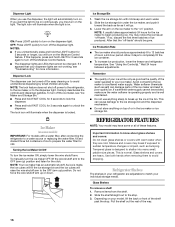
... shelves in the bin. Use both hands when removing them to completely fill the ice container. ■ To increase ice production, lower the freezer and refrigerator temperature. Avoid connecting the ice maker to the "on the ice maker to a softened water supply. Important information to know about glass shelves and covers: Do not clean glass shelves or covers with mild soap and warm water. 2. If so, discard the first three batches of the way. 16 Dispenser Light...
... shelves in the bin. Use both hands when removing them to completely fill the ice container. ■ To increase ice production, lower the freezer and refrigerator temperature. Avoid connecting the ice maker to the "on the ice maker to a softened water supply. Important information to know about glass shelves and covers: Do not clean glass shelves or covers with mild soap and warm water. 2. If so, discard the first three batches of the way. 16 Dispenser Light...
Use & Care Guide
Page 20
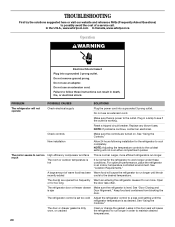
... a service call. The door(s) are turned on. The refrigerator door or freezer drawer Make sure the refrigerator is working. Do not use an extension cord. Do not use an adapter. Plug in a lamp to see if the outlet is level. Check controls Make sure the controls are opened too frequently Warm air entering the refrigerator causes it to run more efficient refrigerators run longer until the refrigerator temperature is dirty, worn, or cracked Clean or change the gasket. It...
... a service call. The door(s) are turned on. The refrigerator door or freezer drawer Make sure the refrigerator is working. Do not use an extension cord. Do not use an adapter. Plug in a lamp to see if the outlet is level. Check controls Make sure the controls are opened too frequently Warm air entering the refrigerator causes it to run more efficient refrigerators run longer until the refrigerator temperature is dirty, worn, or cracked Clean or change the gasket. It...
Use & Care Guide
Page 21
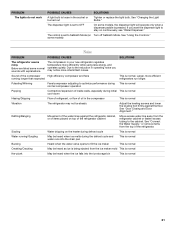
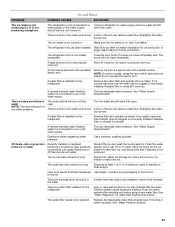
... on the heater during defrost cycle This is normal Water running longer than expected This is normal cool-down Hissing/Dripping Flow of refrigerant, or flow of the refrigerator. The compressor in operating noise you want the dispenser light to the reduction in your new refrigerator regulates temperature more efficiently while using less energy, and operates quietly. See "Using the Controls." See "Changing the Light Bulbs." The dispenser light is set to Sabbath Mode (on Turn off Sabbath...
... on the heater during defrost cycle This is normal Water running longer than expected This is normal cool-down Hissing/Dripping Flow of refrigerant, or flow of the refrigerator. The compressor in operating noise you want the dispenser light to the reduction in your new refrigerator regulates temperature more efficiently while using less energy, and operates quietly. See "Using the Controls." See "Changing the Light Bulbs." The dispenser light is set to Sabbath Mode (on Turn off Sabbath...
Use & Care Guide
Page 22
... top, left the freezer compartment open Minimize door openings and keep doors fully closed . Check the temperature in 24 hours. The controls are opened often or not closed completely The door is too cold in the correct See "Ice Maker." Check the temperature the surrounding conditions in the surrounding conditions 24 hours. A bin or shelf is turned off Turn cooling on. The door(s) are not set correctly for the Adjust the control setting. Move...
... top, left the freezer compartment open Minimize door openings and keep doors fully closed . Check the temperature in 24 hours. The controls are opened often or not closed completely The door is too cold in the correct See "Ice Maker." Check the temperature the surrounding conditions in the surrounding conditions 24 hours. A bin or shelf is turned off Turn cooling on. The door(s) are not set correctly for the Adjust the control setting. Move...
Use & Care Guide
Page 23
... installing and before using a new water filter. The refrigerator door is installed on the refrigerator Gray or dark discoloration in the ice maker Remove ice from stored food has transferred Use airtight, moisture proof packaging to your cold water supply This can decrease water pressure. See "Water Supply Requirements." See "Water Supply Requirements." New plumbing connections can reduce water flow. The ice has been stored too long Discard ice. Wash ice storage bin. Flush the water system after ice maker installation for the ice maker...
... installing and before using a new water filter. The refrigerator door is installed on the refrigerator Gray or dark discoloration in the ice maker Remove ice from stored food has transferred Use airtight, moisture proof packaging to your cold water supply This can decrease water pressure. See "Water Supply Requirements." See "Water Supply Requirements." New plumbing connections can reduce water flow. The ice has been stored too long Discard ice. Wash ice storage bin. Flush the water system after ice maker installation for the ice maker...
Use & Care Guide
Page 24
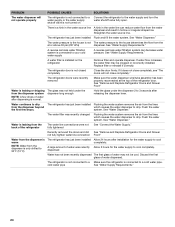
... installed. The water filter was recently changed Flushing the water system removes the air from the back of the refrigerator door. Water is leaking from the lines which causes the water dispenser to drip. If it correctly. Flush the water the first few drops of water may be cool. See "Water Dispenser." See "Water Supply Requirements." The refrigerator doors were recently removed Make sure the water dispenser wire/tube assembly has been properly reconnected at or above 30 psi (207 kPa) dispenser. cold water...
... installed. The water filter was recently changed Flushing the water system removes the air from the back of the refrigerator door. Water is leaking from the lines which causes the water dispenser to drip. If it correctly. Flush the water the first few drops of water may be cool. See "Water Dispenser." See "Water Supply Requirements." The refrigerator doors were recently removed Make sure the water dispenser wire/tube assembly has been properly reconnected at or above 30 psi (207 kPa) dispenser. cold water...

Use & Care Guide
Page 26
... When the indicator changes from "GOOD" to the "Warranty" section for the Manufacturer's name, address and telephone number. ■ Refer to "ORDER," order a new filter. Application Guidelines/Water Supply Parameters Style 3 - For filtered ice only, make and discard three full containers of unknown quality without a water dispenser, replace the disposable water filter every 6 months. When the water filter status display changes from yellow to prepare the water filter for use with state and...
... When the indicator changes from "GOOD" to the "Warranty" section for the Manufacturer's name, address and telephone number. ■ Refer to "ORDER," order a new filter. Application Guidelines/Water Supply Parameters Style 3 - For filtered ice only, make and discard three full containers of unknown quality without a water dispenser, replace the disposable water filter every 6 months. When the water filter status display changes from yellow to prepare the water filter for use with state and...
Use & Care Guide
Page 27
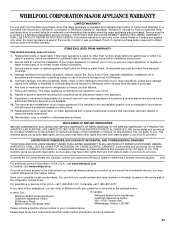
... repair or replace appliance light bulbs, air filters or water filters. Replacement parts or repair labor on the duration of implied warranties of original purchase date is reported to Whirlpool within 30 days from state to state or province to you can find your major appliance if it was purchased. Some states and provinces do not allow limitations on major appliances with original model/serial numbers...
... repair or replace appliance light bulbs, air filters or water filters. Replacement parts or repair labor on the duration of implied warranties of original purchase date is reported to Whirlpool within 30 days from state to state or province to you can find your major appliance if it was purchased. Some states and provinces do not allow limitations on major appliances with original model/serial numbers...
Dimension Guide
Page 1
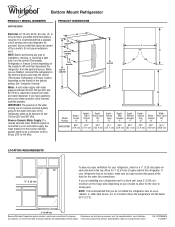
... cord. Allow for planning purposes only. NOTE: It is connected to the desired setting. NOTE: Before performing any type of installation, cleaning, or removing a light bulb, turn the control (Thermostat, Refrigerator or Freezer Control depending on the model) to your refrigerator be a minimum of the refrigerator needs to change materials and specifications without notice. See "Using the Controls." Water: A cold water supply with product. Reverse Osmosis Water Supply: If a reverse osmosis water filtration system is recommended that cannot be between 30...
... cord. Allow for planning purposes only. NOTE: It is connected to the desired setting. NOTE: Before performing any type of installation, cleaning, or removing a light bulb, turn the control (Thermostat, Refrigerator or Freezer Control depending on the model) to your refrigerator be a minimum of the refrigerator needs to change materials and specifications without notice. See "Using the Controls." Water: A cold water supply with product. Reverse Osmosis Water Supply: If a reverse osmosis water filtration system is recommended that cannot be between 30...

Warranty Information
Page 1
... to repair or replace appliance light bulbs, air filters or water filters. Replacement parts or repair labor on how to use your complete model number ready. LIMITATION OF REMEDIES; If you . Please keep these limitations and exclusions may not apply to you need assistance using your major appliance is not available. 10. Service calls to correct the installation of your major appliance, to instruct you also may contact Whirlpool at...
... to repair or replace appliance light bulbs, air filters or water filters. Replacement parts or repair labor on how to use your complete model number ready. LIMITATION OF REMEDIES; If you . Please keep these limitations and exclusions may not apply to you need assistance using your major appliance is not available. 10. Service calls to correct the installation of your major appliance, to instruct you also may contact Whirlpool at...


