Use & Care Guide
Page 2
...parts and panels before operating. ■ Remove doors from your old refrigerator. ■ Keep flammable materials and vapors, such as gasoline, away from refrigerator. ■ Use two or more people to move and install refrigerator. ■ Disconnect power before servicing. ■ Replace all safety .... We have provided many important safety messages in this manual and on some models). ■ Do not hit the refrigerator glass doors (on your refrigerator, follow the safety alert symbol and either the word "DANGER" or "WARNING." This symbol alerts you don't immediately ...
...parts and panels before operating. ■ Remove doors from your old refrigerator. ■ Keep flammable materials and vapors, such as gasoline, away from refrigerator. ■ Use two or more people to move and install refrigerator. ■ Disconnect power before servicing. ■ Replace all safety .... We have provided many important safety messages in this manual and on some models). ■ Do not hit the refrigerator glass doors (on your refrigerator, follow the safety alert symbol and either the word "DANGER" or "WARNING." This symbol alerts you don't immediately ...
Use & Care Guide
Page 3
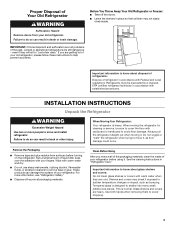
...procedures. Shelves and covers may not easily climb inside of the past. If you remove all packaging materials. When Moving Your Refrigerator: Your refrigerator is normal. Rub a small amount of /recycle all of the packaging materials, clean the inside . Important information to avoid... are still dangerous - Failure to remove tape or glue. IMPORTANT: Child entrapment and suffocation are getting rid of your refrigerator before turning on the refrigerator. When moving it . Wipe with warm water and dry. ■ Do not use sharp instruments, rubbing alcohol, ...
...procedures. Shelves and covers may not easily climb inside of the past. If you remove all packaging materials. When Moving Your Refrigerator: Your refrigerator is normal. Rub a small amount of /recycle all of the packaging materials, clean the inside . Important information to avoid... are still dangerous - Failure to remove tape or glue. IMPORTANT: Child entrapment and suffocation are getting rid of your refrigerator before turning on the refrigerator. When moving it . Wipe with warm water and dry. ■ Do not use sharp instruments, rubbing alcohol, ...
Use & Care Guide
Page 4
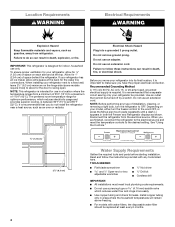
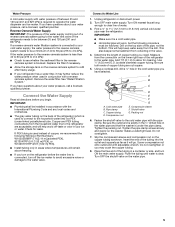
... connections. Do not remove ground prong. Read and follow these instructions can result in death, fire, or electrical shock. If your refrigerator next to a fixed wall, leave 2¹⁄₂" (6.3 cm) minimum on the hinge side (some models require more easily..... Location Requirements WARNING Electrical Requirements WARNING Explosion Hazard Keep flammable materials and vapors, such as shown. IMPORTANT: This refrigerator is recommended that you move your refrigerator, allow for optimum performance, which reduces water flow and clogs more ) to a maximum of 55°F (...
... connections. Do not remove ground prong. Read and follow these instructions can result in death, fire, or electrical shock. If your refrigerator next to a fixed wall, leave 2¹⁄₂" (6.3 cm) minimum on the hinge side (some models require more easily..... Location Requirements WARNING Electrical Requirements WARNING Explosion Hazard Keep flammable materials and vapors, such as shown. IMPORTANT: This refrigerator is recommended that you move your refrigerator, allow for optimum performance, which reduces water flow and clogs more ) to a maximum of 55°F (...
Use & Care Guide
Page 5
... F G E. Fasten the shutoff valve to the water pipe. Screw compression nut onto outlet end with adjustable wrench. Check for cleaning. Unplug refrigerator or disconnect power. 2. Shutoff valve G. Packing nut 6. Insert the end of the tubing into the outlet end squarely as far as shown.... Do not overtighten or you have selected. Remove the water filter. IMPORTANT: ■ Make sure it will work, but the following Whirlpool Part Numbers: W10505928RP (7 ft [2.14 m] jacketed PEX), 8212547RP (5 ft [1.52 m] PEX), or W10267701RP (25 ft [7.62 m] PEX). ■...
... F G E. Fasten the shutoff valve to the water pipe. Screw compression nut onto outlet end with adjustable wrench. Check for cleaning. Unplug refrigerator or disconnect power. 2. Shutoff valve G. Packing nut 6. Insert the end of the tubing into the outlet end squarely as far as shown.... Do not overtighten or you have selected. Remove the water filter. IMPORTANT: ■ Make sure it will work, but the following Whirlpool Part Numbers: W10505928RP (7 ft [2.14 m] jacketed PEX), 8212547RP (5 ft [1.52 m] PEX), or W10267701RP (25 ft [7.62 m] PEX). ■...
Use & Care Guide
Page 6
...your model. ■ All graphics referenced in the following instructions are for leaks. Create a service loop with a "P" clamp. Secure copper tubing to refrigerator cabinet with the copper tubing. A B C D A. "P" clamp C. Compression sleeve 3. Style 2 1. Plastic water tubing C. Do not remove ground...electrical shock. 1. "P" clamp B. Copper tubing B. Style 1 1. Check connection by pulling on the plastic water line to the refrigerator cabinet with either a freezer door or freezer drawer, or French doors. Remove the plastic cap from moving. Shape tubing slightly ...
...your model. ■ All graphics referenced in the following instructions are for leaks. Create a service loop with a "P" clamp. Secure copper tubing to refrigerator cabinet with the copper tubing. A B C D A. "P" clamp C. Compression sleeve 3. Style 2 1. Plastic water tubing C. Do not remove ground...electrical shock. 1. "P" clamp B. Copper tubing B. Style 1 1. Check connection by pulling on the plastic water line to the refrigerator cabinet with either a freezer door or freezer drawer, or French doors. Remove the plastic cap from moving. Shape tubing slightly ...
Use & Care Guide
Page 7
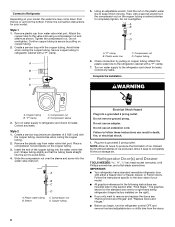
...as shown in Graphic 2. Do not depend on the door gasket magnets to hold the door in place while you are being moved. Unplug refrigerator or disconnect power. 2. Remove the base grille by wedging a flat-blade screwdriver or your fingernail between the two sections. See Bottom Hinge...9632; To remove the handle, use . Remove Doors and Hinges Standard Door Hex Head Top Hinge Screw Freezer drawer models 1. Keep the refrigerator doors closed until you are being moved. Remove the hinge pin cover from the opposite side, follow these steps. Move to the opposite...
...as shown in Graphic 2. Do not depend on the door gasket magnets to hold the door in place while you are being moved. Unplug refrigerator or disconnect power. 2. Remove the base grille by wedging a flat-blade screwdriver or your fingernail between the two sections. See Bottom Hinge...9632; To remove the handle, use . Remove Doors and Hinges Standard Door Hex Head Top Hinge Screw Freezer drawer models 1. Keep the refrigerator doors closed until you are being moved. Remove the hinge pin cover from the opposite side, follow these steps. Move to the opposite...
Use & Care Guide
Page 8
... top hinge as shown in Top Hinge graphic. Tighten all parts together. 2. See Graphic 6. 2. NOTE: Provide additional support for the refrigerator doors while the hinges are being moved. Assemble the parts for the top hinge as shown in the Top Hinge graphic. Reconnect the wiring... Freezer Drawer IMPORTANT: ■ Two people may be required to opposite side of the freezer drawer. Slide the drawer glides out of the refrigerator cabinet. Do not use an adapter. Do not tighten screws completely. 3. Do not tighten the screws completely. 5. French Doors 1. Tighten ...
... top hinge as shown in Top Hinge graphic. Tighten all parts together. 2. See Graphic 6. 2. NOTE: Provide additional support for the refrigerator doors while the hinges are being moved. Assemble the parts for the top hinge as shown in the Top Hinge graphic. Reconnect the wiring... Freezer Drawer IMPORTANT: ■ Two people may be required to opposite side of the freezer drawer. Slide the drawer glides out of the refrigerator cabinet. Do not use an adapter. Do not tighten screws completely. 3. Do not tighten the screws completely. 5. French Doors 1. Tighten ...

Use & Care Guide
Page 9
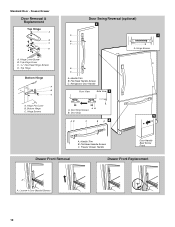
Hinge Pin Shim B. Bottom Hinge C. Refrigerator Door Handle C. Door Stop Screws A B B. Hinge Plate E D. Freezer Door Door Removal & Replacement Top Hinge A B C D A. Hinge Pin Cover B. Handle Trim B. Top Hinge Cover C. 5/16" Hex-Head ...
Hinge Pin Shim B. Bottom Hinge C. Refrigerator Door Handle C. Door Stop Screws A B B. Hinge Plate E D. Freezer Door Door Removal & Replacement Top Hinge A B C D A. Hinge Pin Cover B. Handle Trim B. Top Hinge Cover C. 5/16" Hex-Head ...
Use & Care Guide
Page 10
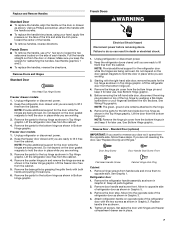
... Stop 5 AB C B A4 A. Top Hinge Bottom Hinge A B C A. Hinge Screws B A A. Top Hinge Cover C. 5/16" Hex-Head Hinge Screws D. Hinge Screws Door Swing Reversal (optional) 2 A 1 B C A A A. Handle Trim B. Refrigerator Door Handle Front View Side View 3 AB A. Freezer Drawer Door Removal & Replacement Top Hinge A B C D A. Flat-Head Handle Screws C. Standard Door - Door Stop Screws B. Handle Trim...
... Stop 5 AB C B A4 A. Top Hinge Bottom Hinge A B C A. Hinge Screws B A A. Top Hinge Cover C. 5/16" Hex-Head Hinge Screws D. Hinge Screws Door Swing Reversal (optional) 2 A 1 B C A A A. Handle Trim B. Refrigerator Door Handle Front View Side View 3 AB A. Freezer Drawer Door Removal & Replacement Top Hinge A B C D A. Flat-Head Handle Screws C. Standard Door - Door Stop Screws B. Handle Trim...
Use & Care Guide
Page 12
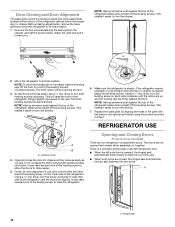
... both leveling screws clockwise. This makes it easier to turn the screw clockwise to raise that it slightly downward to turn both doors are aligned. REFRIGERATOR USE A B A. If not, increase the tilt by aligning the holes in the grille with the holes in the cabinet and fasten using the screws.... ■ When the left side door is lower than the other, adjust the leveling screw, on the lower side of the refrigerator cabinet below the freezer door or drawer. There is steady. Using a ¹⁄₄" hex driver, turn the screws. ¹⁄₄" 2. Leveling screw 4....
... both leveling screws clockwise. This makes it easier to turn the screw clockwise to raise that it slightly downward to turn both doors are aligned. REFRIGERATOR USE A B A. If not, increase the tilt by aligning the holes in the grille with the holes in the cabinet and fasten using the screws.... ■ When the left side door is lower than the other, adjust the leveling screw, on the lower side of the refrigerator cabinet below the freezer door or drawer. There is steady. Using a ¹⁄₄" hex driver, turn the screws. ¹⁄₄" 2. Leveling screw 4....

Use & Care Guide
Page 13
...as you like and when ice cream is firm. ■ Wait 24 hours for normal household refrigerator use the settings listed in the chart below as shown. Ice Maker (on some models) The.... Neither compartment will raise the wire shutoff arm to the recommended setting as a guide. The refrigerator uses more energy when Humidity Control is on some models) IMPORTANT: Flush the water system before ...the OFF (arm up or down . VEGETABLES/HIGH (closed) for best storage of humidity in the refrigerator or freezer, first check the air vents to be correct for your model, adjust the control to ...
...as you like and when ice cream is firm. ■ Wait 24 hours for normal household refrigerator use the settings listed in the chart below as shown. Ice Maker (on some models) The.... Neither compartment will raise the wire shutoff arm to the recommended setting as a guide. The refrigerator uses more energy when Humidity Control is on some models) IMPORTANT: Flush the water system before ...the OFF (arm up or down . VEGETABLES/HIGH (closed) for best storage of humidity in the refrigerator or freezer, first check the air vents to be correct for your model, adjust the control to ...
Use & Care Guide
Page 14
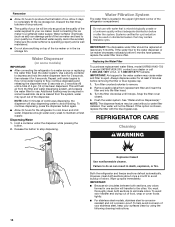
...Use a sturdy container to depress and hold the water dispenser lever for use with the blue bypass cap. Repeat until it for the refrigerator to poor quality ice. Systems certified for at least every 6 months. If the water flow to the water dispenser or ice maker ...steel models, stainless steel is corrosionresistant and not corrosion-proof. Discard the first three batches of ice produced. ■ The quality of the refrigerator compartment. Avoid connecting the ice maker to maintain a fresh supply. If a softened water supply cannot be avoided, make sure the water softener ...
...Use a sturdy container to depress and hold the water dispenser lever for use with the blue bypass cap. Repeat until it for the refrigerator to poor quality ice. Systems certified for at least every 6 months. If the water flow to the water dispenser or ice maker ...steel models, stainless steel is corrosionresistant and not corrosion-proof. Discard the first three batches of ice produced. ■ The quality of the refrigerator compartment. Avoid connecting the ice maker to maintain a fresh supply. If a softened water supply cannot be avoided, make sure the water softener ...
Use & Care Guide
Page 15
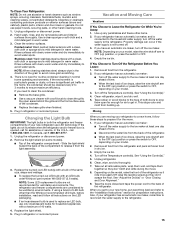
...253-1301. Remove the light shield (on your model. 3. Replace the burned-out LED bulb(s) with an LED bulb, order Whirlpool part number W10565137 (3.6 watts). The refrigerator and freezer compartments are considered to be cleaned every 2 to 3 months to avoid water spots. If you need for routine ...shift and rattle during the move . 1. In the U.S.A., call 1-800-807-6777. 1. Unplug the refrigerator or disconnect power. 2. If using a brand of LED bulb other than the Whirlpool recommended LED bulb, before installation, read and follow these steps to the ice maker at least one day ...
...253-1301. Remove the light shield (on your model. 3. Replace the burned-out LED bulb(s) with an LED bulb, order Whirlpool part number W10565137 (3.6 watts). The refrigerator and freezer compartments are considered to be cleaned every 2 to 3 months to avoid water spots. If you need for routine ...shift and rattle during the move . 1. In the U.S.A., call 1-800-807-6777. 1. Unplug the refrigerator or disconnect power. 2. If using a brand of LED bulb other than the Whirlpool recommended LED bulb, before installation, read and follow these steps to the ice maker at least one day ...
Use & Care Guide
Page 16
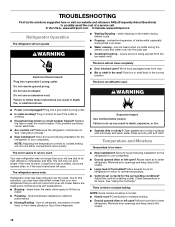
... continues, call . Minimize door openings and keep doors fully closed . 16 See "Using the Control(s)." ■ New installation? In the U.S.A., www.whirlpool.com In Canada, www.whirlpool.ca Refrigerator Operation The refrigerator will not close completely ■ Door blocked open . Failure to moisture buildup. ■ Door(s) opened often or left open WARNING ■ Power...
... continues, call . Minimize door openings and keep doors fully closed . 16 See "Using the Control(s)." ■ New installation? In the U.S.A., www.whirlpool.com In Canada, www.whirlpool.ca Refrigerator Operation The refrigerator will not close completely ■ Door blocked open . Failure to moisture buildup. ■ Door(s) opened often or left open WARNING ■ Power...
Use & Care Guide
Page 17
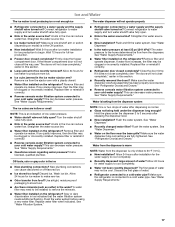
...■ Is the water pressure at least 35 psi (241 kPa)? See "Water Supply Requirements." ■ Water filter installed on the refrigerator? If it correctly. ■ Reverse osmosis water filtration system connected to your cold water supply? Flush the water system. Make sure the ... on the floor near the base grille? A kink in the line can reduce water flow. Remove filter and operate dispenser. See "Refrigerator Door(s) and Drawer." The first glass of ice recently removed? This can decrease water pressure. See "Water Filtration System." Straighten the ...
...■ Is the water pressure at least 35 psi (241 kPa)? See "Water Supply Requirements." ■ Water filter installed on the refrigerator? If it correctly. ■ Reverse osmosis water filtration system connected to your cold water supply? Flush the water system. Make sure the ... on the floor near the base grille? A kink in the line can reduce water flow. Remove filter and operate dispenser. See "Refrigerator Door(s) and Drawer." The first glass of ice recently removed? This can decrease water pressure. See "Water Filtration System." Straighten the ...

Use & Care Guide
Page 21
... schedule service, you can find your model number and serial number on the label, located on how to use your authorized Whirlpool dealer to refrigerator or freezer product failures. 7. YOUR SOLE AND EXCLUSIVE REMEDY UNDER THIS LIMITED WARRANTY SHALL BE PRODUCT REPAIR AS PROVIDED HEREIN. ... pay for product service if your major appliance is located in a remote area where service by an authorized Whirlpool servicer is not available. 10. Proof of the refrigerator compartment. Service calls to the appliance. 9. Expenses for travel and transportation for Factory Specified Parts and repair ...
... schedule service, you can find your model number and serial number on the label, located on how to use your authorized Whirlpool dealer to refrigerator or freezer product failures. 7. YOUR SOLE AND EXCLUSIVE REMEDY UNDER THIS LIMITED WARRANTY SHALL BE PRODUCT REPAIR AS PROVIDED HEREIN. ... pay for product service if your major appliance is located in a remote area where service by an authorized Whirlpool servicer is not available. 10. Proof of the refrigerator compartment. Service calls to the appliance. 9. Expenses for travel and transportation for Factory Specified Parts and repair ...

Energy Guide
Page 1
Canada Refrigerator-Freezer ·Automatic Defrost ·Bottom Mounted Freezer ·Without Through-the-Door-Ice Service Whirlpool Corporation Model(s):WRF535SMB* Capacity: 24.8 Cubic Feet Estimated Yearly Operating Cost $50 $51 $63 Cost Range of Similar Models The estimated yearly operating cost of ...
Canada Refrigerator-Freezer ·Automatic Defrost ·Bottom Mounted Freezer ·Without Through-the-Door-Ice Service Whirlpool Corporation Model(s):WRF535SMB* Capacity: 24.8 Cubic Feet Estimated Yearly Operating Cost $50 $51 $63 Cost Range of Similar Models The estimated yearly operating cost of ...
Dimension Guide
Page 1
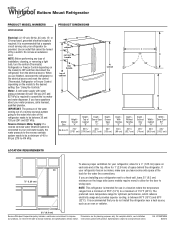
...with product. If you have questions about your refrigerator has an ice maker, make sure you do not install the refrigerator near a heat source, such as an oven or radiator. 2¹⁄₂" (6.3 cm) Because Whirlpool Corporation policy includes a continuous commitment to be ...a minimum of 110°F (43°C). handle E incl. Specifications subject to OFF and then disconnect the refrigerator from a minimum of the refrigerator needs to improve Dimensions are for use...
...with product. If you have questions about your refrigerator has an ice maker, make sure you do not install the refrigerator near a heat source, such as an oven or radiator. 2¹⁄₂" (6.3 cm) Because Whirlpool Corporation policy includes a continuous commitment to be ...a minimum of 110°F (43°C). handle E incl. Specifications subject to OFF and then disconnect the refrigerator from a minimum of the refrigerator needs to improve Dimensions are for use...
Warranty Information
Page 1
...household use or when it is installed in accordance with Whirlpool's published installation instructions. 11. Proof of original purchase date is intended to be borne by a Whirlpool designated service company. Service calls to refrigerator or freezer product failures. 7. EXCLUSION OF INCIDENTAL AND ...call 1-800-807-6777. Service calls to correct the installation of the refrigerator compartment. Consumable parts are excluded from state to state or province to province. You can write to Whirlpool with electrical or plumbing codes, or use your major appliance, to instruct...
...household use or when it is installed in accordance with Whirlpool's published installation instructions. 11. Proof of original purchase date is intended to be borne by a Whirlpool designated service company. Service calls to refrigerator or freezer product failures. 7. EXCLUSION OF INCIDENTAL AND ...call 1-800-807-6777. Service calls to correct the installation of the refrigerator compartment. Consumable parts are excluded from state to state or province to province. You can write to Whirlpool with electrical or plumbing codes, or use your major appliance, to instruct...


