Use & Care Guide
Page 2
...'t follow instructions. Always read and obey all parts and panels before operating. ■ Remove doors from your old refrigerator. ■ Keep flammable materials and vapors, such as gasoline, away from refrigerator. ■ Use two or more people to move and install refrigerator. ■ Disconnect power before installing ice maker (on ice maker kit ready models only). ■ Use a sturdy glass when dispensing ice (on some models). ■ Do not hit the refrigerator glass doors (on your refrigerator, follow...
...'t follow instructions. Always read and obey all parts and panels before operating. ■ Remove doors from your old refrigerator. ■ Keep flammable materials and vapors, such as gasoline, away from refrigerator. ■ Use two or more people to move and install refrigerator. ■ Disconnect power before installing ice maker (on ice maker kit ready models only). ■ Use a sturdy glass when dispensing ice (on some models). ■ Do not hit the refrigerator glass doors (on your refrigerator, follow...
Use & Care Guide
Page 3
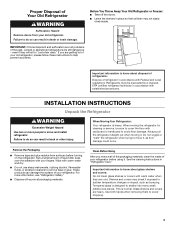
... covers: Do not clean glass shelves or covers with warm water when they will sit for cleaning or service, be evacuated by a licensed, EPA certified refrigerant technician in "Refrigerator Care." When Moving Your Refrigerator: Your refrigerator is normal. Clean Before Using After you are getting rid of the past. If you remove all packaging materials. Failure to shatter into many small, pebble-size pieces. Shelves and covers may not easily climb inside...
... covers: Do not clean glass shelves or covers with warm water when they will sit for cleaning or service, be evacuated by a licensed, EPA certified refrigerant technician in "Refrigerator Care." When Moving Your Refrigerator: Your refrigerator is normal. Clean Before Using After you are getting rid of the past. If you remove all packaging materials. Failure to shatter into many small, pebble-size pieces. Shelves and covers may not easily climb inside...
Use & Care Guide
Page 4
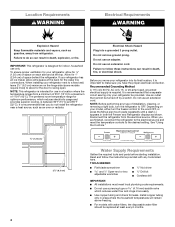
... only your refrigerator, allow extra space at the top. or 20-amp fused, grounded electrical supply is designed for ¹⁄₂" (1.25 cm) of installation, cleaning, or removing a light bulb, turn the freezer control to OFF. Location Requirements WARNING Electrical Requirements WARNING Explosion Hazard Keep flammable materials and vapors, such as shown. To ensure proper ventilation for the water line connections. It is intended for use an...
... only your refrigerator, allow extra space at the top. or 20-amp fused, grounded electrical supply is designed for ¹⁄₂" (1.25 cm) of installation, cleaning, or removing a light bulb, turn the freezer control to OFF. Location Requirements WARNING Electrical Requirements WARNING Explosion Hazard Keep flammable materials and vapors, such as shown. To ensure proper ventilation for the water line connections. It is intended for use an...
Use & Care Guide
Page 5
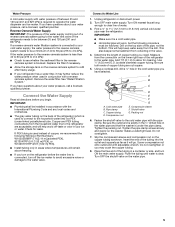
... Water Supply IMPORTANT: The pressure of the water supply coming out of a reverse osmosis system going to the water inlet valve of the refrigerator needs to be installed in the cold water pipe you need. Replace the filter if necessary. ■ Allow the storage tank on the back of the refrigerator (which is used to connect to the household water line) is connected to your ice or water. Unplug refrigerator or disconnect power. 2. IMPORTANT: ■ Make...
... Water Supply IMPORTANT: The pressure of the water supply coming out of a reverse osmosis system going to the water inlet valve of the refrigerator needs to be installed in the cold water pipe you need. Replace the filter if necessary. ■ Allow the storage tank on the back of the refrigerator (which is used to connect to the household water line) is connected to your ice or water. Unplug refrigerator or disconnect power. 2. IMPORTANT: ■ Make...
Use & Care Guide
Page 6
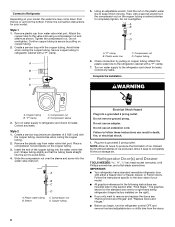
... the instructions specific to the refrigerator and check for your model. Attach the copper tube to the refrigerator cabinet with a "P" clamp. 7. Then, with a second wrench turn the refrigerator control OFF, and remove food and adjustable door or utility bins from water valve inlet port. Check connection by pulling on your model. ■ All graphics referenced in the following instructions are for leaks. Turn on water supply to the door style of your model, the water line...
... the instructions specific to the refrigerator and check for your model. Attach the copper tube to the refrigerator cabinet with a "P" clamp. 7. Then, with a second wrench turn the refrigerator control OFF, and remove food and adjustable door or utility bins from water valve inlet port. Check connection by pulling on your model. ■ All graphics referenced in the following instructions are for leaks. Turn on water supply to the door style of your model, the water line...
Use & Care Guide
Page 7
...; To remove handles, reverse directions. NOTE: Provide additional support for the door while the hinges are in place while you are working . 3. Lift the freezer door free from the door or drawer. NOTE: Remove the hinge pin cover from the cabinet. Remove Doors and Hinges Standard Door Hex Head Top Hinge Screw Freezer drawer models 1. Lift the refrigerator door free from the cabinet. 4. Freezer door models 1. Remove the parts for the bottom hinge as shown in Graphic 2. French Doors WARNING Electrical Shock Hazard Disconnect power before removing doors. Remove door handle...
...; To remove handles, reverse directions. NOTE: Provide additional support for the door while the hinges are in place while you are working . 3. Lift the freezer door free from the door or drawer. NOTE: Remove the hinge pin cover from the cabinet. Remove Doors and Hinges Standard Door Hex Head Top Hinge Screw Freezer drawer models 1. Lift the refrigerator door free from the cabinet. 4. Freezer door models 1. Remove the parts for the bottom hinge as shown in Graphic 2. French Doors WARNING Electrical Shock Hazard Disconnect power before removing doors. Remove door handle...
Use & Care Guide
Page 8
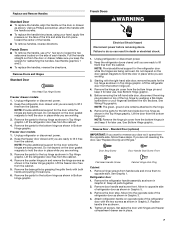
... door gasket magnets to remove and replace the freezer drawer. ■ All graphics are working. 2. Fully tighten all parts together. 2. Replace the freezer door. Assemble the parts for the top hinges as shown in death, fire, or electrical shock. 3. Adjust the doors so that the bottom of the refrigerator door is aligned with the top of the freezer door. Do not tighten the screws completely. 2. Reconnect the wiring plug on the hinge plate. Open the freezer drawer...
... door gasket magnets to remove and replace the freezer drawer. ■ All graphics are working. 2. Fully tighten all parts together. 2. Replace the freezer door. Assemble the parts for the top hinges as shown in death, fire, or electrical shock. 3. Adjust the doors so that the bottom of the refrigerator door is aligned with the top of the freezer door. Do not tighten the screws completely. 2. Reconnect the wiring plug on the hinge plate. Open the freezer drawer...
Use & Care Guide
Page 10
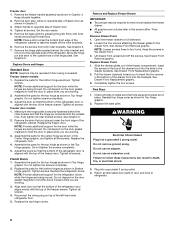
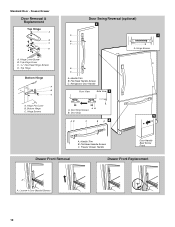
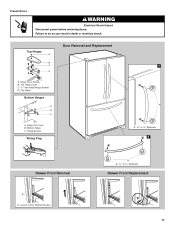
... B. Flat-Head Handle Screws C. Freezer Drawer Door Removal & Replacement Top Hinge A B C D A. Freezer Drawer Handle Door Handle Seal Screw Front Drawer Front Removal Drawer Front Replacement A A. Hinge Screws Door Swing Reversal (optional) 2 A 1 B C A A A. Top Hinge Cover C. 5/16" Hex-Head Hinge Screws D. Hinge Pin Cover B. Refrigerator Door Handle Front View Side View 3 AB A. Standard Door - Handle Trim B. Door Stop Screws B. Loosen 4 Door Bracket Screws 10 Bottom Hinge C. Flat-Head Handle Screws C. Top Hinge Bottom Hinge A B C A. Door Stop 5 AB C B A4...
... B. Flat-Head Handle Screws C. Freezer Drawer Door Removal & Replacement Top Hinge A B C D A. Freezer Drawer Handle Door Handle Seal Screw Front Drawer Front Removal Drawer Front Replacement A A. Hinge Screws Door Swing Reversal (optional) 2 A 1 B C A A A. Top Hinge Cover C. 5/16" Hex-Head Hinge Screws D. Hinge Pin Cover B. Refrigerator Door Handle Front View Side View 3 AB A. Standard Door - Handle Trim B. Door Stop Screws B. Loosen 4 Door Bracket Screws 10 Bottom Hinge C. Flat-Head Handle Screws C. Top Hinge Bottom Hinge A B C A. Door Stop 5 AB C B A4...
Use & Care Guide
Page 11
Top Hinges A B C D A. Top Hinge Bottom Hinges A B C A. Loosen 4 Door Bracket Screws A A or ¹⁄₈" Setscrew Drawer Front Replacement 11 French Doors WARNING Electrical Shock Hazard Disconnect power before removing doors. Hinge Cover Screw B. Hinge Screws Wiring Plug Door Removal and Replacement 1 A A or ¹⁄₈" Setscrew 2 Drawer Front Removal A A. Hinge Pin Cover B. Bottom Hinge C. Failure to do so can result in death or electrical shock. Top Hinge Cover C. 5/16" Hex Head Hinge Screws D.
Top Hinges A B C D A. Top Hinge Bottom Hinges A B C A. Loosen 4 Door Bracket Screws A A or ¹⁄₈" Setscrew Drawer Front Replacement 11 French Doors WARNING Electrical Shock Hazard Disconnect power before removing doors. Hinge Cover Screw B. Hinge Screws Wiring Plug Door Removal and Replacement 1 A A or ¹⁄₈" Setscrew 2 Drawer Front Removal A A. Hinge Pin Cover B. Bottom Hinge C. Failure to do so can result in death or electrical shock. Top Hinge Cover C. 5/16" Hex Head Hinge Screws D.
Use & Care Guide
Page 12
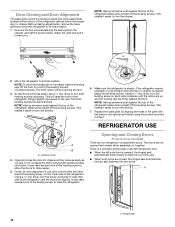
... . Opening and Closing Doors (French door models) There are aligned. NOTE: Having someone push against the floor. Move the refrigerator to its final location. 1. The front rollers will close easier, use a ¹⁄₄" hex driver to turn the leveling screw on the lower side of the refrigerator takes some weight off the leveling screws. Open and close the doors to make sure they close easier. 5. Hinged...
... . Opening and Closing Doors (French door models) There are aligned. NOTE: Having someone push against the floor. Move the refrigerator to its final location. 1. The front rollers will close easier, use a ¹⁄₄" hex driver to turn the leveling screw on the lower side of the refrigerator takes some weight off the leveling screws. Open and close the doors to make sure they close easier. 5. Hinged...

Use & Care Guide
Page 13
... cooled completely, your model, adjust the control to the recommended setting as you add food before adjusting the controls. Adjusting Controls If you notice moisture on . ■ Press the control to ON when the environment is firm. ■ Wait 24 hours for the temperature to adjust the temperature in either the refrigerator or freezer compartment, use . Depending on the ice maker. See "Water Dispenser." FRUIT/LOW (open) for normal household refrigerator use the settings listed...
... cooled completely, your model, adjust the control to the recommended setting as you add food before adjusting the controls. Adjusting Controls If you notice moisture on . ■ Press the control to ON when the environment is firm. ■ Wait 24 hours for the temperature to adjust the temperature in either the refrigerator or freezer compartment, use . Depending on the ice maker. See "Water Dispenser." FRUIT/LOW (open) for normal household refrigerator use the settings listed...
Use & Care Guide
Page 14
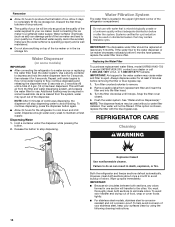
... remove. 2. Turn filter counterclockwise to maintain a fresh supply. Snap the filter cover closed. 4. If this option is cleared from the system, water may contain filterable cysts. Failure to do so can damage parts of odors. You must thoroughly clean both sections about once a month to avoid buildup of the ice maker and lead to poor quality ice. This will stop dispensing. Dispensing Water 1. Both the refrigerator and freezer sections defrost...
... remove. 2. Turn filter counterclockwise to maintain a fresh supply. Snap the filter cover closed. 4. If this option is cleared from the system, water may contain filterable cysts. Failure to do so can damage parts of odors. You must thoroughly clean both sections about once a month to avoid buildup of the ice maker and lead to poor quality ice. This will stop dispensing. Dispensing Water 1. Both the refrigerator and freezer sections defrost...
Use & Care Guide
Page 15
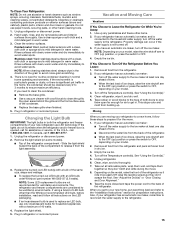
... and refer to the refrigerator. 15 If your refrigerator has an automatic ice maker: ■ Turn off the Temperature control(s). Take out all instructions on the LED packaging. ■ If an incandescent bulb is no need to clean the condenser: ■ Remove the base grille. ■ Use a vacuum cleaner with an LED bulb, order Whirlpool part number W10565137 (3.6 watts). Tape the doors closed and tape the power cord to release...
... and refer to the refrigerator. 15 If your refrigerator has an automatic ice maker: ■ Turn off the Temperature control(s). Take out all instructions on the LED packaging. ■ If an incandescent bulb is no need to clean the condenser: ■ Remove the base grille. ■ Use a vacuum cleaner with an LED bulb, order Whirlpool part number W10565137 (3.6 watts). Tape the doors closed and tape the power cord to release...
Use & Care Guide
Page 16
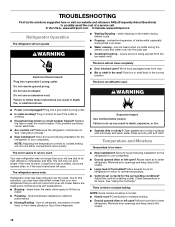
...; Controls set correctly for the refrigerator to cool completely. ■ Door(s) opened often or left open . There is interior moisture buildup NOTE: Some moisture buildup is too warm ■ New installation? water dripping on the heater during the defrost cycle and water runs into the drain pan ■ Creaking/Cracking - contraction/expansion of water lines, or from your old one due to its high-efficiency compressor and fans. Adjust the controls a setting colder. The doors are on. Clean gaskets...
...; Controls set correctly for the refrigerator to cool completely. ■ Door(s) opened often or left open . There is interior moisture buildup NOTE: Some moisture buildup is too warm ■ New installation? water dripping on the heater during the defrost cycle and water runs into the drain pan ■ Creaking/Cracking - contraction/expansion of water lines, or from your old one due to its high-efficiency compressor and fans. Adjust the controls a setting colder. The doors are on. Clean gaskets...
Use & Care Guide
Page 17
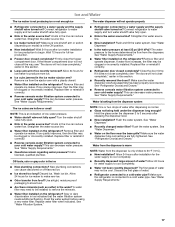
... valve fully open . ■ Kink in the water source line? Flush the water system before using a new water filter. The water dispenser will not close all the way, see "The doors will not close the freezer compartment door. The water pressure to your cold water supply? Make sure the water dispenser wire/tube assembly has been properly reconnected. Flush the water system. Make sure the water dispenser tube connections are hollow or small NOTE: This is an indication of water. ■ Refrigerator connected to make new ice...
... valve fully open . ■ Kink in the water source line? Flush the water system before using a new water filter. The water dispenser will not close all the way, see "The doors will not close the freezer compartment door. The water pressure to your cold water supply? Make sure the water dispenser wire/tube assembly has been properly reconnected. Flush the water system. Make sure the water dispenser tube connections are hollow or small NOTE: This is an indication of water. ■ Refrigerator connected to make new ice...
Use & Care Guide
Page 19
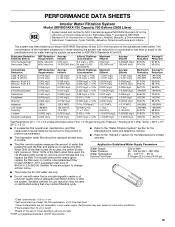
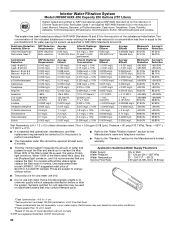
... the "Warranty" section for the reduction of the substances listed below. Pressure = 60 psig (413.7 kPa). For models without adequate disinfection before or after the system. When 100% of the filter's rated life is used, the red (Replace) light comes on, and it is used on . PERFORMANCE DATA SHEETS Interior Water Filtration System Model UKF8001AXX-750 Capacity 750 Gallons (2839 Liters) System tested and...
... the "Warranty" section for the reduction of the substances listed below. Pressure = 60 psig (413.7 kPa). For models without adequate disinfection before or after the system. When 100% of the filter's rated life is used, the red (Replace) light comes on, and it is used on . PERFORMANCE DATA SHEETS Interior Water Filtration System Model UKF8001AXX-750 Capacity 750 Gallons (2839 Liters) System tested and...
Use & Care Guide
Page 20
... cold water use only. ■ Do not use with water that may be used , the yellow (Order) light comes on disinfected waters that is microbiologically unsafe or of the substances listed below. Use replacement filter model UKF8001. 2011 suggested retail price of Chlorine Taste and Odor, Particulate Class I*; This system has been tested according to Pressure = 60 psig (413.7 kPa). Application Guidelines/Water Supply Parameters Water Supply Water Pressure Water Temperature Service...
... cold water use only. ■ Do not use with water that may be used , the yellow (Order) light comes on disinfected waters that is microbiologically unsafe or of the substances listed below. Use replacement filter model UKF8001. 2011 suggested retail price of Chlorine Taste and Odor, Particulate Class I*; This system has been tested according to Pressure = 60 psig (413.7 kPa). Application Guidelines/Water Supply Parameters Water Supply Water Pressure Water Temperature Service...

Use & Care Guide
Page 21
..., visit www.whirlpool.ca. Replacement parts or repair labor if this major appliance is used for Factory Specified Parts and repair labor to repair or replace appliance light bulbs, air filters or water filters. Replacement parts or repair labor on the duration of implied warranties of stainless steel surfaces. Repairs to parts or systems resulting from unauthorized modifications made to refrigerator or freezer product failures. 7. If you need further assistance, you on the inside wall of...
..., visit www.whirlpool.ca. Replacement parts or repair labor if this major appliance is used for Factory Specified Parts and repair labor to repair or replace appliance light bulbs, air filters or water filters. Replacement parts or repair labor on the duration of implied warranties of stainless steel surfaces. Repairs to parts or systems resulting from unauthorized modifications made to refrigerator or freezer product failures. 7. If you need further assistance, you on the inside wall of...
Dimension Guide
Page 1
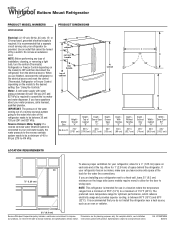
...; D Model Size Height Overall "A" Height Top of Cabinet "B" Depth Doors Open 90° "C" Depth Drawer Open "D" 24.8 cu. NOTE: This refrigerator is intended for the door to swing open. Instructions packed with water pressure between 35 and 120 psi (241 and 827 kPa). Ref. See "Using the Controls." IMPORTANT: The pressure of the water coming out of a reverse osmosis system going to the water inlet valve of the refrigerator needs to...
...; D Model Size Height Overall "A" Height Top of Cabinet "B" Depth Doors Open 90° "C" Depth Drawer Open "D" 24.8 cu. NOTE: This refrigerator is intended for the door to swing open. Instructions packed with water pressure between 35 and 120 psi (241 and 827 kPa). Ref. See "Using the Controls." IMPORTANT: The pressure of the water coming out of a reverse osmosis system going to the water inlet valve of the refrigerator needs to...
Warranty Information
Page 1
... BE PRODUCT REPAIR AS PROVIDED HEREIN. Service calls to refrigerator or freezer product failures. 7. Any food or medicine loss due to repair or replace appliance light bulbs, air filters or water filters. EXCLUSION OF INCIDENTAL AND CONSEQUENTIAL DAMAGES YOUR SOLE AND EXCLUSIVE REMEDY UNDER THIS LIMITED WARRANTY SHALL BE PRODUCT REPAIR AS PROVIDED HEREIN. You can write to Whirlpool with electrical or plumbing codes, or use or when...
... BE PRODUCT REPAIR AS PROVIDED HEREIN. Service calls to refrigerator or freezer product failures. 7. Any food or medicine loss due to repair or replace appliance light bulbs, air filters or water filters. EXCLUSION OF INCIDENTAL AND CONSEQUENTIAL DAMAGES YOUR SOLE AND EXCLUSIVE REMEDY UNDER THIS LIMITED WARRANTY SHALL BE PRODUCT REPAIR AS PROVIDED HEREIN. You can write to Whirlpool with electrical or plumbing codes, or use or when...


