Whirlpool WOSA2EC0H Support and Manuals
Get Help and Manuals for this Whirlpool item

View All Support Options Below
Free Whirlpool WOSA2EC0H manuals!
Problems with Whirlpool WOSA2EC0H?
Ask a Question
Free Whirlpool WOSA2EC0H manuals!
Problems with Whirlpool WOSA2EC0H?
Ask a Question
Popular Whirlpool WOSA2EC0H Manual Pages
Installation Instructions - Page 2

... listed here.
INSTALLATION REQUIREMENTS
Tools and Parts
Gather the required tools and parts before starting installation. WARNING
You can kill or hurt you don't immediately follow the instructions provided with bottom of cabinet cutout.
■■ Floor must be able to support a single oven weight of 129 lbs (59 kg) for 27" (68.6 cm) models or 154...
Installation Instructions - Page 3
...*
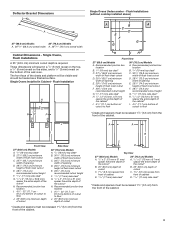
I . 45/8" - 32" (11.7 cm 81.3 cm) bottom of cutout to floor
30" (76.2 cm) Models
A. Deflector Bracket Dimensions
Single Ovens Undercounter - Single Ovens, Flush Installations
A 25" (63.5 cm) minimum cutout depth is required. A
A
B
C
D
D
Top View
27" (68.6 cm) Models
A. 1/2" x 2" (13 mm x 51 mm) spacer the entire depth of the cutout*
B. 25" (63.5 cm...
Installation Instructions - Page 4
Double Ovens, Flush Installations
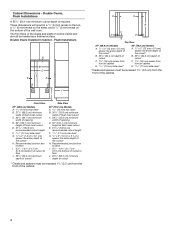
A 253/8" (64.4 cm) minimum cutout depth is required. Recommended junction box location
I
Front View
27" (68.6 cm) Models
A. 9/16" (14 mm) top cleat*
B. 271...17 mm) side cleat*
G. 1/2" x 2" (1.3 cm x 5.1 cm) spacer the entire depth of the wall oven. Double Ovens Installed in a 1/4" (6 mm) reveal on the top, a 1/4" (6 mm) reveal on the sides, and a 1/8" (3 mm)...
Installation Instructions - Page 5

... oven door(s).
1. Decide on select models
B. Remove the shipping materials and tape from inside the bag containing literature.
5. Locate the oven door hinge locks in partially unlocked position
5 Avoid drilling or cutting into house wiring during installation. Set the oven door(s) aside on its handle.
7.
INSTALLATION INSTRUCTIONS
Prepare Built-In Oven
4. Partially close...
Installation Instructions - Page 6

... to a full 90 degrees, repeat steps 1 through 3.
5. Go to the "Make Electrical Connection" section in the Installation Instructions provided with slots in a recommended cutout height of 517/16" (130.6 cm). NOTE: Do not remove the spacers.
4. Replace Oven Door(s)
1.
Positioning Oven Feet
Single Ovens
The positioning of the oven cavity. Locate the slots...
Installation Instructions - Page 7
...a front foot on Single Ovens 1. A
B
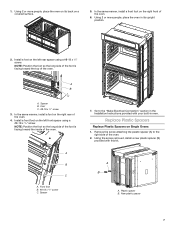
A. Using 2 or more people, place the oven in oven. Replace Plastic Spacers
Replace Plastic Spacers on the right front of the oven. 4. A B C
A. A
B
C
A. Front foot B. #8-18 x 3/8" screw C.
Remove the screw attaching the plastic spacer (A) to the "Make Electrical Connection" section in the Installation Instructions provided with this kit.
Installation Instructions - Page 8
In the same manner, remove and replace the plastic spacer on the front frame.
Using the 2 screws removed, install 2 new plastic spacers
(B) provided with the ... to the right side of the oven. Do not overtighten the screws.
Oven frame hole C. Black trim piece
8 Install Oven
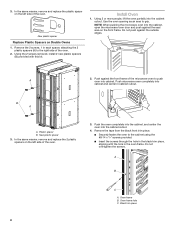
1. Using 2 or more people, lift the oven partially into the cabinet cutout.
4. 3.
Plastic spacer B. A...
Installation Instructions - Page 9
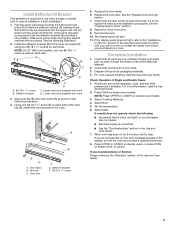
... and Care Guide. Select Cooking Methods. 4. If you do not feel for heat. Some force may also be required to flex the upper vent trim (C) away from the lower vent trim (D). Oven frame B. Replace the oven door. Complete Installation
1. If there is used on each side. Press OVEN on double oven models. 3. Set the temperature...
Whirlpool WOSA2EC0H Reviews
We have not received any reviews for Whirlpool yet.