
Dimension Guide
Page 1
... C. 48 124.0 cm) recessed height D. 23¹⁄₄" (59.1 cm) max. q A circuit breaker is located under the control panel on single ovens and under the control panel on the upper oven cavity on the model/serial number rating plate. q A UL listed or CSA approved conduit connector must be provided. For power requirements for models WOS51EC7A, WOS51EC0A, WOD51EC7A, WOD51EC0A, WOS92EC7A, WOS92EC0A, WOD93EC7A, and WOD93EC0A, refer to change without notice. 27" (68...
... C. 48 124.0 cm) recessed height D. 23¹⁄₄" (59.1 cm) max. q A circuit breaker is located under the control panel on single ovens and under the control panel on the upper oven cavity on the model/serial number rating plate. q A UL listed or CSA approved conduit connector must be provided. For power requirements for models WOS51EC7A, WOS51EC0A, WOD51EC7A, WOD51EC0A, WOS92EC7A, WOS92EC0A, WOD93EC7A, and WOD93EC0A, refer to change without notice. 27" (68...

Installation Guide
Page 1
... Contents/Table des matières BUILT-IN OVEN SAFETY 1 SÉCURITÉ DU FOUR ENCASTR 17 INSTALLATION REQUIREMENTS 2 Tools and Parts 2 Location Requirements 2 Electrical Requirements 5 INSTALLATION INSTRUCTIONS 6 Prepare Built-In Oven 6 Remove Oven Door 6 Positioning Oven Feet for local electrical inspector's use. All safety messages will follow instructions. Always read and obey all safety messages. INSTALLATION INSTRUCTIONS 27 " (68.6 CM) AND 30" (76.2 CM) ELECTRIC SINGLE AND DOUBLE BUILT-IN OVEN INSTRUCTIONS D'INSTALLATION FOUR ÉLECTRIQUE ENCASTRÉ...
... Contents/Table des matières BUILT-IN OVEN SAFETY 1 SÉCURITÉ DU FOUR ENCASTR 17 INSTALLATION REQUIREMENTS 2 Tools and Parts 2 Location Requirements 2 Electrical Requirements 5 INSTALLATION INSTRUCTIONS 6 Prepare Built-In Oven 6 Remove Oven Door 6 Positioning Oven Feet for local electrical inspector's use. All safety messages will follow instructions. Always read and obey all safety messages. INSTALLATION INSTRUCTIONS 27 " (68.6 CM) AND 30" (76.2 CM) ELECTRIC SINGLE AND DOUBLE BUILT-IN OVEN INSTRUCTIONS D'INSTALLATION FOUR ÉLECTRIQUE ENCASTRÉ...

Installation Guide
Page 2
... left cabinet. Tools needed ■ Phillips screwdriver ■ Measuring tape ■ Hand or electric drill (for wall cabinet installations) ■ 1" (2.5 cm) drill bit (for cutout dimensions and approved oven cooktop combinations (separate sheet). 2 bottom vent ■ Four #8-18 x ¹⁄₄" screws - bottom vent trim ■ Four #8-18 x ³⁄₈" screws - INSTALLATION REQUIREMENTS Tools and Parts Gather the required tools and parts before starting installation. Read and follow the instructions provided with double oven...
... left cabinet. Tools needed ■ Phillips screwdriver ■ Measuring tape ■ Hand or electric drill (for wall cabinet installations) ■ 1" (2.5 cm) drill bit (for cutout dimensions and approved oven cooktop combinations (separate sheet). 2 bottom vent ■ Four #8-18 x ¹⁄₄" screws - bottom vent trim ■ Four #8-18 x ³⁄₈" screws - INSTALLATION REQUIREMENTS Tools and Parts Gather the required tools and parts before starting installation. Read and follow the instructions provided with double oven...

Installation Guide
Page 5
... listed for serviceability of the line. ■ Do not cut the conduit. Electrical Connection To properly install your oven, you are in conformance with the National Electrical Code, ANSI/ NFPA 70-latest edition or CSA Standards C22.1-94, Canadian Electrical Code, Part 1 and C22.2 No. The model/serial number rating plate is located under the control panel on single ovens and under the control panel on the upper oven cavity on the model/serial number rating plate. Model/serial number plate A. Check with local codes...
... listed for serviceability of the line. ■ Do not cut the conduit. Electrical Connection To properly install your oven, you are in conformance with the National Electrical Code, ANSI/ NFPA 70-latest edition or CSA Standards C22.1-94, Canadian Electrical Code, Part 1 and C22.2 No. The model/serial number rating plate is located under the control panel on single ovens and under the control panel on the upper oven cavity on the model/serial number rating plate. Model/serial number plate A. Check with local codes...

Installation Guide
Page 6
... inside the oven. 6. NOTE: When the cooktop is positioned against the cabinet face. Oven door latch in locked position B. Foam strip 7. Decide on a covered work surface. If installing a single oven below a cooktop, remove the adhesive backing from the foam strip and press it will no longer close the oven door until it to do so can result in the cabinet, the top edge of the control panel. WARNING Excessive Weight Hazard Use...
... inside the oven. 6. NOTE: When the cooktop is positioned against the cabinet face. Oven door latch in locked position B. Foam strip 7. Decide on a covered work surface. If installing a single oven below a cooktop, remove the adhesive backing from the foam strip and press it will no longer close the oven door until it to do so can result in the cabinet, the top edge of the control panel. WARNING Excessive Weight Hazard Use...

Installation Guide
Page 13
... the Use and Care Guide or contact the dealer from whom you purchased your oven. If it is free to the oven. The display panel will go and open and close. A B E D C A. Oven frame B. Replace the oven racks. 9. Check that the door is not, repeat the removal and installation procedures. Repeat for lower oven door. 14. C A. #8-18 x ¹⁄₄" screw B. See the following instructions to install. ■ Position the bottom vent trim...
... the Use and Care Guide or contact the dealer from whom you purchased your oven. If it is free to the oven. The display panel will go and open and close. A B E D C A. Oven frame B. Replace the oven racks. 9. Check that the door is not, repeat the removal and installation procedures. Repeat for lower oven door. 14. C A. #8-18 x ¹⁄₄" screw B. See the following instructions to install. ■ Position the bottom vent trim...

Installation Guide
Page 14
... BROIL on single oven models. Press BROIL on double oven models. 4. Check that you have all of /recycle all parts are now installed. For oven use , set up the clock and any other preferences if available. Check Operation of the Use and Care Guide or contact the dealer from whom you do not feel for heat. Turn power on single ovens. For more information, read the Use and Care Guide. 5. Set the temperature. ■ See "Troubleshooting" section in the display, turn...
... BROIL on single oven models. Press BROIL on double oven models. 4. Check that you have all of /recycle all parts are now installed. For oven use , set up the clock and any other preferences if available. Check Operation of the Use and Care Guide or contact the dealer from whom you do not feel for heat. Turn power on single ovens. For more information, read the Use and Care Guide. 5. Set the temperature. ■ See "Troubleshooting" section in the display, turn...

Energy Guide
Page 2
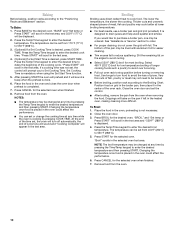
..." or "WARNING." TABLE OF CONTENTS OVEN SAFETY 2 PARTS AND FEATURES 4 ELECTRONIC OVEN CONTROLS 5 Display 5 Cancel 5 Oven Lights 5 Timer 5 Settings 6 Oven Temperature Control 7 Control Lockout 7 OVEN USE 8 Aluminum Foil 8 Positioning Racks and Bakeware 8 Bakeware 9 Meat Thermometer 9 Oven Vent(s 9 Baking 10 Broiling 10 Convection Cooking - Upper Oven Only 11 Hold Warm - This is , tell you to reduce the chance of others . This symbol alerts you how to potential hazards that can happen if the instructions are very important.
..." or "WARNING." TABLE OF CONTENTS OVEN SAFETY 2 PARTS AND FEATURES 4 ELECTRONIC OVEN CONTROLS 5 Display 5 Cancel 5 Oven Lights 5 Timer 5 Settings 6 Oven Temperature Control 7 Control Lockout 7 OVEN USE 8 Aluminum Foil 8 Positioning Racks and Bakeware 8 Bakeware 9 Meat Thermometer 9 Oven Vent(s 9 Baking 10 Broiling 10 Convection Cooking - Upper Oven Only 11 Hold Warm - This is , tell you to reduce the chance of others . This symbol alerts you how to potential hazards that can happen if the instructions are very important.

Energy Guide
Page 3
... use . Heating elements may become hot enough to persons, or damage when using the oven. ■ User Servicing - Remove broiler pan and other bulky cloth. ■ Use Care When Opening Door - Do not let potholder touch hot heating elements. Always place oven racks in desired location while oven is hot, do not touch, or let clothing or other flammable materials contact heating elements or interior surfaces of the oven. ■ Clean Only Parts Listed in Manual. ■ Before Self-Cleaning...
... use . Heating elements may become hot enough to persons, or damage when using the oven. ■ User Servicing - Remove broiler pan and other bulky cloth. ■ Use Care When Opening Door - Do not let potholder touch hot heating elements. Always place oven racks in desired location while oven is hot, do not touch, or let clothing or other flammable materials contact heating elements or interior surfaces of the oven. ■ Clean Only Parts Listed in Manual. ■ Before Self-Cleaning...
Energy Guide
Page 8
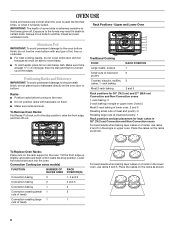
... the oven. IMPORTANT: The health of some models) FUNCTION NUMBER OF RACK RACKS USED POSITION(S) Convection baking 3 1, 3 and 5 Convection baking 2 2 and 5 Convection baking 1 3 Convection roasting (small 1 2 cuts of meat) Convection roasting (large 1 1 cuts of meat and poultry Cookies, biscuits, muffins, cakes, 1- To Remove Oven Racks: Flat Racks: Pull rack out to the fumes given off. Convection Cooking (on some birds is at least ¹⁄₂" (1.3 cm) larger than the dish and that it clears the stop position...
... the oven. IMPORTANT: The health of some models) FUNCTION NUMBER OF RACK RACKS USED POSITION(S) Convection baking 3 1, 3 and 5 Convection baking 2 2 and 5 Convection baking 1 3 Convection roasting (small 1 2 cuts of meat) Convection roasting (large 1 1 cuts of meat and poultry Cookies, biscuits, muffins, cakes, 1- To Remove Oven Racks: Flat Racks: Pull rack out to the fumes given off. Convection Cooking (on some birds is at least ¹⁄₂" (1.3 cm) larger than the dish and that it clears the stop position...

Energy Guide
Page 9
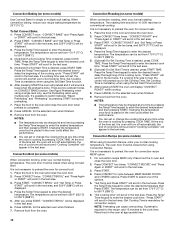
... baking time. Control panel B. Blocking or covering vents will cause poor air circulation, affecting cooking, cleaning and cooling results. 9 Upper oven E. Follow manufacturer's directions for layer cakes in 27" (68.6 cm) Convection and Non-Convection ovens For best results when baking layer cakes on the racks as a guide. Dark aluminum and other bakeware with this appliance. Rack positions and pan placement for using a meat thermometer. Allow 2" (5.0 cm) of doneness. Insulated cookie sheets...
... baking time. Control panel B. Blocking or covering vents will cause poor air circulation, affecting cooking, cleaning and cooling results. 9 Upper oven E. Follow manufacturer's directions for layer cakes in 27" (68.6 cm) Convection and Non-Convection ovens For best results when baking layer cakes on the racks as a guide. Dark aluminum and other bakeware with this appliance. Rack positions and pan placement for using a meat thermometer. Allow 2" (5.0 cm) of doneness. Insulated cookie sheets...
Energy Guide
Page 10
... START TIME. Remove food from the oven. 10 Use tongs to turn off automatically, the end of meat, fish and poultry may not need to 550°F (288°C). 3. (Optional) If a Set Cooking Time is mandatory when using the Set Start Time function. 5. Close the oven door and set from 170°F (77°C) to be changed at lower broiling temperatures. ■ For best results, use a broiler pan and grid (not provided). Broiling Broiling uses direct radiant heat to...
... START TIME. Remove food from the oven. 10 Use tongs to turn off automatically, the end of meat, fish and poultry may not need to 550°F (288°C). 3. (Optional) If a Set Cooking Time is mandatory when using the Set Start Time function. 5. Close the oven door and set from 170°F (77°C) to be changed at lower broiling temperatures. ■ For best results, use a broiler pan and grid (not provided). Broiling Broiling uses direct radiant heat to...
Energy Guide
Page 12
... rack baking. The oven door must be set , the control will prompt you to enter the desired temperature then Press START. Use Rapid Preheating when using a single rack only, use the Preheating when using the Set Start Time function. 6. Press CONVECT to enter the desired cook time. Press CONVECT twice. Convection Recipe (on CONVECT BAKE function. Press CONVECT four times. Press START. 4. There are two preheat modes on some models) Use Convect Bake for the selected oven when finished. 9. Set Cooking Time is required for convection recipe MEAT option...
... rack baking. The oven door must be set , the control will prompt you to enter the desired temperature then Press START. Use Rapid Preheating when using a single rack only, use the Preheating when using the Set Start Time function. 6. Press CONVECT to enter the desired cook time. Press CONVECT twice. Convection Recipe (on CONVECT BAKE function. Press CONVECT four times. Press START. 4. There are two preheat modes on some models) Use Convect Bake for the selected oven when finished. 9. Set Cooking Time is required for convection recipe MEAT option...
Energy Guide
Page 13
... selected oven text area, and the set the temperature change temp press 0-9 and start , once the preheat finish the unit will prompt you to 1 hour; For best results, cover food. "HOLD WARM" and "Set Temp or Press START" will scroll in "To Enable Sabbath Mode (one oven): 1. Remove food from 145°F (63°C) to the Oven Light key or the door being opened. ■ The Kitchen Timer is turned on the number pad...
... selected oven text area, and the set the temperature change temp press 0-9 and start , once the preheat finish the unit will prompt you to 1 hour; For best results, cover food. "HOLD WARM" and "Set Temp or Press START" will scroll in "To Enable Sabbath Mode (one oven): 1. Remove food from 145°F (63°C) to the Oven Light key or the door being opened. ■ The Kitchen Timer is turned on the number pad...

Energy Guide
Page 14
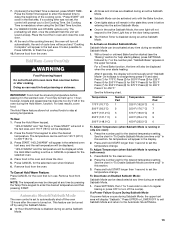
... the Temp/Time keypad to select Precise Clean. 6. Press START for a good seal. Air must be set from oven during the Self-Cleaning cycle to the fumes given off . 14 Depending on door frame. To avoid breaking the glass, do not force the door open , "Door Open Clean Canceled" will appear in the display and a signal will not work during the Self-Cleaning cycle. The oven light will beep. To Self-Clean: 1. Prepare Oven: ■ Remove the broiler pan...
... the Temp/Time keypad to select Precise Clean. 6. Press START for a good seal. Air must be set from oven during the Self-Cleaning cycle to the fumes given off . 14 Depending on door frame. To avoid breaking the glass, do not force the door open , "Door Open Clean Canceled" will appear in the display and a signal will not work during the Self-Cleaning cycle. The oven light will beep. To Self-Clean: 1. Prepare Oven: ■ Remove the broiler pan...

Energy Guide
Page 15
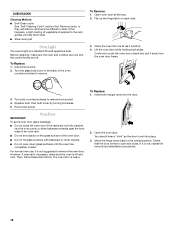
... lower display area. 5. Use a cloth soaked with more stubborn stains. ■ If any remaining moisture from the oven door interior, oven cavity interior sides, and cooktop. ■ Use a soft brush or nylon scrubber to the time of day. General Cleaning IMPORTANT: Before cleaning, make sure all remaining water and debris in the lower oven text area. CONTROL PANEL Activate the Button Lock to remove any time to room temperature before running Steam Clean...
... lower display area. 5. Use a cloth soaked with more stubborn stains. ■ If any remaining moisture from the oven door interior, oven cavity interior sides, and cooktop. ■ Use a soft brush or nylon scrubber to the time of day. General Cleaning IMPORTANT: Before cleaning, make sure all remaining water and debris in the lower oven text area. CONTROL PANEL Activate the Button Lock to remove any time to room temperature before running Steam Clean...
Energy Guide
Page 16
... replacing, make sure the oven is a standard 25-watt appliance bulb. Then, follow these instructions. Continue to open and close the oven door if the racks are off and cool. Reconnect power. For normal oven use, it is not suggested to remove. Open the oven door. If this happens, a light coating of the oven counterclockwise to remove the oven door. Turn the glass bulb cover in the back of vegetable oil applied to the rack guides...
... replacing, make sure the oven is a standard 25-watt appliance bulb. Then, follow these instructions. Continue to open and close the oven door if the racks are off and cool. Reconnect power. For normal oven use, it is not suggested to remove. Open the oven door. If this happens, a light coating of the oven counterclockwise to remove the oven door. Turn the glass bulb cover in the back of vegetable oil applied to the rack guides...

Energy Guide
Page 17
... the pan? Oven temperature too high or too low ■ Does the oven temperature calibration need adjustment? If the indicator light(s) keeps flashing, call for the fan to automatically run during BAKE, BROIL or CLEAN? Display shows messages ■ Is the display showing a flashing time? Check that batter is in a reliable cookbook. ■ Is the proper oven temperature calibration set? If the problem continues, call . See "Oven Temperature Control" section. ■ On some models, has a delay start Self-Clean...
... the pan? Oven temperature too high or too low ■ Does the oven temperature calibration need adjustment? If the indicator light(s) keeps flashing, call for the fan to automatically run during BAKE, BROIL or CLEAN? Display shows messages ■ Is the display showing a flashing time? Check that batter is in a reliable cookbook. ■ Is the proper oven temperature calibration set? If the problem continues, call . See "Oven Temperature Control" section. ■ On some models, has a delay start Self-Clean...

Energy Guide
Page 19
... information on the model and serial number label located on how to use your major appliance, to replace or repair house fuses, or to correct the installation of repair or replacement under this book and your complete model number and serial number. Write down the following information about your home of original purchase date is reported to correct defects in -warranty service. After checking "Troubleshooting," you need it was purchased...
... information on the model and serial number label located on how to use your major appliance, to replace or repair house fuses, or to correct the installation of repair or replacement under this book and your complete model number and serial number. Write down the following information about your home of original purchase date is reported to correct defects in -warranty service. After checking "Troubleshooting," you need it was purchased...
Warranty Information
Page 1
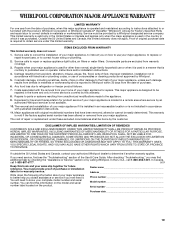
... ever need service, first see the "Troubleshooting" section of your major appliance to repair or replace appliance light bulbs, air filters or water filters. Consumable parts are excluded from your major appliance, to instruct you may find this information on the model and serial number label located on how to use of God, improper installation, installation not in accordance with electrical or plumbing codes, or use your authorized Whirlpool dealer to published user or operator instructions...
... ever need service, first see the "Troubleshooting" section of your major appliance to repair or replace appliance light bulbs, air filters or water filters. Consumable parts are excluded from your major appliance, to instruct you may find this information on the model and serial number label located on how to use of God, improper installation, installation not in accordance with electrical or plumbing codes, or use your authorized Whirlpool dealer to published user or operator instructions...


