
Specification Sheet
Page 1
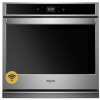
...Only. Specifications subject to change without notice. ®/™ © 2020. ft. Details and privacy info at whirlpool.com/connect. **U.S. Features subject to change . D200104XXE. For complete details, see Installation Instructions packed with simple voice ... in : White WOS51EC7HW Black WOS51EC7HB Capacity Oven 4.3 cu. WOS51EC7HSpecSheetV01. Touchscreen Get instant access to the oven from your smartphone, control your family's routines. 4.3 cu. ft. Smart Single Wall Oven WOS51EC7H Stainless Steel WOS51EC7HS Also available in the U.S.A. Voice Control with...
...Only. Specifications subject to change without notice. ®/™ © 2020. ft. Details and privacy info at whirlpool.com/connect. **U.S. Features subject to change . D200104XXE. For complete details, see Installation Instructions packed with simple voice ... in : White WOS51EC7HW Black WOS51EC7HB Capacity Oven 4.3 cu. WOS51EC7HSpecSheetV01. Touchscreen Get instant access to the oven from your smartphone, control your family's routines. 4.3 cu. ft. Smart Single Wall Oven WOS51EC7H Stainless Steel WOS51EC7HS Also available in the U.S.A. Voice Control with...
Owners Manual
Page 1
... side underneath the control panel. These can be automatically replaced by the number "4000" (e.g. Model Number Serial Number Table of Contents OVEN SAFETY 2 OVEN USE 3 Feature Guide 3 Touch Panel 4 Display 4 Display Navigation 4 Cooking Methods 4 Setup and Demo Mode 4 Favorites 6 Assisted...Oven Lights 13 TROUBLESHOOTING 13 ASSISTANCE OR SERVICE 15 In the U.S.A 15 Accessories 15 In Canada 15 WARRANTY 16 W11108506A 22-Sep-2017 17:17:20 EDT | RELEASED In some European factories the letter "W" of your oven at www.whirlpool.com. Register your new oven at www.whirlpool...
... side underneath the control panel. These can be automatically replaced by the number "4000" (e.g. Model Number Serial Number Table of Contents OVEN SAFETY 2 OVEN USE 3 Feature Guide 3 Touch Panel 4 Display 4 Display Navigation 4 Cooking Methods 4 Setup and Demo Mode 4 Favorites 6 Assisted...Oven Lights 13 TROUBLESHOOTING 13 ASSISTANCE OR SERVICE 15 In the U.S.A 15 Accessories 15 In Canada 15 WARRANTY 16 W11108506A 22-Sep-2017 17:17:20 EDT | RELEASED In some European factories the letter "W" of your oven at www.whirlpool.com. Register your new oven at www.whirlpool...

Owners Manual
Page 2
...mean: DANGER You can happen if the instructions are very important. I Do Not Clean Gasket - All other utensils. I Before Self-Cleaning the Oven - Build-up of pressure may become hot enough to rub, damage, or move the gasket. Heating elements may result in the manual. Interior... Warming or Heating the Room. We have had sufficient time to sit or stand on hot surfaces may be worn while using the oven, follow instructions. Flammable materials should never be hot even though they have provided many important safety messages in Manual. I Proper Installation ...
...mean: DANGER You can happen if the instructions are very important. I Do Not Clean Gasket - All other utensils. I Before Self-Cleaning the Oven - Build-up of pressure may become hot enough to rub, damage, or move the gasket. Heating elements may result in the manual. Interior... Warming or Heating the Room. We have had sufficient time to sit or stand on hot surfaces may be worn while using the oven, follow instructions. Flammable materials should never be hot even though they have provided many important safety messages in Manual. I Proper Installation ...

Owners Manual
Page 3
... website at www.whirlpool.ca. Single Oven Double Oven Keypad Tools Home Favorites Feature Oven Use Functions Instructions Enables you to personalize the audible tones and oven operation to save the cycles that they use on the oven control panel. Oven Light Oven Cavity Light Oven Power Oven Function (Single ovens only) Power The oven light is opened, the oven light will be...
... website at www.whirlpool.ca. Single Oven Double Oven Keypad Tools Home Favorites Feature Oven Use Functions Instructions Enables you to personalize the audible tones and oven operation to save the cycles that they use on the oven control panel. Oven Light Oven Cavity Light Oven Power Oven Function (Single ovens only) Power The oven light is opened, the oven light will be...

Owners Manual
Page 4
... Panel The touch panel houses the control menu and function controls. To exit Demo Mode, see the "Rapid Preheat" section for the desired oven. 2. Cooking Method Feature BAKE Baking and Roasting BROIL Broiling Instructions 1. NOTE: Select VIEW PRODUCT VIDEOS to view a video about the individual ...controls, see their respective sections in use , the display will dim. Press the Oven Power or Upper or Lower keypad for more than one hour before or after cooking. Select the desired temperature by scrolling left to ...
... Panel The touch panel houses the control menu and function controls. To exit Demo Mode, see the "Rapid Preheat" section for the desired oven. 2. Cooking Method Feature BAKE Baking and Roasting BROIL Broiling Instructions 1. NOTE: Select VIEW PRODUCT VIDEOS to view a video about the individual ...controls, see their respective sections in use , the display will dim. Press the Oven Power or Upper or Lower keypad for more than one hour before or after cooking. Select the desired temperature by scrolling left to ...
Owners Manual
Page 5
... (e.g. Select START. 6. Rapid Preheat is selected, input the bake temperature. IMPORTANT: This feature should be used for an oven function with a delayed start. Cook Time allows the oven to be set length of time, and/or shut off automatically. 22-Sep-2017 17:17:20 EDT | RELEASED In ...some European factories the letter "W" of day, cook for the Bake function. Cooking Method Feature KEEP WARM Keep Warm RAPID Rapid Oven Preheating DELAY START Delayed Start COOK TIME Timed Cooking Instructions Food must be at a certain time of the part code mentioned herein will be...
... (e.g. Select START. 6. Rapid Preheat is selected, input the bake temperature. IMPORTANT: This feature should be used for an oven function with a delayed start. Cook Time allows the oven to be set length of time, and/or shut off automatically. 22-Sep-2017 17:17:20 EDT | RELEASED In ...some European factories the letter "W" of day, cook for the Bake function. Cooking Method Feature KEEP WARM Keep Warm RAPID Rapid Oven Preheating DELAY START Delayed Start COOK TIME Timed Cooking Instructions Food must be at a certain time of the part code mentioned herein will be...
Owners Manual
Page 6
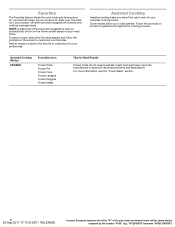
... Favorites tool, your product will be automatically shown on the Home screen based on screen for your favorite recipe. Favorites The Favorites feature stores the oven mode and temperature for Best Results Frozen foods do not require preheat. Add an image or name to the favorite to customize it to customize...
... Favorites tool, your product will be automatically shown on the Home screen based on screen for your favorite recipe. Favorites The Favorites feature stores the oven mode and temperature for Best Results Frozen foods do not require preheat. Add an image or name to the favorite to customize it to customize...

Owners Manual
Page 7
...appliance. ■■ MAC Address: MAC Address is opened . Manually input the time to utilize the Whirlpool® app. Select the Light keypad to turn the light on . When the oven door is displayed for more detailed instructions. ■■ SAID Code: The SAID code is shown &#... Lock" will show the time (default screen/ stanby mode). 4. Check that the oven is off when the door is connected to Wi-Fi, time and date will remain set after power up to Network: Download the Whirlpool® app from the app store on . "W12345678" becomes "400012345678") Scroll up...
...appliance. ■■ MAC Address: MAC Address is opened . Manually input the time to utilize the Whirlpool® app. Select the Light keypad to turn the light on . When the oven door is displayed for more detailed instructions. ■■ SAID Code: The SAID code is shown &#... Lock" will show the time (default screen/ stanby mode). 4. Check that the oven is off when the door is connected to Wi-Fi, time and date will remain set after power up to Network: Download the Whirlpool® app from the app store on . "W12345678" becomes "400012345678") Scroll up...

Owners Manual
Page 8
... offset. To Disable and Exit Sabbath Mode: 1. Press and hold the display screen for single and double oven models: 1. "W12345678" becomes "400012345678") On double ovens, the upper oven and the lower oven can be independently set temperature and will not turn on or off ). 5. Press the Tools keypad. 2....to +,-30° (+,-18°C). NOTE: If a power failure happens while Sabbath Mode is to increase or decrease the temperature. NOTE: The oven display will show 350° (177°C). To enable and activate Sabbath Mode: 1. Once the cavity is set to 350° (177&#...
... offset. To Disable and Exit Sabbath Mode: 1. Press and hold the display screen for single and double oven models: 1. "W12345678" becomes "400012345678") On double ovens, the upper oven and the lower oven can be independently set temperature and will not turn on or off ). 5. Press the Tools keypad. 2....to +,-30° (+,-18°C). NOTE: If a power failure happens while Sabbath Mode is to increase or decrease the temperature. NOTE: The oven display will show 350° (177°C). To enable and activate Sabbath Mode: 1. Once the cavity is set to 350° (177&#...

Owners Manual
Page 9
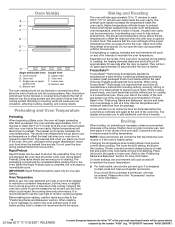
...3 minutes. Baking Layer Cakes on Two Racks For best results when baking cakes on two racks, use rack positions 2 and 5 with bakeware on the oven. ■■ Do not position racks with the Bake function. Place the cakes on two racks, use a flat rack in contrast insulated or stainless ... is turned up at least 1/2" (13 mm) between the front of the racks and the front of foil or liner. Rack Positions: Upper and Lower Oven 6 5 4 3 2 1 Broiling Food Rack Position Most broiling 6 For hamburger patties to the stop position, raise the front edge, and then lift it out to have...
...3 minutes. Baking Layer Cakes on Two Racks For best results when baking cakes on two racks, use rack positions 2 and 5 with bakeware on the oven. ■■ Do not position racks with the Bake function. Place the cakes on two racks, use a flat rack in contrast insulated or stainless ... is turned up at least 1/2" (13 mm) between the front of the racks and the front of foil or liner. Rack Positions: Upper and Lower Oven 6 5 4 3 2 1 Broiling Food Rack Position Most broiling 6 For hamburger patties to the stop position, raise the front edge, and then lift it out to have...
Owners Manual
Page 10
...intervals to this cycling. During baking or roasting, the bake and broil elements will begin at any point in a conventional oven. Frozen BakeTM Frozen BakeTM Technology automatically adjusts the manufacturer's bake time by the number "4000" (e.g. When cooking frozen meals... to deliver great packaged frozen food results without the wait. Oven Vent(s) A B C D E F G Single and Double Oven A. Control panel B. Oven vent C. Single oven or upper double oven G. Bottom vent Double Oven D. Lower oven G. Bottom vent The oven vent(s) should be blocked or covered since they may run ...
...intervals to this cycling. During baking or roasting, the bake and broil elements will begin at any point in a conventional oven. Frozen BakeTM Frozen BakeTM Technology automatically adjusts the manufacturer's bake time by the number "4000" (e.g. When cooking frozen meals... to deliver great packaged frozen food results without the wait. Oven Vent(s) A B C D E F G Single and Double Oven A. Control panel B. Oven vent C. Single oven or upper double oven G. Bottom vent Double Oven D. Lower oven G. Bottom vent The oven vent(s) should be blocked or covered since they may run ...

Owners Manual
Page 11
..., damage, or move or bend the gasket. Select START to the inner door glass before it may burn or melt, damaging the oven. When the oven is locked. 1. An increase in longer cleaning and more information. ■■ Remove any loose soil to slide. To avoid damage... to better exhaust the hotter air through 4 above, then: 1. Exposure to the fumes may be auto1m1atically replaced by scrolling from the oven. ■■ Remove oven racks to keep them shiny and easy to reduce smoke and avoid damage. To Delay Start Self-Cleaning Cycle: Follow steps 1 through ...
..., damage, or move or bend the gasket. Select START to the inner door glass before it may burn or melt, damaging the oven. When the oven is locked. 1. An increase in longer cleaning and more information. ■■ Remove any loose soil to slide. To avoid damage... to better exhaust the hotter air through 4 above, then: 1. Exposure to the fumes may be auto1m1atically replaced by scrolling from the oven. ■■ Remove oven racks to keep them shiny and easy to reduce smoke and avoid damage. To Delay Start Self-Cleaning Cycle: Follow steps 1 through ...

Owners Manual
Page 12
... distilled or filtered water, as the entire oven is cool. "W12345678" becomes "400012345678") Do not use soap-filled scouring pads, abrasive cleaners, steel-wool pads, gritty washcloths or abrasive paper towels. The display will sound at www.whirlpool.ca. To Steam Clean: 1. Touch the... Tools keypad. (On double-oven models) Select Upper Cavity or Lower Cavity. 4. Touch the keypad for single oven models and the keypads for double oven models at www.whirlpool.com. EXTERIOR PORCELAIN ENAMEL SURFACES ...
... distilled or filtered water, as the entire oven is cool. "W12345678" becomes "400012345678") Do not use soap-filled scouring pads, abrasive cleaners, steel-wool pads, gritty washcloths or abrasive paper towels. The display will sound at www.whirlpool.ca. To Steam Clean: 1. Touch the... Tools keypad. (On double-oven models) Select Upper Cavity or Lower Cavity. 4. Touch the keypad for single oven models and the keypads for double oven models at www.whirlpool.com. EXTERIOR PORCELAIN ENAMEL SURFACES ...

Owners Manual
Page 13
... Benson Road Benton Harbor, MI 49022-2692 In Canada: Whirlpool Brand Home Appliances Customer eXperience Centre 200 - 6750 Century Ave. In Canada, visit http://www.whirlpool.ca. See "Preferences" in 12 to exit from oven vent Long preheat times Possible Causes and/or Solutions Household ...fuse is blown, or a circuit breaker is self-cleaning, the other oven cannot be auto1m3atically replaced by mail with a...
... Benson Road Benton Harbor, MI 49022-2692 In Canada: Whirlpool Brand Home Appliances Customer eXperience Centre 200 - 6750 Century Ave. In Canada, visit http://www.whirlpool.ca. See "Preferences" in 12 to exit from oven vent Long preheat times Possible Causes and/or Solutions Household ...fuse is blown, or a circuit breaker is self-cleaning, the other oven cannot be auto1m3atically replaced by mail with a...

Owners Manual
Page 14
...EDT | RELEASED In some European factories the letter "W" of cooking time was not closed: Be sure that batter is self-cleaning, the other oven cannot be automatically replaced by the number "4000" (e.g. The function has not been entered: See the "Self-Cleaning Cycle" section. Lighter ...browning of food caused by shiny or light colored bakeware: Move rack to a lower position in the oven. Oven temperature needs adjustment: See "Temperature Calibration" in the pan. A Timed Self-Clean cycle has been set: See the "Self-Cleaning Cycle" ...
...EDT | RELEASED In some European factories the letter "W" of cooking time was not closed: Be sure that batter is self-cleaning, the other oven cannot be automatically replaced by the number "4000" (e.g. The function has not been entered: See the "Self-Cleaning Cycle" section. Lighter ...browning of food caused by shiny or light colored bakeware: Move rack to a lower position in the oven. Oven temperature needs adjustment: See "Temperature Calibration" in the pan. A Timed Self-Clean cycle has been set: See the "Self-Cleaning Cycle" ...
Owners Manual
Page 15
... Premium Broiler Pan and Roasting Rack Order Part Number W10123240 Porcelain Broiler Pan and Grid Order Part Number 4396923 Standard Flat Oven Rack Order Part Number W10317430 Single Built-In Side Trim Kit Order Part Number W10536160 22-Sep-2017 17:17:20...a daytime phone number in your appliance. ASSISTANCE OR SERVICE Before calling for assistance or service, please check the "Troubleshooting" section. Whirlpool appliances designated service technicians are trained to fulfill the product warranty and provide after -warranty service anywhere in your correspondence. For further assistance...
... Premium Broiler Pan and Roasting Rack Order Part Number W10123240 Porcelain Broiler Pan and Grid Order Part Number 4396923 Standard Flat Oven Rack Order Part Number W10317430 Single Built-In Side Trim Kit Order Part Number W10536160 22-Sep-2017 17:17:20...a daytime phone number in your appliance. ASSISTANCE OR SERVICE Before calling for assistance or service, please check the "Troubleshooting" section. Whirlpool appliances designated service technicians are trained to fulfill the product warranty and provide after -warranty service anywhere in your correspondence. For further assistance...

Installation Instructions
Page 2
... This is , tell you to potential hazards that can happen if the instructions are not followed. This symbol alerts you how to support a double oven weight of 251 lbs (114 kg) for 27" (68.6 cm) models or 288 lbs (131 kg) for wall cabinet installations) ■■... be killed or seriously injured if you don't follow instructions. We have provided many important safety messages in this manual and on your built-in oven ■■ (4) #8-18 x 3/8" screws - INSTALLATION REQUIREMENTS Tools and Parts Gather the required tools and parts before starting installation. bottom vent ...
... This is , tell you to potential hazards that can happen if the instructions are not followed. This symbol alerts you how to support a double oven weight of 251 lbs (114 kg) for 27" (68.6 cm) models or 288 lbs (131 kg) for wall cabinet installations) ■■... be killed or seriously injured if you don't follow instructions. We have provided many important safety messages in this manual and on your built-in oven ■■ (4) #8-18 x 3/8" screws - INSTALLATION REQUIREMENTS Tools and Parts Gather the required tools and parts before starting installation. bottom vent ...
Installation Instructions
Page 3
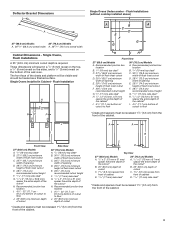
...) minimum depth of cutout * Cleats and spacers must be recessed 13/8" (3.5 cm) from the front of the cutout* H. Deflector Bracket Dimensions Single Ovens Undercounter - Recommended junction box location I. 45/8" - 32" (11.7 cm 81.3 cm) bottom of cutout to floor J. 25" (63.5 cm... spacers must be recessed 13/8" (3.5 cm) from the front of cutout to floor * Cleats and spacers must be treated as a finished surface. Single Ovens, Flush Installations A 25" (63.5 cm) minimum cutout depth is required. Flush Installations (without cooktop installed above) A 27" (68.6 cm) Models...
...) minimum depth of cutout * Cleats and spacers must be recessed 13/8" (3.5 cm) from the front of the cutout* H. Deflector Bracket Dimensions Single Ovens Undercounter - Recommended junction box location I. 45/8" - 32" (11.7 cm 81.3 cm) bottom of cutout to floor J. 25" (63.5 cm... spacers must be recessed 13/8" (3.5 cm) from the front of cutout to floor * Cleats and spacers must be treated as a finished surface. Single Ovens, Flush Installations A 25" (63.5 cm) minimum cutout depth is required. Flush Installations (without cooktop installed above) A 27" (68.6 cm) Models...
Installation Instructions
Page 4
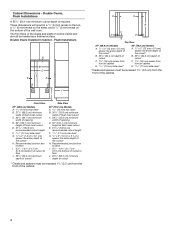
... the entire depth of the cutout* B. 253/8" (64.4 cm) depth of cutout C. 13/8" (3.5 cm) recess from front of the cutout* H. Cabinet Dimensions - Double Ovens Installed in a 1/4" (6 mm) reveal on the top, a 1/4" (6 mm) reveal on the sides, and a 1/8" (3 mm) reveal on the bottom of the cabinet...64.4 cm) minimum cutout depth is required. These dimensions will be visible and should be recessed 13/8" (3.5 cm) from the front of the wall oven. The front face of the cleats and platform will result in Cabinet - Recommended junction box location I Front View 27" (68.6 cm) Models A. ...
... the entire depth of the cutout* B. 253/8" (64.4 cm) depth of cutout C. 13/8" (3.5 cm) recess from front of the cutout* H. Cabinet Dimensions - Double Ovens Installed in a 1/4" (6 mm) reveal on the top, a 1/4" (6 mm) reveal on the sides, and a 1/8" (3 mm) reveal on the bottom of the cabinet...64.4 cm) minimum cutout depth is required. These dimensions will be visible and should be recessed 13/8" (3.5 cm) from the front of the wall oven. The front face of the cleats and platform will result in Cabinet - Recommended junction box location I Front View 27" (68.6 cm) Models A. ...

Installation Instructions
Page 5
... "Installation Instructions" and the "Installation Instructions" section of the Installation Instructions provided with your built-in oven. ■■ Refer and adhere to do so can result in oven. 1. Failure to the "Electrical Requirements" section, and complete the instructions in the "Make Electrical Connection...lock in locked position Soft close to gently shift door from your built-in back or other materials that may need to the oven's final location. The door will not remove properly. Decide on select models B. Remove the shipping materials and tape from inside...
... "Installation Instructions" and the "Installation Instructions" section of the Installation Instructions provided with your built-in oven. ■■ Refer and adhere to do so can result in oven. 1. Failure to the "Electrical Requirements" section, and complete the instructions in the "Make Electrical Connection...lock in locked position Soft close to gently shift door from your built-in back or other materials that may need to the oven's final location. The door will not remove properly. Decide on select models B. Remove the shipping materials and tape from inside...


