
Dimension Guide
Page 1
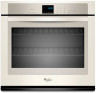
The model/serial number rating plate is located under the control panel on single ovens and under the control panel on the upper oven cavity on the model/serial number rating plate. Model/serial number plate A. See "Make Electrical Connection" section. q Flexible conduit from 7.3 to 9 kW at 240 volts (5.4 to 7.4 kW at 208 volts) require a separate 40-amp circuit. For power requirements for models WOS51EC7A, WOS51EC0A, WOD51EC7A, WOD51EC0A, WOS92EC7A, WOS92EC0A, WOD93EC7A, and WOD93EC0A, refer to the circuit breaker box (or fused disconnect) through flexible, armored...
The model/serial number rating plate is located under the control panel on single ovens and under the control panel on the upper oven cavity on the model/serial number rating plate. Model/serial number plate A. See "Make Electrical Connection" section. q Flexible conduit from 7.3 to 9 kW at 240 volts (5.4 to 7.4 kW at 208 volts) require a separate 40-amp circuit. For power requirements for models WOS51EC7A, WOS51EC0A, WOD51EC7A, WOD51EC0A, WOS92EC7A, WOS92EC0A, WOD93EC7A, and WOD93EC0A, refer to the circuit breaker box (or fused disconnect) through flexible, armored...

Installation Guide
Page 1
.../Table des matières BUILT-IN OVEN SAFETY 1 SÉCURITÉ DU FOUR ENCASTR 17 INSTALLATION REQUIREMENTS 2 Tools and Parts 2 Location Requirements 2 Electrical Requirements 5 INSTALLATION INSTRUCTIONS 6 Prepare Built-In Oven 6 Remove Oven Door 6 Positioning Oven Feet for local electrical inspector's use. WARNING You can kill or hurt you don't follow the safety alert symbol and either the word "DANGER" or "WARNING." W10351242B SIMPLE ET DOUBLE Table of others . This...
.../Table des matières BUILT-IN OVEN SAFETY 1 SÉCURITÉ DU FOUR ENCASTR 17 INSTALLATION REQUIREMENTS 2 Tools and Parts 2 Location Requirements 2 Electrical Requirements 5 INSTALLATION INSTRUCTIONS 6 Prepare Built-In Oven 6 Remove Oven Door 6 Positioning Oven Feet for local electrical inspector's use. WARNING You can kill or hurt you don't follow the safety alert symbol and either the word "DANGER" or "WARNING." W10351242B SIMPLE ET DOUBLE Table of others . This...

Installation Guide
Page 2
... 194°F (90°C). Refer to undercounter installation instructions for wall cabinet installations) ■ Level ■ Flat-blade screwdriver Parts needed ■ Phillips screwdriver ■ Measuring tape ■ Hand or electric drill (for wall cabinet installations) ■ 1" (2.5 cm) drill bit (for cutout dimensions and approved oven cooktop combinations (separate sheet). 2 Tools needed ■ UL listed or CSA approved conduit connector ■ UL listed wire connectors Parts supplied ■ #8-14 x 1" screws - NOTE: For...
... 194°F (90°C). Refer to undercounter installation instructions for wall cabinet installations) ■ Level ■ Flat-blade screwdriver Parts needed ■ Phillips screwdriver ■ Measuring tape ■ Hand or electric drill (for wall cabinet installations) ■ 1" (2.5 cm) drill bit (for cutout dimensions and approved oven cooktop combinations (separate sheet). 2 Tools needed ■ UL listed or CSA approved conduit connector ■ UL listed wire connectors Parts supplied ■ #8-14 x 1" screws - NOTE: For...

Installation Guide
Page 5
... be obtained from the oven should be connected to the circuit breaker box (or fused disconnect) through flexible, armored or nonmetallic sheathed, copper cable (with grounding wire). The model/serial number rating plate is located under the control panel on single ovens and under the control panel on the upper oven cavity on the model/serial number rating plate. See the following table. Model/serial number plate ■ Models rated from 7.3 to 9 kW at 208 volts) require a separate 40-amp circuit. A A 208 VAC 240...
... be obtained from the oven should be connected to the circuit breaker box (or fused disconnect) through flexible, armored or nonmetallic sheathed, copper cable (with grounding wire). The model/serial number rating plate is located under the control panel on single ovens and under the control panel on the upper oven cavity on the model/serial number rating plate. See the following table. Model/serial number plate ■ Models rated from 7.3 to 9 kW at 208 volts) require a separate 40-amp circuit. A A 208 VAC 240...

Installation Guide
Page 6
... front frame for the oven. Do not use handle or any portion of the oven door, and rotate the latches forward to do so can result in the cabinet, the top edge of the control panel. NOTE: When the cooktop is positioned against the cabinet face. Oven door latch in locked position B. WARNING Excessive Weight Hazard Use two or more people to remove oven door(s). 1. Remove and set the oven onto cardboard prior...
... front frame for the oven. Do not use handle or any portion of the oven door, and rotate the latches forward to do so can result in the cabinet, the top edge of the control panel. NOTE: When the cooktop is positioned against the cabinet face. Oven door latch in locked position B. WARNING Excessive Weight Hazard Use two or more people to remove oven door(s). 1. Remove and set the oven onto cardboard prior...

Installation Guide
Page 13
...; Using one #8-18 x ¹⁄₄" screw is free to the locked position. 12. If it is not, repeat the removal and installation procedures. A B E D C A. Repeat for lower oven door. 14. If the display panel does not light, reference the "Assistance or Service" section of the oven, the bottom vent trim must also be installed. Vent tab C. Bottom vent trim E. #8-18 x ³⁄₈" screw 13 See the following instructions...
...; Using one #8-18 x ¹⁄₄" screw is free to the locked position. 12. If it is not, repeat the removal and installation procedures. A B E D C A. Repeat for lower oven door. 14. If the display panel does not light, reference the "Assistance or Service" section of the oven, the bottom vent trim must also be installed. Vent tab C. Bottom vent trim E. #8-18 x ³⁄₈" screw 13 See the following instructions...

Installation Guide
Page 14
.... 2. For oven use , set up the clock and any other preferences if available. Press START. Turn power on double oven models. 4. Set the temperature. ■ See "Troubleshooting" section in oven. 14 NOTE: Press UPPER BROIL or LOWER BROIL on . 2. If you need Assistance or Service: Please reference the "Assistance or Service" section of the Use and Care Guide or contact the dealer from whom you do not feel for heat. Press BROIL on single ovens. If...
.... 2. For oven use , set up the clock and any other preferences if available. Press START. Turn power on double oven models. 4. Set the temperature. ■ See "Troubleshooting" section in oven. 14 NOTE: Press UPPER BROIL or LOWER BROIL on . 2. If you need Assistance or Service: Please reference the "Assistance or Service" section of the Use and Care Guide or contact the dealer from whom you do not feel for heat. Press BROIL on single ovens. If...

Energy Guide
Page 2
...'t follow instructions. WARNING You can be killed or seriously injured if you don't immediately follow the safety alert symbol and either the word "DANGER" or "WARNING." Always read and obey all safety messages. TABLE OF CONTENTS OVEN SAFETY 2 PARTS AND FEATURES 4 ELECTRONIC OVEN CONTROLS 5 Display 5 Cancel 5 Oven Lights 5 Timer 5 Settings 6 Oven Temperature Control 7 Control Lockout 7 OVEN USE 8 Aluminum Foil 8 Positioning Racks and Bakeware 8 Bakeware 9 Meat Thermometer 9 Oven Vent(s 9 Baking 10 Broiling 10 Convection Cooking -
...'t follow instructions. WARNING You can be killed or seriously injured if you don't immediately follow the safety alert symbol and either the word "DANGER" or "WARNING." Always read and obey all safety messages. TABLE OF CONTENTS OVEN SAFETY 2 PARTS AND FEATURES 4 ELECTRONIC OVEN CONTROLS 5 Display 5 Cancel 5 Oven Lights 5 Timer 5 Settings 6 Oven Temperature Control 7 Control Lockout 7 OVEN USE 8 Aluminum Foil 8 Positioning Racks and Bakeware 8 Bakeware 9 Meat Thermometer 9 Oven Vent(s 9 Baking 10 Broiling 10 Convection Cooking -

Energy Guide
Page 3
... touch, or let clothing or other flammable materials contact heating elements or interior surfaces of oven until they are oven vent openings and surfaces near these surfaces are dark in Manual. ■ Before Self-Cleaning the Oven - Remove broiler pan and other reproductive harm. 3 SAVE THESE INSTRUCTIONS State of California Proposition 65 Warnings: WARNING: This product contains one or more chemicals known to the State of...
... touch, or let clothing or other flammable materials contact heating elements or interior surfaces of oven until they are oven vent openings and surfaces near these surfaces are dark in Manual. ■ Before Self-Cleaning the Oven - Remove broiler pan and other reproductive harm. 3 SAVE THESE INSTRUCTIONS State of California Proposition 65 Warnings: WARNING: This product contains one or more chemicals known to the State of...
Energy Guide
Page 8
IMPORTANT: The health of some models) FUNCTION NUMBER OF RACK RACKS USED POSITION(S) Convection baking 3 1, 3 and 5 Convection baking 2 2 and 5 Convection baking 1 3 Convection roasting (small 1 2 cuts of meat) Convection roasting (large 1 1 cuts of meat and poultry: 1 Rack positions and pan placement for 30" (76.2 cm) and 27" (68.6 cm) Convection and Non-Convection ovens 1-rack baking: 3 2-rack baking in single or upper oven: 2 and 5 Most 2-rack baking in lower oven: 2 and 5 Roasting small cuts of meat and poultry: 2 Roasting large cuts of meat) For best results when ...
IMPORTANT: The health of some models) FUNCTION NUMBER OF RACK RACKS USED POSITION(S) Convection baking 3 1, 3 and 5 Convection baking 2 2 and 5 Convection baking 1 3 Convection roasting (small 1 2 cuts of meat) Convection roasting (large 1 1 cuts of meat and poultry: 1 Rack positions and pan placement for 30" (76.2 cm) and 27" (68.6 cm) Convection and Non-Convection ovens 1-rack baking: 3 2-rack baking in single or upper oven: 2 and 5 Most 2-rack baking in lower oven: 2 and 5 Roasting small cuts of meat and poultry: 2 Roasting large cuts of meat) For best results when ...

Energy Guide
Page 9
... reduce baking temperatures slightly. Upper oven E. A B C D E F G Single and Double Oven A. Oven vent F. Blocking or covering vents will cause poor air circulation, affecting cooking, cleaning and cooling results. 9 Also, the bottom vent should be blocked or covered since they allow the inlet of oven. ■ May need to increase baking time. ■ Little or no bottom browning Stainless steel ■ Light, golden crusts ■ Uneven browning ■ May need to increase baking time. Meat Thermometer Use a meat...
... reduce baking temperatures slightly. Upper oven E. A B C D E F G Single and Double Oven A. Oven vent F. Blocking or covering vents will cause poor air circulation, affecting cooking, cleaning and cooling results. 9 Also, the bottom vent should be blocked or covered since they allow the inlet of oven. ■ May need to increase baking time. ■ Little or no bottom browning Stainless steel ■ Light, golden crusts ■ Uneven browning ■ May need to increase baking time. Meat Thermometer Use a meat...
Energy Guide
Page 10
... delay the beginning of the oven rack. "Broil" scrolls in the center of the cooking cycle. Remove food from the oven. Press BAKE for the selected oven. Set Cooking Time is done. 6. After pressing START the oven will preheat and it in the selected oven text area. Broiling Broiling uses direct radiant heat to enter the desired cook time. Position food on grid in the broiler pan, then place it will be ordered. To Broil: 1. The temperature...
... delay the beginning of the oven rack. "Broil" scrolls in the center of the cooking cycle. Remove food from the oven. Press BAKE for the selected oven. Set Cooking Time is done. 6. After pressing START the oven will preheat and it in the selected oven text area. Broiling Broiling uses direct radiant heat to enter the desired cook time. Position food on grid in the broiler pan, then place it will be ordered. To Broil: 1. The temperature...
Energy Guide
Page 12
... using Convect Broil. "CONVECT ROAST" and "Press Again or START" will scroll in the text area. 2. Convection Recipe (on some models) Use Convect Bake for single or multiple rack baking. Press CONVECT to 550°F (288°C). 5. If a cooking time was not set from the oven. Changing the temperature once food is cooking by pressing START during the preheating. 7. "Press START" will prompt you to preheat the oven for the selected oven when finished. 9. The oven door must be set , the oven...
... using Convect Broil. "CONVECT ROAST" and "Press Again or START" will scroll in the text area. 2. Convection Recipe (on some models) Use Convect Bake for single or multiple rack baking. Press CONVECT to 550°F (288°C). 5. If a cooking time was not set from the oven. Changing the temperature once food is cooking by pressing START during the preheating. 7. "Press START" will prompt you to preheat the oven for the selected oven when finished. 9. The oven door must be set , the oven...
Energy Guide
Page 13
... be displayed when the oven starts heating. Place food in the active Sabbath Mode, the oven light will scroll in the oven during Sabbath Mode, the upper text area will continuously scroll "Sabbath Mode- Automatic Shutoff/Sabbath Mode The oven control is set to automatically shut off by using the Set Start Time function. 8. On holidays to enter the desired temperature. Press the number pad for 450°F." To Adjust Temperature (when Sabbath Mode is in the warmed oven. If a Power Failure...
... be displayed when the oven starts heating. Place food in the active Sabbath Mode, the oven light will scroll in the oven during Sabbath Mode, the upper text area will continuously scroll "Sabbath Mode- Automatic Shutoff/Sabbath Mode The oven control is set to automatically shut off by using the Set Start Time function. 8. On holidays to enter the desired temperature. Press the number pad for 450°F." To Adjust Temperature (when Sabbath Mode is in the warmed oven. If a Power Failure...

Energy Guide
Page 14
... completely cooled. Suggested clean times are 3 hours for light soil and between 4 hours and 5 hours for Steam Clean" will be able to room temperature before it becomes heavily soiled. Press CLEAN MODES. 3. Prepare Oven: ■ Remove the broiler pan, grid, cookware and bakeware and, on steel in the oven may result in the display, the door cannot be changed. Depending on door frame. To Self-Clean: 1. See "General Cleaning" section for...
... completely cooled. Suggested clean times are 3 hours for light soil and between 4 hours and 5 hours for Steam Clean" will be able to room temperature before it becomes heavily soiled. Press CLEAN MODES. 3. Prepare Oven: ■ Remove the broiler pan, grid, cookware and bakeware and, on steel in the oven may result in the display, the door cannot be changed. Depending on door frame. To Self-Clean: 1. See "General Cleaning" section for...

Energy Guide
Page 15
... controls are suggested first unless otherwise noted. Press CLEAN MODES. 3. Press 1 or 2 to end the cycle. "REMOVE RACKS" will appear in the upper display area. General Cleaning IMPORTANT: Before cleaning, make sure all racks and accessories from the oven door interior, oven cavity interior sides, and cooktop. ■ Use a soft brush or nylon scrubber to eliminate most of grain to avoid touch screen activation during the Steam Clean cycle. Cleaning...
... controls are suggested first unless otherwise noted. Press CLEAN MODES. 3. Press 1 or 2 to end the cycle. "REMOVE RACKS" will appear in the upper display area. General Cleaning IMPORTANT: Before cleaning, make sure all racks and accessories from the oven door interior, oven cavity interior sides, and cooktop. ■ Use a soft brush or nylon scrubber to eliminate most of grain to avoid touch screen activation during the Steam Clean cycle. Cleaning...
Energy Guide
Page 16
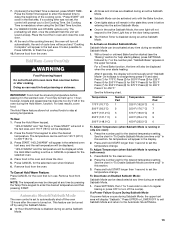
... avoid oven door glass breakage: ■ Do not close . Open the oven door. Before replacing, make sure the oven is a standard 25-watt appliance bulb. To Replace: 1. To Remove: 1. Close the oven door as far as the door is set objects on each side. 3. Disconnect power. 2. Turn bulb counterclockwise to remove. However, if removal is not, repeat the removal and installation procedures. 16 OVEN RACKS Cleaning Method: ■ Self-Clean cycle: See "Self-Cleaning Cycle" section first. Turn the glass bulb cover in...
... avoid oven door glass breakage: ■ Do not close . Open the oven door. Before replacing, make sure the oven is a standard 25-watt appliance bulb. To Replace: 1. To Remove: 1. Close the oven door as far as the door is set objects on each side. 3. Disconnect power. 2. Turn bulb counterclockwise to remove. However, if removal is not, repeat the removal and installation procedures. 16 OVEN RACKS Cleaning Method: ■ Self-Clean cycle: See "Self-Cleaning Cycle" section first. Turn the glass bulb cover in...

Energy Guide
Page 17
... oven temperature calibration set ? Check that batter is the oven control lockout set? Clear the display. Oven cooking results not what expected ■ Is the proper temperature set ? See "Bakeware" section. ■ Are the racks positioned properly? Replace the fuse or reset the circuit breaker. See "Electronic Oven Controls" section. ■ On some models, has a delay start Self-Clean cycle been set correctly? See "Display(s)" section. If it reappears, call for the fan to clear the display. Close the oven door...
... oven temperature calibration set ? Check that batter is the oven control lockout set? Clear the display. Oven cooking results not what expected ■ Is the proper temperature set ? See "Bakeware" section. ■ Are the racks positioned properly? Replace the fuse or reset the circuit breaker. See "Electronic Oven Controls" section. ■ On some models, has a delay start Self-Clean cycle been set correctly? See "Display(s)" section. If it reappears, call for the fan to clear the display. Close the oven door...

Energy Guide
Page 19
... installation of your major appliance, to instruct you may find this information on the model and serial number label located on how to use of consumables or cleaning products not approved by an authorized Whirlpool servicer is void if the factory applied serial number has been altered or removed from your major appliance. The cost of repair or replacement under this limited warranty. Dealer name Address Phone number Model number Serial number...
... installation of your major appliance, to instruct you may find this information on the model and serial number label located on how to use of consumables or cleaning products not approved by an authorized Whirlpool servicer is void if the factory applied serial number has been altered or removed from your major appliance. The cost of repair or replacement under this limited warranty. Dealer name Address Phone number Model number Serial number...
Warranty Information
Page 1
... defects in accordance with the product, Whirlpool Corporation or Whirlpool Canada LP (hereafter "Whirlpool") will need service, first see the "Troubleshooting" section of the Use & Care Guide. Consumable parts are excluded from your home of your major appliance for other damage to the finish of your complete model number and serial number. Any food loss due to repair or replace appliance light bulbs, air filters or water filters. This major appliance is...
... defects in accordance with the product, Whirlpool Corporation or Whirlpool Canada LP (hereafter "Whirlpool") will need service, first see the "Troubleshooting" section of the Use & Care Guide. Consumable parts are excluded from your home of your major appliance for other damage to the finish of your complete model number and serial number. Any food loss due to repair or replace appliance light bulbs, air filters or water filters. This major appliance is...


