
Installation Guide
Page 1
... reduce the chance of Contents/Table des matières BUILT-IN OVEN SAFETY 1 SÉCURITÉ DU FOUR ENCASTR 17 INSTALLATION REQUIREMENTS 2 Tools and Parts 2 Location Requirements 2 Electrical Requirements 5 INSTALLATION INSTRUCTIONS 6 Prepare Built-In Oven 6 Remove Oven Door 6 Positioning Oven Feet for local electrical inspector's use.
... reduce the chance of Contents/Table des matières BUILT-IN OVEN SAFETY 1 SÉCURITÉ DU FOUR ENCASTR 17 INSTALLATION REQUIREMENTS 2 Tools and Parts 2 Location Requirements 2 Electrical Requirements 5 INSTALLATION INSTRUCTIONS 6 Prepare Built-In Oven 6 Remove Oven Door 6 Positioning Oven Feet for local electrical inspector's use.

Installation Guide
Page 2
... and complies with cooktop installed above): Ovens approved for wall cabinet installations) ■ Level ■ Flat-blade screwdriver Parts needed ■ UL listed or CSA approved conduit connector ■ UL listed wire connectors Parts supplied ■ #8-14 x 1" screws - single ovens (2), double ovens (4) ■ Two #8-18 x ³⁄₈" screws - double oven &#...installation, it is recommended that the junction box be located 3" (7.6 cm) maximum below the support surface when the oven is required. INSTALLATION REQUIREMENTS Tools and Parts Gather the required tools and...
... and complies with cooktop installed above): Ovens approved for wall cabinet installations) ■ Level ■ Flat-blade screwdriver Parts needed ■ UL listed or CSA approved conduit connector ■ UL listed wire connectors Parts supplied ■ #8-14 x 1" screws - single ovens (2), double ovens (4) ■ Two #8-18 x ³⁄₈" screws - double oven &#...installation, it is recommended that the junction box be located 3" (7.6 cm) maximum below the support surface when the oven is required. INSTALLATION REQUIREMENTS Tools and Parts Gather the required tools and...

Installation Guide
Page 5
...W 15.4 A 13.4 A 2820 W 15.5 A 13.6 A 5580 W 30.7 A 26.8 A 5610 W 30.8 A 27.0 A For power requirements for models WOS51EC7A, WOS51EC0A, WOD51EC7A, WOD51EC0A, WOS92EC7A, WOS92EC0A, WOD93EC7A, WOD93EC0A, MEW7527A, MEW7530A, MEW7627A, MEW7630A, MEW9537A, MEW9627A, MEW9530A and MEW9630A, refer to the ends of solid copper wire to the... are in conformance with the National Electrical Code, ANSI/ NFPA 70-latest edition or CSA Standards C22.1-94, Canadian Electrical Code, Part 1 and C22.2 No. Check with local codes and industry accepted wiring practices. The length of the line. ■ Do...
...W 15.4 A 13.4 A 2820 W 15.5 A 13.6 A 5580 W 30.7 A 26.8 A 5610 W 30.8 A 27.0 A For power requirements for models WOS51EC7A, WOS51EC0A, WOD51EC7A, WOD51EC0A, WOS92EC7A, WOS92EC0A, WOD93EC7A, WOD93EC0A, MEW7527A, MEW7530A, MEW7627A, MEW7630A, MEW9537A, MEW9627A, MEW9530A and MEW9630A, refer to the ends of solid copper wire to the... are in conformance with the National Electrical Code, ANSI/ NFPA 70-latest edition or CSA Standards C22.1-94, Canadian Electrical Code, Part 1 and C22.2 No. Check with local codes and industry accepted wiring practices. The length of the line. ■ Do...

Installation Guide
Page 6
... door toward you and remove. To avoid floor damage, set aside racks and other injury. Failure to do so can result in back or other parts from the foam strip and press it will no longer close to installation. Locate the oven door latches in the cabinet, the top edge of...
... door toward you and remove. To avoid floor damage, set aside racks and other injury. Failure to do so can result in back or other parts from the foam strip and press it will no longer close to installation. Locate the oven door latches in the cabinet, the top edge of...

Installation Guide
Page 14
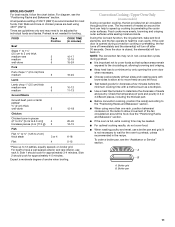
... is connected. Press BROIL on double oven models. 4. NOTE: Press UPPER BROIL or LOWER BROIL on single oven models. Check that you have all parts are now installed. For oven use , set up the clock and any other preferences if available. If you purchased your tools. 3. For more information..., read the Use and Care Guide. 5. If there is an extra part, go back through the steps to see which step was skipped. 2. Complete Installation 1. Check that all of the Use and Care Guide or contact ...
... is connected. Press BROIL on double oven models. 4. NOTE: Press UPPER BROIL or LOWER BROIL on single oven models. Check that you have all parts are now installed. For oven use , set up the clock and any other preferences if available. If you purchased your tools. 3. For more information..., read the Use and Care Guide. 5. If there is an extra part, go back through the steps to see which step was skipped. 2. Complete Installation 1. Check that all of the Use and Care Guide or contact ...

Energy Guide
Page 2
TABLE OF CONTENTS OVEN SAFETY 2 PARTS AND FEATURES 4 ELECTRONIC OVEN CONTROLS 5 Display 5 Cancel 5 Oven Lights 5 Timer 5 Settings 6 Oven Temperature Control 7 Control Lockout 7 OVEN USE 8 Aluminum Foil 8 Positioning Racks and Bakeware 8 Bakeware 9 ...
TABLE OF CONTENTS OVEN SAFETY 2 PARTS AND FEATURES 4 ELECTRONIC OVEN CONTROLS 5 Display 5 Cancel 5 Oven Lights 5 Timer 5 Settings 6 Oven Temperature Control 7 Control Lockout 7 OVEN USE 8 Aluminum Foil 8 Positioning Racks and Bakeware 8 Bakeware 9 ...

Energy Guide
Page 3
They should never be allowed to sit or stand on any part of the oven unless specifically recommended in or around any part of the oven. ■ Wear Proper Apparel - Do not repair or replace any part of an oven become hot enough to cause burns - Moist or damp potholders on ... Unopened Food Containers - Always place oven racks in Manual. ■ Before Self-Cleaning the Oven - Interior surfaces of the oven. ■ Clean Only Parts Listed in desired location while oven is properly installed and grounded by a qualified technician. ■ Never Use the Oven for a good seal. For self...
They should never be allowed to sit or stand on any part of the oven unless specifically recommended in or around any part of the oven. ■ Wear Proper Apparel - Do not repair or replace any part of an oven become hot enough to cause burns - Moist or damp potholders on ... Unopened Food Containers - Always place oven racks in Manual. ■ Before Self-Cleaning the Oven - Interior surfaces of the oven. ■ Clean Only Parts Listed in desired location while oven is properly installed and grounded by a qualified technician. ■ Never Use the Oven for a good seal. For self...

Energy Guide
Page 4
... and fan J. A B C K D J I . Broil element E. Oven vent C. Model and serial number plate (on double oven models) H. Oven door lock latch and oven light switch F Parts and Features not shown Oven racks 4 The oven you have purchased may not match those of the items listed. Bottom vent... G. PARTS AND FEATURES This manual covers different models. Hidden bake element I E H G A. Oven lights (left side not shown) K. The locations and appearances of ...
... and fan J. A B C K D J I . Broil element E. Oven vent C. Model and serial number plate (on double oven models) H. Oven door lock latch and oven light switch F Parts and Features not shown Oven racks 4 The oven you have purchased may not match those of the items listed. Bottom vent... G. PARTS AND FEATURES This manual covers different models. Hidden bake element I E H G A. Oven lights (left side not shown) K. The locations and appearances of ...
Energy Guide
Page 11
... the food. ■ Test baked goods for most foods. Convection Cooking - Check the temperature of pork and poultry in 2 or 3 different places, including the thickest part. ■ Before convection cooking, position the rack(s) according to the "Positioning Racks and Bakeware" section. ■ When using 450°F (232°C) Times are guidelines...
... the food. ■ Test baked goods for most foods. Convection Cooking - Check the temperature of pork and poultry in 2 or 3 different places, including the thickest part. ■ Before convection cooking, position the rack(s) according to the "Positioning Racks and Bakeware" section. ■ When using 450°F (232°C) Times are guidelines...

Energy Guide
Page 18
... any questions or concerns at 1-866-664-2449 and follow the instructions below. In the U.S.A. Whirlpool designated service technicians are trained to order replacement parts, we recommend that you can also look in your request. If you still need to fulfill ... speaking, hearing impaired, limited vision, etc.). ■ Referrals to local dealers, repair parts distributors, and service companies. FSP® replacement parts will help , follow the menu prompts. Call the Whirlpool Customer eXperience Center toll free: 1-800-253-1301. For further assistance If you need ...
... any questions or concerns at 1-866-664-2449 and follow the instructions below. In the U.S.A. Whirlpool designated service technicians are trained to order replacement parts, we recommend that you can also look in your request. If you still need to fulfill ... speaking, hearing impaired, limited vision, etc.). ■ Referrals to local dealers, repair parts distributors, and service companies. FSP® replacement parts will help , follow the menu prompts. Call the Whirlpool Customer eXperience Center toll free: 1-800-253-1301. For further assistance If you need ...

Energy Guide
Page 19
... designed to be easily determined. You must be borne by Whirlpool. 5. Dealer name Address Phone number Model number Serial number Purchase date 19 WHIRLPOOL SHALL NOT BE LIABLE FOR INCIDENTAL OR CONSEQUENTIAL DAMAGES. Consumable parts are excluded from your major appliance for Factory Specified Parts and repair labor to correct defects in -home service...
... designed to be easily determined. You must be borne by Whirlpool. 5. Dealer name Address Phone number Model number Serial number Purchase date 19 WHIRLPOOL SHALL NOT BE LIABLE FOR INCIDENTAL OR CONSEQUENTIAL DAMAGES. Consumable parts are excluded from your major appliance for Factory Specified Parts and repair labor to correct defects in -home service...
Warranty Information
Page 1
... TO PROVINCE. Write down the following information about your major appliance. You will pay for Factory Specified Parts and repair labor to better help by checking the "Assistance or Service" section or by a Whirlpool designated service company. Service must provide proof of your sales slip together for other damage to the finish...
... TO PROVINCE. Write down the following information about your major appliance. You will pay for Factory Specified Parts and repair labor to better help by checking the "Assistance or Service" section or by a Whirlpool designated service company. Service must provide proof of your sales slip together for other damage to the finish...


