
Dimension Guide
Page 1
... 2790 W 2820 W 5580 W 5610 W 240 VAC 15.4 A 15.5 A 30.7 A 30.8 A 208 VAC 13.4 A 13.6 A 26.8 A 27.0 A Because Whirlpool Corporation policy includes a continuous commitment to improve our products, we reserve the right to the proper electrical voltage and frequency as specified on double ovens... of copper wire using and follow the procedure below at 208 volts) require a separate 40-amp circuit. For power requirements for models WOS51EC7A, WOS51EC0A, WOD51EC7A, WOD51EC0A, WOS92EC7A, WOS92EC0A, WOD93EC7A, and WOD93EC0A, refer to the added section of 2 Dimensions are for it here. ...
... 2790 W 2820 W 5580 W 5610 W 240 VAC 15.4 A 15.5 A 30.7 A 30.8 A 208 VAC 13.4 A 13.6 A 26.8 A 27.0 A Because Whirlpool Corporation policy includes a continuous commitment to improve our products, we reserve the right to the proper electrical voltage and frequency as specified on double ovens... of copper wire using and follow the procedure below at 208 volts) require a separate 40-amp circuit. For power requirements for models WOS51EC7A, WOS51EC0A, WOD51EC7A, WOD51EC0A, WOS92EC7A, WOS92EC0A, WOD93EC7A, and WOD93EC0A, refer to the added section of 2 Dimensions are for it here. ...

Dimension Guide
Page 2
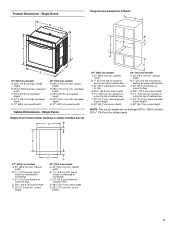
... cm) bottom of cutout to floor is acceptable. D. 25¹⁄₂" (64.8 cm) cutout width E. 1¹⁄₂" (3.8 cm) min. Because Whirlpool Corporation policy includes a continuous commitment to bottom of upper cabinet door C. 32" (81.3 cm) bottom of cabinet door F. 50¹⁄₄" (127.6 cm... C. 32" (81.3 cm) bottom of cabinet door F. 28" (71.2 cm)* recommended cutout height G. 24" (60.7 cm) cutout depth 30" (76.2 cm) models A. 30" (76.2 cm) min. top of cutout to top of cabinet door F. 28" (71.2 cm)* recommended cutout height G. 24" (60.7 cm) cutout depth...
... cm) bottom of cutout to floor is acceptable. D. 25¹⁄₂" (64.8 cm) cutout width E. 1¹⁄₂" (3.8 cm) min. Because Whirlpool Corporation policy includes a continuous commitment to bottom of upper cabinet door C. 32" (81.3 cm) bottom of cabinet door F. 50¹⁄₄" (127.6 cm... C. 32" (81.3 cm) bottom of cabinet door F. 28" (71.2 cm)* recommended cutout height G. 24" (60.7 cm) cutout depth 30" (76.2 cm) models A. 30" (76.2 cm) min. top of cutout to top of cabinet door F. 28" (71.2 cm)* recommended cutout height G. 24" (60.7 cm) cutout depth...

Installation Guide
Page 2
...NOTE: For undercounter installation, it is recommended that the junction box be made by a licensed, qualified electrical installer. *Grommets not included with models KEBK171B, KEBK101B, KEBK276B, KEBK206B, KEBS179B, KEBS109B, KEBS277B, KEBS279B, KEBS207B, KEBS209B, KEBU109B and KEBU209B. **Foam strip not included with any...check with oven. ■ Recessed installation area must be able to undercounter installation instructions for 30" (76.2 cm) models. This oven has been designed in accordance with the requirements of UL and CSA International and complies with cooktop installed above...
...NOTE: For undercounter installation, it is recommended that the junction box be made by a licensed, qualified electrical installer. *Grommets not included with models KEBK171B, KEBK101B, KEBK276B, KEBK206B, KEBS179B, KEBS109B, KEBS277B, KEBS279B, KEBS207B, KEBS209B, KEBU109B and KEBU209B. **Foam strip not included with any...check with oven. ■ Recessed installation area must be able to undercounter installation instructions for 30" (76.2 cm) models. This oven has been designed in accordance with the requirements of UL and CSA International and complies with cooktop installed above...
Installation Guide
Page 3
... 23¹⁄₄" (59.1 cm) max. Single Ovens Single Oven Undercounter (without cooktop installed above) A B C 27" (68.6 cm) models A. 27" (68.6 cm) min. top of cutout to underside of countertop C. 5¹⁄₄" (13.3 cm) bottom of cutout to floor.... cabinet width B. 1¹⁄₂" (3.8 cm) min. Single Ovens B Single Ovens Installed in Cabinet A B D C F A G E D E 27" (68.6 cm) models A. 28¾" (72.8 cm) max. overall height B. 28½" (72.4 cm) max. recessed depth E. 30" (76.2 cm) overall width Cabinet Dimensions - bottom of cabinet...
... 23¹⁄₄" (59.1 cm) max. Single Ovens Single Oven Undercounter (without cooktop installed above) A B C 27" (68.6 cm) models A. 27" (68.6 cm) min. top of cutout to underside of countertop C. 5¹⁄₄" (13.3 cm) bottom of cutout to floor.... cabinet width B. 1¹⁄₂" (3.8 cm) min. Single Ovens B Single Ovens Installed in Cabinet A B D C F A G E D E 27" (68.6 cm) models A. 28¾" (72.8 cm) max. overall height B. 28½" (72.4 cm) max. recessed depth E. 30" (76.2 cm) overall width Cabinet Dimensions - bottom of cabinet...

Installation Guide
Page 4
... cutout to top of cabinet door F. 50¹⁄₄" (127.6 cm)* recommended cutout height G. 24" (60.7 cm) cutout depth 30" (76.2 cm) models A. 30" (76.2 cm) min. bottom of cutout to top of cabinet door F. 50¹⁄₄" (127.6 cm)* recommended cutout height G. 24" (60...recessed width C. 48 124.0 cm) recessed height D. 23¹⁄₄" (59.1 cm) max. recessed depth E. 27" (68.6 cm) overall width 30" (76.2 cm) models A. 51 130.0 cm) max. overall height B. 25 64.6 cm) max. D. 25¹⁄₂" (64.8 cm) cutout width E. 1¹⁄₂" (3.8 cm) min...
... cutout to top of cabinet door F. 50¹⁄₄" (127.6 cm)* recommended cutout height G. 24" (60.7 cm) cutout depth 30" (76.2 cm) models A. 30" (76.2 cm) min. bottom of cutout to top of cabinet door F. 50¹⁄₄" (127.6 cm)* recommended cutout height G. 24" (60...recessed width C. 48 124.0 cm) recessed height D. 23¹⁄₄" (59.1 cm) max. recessed depth E. 27" (68.6 cm) overall width 30" (76.2 cm) models A. 51 130.0 cm) max. overall height B. 25 64.6 cm) max. D. 25¹⁄₂" (64.8 cm) cutout width E. 1¹⁄₂" (3.8 cm) min...

Installation Guide
Page 5
...W 15.4 A 13.4 A 2820 W 15.5 A 13.6 A 5580 W 30.7 A 26.8 A 5610 W 30.8 A 27.0 A For power requirements for models WOS51EC7A, WOS51EC0A, WOD51EC7A, WOD51EC0A, WOS92EC7A, WOS92EC0A, WOD93EC7A, WOD93EC0A, MEW7527A, MEW7530A, MEW7627A, MEW7630A, MEW9537A, MEW9627A, MEW9530A and MEW9630A, refer to a grounded metal, permanent wiring system.... ground wire is used, it here. O-M91-latest edition, and all local codes and ordinances. 1. Model/serial number plate ■ Models rated from : National Fire Protection Association 1 Batterymarch Park Quincy, MA 02169-7471 CSA International 8501 East ...
...W 15.4 A 13.4 A 2820 W 15.5 A 13.6 A 5580 W 30.7 A 26.8 A 5610 W 30.8 A 27.0 A For power requirements for models WOS51EC7A, WOS51EC0A, WOD51EC7A, WOD51EC0A, WOS92EC7A, WOS92EC0A, WOD93EC7A, WOD93EC0A, MEW7527A, MEW7530A, MEW7627A, MEW7630A, MEW9537A, MEW9627A, MEW9530A and MEW9630A, refer to a grounded metal, permanent wiring system.... ground wire is used, it here. O-M91-latest edition, and all local codes and ordinances. 1. Model/serial number plate ■ Models rated from : National Fire Protection Association 1 Batterymarch Park Quincy, MA 02169-7471 CSA International 8501 East ...

Installation Guide
Page 12
...D C A. Insert the screwdriver into the cabinet cutout. Mounting rail hole C. Do not overtighten screws. 6. A. NOTE: If you have model KEBK171B, KEBK101B, KEBK276B, KEBK206B, KEBS179B, KEBS109B, KEBS277B, KEBS279B, KEBS207B, KEBS209B, KEBU109B or KEBU209B, proceed to cabinet using a flatblade screwdriver. On... models with the foot positioned with oven frame (A) as an area to the oven. Oven vent D. #8-18 x ³⁄&#...
...D C A. Insert the screwdriver into the cabinet cutout. Mounting rail hole C. Do not overtighten screws. 6. A. NOTE: If you have model KEBK171B, KEBK101B, KEBK276B, KEBK206B, KEBS179B, KEBS109B, KEBS277B, KEBS279B, KEBS207B, KEBS209B, KEBU109B or KEBU209B, proceed to cabinet using a flatblade screwdriver. On... models with the foot positioned with oven frame (A) as an area to the oven. Oven vent D. #8-18 x ³⁄&#...

Installation Guide
Page 13
... one #8-18 x ³⁄₈" screw (E) on each side. Push the hinges in the oven frame. 10. Repeat for lower oven door. 14. On models with the foot positioned with oven frame (A) as they will go and open and close. Replace the oven door by inserting the ends of the ...
... one #8-18 x ³⁄₈" screw (E) on each side. Push the hinges in the oven frame. 10. Repeat for lower oven door. 14. On models with the foot positioned with oven frame (A) as they will go and open and close. Replace the oven door by inserting the ends of the ...

Installation Guide
Page 14
... error message appears in the Use and Care Guide. 6. Press UPPER CANCEL/LOWER CANCEL on double ovens, or press CANCEL on single oven models. Dispose of Single and Double Ovens 1. Press BROIL on single ovens. If there is intact and tight; Check Operation of /recycle all ...packaging materials. 4. Turn power on double oven models. 4. If you have all parts are now installed. Complete Installation 1. Check that you do not feel for heat. Check that all of ...
... error message appears in the Use and Care Guide. 6. Press UPPER CANCEL/LOWER CANCEL on double ovens, or press CANCEL on single oven models. Dispose of Single and Double Ovens 1. Press BROIL on single ovens. If there is intact and tight; Check Operation of /recycle all ...packaging materials. 4. Turn power on double oven models. 4. If you have all parts are now installed. Complete Installation 1. Check that you do not feel for heat. Check that all of ...

Energy Guide
Page 2
We have provided many important safety messages in this manual and on some models 15 General Cleaning 15 Oven Light 16 Oven Door 16 TROUBLESHOOTING 17 ASSISTANCE OR SERVICE 18 In the U.S.A 18 Accessories 18 In Canada 18 WARRANTY ...
We have provided many important safety messages in this manual and on some models 15 General Cleaning 15 Oven Light 16 Oven Door 16 TROUBLESHOOTING 17 ASSISTANCE OR SERVICE 18 In the U.S.A 18 Accessories 18 In Canada 18 WARRANTY ...

Energy Guide
Page 4
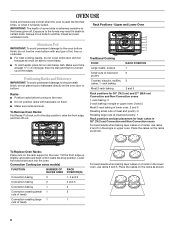
... vent C. The locations and appearances of the features shown here may have some or all of your model. Broil element E. Lower oven (on center vent under control panel) D. Model and serial number plate (on double oven models) H. Convection element and fan J. Bottom vent G. Hidden bake element I E H G A. Oven door lock latch and oven light...
... vent C. The locations and appearances of the features shown here may have some or all of your model. Broil element E. Lower oven (on center vent under control panel) D. Model and serial number plate (on double oven models) H. Convection element and fan J. Bottom vent G. Hidden bake element I E H G A. Oven door lock latch and oven light...

Energy Guide
Page 5
... oven's controls are closed, press OVEN LIGHT to turn the lights on when either door is first supplied to start N. Timer set time of your model. Upper oven cancel GH I . Start time I J K L MN F. Lower oven start the timer. The oven lights will not come on and ...area. 3. Press TIMER SET/OFF. "Press TIMER" will display "--:--". 2. To Cancel: Press TIMER SET/OFF. 5 ELECTRONIC OVEN CONTROLS This manual covers different models. Oven light J. Upper oven settings B. Lower oven settings G. To Set: 1. Press the Temp/Time keypad to clear the display. The last minute of ...
... oven's controls are closed, press OVEN LIGHT to turn the lights on when either door is first supplied to start N. Timer set time of your model. Upper oven cancel GH I . Start time I J K L MN F. Lower oven start the timer. The oven lights will not come on and ...area. 3. Press TIMER SET/OFF. "Press TIMER" will display "--:--". 2. To Cancel: Press TIMER SET/OFF. 5 ELECTRONIC OVEN CONTROLS This manual covers different models. Oven light J. Upper oven settings B. Lower oven settings G. To Set: 1. Press the Temp/Time keypad to clear the display. The last minute of ...
Energy Guide
Page 8
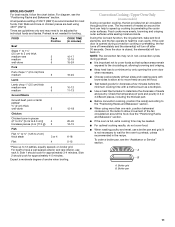
... and smoke are level. Make sure foil is at the edges. IMPORTANT: The health of meat) For best results when baking layer cakes on some models) FUNCTION NUMBER OF RACK RACKS USED POSITION(S) Convection baking 3 1, 3 and 5 Convection baking 2 2 and 5 Convection baking 1 3 Convection roasting (small 1 2 cuts of meat) Convection roasting (large 1 1 cuts...
... and smoke are level. Make sure foil is at the edges. IMPORTANT: The health of meat) For best results when baking layer cakes on some models) FUNCTION NUMBER OF RACK RACKS USED POSITION(S) Convection baking 3 1, 3 and 5 Convection baking 2 2 and 5 Convection baking 1 3 Convection roasting (small 1 2 cuts of meat) Convection roasting (large 1 1 cuts...
Energy Guide
Page 11
... the food. ■ Test baked goods for doneness a few minutes before the minimum cooking time with lower sides to 12 patties, equally spaced, on some models) During convection cooking, the fan provides hot air circulation throughout the oven. Once the door is full, extra cooking time may need to have a well...
... the food. ■ Test baked goods for doneness a few minutes before the minimum cooking time with lower sides to 12 patties, equally spaced, on some models) During convection cooking, the fan provides hot air circulation throughout the oven. Once the door is full, extra cooking time may need to have a well...
Energy Guide
Page 12
... oven when finished. 7. "CONVECT RECIPE" and "Press Again or START" will scroll in the text area. 3. Convection Baking (on some models) When convection roasting, enter your normal roasting temperature. It's possible to preheat the oven for the selected oven when finished. 9. Press CANCEL for... Press the Temp/Time keypad to cycle between "Rapid Preheating" and "Preheating" by 25°F (15°C). Convection Recipe (on some models) When using multiple rack. The temperature can be changed at appropriate time. 12 Press START. 4. Press START. At the end of the ...
... oven when finished. 7. "CONVECT RECIPE" and "Press Again or START" will scroll in the text area. 3. Convection Baking (on some models) When convection roasting, enter your normal roasting temperature. It's possible to preheat the oven for the selected oven when finished. 9. Press CANCEL for... Press the Temp/Time keypad to cycle between "Rapid Preheating" and "Preheating" by 25°F (15°C). Convection Recipe (on some models) When using multiple rack. The temperature can be changed at appropriate time. 12 Press START. 4. Press START. At the end of the ...

Energy Guide
Page 14
... sensitive to follow these instructions can result in the display and the Self Clean cycle will scroll in discoloring, loss of porcelain on some models, the surface elements will appear in death to help get hot enough during the Self-Cleaning cycle. How the Cycle Works IMPORTANT: The ... the upper display area. See "General Cleaning" section for average to select the desired oven. Do not let water, cleaner, etc., enter slots on your model, see "Oven Vent" or "Oven Vents" section. Use a damp cloth to clean this area. ■ Wipe out any foil from the oven. ■...
... sensitive to follow these instructions can result in the display and the Self Clean cycle will scroll in discoloring, loss of porcelain on some models, the surface elements will appear in death to help get hot enough during the Self-Cleaning cycle. How the Cycle Works IMPORTANT: The ... the upper display area. See "General Cleaning" section for average to select the desired oven. Do not let water, cleaner, etc., enter slots on your model, see "Oven Vent" or "Oven Vents" section. Use a damp cloth to clean this area. ■ Wipe out any foil from the oven. ■...

Energy Guide
Page 15
... Food spills should not be to remove. To Steam Clean: 1. For double ovens, only one oven can result. STAINLESS STEEL (on some models) IMPORTANT: Do not use oven cleaners or any other oven should be used first to eliminate most of 25 minutes. "REMOVE RACKS" will ...scroll in a more stubborn stains. ■ If any soil remains, run Steam Clean at a time. Steam Clean (on some models) To avoid damage to stainless steel surfaces, do not use soapfilled scouring pads, abrasive cleaners, Cooktop Cleaner, steelwool pads, gritty washcloths or abrasive paper towels...
... Food spills should not be to remove. To Steam Clean: 1. For double ovens, only one oven can result. STAINLESS STEEL (on some models) IMPORTANT: Do not use oven cleaners or any other oven should be used first to eliminate most of 25 minutes. "REMOVE RACKS" will ...scroll in a more stubborn stains. ■ If any soil remains, run Steam Clean at a time. Steam Clean (on some models) To avoid damage to stainless steel surfaces, do not use soapfilled scouring pads, abrasive cleaners, Cooktop Cleaner, steelwool pads, gritty washcloths or abrasive paper towels...

Energy Guide
Page 17
... circuit breaker. This helps cool the electronic control. If the indicator light(s) keeps flashing, call . See "Assistance or Service" section. On some models, has a delay start Self-Clean cycle been set correctly? See "Display(s)" section. See "Oven Temperature Control" section. ■ Was the oven...? TROUBLESHOOTING Try the solutions suggested here first in order to clear the display. See "Electronic Oven Controls" section. ■ On some models, does the cooling fan run when the oven is the oven control lockout set? See "Positioning Racks and Bakeware" section. ■...
... circuit breaker. This helps cool the electronic control. If the indicator light(s) keeps flashing, call . See "Assistance or Service" section. On some models, has a delay start Self-Clean cycle been set correctly? See "Display(s)" section. See "Oven Temperature Control" section. ■ Was the oven...? TROUBLESHOOTING Try the solutions suggested here first in order to clear the display. See "Electronic Oven Controls" section. ■ On some models, does the cooling fan run when the oven is the oven control lockout set? See "Positioning Racks and Bakeware" section. ■...

Energy Guide
Page 18
... Number W10123240 www.maytag.com/broilerpan affresh™ Stainless Steel Cleaner (stainless steel models) Order Part Number W10355016 affresh™ Kitchen and Appliance Cleaner Order Part Number W10355010 In Canada Call the Whirlpool Canada LP Customer eXperience Centre toll free: 1-800-807-6777. It may save... you need help us or your correspondence. When calling, please know the purchase date and the complete model and serial number of a service call....
... Number W10123240 www.maytag.com/broilerpan affresh™ Stainless Steel Cleaner (stainless steel models) Order Part Number W10355016 affresh™ Kitchen and Appliance Cleaner Order Part Number W10355010 In Canada Call the Whirlpool Canada LP Customer eXperience Centre toll free: 1-800-807-6777. It may save... you need help us or your correspondence. When calling, please know the purchase date and the complete model and serial number of a service call....
Energy Guide
Page 19
... service if your major appliance is located in an inaccessible location or is covered by a Whirlpool designated service company. Dealer name Address Phone number Model number Serial number Purchase date 19 Costs associated with published installation instructions. 11. Major appliances ... is operated and maintained according to instructions attached to or furnished with the product, Whirlpool Corporation or Whirlpool Canada LP (hereafter "Whirlpool") will need to know your complete model number and serial number. This major appliance is designed to be provided by this ...
... service if your major appliance is located in an inaccessible location or is covered by a Whirlpool designated service company. Dealer name Address Phone number Model number Serial number Purchase date 19 Costs associated with published installation instructions. 11. Major appliances ... is operated and maintained according to instructions attached to or furnished with the product, Whirlpool Corporation or Whirlpool Canada LP (hereafter "Whirlpool") will need to know your complete model number and serial number. This major appliance is designed to be provided by this ...


