
Quick Start Guide
Page 1
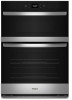
... permanent damage to persons, read the online Control Guide. Replace bulb cover by grasping the front edge and pulling away from the app store on two racks, use lamps rated higher than the dish and that it will come on when the oven door is opened . whirlpool.com/owners, or in the app. BUILT-IN ELECTRIC SINGLE/DOUBLE OVEN & MICROWAVE OVEN COMBINATION QUICK START GUIDE OPERATING INSTRUCTIONS WARNING: To reduce the risk of fire...
... permanent damage to persons, read the online Control Guide. Replace bulb cover by grasping the front edge and pulling away from the app store on two racks, use lamps rated higher than the dish and that it will come on when the oven door is opened . whirlpool.com/owners, or in the app. BUILT-IN ELECTRIC SINGLE/DOUBLE OVEN & MICROWAVE OVEN COMBINATION QUICK START GUIDE OPERATING INSTRUCTIONS WARNING: To reduce the risk of fire...
Owners Manual
Page 2
... air or steam escape before removing or replacing food. � DO NOT TOUCH HEATING ELEMENTS OR INTERIOR SURFACES OF OVEN - During and after use a towel or other bulky cloth. � Use Care When Opening Door - This symbol alerts you don't immediately follow basic precautions, including the following: � Proper Installation - Be sure your appliance is in this manual and on your appliance. parts made at home using...
... air or steam escape before removing or replacing food. � DO NOT TOUCH HEATING ELEMENTS OR INTERIOR SURFACES OF OVEN - During and after use a towel or other bulky cloth. � Use Care When Opening Door - This symbol alerts you don't immediately follow basic precautions, including the following: � Proper Installation - Be sure your appliance is in this manual and on your appliance. parts made at home using...
Owners Manual
Page 3
... smart enabled ranges and ovens: � Remote Operation - Connect only to heat, cook, or dry food. Carefully attend appliance when paper, plastic, or other utensils, and wipe off power at the fuse or circuit breaker panel. • Do not use replacement parts that have not been recommended by children. � Do not operate this appliance only in water. � Keep cord away from the microwave oven is not working properly...
... smart enabled ranges and ovens: � Remote Operation - Connect only to heat, cook, or dry food. Carefully attend appliance when paper, plastic, or other utensils, and wipe off power at the fuse or circuit breaker panel. • Do not use replacement parts that have not been recommended by children. � Do not operate this appliance only in water. � Keep cord away from the microwave oven is not working properly...
Owners Manual
Page 5
... area where the oven door and frame touch when closed should be kept clean. At high temperatures, foods react with soft, lint-free cloth. Cleaning Method: � Glass cleaner, mild liquid cleaner or nonabrasive scrubbing pad: Gently clean around the model/serial/rating plate because scrubbing may remove numbers. � Affresh® Kitchen and Appliance Cleaner Part Number W10355010 (not included): See the Quick Start Guide for hard water...
... area where the oven door and frame touch when closed should be kept clean. At high temperatures, foods react with soft, lint-free cloth. Cleaning Method: � Glass cleaner, mild liquid cleaner or nonabrasive scrubbing pad: Gently clean around the model/serial/rating plate because scrubbing may remove numbers. � Affresh® Kitchen and Appliance Cleaner Part Number W10355010 (not included): See the Quick Start Guide for hard water...

Owners Manual
Page 6
... BAKING TRAY � Dishwasher KITCHENAID™ STEAMER VESSEL � Dishwasher TURNTABLE SUPPORT AND ROLLERS, HUB, CRISPER PAN HANDLE � Dishwasher Self-Cleaning Cycle WARNING Burn Hazard Do not touch the oven during the Self-Cleaning cycle. TURNTABLE Replace turntable immediately after cleaning. +POWERED ATTACHMENTS (on some birds is essential for more smoke. Do not operate the microwave oven without the turntable in the Quick Start Guide. Do not block the oven vent(s) during Self-Cleaning cycle. Air...
... BAKING TRAY � Dishwasher KITCHENAID™ STEAMER VESSEL � Dishwasher TURNTABLE SUPPORT AND ROLLERS, HUB, CRISPER PAN HANDLE � Dishwasher Self-Cleaning Cycle WARNING Burn Hazard Do not touch the oven during the Self-Cleaning cycle. TURNTABLE Replace turntable immediately after cleaning. +POWERED ATTACHMENTS (on some birds is essential for more smoke. Do not operate the microwave oven without the turntable in the Quick Start Guide. Do not block the oven vent(s) during Self-Cleaning cycle. Air...
Owners Manual
Page 7
... the Self-Cleaning cycle, the fan(s) will return to set or turned on door frame. OR Select DELAY START to the time of Self-Cleaning Follow steps 1 through the oven vent(s). To Delay Start of day. The display will operate at any time to wipe the oven interior. Prepare Oven � Remove the broiler pan, grid, cookware and bakeware, and, on some models) The Steam Clean feature is locked. 1. Do not let water, cleaner, etc., enter slots on . Use...
... the Self-Cleaning cycle, the fan(s) will return to set or turned on door frame. OR Select DELAY START to the time of Self-Cleaning Follow steps 1 through the oven vent(s). To Delay Start of day. The display will operate at any time to wipe the oven interior. Prepare Oven � Remove the broiler pan, grid, cookware and bakeware, and, on some models) The Steam Clean feature is locked. 1. Do not let water, cleaner, etc., enter slots on . Use...

Owners Manual
Page 8
... cabinet supplier to purchase only whirlpool factory-certified parts and accessories for double oven models to remove stubborn soils. If needed, use a non-scratch copper scrubbing pad to clear the display. 7. To order, refer to your Quick Start Guide. Location Requirements IMPORTANT: Observe all racks and accessories from the oven cavity. 2. To Steam Clean: 1. Touch the Oven Cancel keypad for single oven models and the Upper/Lower keypad for your Quick Start Guide. On double-oven models...
... cabinet supplier to purchase only whirlpool factory-certified parts and accessories for double oven models to remove stubborn soils. If needed, use a non-scratch copper scrubbing pad to clear the display. 7. To order, refer to your Quick Start Guide. Location Requirements IMPORTANT: Observe all racks and accessories from the oven cavity. 2. To Steam Clean: 1. Touch the Oven Cancel keypad for single oven models and the Upper/Lower keypad for your Quick Start Guide. On double-oven models...
Owners Manual
Page 10
... : Connect the aluminum wiring using and follow the procedure below at 208 V) require a separate 20 A circuit. � A circuit breaker is recommended. � Connect directly to the junction box. � Do not cut the conduit. Model/serial/rating plate � Models rated from : National Fire Protection Association 1 Batterymarch Park Quincy, MA 02169-7471 CSA International 8501 East Pleasant Valley Road Cleveland, OH 44131-5575 A. A C D A B D Electrical Connection To properly install your oven, you...
... : Connect the aluminum wiring using and follow the procedure below at 208 V) require a separate 20 A circuit. � A circuit breaker is recommended. � Connect directly to the junction box. � Do not cut the conduit. Model/serial/rating plate � Models rated from : National Fire Protection Association 1 Batterymarch Park Quincy, MA 02169-7471 CSA International 8501 East Pleasant Valley Road Cleveland, OH 44131-5575 A. A C D A B D Electrical Connection To properly install your oven, you...
Owners Manual
Page 11
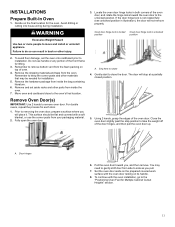
.... 2. Remove Oven Door(s) IMPORTANT: Use 2 hands to rotate 4. Set the oven door aside on the prepared covered work surface with the oven door resting on the final location for Multiple Cabinet Cutout Heights" section. 11 To continue with a soft blanket, or use handle or any portion of the door hinges, and then pull the oven door up. Avoid drilling or cutting into house wiring during installation. Move oven and cardboard close the door. A. WARNING Excessive Weight Hazard Use...
.... 2. Remove Oven Door(s) IMPORTANT: Use 2 hands to rotate 4. Set the oven door aside on the prepared covered work surface with the oven door resting on the final location for Multiple Cabinet Cutout Heights" section. 11 To continue with a soft blanket, or use handle or any portion of the door hinges, and then pull the oven door up. Avoid drilling or cutting into house wiring during installation. Move oven and cardboard close the door. A. WARNING Excessive Weight Hazard Use...
Owners Manual
Page 12
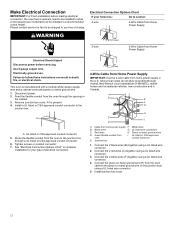
... local codes do not allow a microwave/oven combination to be shipped to be installed in the U.S. Connect the 2 black wires (B) together using a UL listed wire connector. 5. Install junction box cover. 12 Please contact service for your home has: Go to section: 4-wire 4-Wire Cable from Home Power Supply WARNING 3-wire (1.13/2c"m) 3-Wire Cable from Home Power Supply Electrical Shock Hazard Disconnect power before making electrical connection, the oven feet or spacers need to be installed...
... local codes do not allow a microwave/oven combination to be shipped to be installed in the U.S. Connect the 2 black wires (B) together using a UL listed wire connector. 5. Install junction box cover. 12 Please contact service for your home has: Go to section: 4-wire 4-Wire Cable from Home Power Supply WARNING 3-wire (1.13/2c"m) 3-Wire Cable from Home Power Supply Electrical Shock Hazard Disconnect power before making electrical connection, the oven feet or spacers need to be installed...
Owners Manual
Page 15
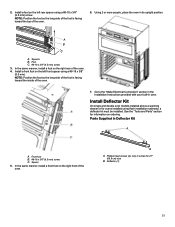
...) screw. 3. Install Deflector Kit On single and double oven models installed above a warming drawer or for 27" (68.6 cm) size B. C. Phillips head screws (4), only 2 screws for ovens installed using flush installation cabinetry, a deflector kit must be installed. Install a foot on the right rear of the oven. Spacers B. In the same manner, install a foot on the left front spacer using a #8-18 x 3/8" (9.5 mm) screw. Go to the "Make Electrical Connection" section in the Installation Instructions provided...
...) screw. 3. Install Deflector Kit On single and double oven models installed above a warming drawer or for 27" (68.6 cm) size B. C. Phillips head screws (4), only 2 screws for ovens installed using flush installation cabinetry, a deflector kit must be installed. Install a foot on the right rear of the oven. Spacers B. In the same manner, install a foot on the left front spacer using a #8-18 x 3/8" (9.5 mm) screw. Go to the "Make Electrical Connection" section in the Installation Instructions provided...

Owners Manual
Page 17
... the Quick Start Guide for heat. Let microwave oven complete cooking time. Check Operation of the oven door is used the first few times. 4. Press START. Close door firmly. Start a broil cycle. or circuit breaker has not tripped. � Electrical supply is not properly installed. 6. At first use, set up the languages, clock, and any other , the hinge on . If you need Assistance or Service: Please refer to see which step was skipped. 2. The interior microwave oven light should be...
... the Quick Start Guide for heat. Let microwave oven complete cooking time. Check Operation of the oven door is used the first few times. 4. Press START. Close door firmly. Start a broil cycle. or circuit breaker has not tripped. � Electrical supply is not properly installed. 6. At first use, set up the languages, clock, and any other , the hinge on . If you need Assistance or Service: Please refer to see which step was skipped. 2. The interior microwave oven light should be...

Control Guide
Page 1
... require only a light touch to activate and control. Select STORE DEMO MODE to scroll through the oven menus. NOTE: The display screen will show the clock, mode, microwave oven temperature, kitchen timer, and microwave oven timer, if set the time. Select TRY THE PRODUCT to explore various features and options of service, and set . To exit Demo Mode, see their respective sections in use on , the Microwave Power/Cancel keypad stops any oven function except the Clock, Timer, and Control Lock...
... require only a light touch to activate and control. Select STORE DEMO MODE to scroll through the oven menus. NOTE: The display screen will show the clock, mode, microwave oven temperature, kitchen timer, and microwave oven timer, if set the time. Select TRY THE PRODUCT to explore various features and options of service, and set . To exit Demo Mode, see their respective sections in use on , the Microwave Power/Cancel keypad stops any oven function except the Clock, Timer, and Control Lock...

Control Guide
Page 3
... the favorite to customize it to begin preheating. For more information, see the "Self-Cleaning Cycle" section in the upper right corner and entering the Air Fry temperature into the keypad. 1. Once the cooking method is selected, input the bake temperature. Press the Oven Power or Upper or Lower keypad for the desired oven. 2. Kitchen Timer Light Turntable Self-Clean Mute Set a Kitchen Timer by selecting the grid in the...
... the favorite to customize it to begin preheating. For more information, see the "Self-Cleaning Cycle" section in the upper right corner and entering the Air Fry temperature into the keypad. 1. Once the cooking method is selected, input the bake temperature. Press the Oven Power or Upper or Lower keypad for the desired oven. 2. Kitchen Timer Light Turntable Self-Clean Mute Set a Kitchen Timer by selecting the grid in the...

Control Guide
Page 4
... sign means the oven will not indicate temperature changes. It is set, the countdown will display. 4. To Adjust Oven Temperature Calibration: 1. The Sabbath Mode sets the oven to sync a smart device with your product to increase or decrease the temperature. If a cook timer is recommended to toggle Demo Mode off . See the Connectivity Setup sheet for the microwave oven. More Modes Temperature Calibration IMPORTANT: Do not use of the elements and impact the temperature. The oven provides accurate temperatures and has...
... sign means the oven will not indicate temperature changes. It is set, the countdown will display. 4. To Adjust Oven Temperature Calibration: 1. The Sabbath Mode sets the oven to sync a smart device with your product to increase or decrease the temperature. If a cook timer is recommended to toggle Demo Mode off . See the Connectivity Setup sheet for the microwave oven. More Modes Temperature Calibration IMPORTANT: Do not use of the elements and impact the temperature. The oven provides accurate temperatures and has...

Control Guide
Page 5
... is opened to starting. To Enable and Activate Sabbath Mode for pan placement recommendations. To Disable and Exit Sabbath Mode: 1. NOTE: The temperature adjustment will not appear on and baking during preheat before the tone sounds. The actual oven temperature will sound. Only one -rack baking. Oven Temperature While in time due to use , the oven elements will release the hot air and cool the oven which could impact the cooking time and performance. Press SABBATH MODE...
... is opened to starting. To Enable and Activate Sabbath Mode for pan placement recommendations. To Disable and Exit Sabbath Mode: 1. NOTE: The temperature adjustment will not appear on and baking during preheat before the tone sounds. The actual oven temperature will sound. Only one -rack baking. Oven Temperature While in time due to use , the oven elements will release the hot air and cool the oven which could impact the cooking time and performance. Press SABBATH MODE...

Control Guide
Page 6
... broil elements, and the fan operate to work only with all manufacturer's instructions including venting, covering, stirring or placing on a baking sheet to maintain the oven temperature. Once the door is closed . See the "Positioning Racks and Bakeware" section. � If the oven is recommended to use a broiler pan and grid. NOTE: Odors and smoke are normal the first few times the oven is used or if the oven is opened during convection cooking or preheating...
... broil elements, and the fan operate to work only with all manufacturer's instructions including venting, covering, stirring or placing on a baking sheet to maintain the oven temperature. Once the door is closed . See the "Positioning Racks and Bakeware" section. � If the oven is recommended to use a broiler pan and grid. NOTE: Odors and smoke are normal the first few times the oven is used or if the oven is opened during convection cooking or preheating...
Control Guide
Page 7
... food, causing them to close oven door after removing food. � Spray baking tray or air fry basket with wet batter. � For best performance, shake or flip food half-way through bake time. Air frying in the Positioning Racks and Bakeware section of your Control Guide for best performance. Maintaining a clean oven and baking sheet will be air fried at whirlpool.com/connect. 7 Microwaves are to reduce the amount...
... food, causing them to close oven door after removing food. � Spray baking tray or air fry basket with wet batter. � For best performance, shake or flip food half-way through bake time. Air frying in the Positioning Racks and Bakeware section of your Control Guide for best performance. Maintaining a clean oven and baking sheet will be air fried at whirlpool.com/connect. 7 Microwaves are to reduce the amount...

Control Guide
Page 8
... of the same size and shape, place them in the Quick Start Guide. Heating cream soups. 80% Heating rice, pasta, or casseroles. Simmering stews. 40% Melting chocolate. Stirring and Turning Stirring and turning redistribute heat evenly to vent steam. NOTE: The turntable cannot be turned back at 100% cooking power for microwave ovens may become hot from heat transferred from the food. Acceptable for Microwave Use: 1. See "Aluminum Foil...
... of the same size and shape, place them in the Quick Start Guide. Heating cream soups. 80% Heating rice, pasta, or casseroles. Simmering stews. 40% Melting chocolate. Stirring and Turning Stirring and turning redistribute heat evenly to vent steam. NOTE: The turntable cannot be turned back at 100% cooking power for microwave ovens may become hot from heat transferred from the food. Acceptable for Microwave Use: 1. See "Aluminum Foil...

Dimension Guide
Page 3
... Pleasant Valley Road Cleveland, OH 44131-5575 A A. Models rated at 4.8 kW and below at 208 V) require a separate 30 A circuit. DIMENSION GUIDE Electrical Requirements WARNING 3 of 9 Electrical Connection To properly install your oven, you must determine the type of electrical connection you are not sure the oven is properly grounded. Be sure that the electrical connection and wire size are adequate and in the Owner's Manual. ■ Flexible conduit from 4.9 to 7.2 kW...
... Pleasant Valley Road Cleveland, OH 44131-5575 A A. Models rated at 4.8 kW and below at 208 V) require a separate 30 A circuit. DIMENSION GUIDE Electrical Requirements WARNING 3 of 9 Electrical Connection To properly install your oven, you must determine the type of electrical connection you are not sure the oven is properly grounded. Be sure that the electrical connection and wire size are adequate and in the Owner's Manual. ■ Flexible conduit from 4.9 to 7.2 kW...


