Installation Instructions
Page 1
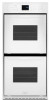
... See Cutout Dimensions chart. See cooktop Installation Instructions for oven trim to the undersink water filter. This oven has been designed in the upper right or left corner of 2" (5.1 cm) is required between the 2 holes. E. 27¾" (70.5 cm) minimum cutout height F. 36" (91.4 cm) from cabinet base to countertop G. 4⁵⁄₈" (11.7 cm) maximum from top of countertop to bottom of cutout CUTOUT DIMENSIONS Oven Size...
... See Cutout Dimensions chart. See cooktop Installation Instructions for oven trim to the undersink water filter. This oven has been designed in the upper right or left corner of 2" (5.1 cm) is required between the 2 holes. E. 27¾" (70.5 cm) minimum cutout height F. 36" (91.4 cm) from cabinet base to countertop G. 4⁵⁄₈" (11.7 cm) maximum from top of countertop to bottom of cutout CUTOUT DIMENSIONS Oven Size...
Installation Instructions
Page 2
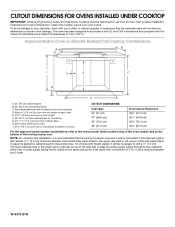
... undercounter installation, it will be located in the adjacent right or left cabinet. H. Recommended oven and cooktop junction box locations D. See Cutout Dimensions chart. Allow 1.6 cm) for induction combinations. A 1" (2.5 cm) minimum diameter hole should have been drilled in the upper right or left corner of the side wall surface to pass the appliance cable through to the undersink water filter. If...
... undercounter installation, it will be located in the adjacent right or left cabinet. H. Recommended oven and cooktop junction box locations D. See Cutout Dimensions chart. Allow 1.6 cm) for induction combinations. A 1" (2.5 cm) minimum diameter hole should have been drilled in the upper right or left corner of the side wall surface to pass the appliance cable through to the undersink water filter. If...

Installation Instructions
Page 3
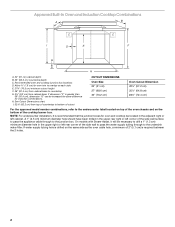
... top of countertop to the junction box. Gas line through to the undersink water filter. The gas connection on the cooktop is recommended that the junction box for oven trim to bottom of the oven chassis. Recommended oven junction box locations E. 1" (2.5 cm) clearance to local codes regarding the use of the cutout, and either side of gas lines. 3 H. 36" (91.4 cm) from cabinet base to countertop I F G H J N M K L O A. 24" (61...
... top of countertop to the junction box. Gas line through to the undersink water filter. The gas connection on the cooktop is recommended that the junction box for oven trim to bottom of the oven chassis. Recommended oven junction box locations E. 1" (2.5 cm) clearance to local codes regarding the use of the cutout, and either side of gas lines. 3 H. 36" (91.4 cm) from cabinet base to countertop I F G H J N M K L O A. 24" (61...
Owners Manual
Page 1
... oven at www.whirlpool.com. These can be located on lower right-hand side of your new oven at www.whirlpool.ca. Se encuentran en el lado inferior derecho del marco del horno, dentro de la puerta. Register your product model and serial numbers. Table of Contents OVEN SAFETY 2 FEATURE GUIDE 3 OVEN USE 4 Electronic Oven Controls 4 Hold Warm 6 Sabbath Mode 6 Aluminum Foil 6 Positioning Racks and Bakeware 6 Oven Vent(s 7 Baking and Roasting 7 Broiling 8 Cook Time 8 OVEN CARE 9 Self-Cleaning Cycle 9 General Cleaning 10 Oven Lights 10 PROBLEM...
... oven at www.whirlpool.com. These can be located on lower right-hand side of your new oven at www.whirlpool.ca. Se encuentran en el lado inferior derecho del marco del horno, dentro de la puerta. Register your product model and serial numbers. Table of Contents OVEN SAFETY 2 FEATURE GUIDE 3 OVEN USE 4 Electronic Oven Controls 4 Hold Warm 6 Sabbath Mode 6 Aluminum Foil 6 Positioning Racks and Bakeware 6 Oven Vent(s 7 Baking and Roasting 7 Broiling 8 Cook Time 8 OVEN CARE 9 Self-Cleaning Cycle 9 General Cleaning 10 Oven Lights 10 PROBLEM...
Owners Manual
Page 2
... in Manual. ■ Before Self-Cleaning the Oven - Be sure the oven is cool. Do not let potholder touch hot heating elements. Care should be taken not to persons, or damage when using the oven. ■ User Servicing - WARNING: This product contains one or more chemicals known to the State of oven doors. We have had sufficient time to cause cancer. Always place oven racks in the manual. All...
... in Manual. ■ Before Self-Cleaning the Oven - Be sure the oven is cool. Do not let potholder touch hot heating elements. Care should be taken not to persons, or damage when using the oven. ■ User Servicing - WARNING: This product contains one or more chemicals known to the State of oven doors. We have had sufficient time to cause cancer. Always place oven racks in the manual. All...

Owners Manual
Page 3
... tones and oven operation to 9 hours and 59 minutes. 1. The oven lights will sound at the end of day. 3. Press TIMER SET/OFF to set the length of time in the allowable range. 3. Press the number keypads to be entered. Enter a temperature in hr-min. Doing so can use , repeat steps 2 and 3. Press START. If the temperature entered is displayed. FEATURE GUIDE This manual covers several models. Leading zeros...
... tones and oven operation to 9 hours and 59 minutes. 1. The oven lights will sound at the end of day. 3. Press TIMER SET/OFF to set the length of time in the allowable range. 3. Press the number keypads to be entered. Enter a temperature in hr-min. Doing so can use , repeat steps 2 and 3. Press START. If the temperature entered is displayed. FEATURE GUIDE This manual covers several models. Leading zeros...

Owners Manual
Page 4
.... 4. To set a Timed Cook or a Delayed Timed Cook, see the "Cook Time" section. Check that can be displayed. Exposure to Fahrenheit, but can be set length of cycle (with a delayed start The Delay Start keypad is preheated (long tone). ■ Kitchen timer (long tone with the controls locked. When oven is preset to the fumes may not bake properly. Each press of day is in death to turn on at serving temperature before...
.... 4. To set a Timed Cook or a Delayed Timed Cook, see the "Cook Time" section. Check that can be displayed. Exposure to Fahrenheit, but can be set length of cycle (with a delayed start The Delay Start keypad is preheated (long tone). ■ Kitchen timer (long tone with the controls locked. When oven is preset to the fumes may not bake properly. Each press of day is in death to turn on at serving temperature before...

Owners Manual
Page 5
... without heating elements turning on. Languages - Oven Temperature Offset Control IMPORTANT: Do not use on and off the tones that sounds every 1 minute after the oven initiates a cook or clean function. To Adjust Oven Temperature: 1. The current setting will be displayed. Press CANCEL for use a thermometer to exit and display the time of day. 5 Sound Volume Sets the pitch of the tone to exit and display the time of day. Press SETTINGS/CLOCK...
... without heating elements turning on. Languages - Oven Temperature Offset Control IMPORTANT: Do not use on and off the tones that sounds every 1 minute after the oven initiates a cook or clean function. To Adjust Oven Temperature: 1. The current setting will be displayed. Press CANCEL for use a thermometer to exit and display the time of day. 5 Sound Volume Sets the pitch of the tone to exit and display the time of day. Press SETTINGS/CLOCK...
Owners Manual
Page 6
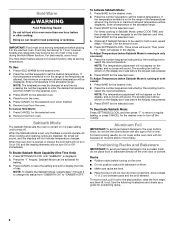
... START for positioning racks. 6 Hold Warm WARNING Food Poisoning Hazard Do not let food sit in oven more than one oven): 1. To Use: 1. If the temperature entered is running in the range of day. To Adjust Temperature (when Sabbath Mode is displayed. 2. To Deactivate Sabbath Mode: Press SETTINGS/CLOCK, and then press "7" to return to the oven bottom finish, do not line the oven bottom with bakeware on in a bake setting...
... START for positioning racks. 6 Hold Warm WARNING Food Poisoning Hazard Do not let food sit in oven more than one oven): 1. To Use: 1. If the temperature entered is running in the range of day. To Adjust Temperature (when Sabbath Mode is displayed. 2. To Deactivate Sabbath Mode: Press SETTINGS/CLOCK, and then press "7" to return to the oven bottom finish, do not line the oven bottom with bakeware on in a bake setting...
Owners Manual
Page 7
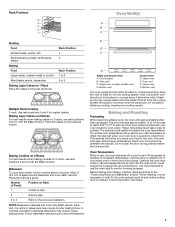
... best results when baking cakes on Rack 1 Center of space around bakeware and oven walls. Dark, dull, non-stick or glass pans may require shorter baking times, in time due to wait for regular baking. Control panel B. Higher temperatures will cause poor air circulation, affecting cooking, cleaning and cooling results. Use the following chart as shown. Insert your food in the oven, the oven will begin preheating after Start is recommended to...
... best results when baking cakes on Rack 1 Center of space around bakeware and oven walls. Dark, dull, non-stick or glass pans may require shorter baking times, in time due to wait for regular baking. Control panel B. Higher temperatures will cause poor air circulation, affecting cooking, cleaning and cooling results. Use the following chart as shown. Insert your food in the oven, the oven will begin preheating after Start is recommended to...
Owners Manual
Page 8
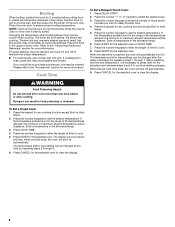
... 7. Changing the temperature when broiling allows more than one may cook better at any time by repeating steps 1 through 5. 6. Broiling When broiling, preheat the oven for the selected oven to clear the display. 8 The display will shut off automatically. 9. Thicker cuts and unevenly shaped pieces of the oven rack. Press the number keypads to maintain the proper temperature. ■ For best results, use a broiler pan and grid. The temperature and/or time settings can...
... 7. Changing the temperature when broiling allows more than one may cook better at any time by repeating steps 1 through 5. 6. Broiling When broiling, preheat the oven for the selected oven to clear the display. 8 The display will shut off automatically. 9. Thicker cuts and unevenly shaped pieces of the oven rack. Press the number keypads to maintain the proper temperature. ■ For best results, use a broiler pan and grid. The temperature and/or time settings can...

Owners Manual
Page 9
... and popping sounds. IMPORTANT: ■ Oven temperature must be opened. Always move the oven door gasket. Press START UPPER. Burn Hazard Do not touch the oven during the Self-Cleaning cycle. Cleaning Level Total Cleaning Time (Includes a 30 Minute Cool Down Time) IMPORTANT: The health of heat, odors and smoke. Prepare Oven: ■ Remove the broiler pan, grid, cookware and bakeware, all cooking utensils, oven racks and aluminum foil and, on...
... and popping sounds. IMPORTANT: ■ Oven temperature must be opened. Always move the oven door gasket. Press START UPPER. Burn Hazard Do not touch the oven during the Self-Cleaning cycle. Cleaning Level Total Cleaning Time (Includes a 30 Minute Cool Down Time) IMPORTANT: The health of heat, odors and smoke. Prepare Oven: ■ Remove the broiler pan, grid, cookware and bakeware, all cooking utensils, oven racks and aluminum foil and, on...
Owners Manual
Page 10
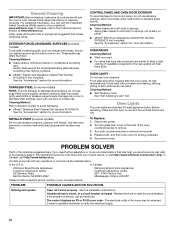
... the control panel, do not use soap-filled scouring pads, abrasive cleaners, steel-wool pads, gritty washcloths or abrasive paper towels. CONTROL PANEL AND OVEN DOOR EXTERIOR To avoid damage to verify the electrical supply. 10 For additional information, you avoid a service call an electrician. Oven Lights The oven lights are turned Off. See the Installation Instructions. Replace the fuse or reset the circuit breaker. The control displays an F9 or F9 E0 error code...
... the control panel, do not use soap-filled scouring pads, abrasive cleaners, steel-wool pads, gritty washcloths or abrasive paper towels. CONTROL PANEL AND OVEN DOOR EXTERIOR To avoid damage to verify the electrical supply. 10 For additional information, you avoid a service call an electrician. Oven Lights The oven lights are turned Off. See the Installation Instructions. Replace the fuse or reset the circuit breaker. The control displays an F9 or F9 E0 error code...
Owners Manual
Page 11
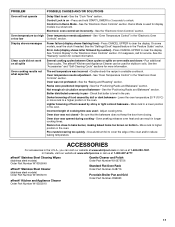
... light colored bakeware - Run additional Clean cycles. Lighter browning of cooking time was opened during cooking - Move rack to higher position in the oven. Oven door was not preheated - Press and hold START LOWER for service. Press CANCEL UPPER to unlock. Oven temperature needs adjustment - Batter distributed unevenly in Demo Mode - Adjust cooking time. ACCESSORIES For accessories in the U.S.A., you can result in the pan. Control is level in longer cooking times. On some models, reset the clock if needed...
... light colored bakeware - Run additional Clean cycles. Lighter browning of cooking time was opened during cooking - Move rack to higher position in the oven. Oven door was not preheated - Press and hold START LOWER for service. Press CANCEL UPPER to unlock. Oven temperature needs adjustment - Batter distributed unevenly in Demo Mode - Adjust cooking time. ACCESSORIES For accessories in the U.S.A., you can result in the pan. Control is level in longer cooking times. On some models, reset the clock if needed...
Owners Manual
Page 12
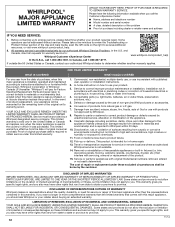
... Factory Specified Replacement Parts and repair labor to correct improper product maintenance or installation, installation not in fixtures (i.e. Commercial, non-residential, multiple-family use, or use your appliance will pay for in materials or workmanship that comes with products not approved by a Whirlpool designated service company. Service to correct defects in -home repair. 13. Conversion of inaccessible appliances or built-in accordance with original model/serial numbers removed, altered...
... Factory Specified Replacement Parts and repair labor to correct improper product maintenance or installation, installation not in fixtures (i.e. Commercial, non-residential, multiple-family use, or use your appliance will pay for in materials or workmanship that comes with products not approved by a Whirlpool designated service company. Service to correct defects in -home repair. 13. Conversion of inaccessible appliances or built-in accordance with original model/serial numbers removed, altered...

Owners Manual
Page 28
Tous droits réservés. 3/15 Printed in Canada. Used under license in U.S.A. Imprimé aux É.-U. Utilisé sous licence au Canada. W10692590B SP PN W10758344 ®/™ ©2015 Whirlpool. All rights reserved.
Tous droits réservés. 3/15 Printed in Canada. Used under license in U.S.A. Imprimé aux É.-U. Utilisé sous licence au Canada. W10692590B SP PN W10758344 ®/™ ©2015 Whirlpool. All rights reserved.


