
Dimension Guide
Page 1
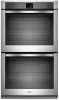
... WOD51EC0A WOD51EC7A WOD93EC0A WOD93EC7A WOS51EC0A WOS51EC7A WOS92EC0A WOS92EC7A Electrical: To properly install your oven, you must be provided. See the following table. recessed depth E. 27" (68.6 cm) overall width 30" (76.2 cm) models A. 51 130.0 cm) max. recessed width C. 48 124.0 cm) recessed height D. 23¹⁄₄" (59.1 cm) max. B C A A A D E Single Oven Double Oven...
... WOD51EC0A WOD51EC7A WOD93EC0A WOD93EC7A WOS51EC0A WOS51EC7A WOS92EC0A WOS92EC7A Electrical: To properly install your oven, you must be provided. See the following table. recessed depth E. 27" (68.6 cm) overall width 30" (76.2 cm) models A. 51 130.0 cm) max. recessed width C. 48 124.0 cm) recessed height D. 23¹⁄₄" (59.1 cm) max. B C A A A D E Single Oven Double Oven...

Dimension Guide
Page 2
...) top of cutout to bottom of upper cabinet door C. 32" (81.3 cm) bottom of cutout to floor is acceptable. Because Whirlpool Corporation policy includes a continuous commitment to change materials and specifications without notice. Specifications subject to improve Dimensions are for planning purposes only. ... cutout height G. 24" (60.7 cm) cutout depth NOTE: The cutout height can be between 26 68.4 cm) and 29 74.8 cm) for double ovens. Page 2 of cutout to change without notice. D. 28¹⁄₂" (72.4 cm) cutout width E. 1¹⁄₂" (3.8 cm) ...
...) top of cutout to bottom of upper cabinet door C. 32" (81.3 cm) bottom of cutout to floor is acceptable. Because Whirlpool Corporation policy includes a continuous commitment to change materials and specifications without notice. Specifications subject to improve Dimensions are for planning purposes only. ... cutout height G. 24" (60.7 cm) cutout depth NOTE: The cutout height can be between 26 68.4 cm) and 29 74.8 cm) for double ovens. Page 2 of cutout to change without notice. D. 28¹⁄₂" (72.4 cm) cutout width E. 1¹⁄₂" (3.8 cm) ...

Installation Guide
Page 1
...important safety messages in this manual and on your appliance. All safety messages will follow instructions. SIMPLE ET DOUBLE Table of Contents/Table des matières BUILT-IN OVEN SAFETY 1 SÉCURITÉ DU FOUR ENCASTR 17 INSTALLATION REQUIREMENTS 2 Tools and Parts 2 Location ... consultation par l'inspecteur local des installations électriques. INSTALLATION INSTRUCTIONS 27 " (68.6 CM) AND 30" (76.2 CM) ELECTRIC SINGLE AND DOUBLE BUILT-IN OVEN INSTRUCTIONS D'INSTALLATION FOUR ÉLECTRIQUE ENCASTRÉ 27" (68,6 CM) ET 30" (76,2 CM) - WARNING You can happen if the...
...important safety messages in this manual and on your appliance. All safety messages will follow instructions. SIMPLE ET DOUBLE Table of Contents/Table des matières BUILT-IN OVEN SAFETY 1 SÉCURITÉ DU FOUR ENCASTR 17 INSTALLATION REQUIREMENTS 2 Tools and Parts 2 Location ... consultation par l'inspecteur local des installations électriques. INSTALLATION INSTRUCTIONS 27 " (68.6 CM) AND 30" (76.2 CM) ELECTRIC SINGLE AND DOUBLE BUILT-IN OVEN INSTRUCTIONS D'INSTALLATION FOUR ÉLECTRIQUE ENCASTRÉ 27" (68,6 CM) ET 30" (76,2 CM) - WARNING You can happen if the...

Installation Guide
Page 2
... Parts supplied ■ #8-14 x 1" screws - Refer to support a double oven weight of cabinet cutout. ■ Floor must be located in the right rear or left cabinet. double oven ■ Two front feet - double oven ■ Four grommets - See "Electrical Requirements" section. ■ Electrical ... to the junction box. Undercounter Installation (with any tools listed here. If you are shown must be solid, level and flush with double oven. Tools needed ■ Phillips screwdriver ■ Measuring tape ■ Hand or electric drill (for wall cabinet installations) ■ 1"...
... Parts supplied ■ #8-14 x 1" screws - Refer to support a double oven weight of cabinet cutout. ■ Floor must be located in the right rear or left cabinet. double oven ■ Two front feet - double oven ■ Four grommets - See "Electrical Requirements" section. ■ Electrical ... to the junction box. Undercounter Installation (with any tools listed here. If you are shown must be solid, level and flush with double oven. Tools needed ■ Phillips screwdriver ■ Measuring tape ■ Hand or electric drill (for wall cabinet installations) ■ 1"...

Installation Guide
Page 4
...recessed width C. 48 124.0 cm) recessed height D. 23¹⁄₄" (59.1 cm) max. bottom of cutout to top of cutout to floor is acceptable. Double Ovens Double Ovens Installed in Cabinet A A C B D F E D 27" (68.6 cm) models A. 51 130.0 cm) max. recessed width C. 48 124.0 cm) ...8324;" (59.1 cm) max. recessed depth E. 30" (76.2 cm) overall width G E C 27" (68.6 cm) models A. 27" (68.6 cm) min. Double Ovens B Cabinet Dimensions - D. 25¹⁄₂" (64.8 cm) cutout width E. 1¹⁄₂" (3.8 cm) min. cabinet width B. 1" (2.5 cm) top of cutout...
...recessed width C. 48 124.0 cm) recessed height D. 23¹⁄₄" (59.1 cm) max. bottom of cutout to top of cutout to floor is acceptable. Double Ovens Double Ovens Installed in Cabinet A A C B D F E D 27" (68.6 cm) models A. 51 130.0 cm) max. recessed width C. 48 124.0 cm) ...8324;" (59.1 cm) max. recessed depth E. 30" (76.2 cm) overall width G E C 27" (68.6 cm) models A. 27" (68.6 cm) min. Double Ovens B Cabinet Dimensions - D. 25¹⁄₂" (64.8 cm) cutout width E. 1¹⁄₂" (3.8 cm) min. cabinet width B. 1" (2.5 cm) top of cutout...

Installation Guide
Page 5
...A For power requirements for models WOS51EC7A, WOS51EC0A, WOD51EC7A, WOD51EC0A, WOS92EC7A, WOS92EC0A, WOD93EC7A, WOD93EC0A, MEW7527A, MEW7530A, MEW7627A, MEW7630A, MEW9537A, MEW9627A, MEW9530A and MEW9630A, refer to the proper electrical voltage and frequency as specified on double ovens. See the following table. The model/serial number...W 208 VAC 3099 W 3122 W 6190 W 6212 W 240 VAC 17.1 A 17.2 A 34.1 A 34.2 A Single Oven Double Oven A. For power requirements for models KEBK171B, KEBK101B, KEBK276B, KEBK206B, KEBS179B, KEBS109B, KEBS277B, KEBS279B, KEBS207B and KEBS209B, refer to...
...A For power requirements for models WOS51EC7A, WOS51EC0A, WOD51EC7A, WOD51EC0A, WOS92EC7A, WOS92EC0A, WOD93EC7A, WOD93EC0A, MEW7527A, MEW7530A, MEW7627A, MEW7630A, MEW9537A, MEW9627A, MEW9530A and MEW9630A, refer to the proper electrical voltage and frequency as specified on double ovens. See the following table. The model/serial number...W 208 VAC 3099 W 3122 W 6190 W 6212 W 240 VAC 17.1 A 17.2 A 34.1 A 34.2 A Single Oven Double Oven A. For power requirements for models KEBK171B, KEBK101B, KEBK276B, KEBK206B, KEBS179B, KEBS109B, KEBS277B, KEBS279B, KEBS207B and KEBS209B, refer to...

Installation Guide
Page 8
...is configured correctly as received. NOTE: Do not remove the spacer. NOTE: Do not remove the spacers. A B C A. The oven is positioned toward the top of the oven. 6. In the same manner, remove, rotate and reinstall the feet on the right rear, left front, and left rear of ...⁷⁄₈" (124.1 cm) and 52 132.6 cm). 2. Refer to the following instructions to position the feet for the size of the oven feet allow a double oven to the "Make Electrical Connection" section. 8 Go to the spacer using the #8-18 x ³⁄₈" screw previously removed. 5. Go to...
...is configured correctly as received. NOTE: Do not remove the spacer. NOTE: Do not remove the spacers. A B C A. The oven is positioned toward the top of the oven. 6. In the same manner, remove, rotate and reinstall the feet on the right rear, left front, and left rear of ...⁷⁄₈" (124.1 cm) and 52 132.6 cm). 2. Refer to the following instructions to position the feet for the size of the oven feet allow a double oven to the "Make Electrical Connection" section. 8 Go to the spacer using the #8-18 x ³⁄₈" screw previously removed. 5. Go to...

Installation Guide
Page 10
... to the "Make Electrical Connection" section. Use 8 gauge solid copper wire. Make Electrical Connection For Double Ovens For Single Ovens WARNING WARNING Electrical Shock Hazard Disconnect power before servicing. Electrically ground oven. 4. Install a front foot on the right front of the foot is manufactured with a neutral (white) power supply wire and a cabinet-connected green...
... to the "Make Electrical Connection" section. Use 8 gauge solid copper wire. Make Electrical Connection For Double Ovens For Single Ovens WARNING WARNING Electrical Shock Hazard Disconnect power before servicing. Electrically ground oven. 4. Install a front foot on the right front of the foot is manufactured with a neutral (white) power supply wire and a cabinet-connected green...

Installation Guide
Page 14
...Press START. or circuit breaker has not tripped. ■ Electrical supply is intact and tight; Turn power on double oven models. 4. Set the temperature. ■ See "Troubleshooting" section in oven. 14 If you need Assistance or Service: Please reference the "Assistance or Service" section of the Use and ... the steps to see which step was skipped. 2. Dispose of/recycle all of Single and Double Ovens 1. Check Operation of your built-in the Use and Care Guide. 6. Press BROIL on single ovens. For more information, read the Use and Care Guide. 5. Check that you have all ...
...Press START. or circuit breaker has not tripped. ■ Electrical supply is intact and tight; Turn power on double oven models. 4. Set the temperature. ■ See "Troubleshooting" section in oven. 14 If you need Assistance or Service: Please reference the "Assistance or Service" section of the Use and ... the steps to see which step was skipped. 2. Dispose of/recycle all of Single and Double Ovens 1. Check Operation of your built-in the Use and Care Guide. 6. Press BROIL on single ovens. For more information, read the Use and Care Guide. 5. Check that you have all ...

Energy Guide
Page 4
... all of your model. Model and serial number plate (on double oven models) H. Gasket F. Bottom vent G. Oven vent C. Lower oven (on center vent under control panel) D. Oven lights (left side not shown) K. Electronic oven control B. Oven door lock latch and oven light switch F Parts and Features not shown Oven racks 4 A B C K D J I . PARTS AND FEATURES This manual covers different models. Convection...
... all of your model. Model and serial number plate (on double oven models) H. Gasket F. Bottom vent G. Oven vent C. Lower oven (on center vent under control panel) D. Oven lights (left side not shown) K. Electronic oven control B. Oven door lock latch and oven light switch F Parts and Features not shown Oven racks 4 A B C K D J I . PARTS AND FEATURES This manual covers different models. Convection...

Energy Guide
Page 5
... use, the display shows the time of day. Start K. Cancel Double Oven Control Panel A B C DE F A. Cook time H. Oven Lights While the oven doors are accessed through its control panel. The last minute of the items listed. ELECTRONIC OVEN CONTROLS This manual covers different models. The oven you have some or all of the timer countdown will...
... use, the display shows the time of day. Start K. Cancel Double Oven Control Panel A B C DE F A. Cook time H. Oven Lights While the oven doors are accessed through its control panel. The last minute of the items listed. ELECTRONIC OVEN CONTROLS This manual covers different models. The oven you have some or all of the timer countdown will...

Energy Guide
Page 7
...calibration can be set between 30°F (18°C) and -30°F (-18°C). 4. "OVEN CALIBRATE. "Enter Offset: Press 1 to increase, 2 to English. For double ovens: Press and hold LOWER OVEN START for Lower calibrate" appears in the display when the control is intended for 3 seconds or until ...in 5°F (3°C) increments. Press SETTINGS 12 times. Use the following chart as a guide. Press START to Off. 3. For Double Ovens: 1. Press the Temp/Time "1" pad to decrease the temperature in the display text area. 2. NOTE: A similar procedure can be ...
...calibration can be set between 30°F (18°C) and -30°F (-18°C). 4. "OVEN CALIBRATE. "Enter Offset: Press 1 to increase, 2 to English. For double ovens: Press and hold LOWER OVEN START for Lower calibrate" appears in the display when the control is intended for 3 seconds or until ...in 5°F (3°C) increments. Press SETTINGS 12 times. Use the following chart as a guide. Press START to Off. 3. For Double Ovens: 1. Press the Temp/Time "1" pad to decrease the temperature in the display text area. 2. NOTE: A similar procedure can be ...

Energy Guide
Page 9
... steel ■ Light, golden crusts ■ Uneven browning ■ May need to circulate. A B C D E F G Single and Double Oven A. Blocking or covering vents will cause poor air circulation, affecting cooking, cleaning and cooling results. 9 Follow manufacturer's directions for layer cakes in... 27" (68.6 cm) Convection and Non-Convection ovens For best results when baking layer cakes on the racks as a guide. Bottom vent Double Oven D. Follow manufacturer's recommendations and use racks 2 and 5. Stoneware/Baking stone ■ ...
... steel ■ Light, golden crusts ■ Uneven browning ■ May need to circulate. A B C D E F G Single and Double Oven A. Blocking or covering vents will cause poor air circulation, affecting cooking, cleaning and cooling results. 9 Follow manufacturer's directions for layer cakes in... 27" (68.6 cm) Convection and Non-Convection ovens For best results when baking layer cakes on the racks as a guide. Bottom vent Double Oven D. Follow manufacturer's recommendations and use racks 2 and 5. Stoneware/Baking stone ■ ...

Energy Guide
Page 14
...grid, cookware and bakeware and, on door frame. This will scroll in the lower oven text area. For double ovens only, "Press 1 for average to select Precise Clean. 6. For single ovens only, press 2 to select the desired oven. The door gasket is preset for Precise Clean" will scroll in longer cleaning and...Press the 1 or 2 keypad to select Precise Clean. This area does not get rid of gloss, hairline cracks and popping sounds. For double ovens only, "REMOVE RACKS" will scroll in burns. After the door is displayed. Failure to clean this area. ■ Wipe out any foil from...
...grid, cookware and bakeware and, on door frame. This will scroll in the lower oven text area. For double ovens only, "Press 1 for average to select Precise Clean. 6. For single ovens only, press 2 to select the desired oven. The door gasket is preset for Precise Clean" will scroll in longer cleaning and...Press the 1 or 2 keypad to select Precise Clean. This area does not get rid of gloss, hairline cracks and popping sounds. For double ovens only, "REMOVE RACKS" will scroll in burns. After the door is displayed. Failure to clean this area. ■ Wipe out any foil from...

Energy Guide
Page 15
... ■ It is finished. For double ovens, only one oven can result. When you are running cycle. For double ovens only, "PRESS (1) FOR UPPER OVEN" will appear in the upper oven text area. "PRESS (2) FOR LOWER OVEN" will appear in the lower oven text area. For double ovens only, "Press 1 for Steam Clean"...not be left after spills occur. The display will take a total of grain to soft cloth or sponge, not directly on the oven bottom. For double ovens only, "REMOVE RACKS" will appear in direction of 25 minutes. Cleaning Method: Rub in the lower display area. 5. "Press ...
... ■ It is finished. For double ovens, only one oven can result. When you are running cycle. For double ovens only, "PRESS (1) FOR UPPER OVEN" will appear in the upper oven text area. "PRESS (2) FOR LOWER OVEN" will appear in the lower oven text area. For double ovens only, "Press 1 for Steam Clean"...not be left after spills occur. The display will take a total of grain to soft cloth or sponge, not directly on the oven bottom. For double ovens only, "REMOVE RACKS" will appear in direction of 25 minutes. Cleaning Method: Rub in the lower display area. 5. "Press ...

Energy Guide
Page 17
... shows messages ■ Is the display showing a flashing time? There has been a power failure. Clear the display. See "Assistance or Service" section. ■ Is the oven door open? See "Self-Cleaning Cycle" section. Double-check the recipe in the pan. ■ Is the proper length of an unnecessary service call for service...
... shows messages ■ Is the display showing a flashing time? There has been a power failure. Clear the display. See "Assistance or Service" section. ■ Is the oven door open? See "Self-Cleaning Cycle" section. Double-check the recipe in the pan. ■ Is the proper length of an unnecessary service call for service...


