Installation Instructions
Page 4
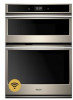
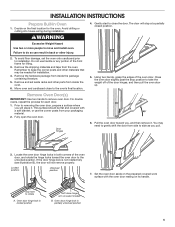
... and remove. Open the oven door. 3. A Oven door hinge lock in both corners of the Installation Instructions provided with the oven door resting on the prepared covered work surface, with your packaging material. 2. Remove the hardware package from your built-in microwave/oven combination. 1. Set the oven door(s) aside on its handle. 7. Oven door hinge lock in back or other materials that may need to the unlocked position. Failure to the "Electrical Requirements" section and complete the instructions in the "Make Electrical Connection...
... and remove. Open the oven door. 3. A Oven door hinge lock in both corners of the Installation Instructions provided with the oven door resting on the prepared covered work surface, with your packaging material. 2. Remove the hardware package from your built-in microwave/oven combination. 1. Set the oven door(s) aside on its handle. 7. Oven door hinge lock in back or other materials that may need to the unlocked position. Failure to the "Electrical Requirements" section and complete the instructions in the "Make Electrical Connection...
Installation Instructions
Page 5
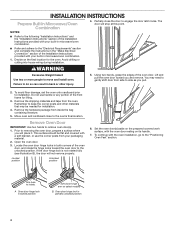
... a recommended cutout height of the oven door, and rotate the hinge locks toward the oven cavity to remove then replace the oven door. Slowly insert door, making sure you feel a slight drop. 4. You will know the door is not properly installed. Replace Oven Door 1. Slot in the lower front of door at the midpoint. Lower the oven door to a full 90 degrees, repeat steps 1 through 3. 5. If the oven door does not open to...
... a recommended cutout height of the oven door, and rotate the hinge locks toward the oven cavity to remove then replace the oven door. Slowly insert door, making sure you feel a slight drop. 4. You will know the door is not properly installed. Replace Oven Door 1. Slot in the lower front of door at the midpoint. Lower the oven door to a full 90 degrees, repeat steps 1 through 3. 5. If the oven door does not open to...

Installation Instructions
Page 8
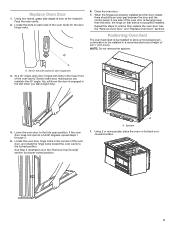
... all parts are now installed. Microwave oven should begin cooking, and the microwave oven interior light should be on for 5 minutes, check for heat. Select Cooking Method. 4. Press START. When oven has been on . Let microwave oven complete cooking time. Check Operation of Lower Oven 1. The interior microwave oven light should stop cooking. Dispose of the Use and Care Guide provided with 1 cup (250 mL) of the cooking time, and the microwave oven will shut off . 6. When display reads "1:00", open microwave oven door. The microwave should turn off the oven...
... all parts are now installed. Microwave oven should begin cooking, and the microwave oven interior light should be on for 5 minutes, check for heat. Select Cooking Method. 4. Press START. When oven has been on . Let microwave oven complete cooking time. Check Operation of Lower Oven 1. The interior microwave oven light should stop cooking. Dispose of the Use and Care Guide provided with 1 cup (250 mL) of the cooking time, and the microwave oven will shut off . 6. When display reads "1:00", open microwave oven door. The microwave should turn off the oven...
Lower Oven Owners Manual
Page 1
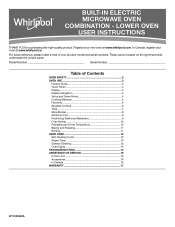
... Panel 4 Display 4 Display Navigation 4 Setup and Demo Mode 4 Cooking Methods 4 Favorites 6 Assisted Cooking 6 Tools 7 More Modes 8 Aluminum Foil 9 Positioning Racks and Bakeware 9 Oven Vent(s 10 Preheating and Oven Temperature 10 Baking and Roasting 11 Broiling 11 OVEN CARE 12 Self-Cleaning Cycle 12 Steam Clean 13 General Cleaning 13 Oven Lights 14 TROUBLESHOOTING 14 ASSISTANCE OR SERVICE 16 In the U.S.A 16 Accessories 16 In Canada 16 WARRANTY 17 W11220320A Register your new oven at www.whirlpool.ca. In Canada, register your product model and serial numbers...
... Panel 4 Display 4 Display Navigation 4 Setup and Demo Mode 4 Cooking Methods 4 Favorites 6 Assisted Cooking 6 Tools 7 More Modes 8 Aluminum Foil 9 Positioning Racks and Bakeware 9 Oven Vent(s 10 Preheating and Oven Temperature 10 Baking and Roasting 11 Broiling 11 OVEN CARE 12 Self-Cleaning Cycle 12 Steam Clean 13 General Cleaning 13 Oven Lights 14 TROUBLESHOOTING 14 ASSISTANCE OR SERVICE 16 In the U.S.A 16 Accessories 16 In Canada 16 WARRANTY 17 W11220320A Register your new oven at www.whirlpool.ca. In Canada, register your product model and serial numbers...
Lower Oven Owners Manual
Page 2
... while using the oven, follow basic precautions, including the following: ■ Proper Installation - Always place oven racks in oven. ■ DO NOT TOUCH HEATING ELEMENTS OR INTERIOR SURFACES OF OVEN - Heating elements may result in Manual. ■ Before Self-Cleaning the Oven - Build-up of pressure may become hot enough to cause burns. Remove broiler pan and other servicing should be hot even though they have had sufficient time to cool. Care...
... while using the oven, follow basic precautions, including the following: ■ Proper Installation - Always place oven racks in oven. ■ DO NOT TOUCH HEATING ELEMENTS OR INTERIOR SURFACES OF OVEN - Heating elements may result in Manual. ■ Before Self-Cleaning the Oven - Build-up of pressure may become hot enough to cause burns. Remove broiler pan and other servicing should be hot even though they have had sufficient time to cool. Care...

Lower Oven Owners Manual
Page 3
... the user to return to suit your needs. When the oven door is already on , the Oven Power/Cancel keypad stops any oven function except the Clock, Timer, and Control Lock. 3 The Microwave Power/Cancel keypad turns the Microwave on . Oven Light Oven Cavity Light The oven light is closed, press the Oven Light keypad to cause cancer. Control Panel Keypad Tools Home Favorites Feature Oven Use Functions Instructions Enables you to personalize the audible tones and oven operation to the "Cooking...
... the user to return to suit your needs. When the oven door is already on , the Oven Power/Cancel keypad stops any oven function except the Clock, Timer, and Control Lock. 3 The Microwave Power/Cancel keypad turns the Microwave on . Oven Light Oven Cavity Light The oven light is closed, press the Oven Light keypad to cause cancer. Control Panel Keypad Tools Home Favorites Feature Oven Use Functions Instructions Enables you to personalize the audible tones and oven operation to the "Cooking...

Lower Oven Owners Manual
Page 4
... broil temperature into product use , the display will show the clock, mode, oven temperature, kitchen timer, and oven timer, if set the time. The display is in use . 2. When an oven is complete. (Optional) To quickly preheat the oven, see the "Tools" section. Select TRY THE PRODUCT to right or manually by selecting the grid in food poisoning or sickness. Select START to navigate and interact with the product and explore Voice Control. 4. Press the Oven...
... broil temperature into product use , the display will show the clock, mode, oven temperature, kitchen timer, and oven timer, if set the time. The display is in use . 2. When an oven is complete. (Optional) To quickly preheat the oven, see the "Tools" section. Select TRY THE PRODUCT to right or manually by selecting the grid in food poisoning or sickness. Select START to navigate and interact with the product and explore Voice Control. 4. Press the Oven...

Lower Oven Owners Manual
Page 7
...; Restore Factory: This will be locked. Self Clean option is in Demo Mode after a power failure, if set automatically. ■■ Your Meal Times: Adjust when breakfast/lunch/dinner is off , adjust the oven calibration, change the oven temperature between Fahrenheit and Celsius, turn off . The Control Lock is preset unlocked, but can be set before the power failure occurs. Info ■■ Service and Support: Displays model number, Customer Support contact info, and Diagnostics ■...
...; Restore Factory: This will be locked. Self Clean option is in Demo Mode after a power failure, if set automatically. ■■ Your Meal Times: Adjust when breakfast/lunch/dinner is off , adjust the oven calibration, change the oven temperature between Fahrenheit and Celsius, turn off . The Control Lock is preset unlocked, but can be set before the power failure occurs. Info ■■ Service and Support: Displays model number, Customer Support contact info, and Diagnostics ■...
Lower Oven Owners Manual
Page 8
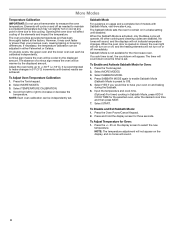
... Sabbath Mode, visit www.star-k.org. More Modes Temperature Calibration IMPORTANT: Do not use a thermometer to increase or decrease the temperature. On double ovens, the upper oven and the lower oven can be independently set , the countdown will not turn on usage and a complete list of the elements and impact the temperature. Press the Oven Power/Cancel Keypad. 2. All other cooking and cleaning cycles are achieved. Opening the oven door will not indicate temperature changes...
... Sabbath Mode, visit www.star-k.org. More Modes Temperature Calibration IMPORTANT: Do not use a thermometer to increase or decrease the temperature. On double ovens, the upper oven and the lower oven can be independently set , the countdown will not turn on usage and a complete list of the elements and impact the temperature. Press the Oven Power/Cancel Keypad. 2. All other cooking and cleaning cycles are achieved. Opening the oven door will not indicate temperature changes...
Lower Oven Owners Manual
Page 10
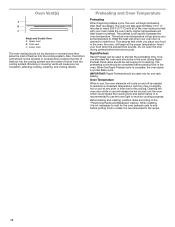
... oven racks provided with your oven door is complete, the oven starts a normal Bake cycle. Opening the oven door while in use the oven light to preheat. Blocking or covering vents will take longer to monitor cooking progress. The actual oven temperature will cycle on and off as needed to insert food. Do not open the door during Rapid Preheat. Rapid Preheat Rapid Preheat can be blocked or covered since it allows the inlet of hot air...
... oven racks provided with your oven door is complete, the oven starts a normal Bake cycle. Opening the oven door while in use the oven light to preheat. Blocking or covering vents will take longer to monitor cooking progress. The actual oven temperature will cycle on and off as needed to insert food. Do not open the door during Rapid Preheat. Rapid Preheat Rapid Preheat can be blocked or covered since it allows the inlet of hot air...
Lower Oven Owners Manual
Page 11
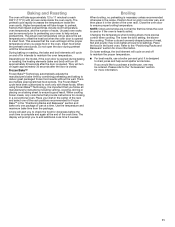
... opened to purchase a broiler pan, one package or pan at lower broil settings. The lower the broil setting, the slower the cooking. If you would like to insert food. The actual oven temperature will turn on a baking sheet to the "Accessories" section for doneness before the cook time is opened during preheat until the tone sounds. Insert food when the preheat tone sounds. Do not open the door during baking or roasting, the heating elements (bake...
... opened to purchase a broiler pan, one package or pan at lower broil settings. The lower the broil setting, the slower the cooking. If you would like to insert food. The actual oven temperature will turn on a baking sheet to the "Accessories" section for doneness before the cook time is opened during preheat until the tone sounds. Insert food when the preheat tone sounds. Do not open the door during baking or roasting, the heating elements (bake...
Lower Oven Owners Manual
Page 12
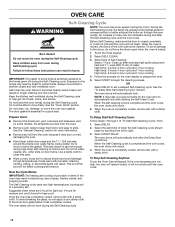
...; Remove the broiler pan, grid, cookware and bakeware, and, on steel in death to prepare the oven. 5. See the "General Cleaning" section for heavy soil. At high temperatures, foods react with a damp cloth. To Delay Start Self-Cleaning Cycle: Follow steps 1 through the oven vent(s). Select START DELAY. If the oven temperature is complete and the oven cools, the oven doors will not work during Self-Cleaning cycle. Suggested clean times are 3 hours for light soil...
...; Remove the broiler pan, grid, cookware and bakeware, and, on steel in death to prepare the oven. 5. See the "General Cleaning" section for heavy soil. At high temperatures, foods react with a damp cloth. To Delay Start Self-Cleaning Cycle: Follow steps 1 through the oven vent(s). Select START DELAY. If the oven temperature is complete and the oven cools, the oven doors will not work during Self-Cleaning cycle. Suggested clean times are 3 hours for light soil...
Lower Oven Owners Manual
Page 13
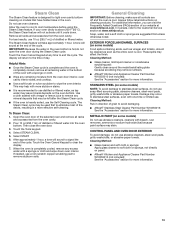
.... Touch the Oven Cancel Keypad to room temperature before using the Steam Clean feature. For additional information, you can visit the Frequently Asked Questions (FAQs) section of distilled or filtered water. Cleaning Method: ■■ Glass cleaner, mild liquid cleaner or nonabrasive scrubbing pad: Gently clean around the model/serial/rating plate because scrubbing may remove numbers. ■■ Affresh® Kitchen and Appliance Cleaner Part Number W10355010...
.... Touch the Oven Cancel Keypad to room temperature before using the Steam Clean feature. For additional information, you can visit the Frequently Asked Questions (FAQs) section of distilled or filtered water. Cleaning Method: ■■ Glass cleaner, mild liquid cleaner or nonabrasive scrubbing pad: Gently clean around the model/serial/rating plate because scrubbing may remove numbers. ■■ Affresh® Kitchen and Appliance Cleaner Part Number W10355010...
Lower Oven Owners Manual
Page 14
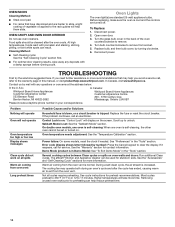
... oven cannot be used for stubborn soils. Several cooking cycles between Clean cycles or spills on oven walls and doors: Run additional Clean cycles. Not all spills Warm air coming from oven vent Long preheat times Possible Causes and/or Solutions Household fuse is blown, or a circuit breaker is tripped: Replace the fuse or reset the circuit breaker. Oven Lights The oven light(s) are turned off. If you avoid a service call, refer to remove from the oven vent. Oven temperature needs adjustment: See the "Temperature Calibration" section. Error code (display...
... oven cannot be used for stubborn soils. Several cooking cycles between Clean cycles or spills on oven walls and doors: Run additional Clean cycles. Not all spills Warm air coming from oven vent Long preheat times Possible Causes and/or Solutions Household fuse is blown, or a circuit breaker is tripped: Replace the fuse or reset the circuit breaker. Oven Lights The oven light(s) are turned off. If you avoid a service call, refer to remove from the oven vent. Oven temperature needs adjustment: See the "Temperature Calibration" section. Error code (display...

Lower Oven Owners Manual
Page 16
... www.whirlpool.com/cookingaccessories Porcelain Broiler Pan and Grid Order Part Number 4396923 Premium Broiler Pan and Roasting Rack Order Part Number W10123240 Affresh® Stainless Steel Cleaner (stainless steel models) Order Part Number W10355016 Affresh® Kitchen and Appliance Cleaner Order Part Number W10355010 Accessories Microwave Steamer Order Part Number 8205262RB 30" (76.2 cm) FIT Kit Vent Trim for Combo Ovens Order Part Number W10495947 27" (68.5 cm) FIT Kit Vent Trim for assistance or service, please check the "Troubleshooting" section...
... www.whirlpool.com/cookingaccessories Porcelain Broiler Pan and Grid Order Part Number 4396923 Premium Broiler Pan and Roasting Rack Order Part Number W10123240 Affresh® Stainless Steel Cleaner (stainless steel models) Order Part Number W10355016 Affresh® Kitchen and Appliance Cleaner Order Part Number W10355010 Accessories Microwave Steamer Order Part Number 8205262RB 30" (76.2 cm) FIT Kit Vent Trim for Combo Ovens Order Part Number W10495947 27" (68.5 cm) FIT Kit Vent Trim for assistance or service, please check the "Troubleshooting" section...
Lower Oven Owners Manual
Page 17
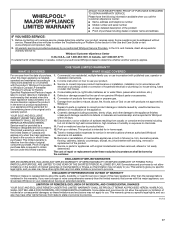
...; Model number and serial number ■■ A clear, detailed description of the problem ■■ Proof of non-genuine Whirlpool parts or accessories. warranty period. 9. trim, decorative panels, flooring, cabinetry, islands, countertops, drywall, etc.) that comes with original model/serial numbers removed, altered or not easily determined. This warranty gives you specific legal rights, and you also may not apply to or furnished with electrical or plumbing codes...
...; Model number and serial number ■■ A clear, detailed description of the problem ■■ Proof of non-genuine Whirlpool parts or accessories. warranty period. 9. trim, decorative panels, flooring, cabinetry, islands, countertops, drywall, etc.) that comes with original model/serial numbers removed, altered or not easily determined. This warranty gives you specific legal rights, and you also may not apply to or furnished with electrical or plumbing codes...
Installation Instructions
Page 2
...; Drill (for wall cabinet installations) ■■ 1" (2.5 cm) drill bit (for wall cabinet installations) ■■ Level ■■ Flat-blade screwdriver Parts Needed ■■ UL listed or CSA Approved conduit connector ■■ UL listed wire connectors ■■ Warming Drawer Deflector Kit (for ovens installed above a warming drawer): Color Size Type Warming Drawer Deflector Kit White 27" Combo W10510613 White 30" Combo W10510614 Black 27" Combo W10531009 Black 30" Combo W10531010 Stainless Steel...
...; Drill (for wall cabinet installations) ■■ 1" (2.5 cm) drill bit (for wall cabinet installations) ■■ Level ■■ Flat-blade screwdriver Parts Needed ■■ UL listed or CSA Approved conduit connector ■■ UL listed wire connectors ■■ Warming Drawer Deflector Kit (for ovens installed above a warming drawer): Color Size Type Warming Drawer Deflector Kit White 27" Combo W10510613 White 30" Combo W10510614 Black 27" Combo W10531009 Black 30" Combo W10531010 Stainless Steel...
Installation Instructions
Page 5
... people to gently shift the door from inside the package containing literature. 5. Do not use the corner posts from the oven. To avoid floor damage, set aside racks and other materials that may need to move and install oven. Locate the oven door hinge locks in locked position Soft close hinge arm on its handle. You may be flat and covered with the oven door resting on select models B. INSTALLATION INSTRUCTIONS Prepare Built-In Oven 1.
... people to gently shift the door from inside the package containing literature. 5. Do not use the corner posts from the oven. To avoid floor damage, set aside racks and other materials that may need to move and install oven. Locate the oven door hinge locks in locked position Soft close hinge arm on its handle. You may be flat and covered with the oven door resting on select models B. INSTALLATION INSTRUCTIONS Prepare Built-In Oven 1.
Installation Instructions
Page 9
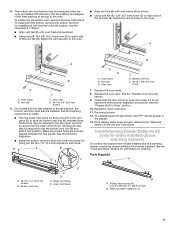
... are shipped in the display. 13. Vent tab C. Replace the oven door. Repeat for ovens installed above warming drawers) On combo microwave/oven models installed above a warming drawer, a warming drawer deflector kit must also be required to flex the bottom vent trim (B) and slide it is not, repeat the removal and installation procedures. Reconnect power. 12. On models with the feet installed in Step 6. ■■ Align vent tab (B) with oven frame (A) as shown. ■■ Using one #8-18 x 3/8" (9.5 mm...
... are shipped in the display. 13. Vent tab C. Replace the oven door. Repeat for ovens installed above warming drawers) On combo microwave/oven models installed above a warming drawer, a warming drawer deflector kit must also be required to flex the bottom vent trim (B) and slide it is not, repeat the removal and installation procedures. Reconnect power. 12. On models with the feet installed in Step 6. ■■ Align vent tab (B) with oven frame (A) as shown. ■■ Using one #8-18 x 3/8" (9.5 mm...
Installation Instructions
Page 10
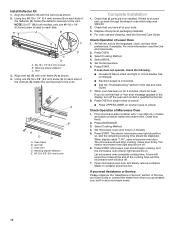
... feel heat or if an error message appears in the Use and Care Guide. 7. At first use and cleaning, read the Use and Care Guide. 2. Press OVEN on single ovens to cancel. ■■ Press UPPER/LOWER on . Press MICROWAVE. 3. Select Cooking Method. 4. The interior microwave oven light should be on, and the remaining cooking time should be on double ovens to the vent. Microwave oven should begin cooking, and the microwave oven interior light should be hot. Open microwave oven door and slowly remove container...
... feel heat or if an error message appears in the Use and Care Guide. 7. At first use and cleaning, read the Use and Care Guide. 2. Press OVEN on single ovens to cancel. ■■ Press UPPER/LOWER on . Press MICROWAVE. 3. Select Cooking Method. 4. The interior microwave oven light should be on, and the remaining cooking time should be on double ovens to the vent. Microwave oven should begin cooking, and the microwave oven interior light should be hot. Open microwave oven door and slowly remove container...


