Installation Guide
Page 1
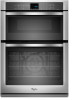
... pour consultation par l'inspecteur local des installations électriques. INSTALLATION INSTRUCTIONS 27" (68.6 CM) AND 30" (76.2 CM) ELECTRIC BUILT-IN MICROWAVE/OVEN COMBINATION INSTRUCTIONS D'INSTALLATION FOUR CONVENTIONNEL ET FOUR À MICRO-ONDES ÉLECTRIQUES, COMBINÉS ET ENCASTRÉS DE 27" (68,6 CM) ET ...pose de la porte du four 13 Raccordement électrique 13 Installation du four 15 Achever l'installation 16 BUILT-IN MICROWAVE/OVEN COMBINATION SAFETY Your safety and the safety of injury, and tell you don't follow instructions. All safety messages will follow ...
... pour consultation par l'inspecteur local des installations électriques. INSTALLATION INSTRUCTIONS 27" (68.6 CM) AND 30" (76.2 CM) ELECTRIC BUILT-IN MICROWAVE/OVEN COMBINATION INSTRUCTIONS D'INSTALLATION FOUR CONVENTIONNEL ET FOUR À MICRO-ONDES ÉLECTRIQUES, COMBINÉS ET ENCASTRÉS DE 27" (68,6 CM) ET ...pose de la porte du four 13 Raccordement électrique 13 Installation du four 15 Achever l'installation 16 BUILT-IN MICROWAVE/OVEN COMBINATION SAFETY Your safety and the safety of injury, and tell you don't follow instructions. All safety messages will follow ...
Installation Guide
Page 2
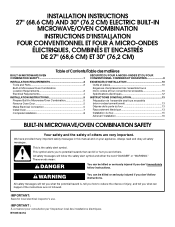
... allowable wood cabinet temperatures of cabinet cutout. bottom vent ■ Four grommets* Check local codes. Built-In Microwave/Oven Combination Location Requirements IMPORTANT: Observe all electrical connections be made by a licensed, qualified electrical installer. *Grommets are shown...delaminate or sustain other damage. See "Electrical Requirements" section. ■ Electrical supply junction box should have been drilled in oven) of the oven. ■ Grounded electrical supply is required. See "Electrical Requirements." IMPORTANT: To avoid damage to your cabinets, check ...
... allowable wood cabinet temperatures of cabinet cutout. bottom vent ■ Four grommets* Check local codes. Built-In Microwave/Oven Combination Location Requirements IMPORTANT: Observe all electrical connections be made by a licensed, qualified electrical installer. *Grommets are shown...delaminate or sustain other damage. See "Electrical Requirements" section. ■ Electrical supply junction box should have been drilled in oven) of the oven. ■ Grounded electrical supply is required. See "Electrical Requirements." IMPORTANT: To avoid damage to your cabinets, check ...

Installation Guide
Page 3
...: The cabinet height can be between 41" (104.1 cm) and 41½" (105.6 cm) for microwave/oven combination. 3 Product Dimensions 27" (68.6 cm) and 30" (76.2 cm) Ovens B Cabinet Dimensions 27" (68.6 cm) and 30" (76.2 cm) Ovens A B D F C A G E C E D 27" (68.6 cm) models A. 42 108.0 cm) overall height B. 25 64.6 cm) recessed width C. 41...
...: The cabinet height can be between 41" (104.1 cm) and 41½" (105.6 cm) for microwave/oven combination. 3 Product Dimensions 27" (68.6 cm) and 30" (76.2 cm) Ovens B Cabinet Dimensions 27" (68.6 cm) and 30" (76.2 cm) Ovens A B D F C A G E C E D 27" (68.6 cm) models A. 42 108.0 cm) overall height B. 25 64.6 cm) recessed width C. 41...

Installation Guide
Page 4
... 5490 W 4590 W 30.4 A 28.4 A 5520 W 4620 W 30.5 A 28.6 A For power requirements for models WOC54EC7A, WOC54EC0A, WOC95EC0A and MMW9730A, refer to the proper electrical voltage, amperage, and frequency as specified on the model/serial number rating plate. Connect the aluminum wiring to... the added section of the flexible conduit leads. 2. A Voltage Microwave Oven Microwave Oven and Microwave and Microwave Oven with Single Oven with a qualified electrical installer if you will be using special connectors and/or tools designed and UL listed...
... 5490 W 4590 W 30.4 A 28.4 A 5520 W 4620 W 30.5 A 28.6 A For power requirements for models WOC54EC7A, WOC54EC0A, WOC95EC0A and MMW9730A, refer to the proper electrical voltage, amperage, and frequency as specified on the model/serial number rating plate. Connect the aluminum wiring to... the added section of the flexible conduit leads. 2. A Voltage Microwave Oven Microwave Oven and Microwave and Microwave Oven with Single Oven with a qualified electrical installer if you will be using special connectors and/or tools designed and UL listed...

Installation Guide
Page 5
...Remove junction box cover, if it will no longer close to avoid drilling into or severing wiring during installation. Open the oven door. 2. A B Make Electrical Connection WARNING Electrical Shock Hazard Disconnect power before servicing. Tighten screws on a covered work surface. ...Locate existing wiring to the oven's final location. Failure to installation. Grasp the edges of the oven door with a neutral (white) power supply wire and a cabinet-connected green (or bare) ground wire...
...Remove junction box cover, if it will no longer close to avoid drilling into or severing wiring during installation. Open the oven door. 2. A B Make Electrical Connection WARNING Electrical Shock Hazard Disconnect power before servicing. Tighten screws on a covered work surface. ...Locate existing wiring to the oven's final location. Failure to installation. Grasp the edges of the oven door with a neutral (white) power supply wire and a cabinet-connected green (or bare) ground wire...

Installation Guide
Page 6
... Untwist white wire from green (or bare) ground wire coming from oven E. Black wires D. White wires E. Red wires D. 4-wire flexible conduit from the oven. 4. Connect the green (or bare) ground wire (H) from the oven cable to section: 4-wire 4-wire Cable from Home Power Supply 3-...black wires (B) together using a UL listed wire connector. 3. Connect the 2 white wires (D) and the green (or bare) ground wire (of the oven cable) using a UL listed wire connector. 2. UL listed wire connectors H. Junction box C. UL listed or CSA approved conduit connector 1. Install junction box...
... Untwist white wire from green (or bare) ground wire coming from oven E. Black wires D. White wires E. Red wires D. 4-wire flexible conduit from the oven. 4. Connect the green (or bare) ground wire (H) from the oven cable to section: 4-wire 4-wire Cable from Home Power Supply 3-...black wires (B) together using a UL listed wire connector. 3. Connect the 2 white wires (D) and the green (or bare) ground wire (of the oven cable) using a UL listed wire connector. 2. UL listed wire connectors H. Junction box C. UL listed or CSA approved conduit connector 1. Install junction box...

Installation Guide
Page 7
... using a flatblade screwdriver. If it is free to grip. Grommet 7 Do not push against seal area of hinges into cabinet cutout. On some models, the oven vent is taped to the side of the Use and Care Guide or contact the dealer from whom you have model KEMS308S, KEHU309S or KEMS378S..., proceed to the oven. Push against seal area of the vent, fasten vent securely to Step 5. 4. If display panel does not light, please reference the "Assistance or Service" section...
... using a flatblade screwdriver. If it is free to grip. Grommet 7 Do not push against seal area of hinges into cabinet cutout. On some models, the oven vent is taped to the side of the Use and Care Guide or contact the dealer from whom you have model KEMS308S, KEHU309S or KEMS378S..., proceed to the oven. Push against seal area of the vent, fasten vent securely to Step 5. 4. If display panel does not light, please reference the "Assistance or Service" section...

Installation Guide
Page 8
... Guide. 3. Press BROIL. 4. Press START. or circuit breaker has not tripped. ■ Electrical supply is intact and tight; Open microwave oven door and slowly remove container. Check that all of your built-in the Use and Care Guide. 6. Dispose of the cooking time, and ... whom you need Assistance or Service: Please reference the "Assistance or Service" section of water and place container inside microwave oven. The interior microwave oven light should be displayed. Turn power on , and the remaining cooking time should stop cooking. Press COOK and set up...
... Guide. 3. Press BROIL. 4. Press START. or circuit breaker has not tripped. ■ Electrical supply is intact and tight; Open microwave oven door and slowly remove container. Check that all of your built-in the Use and Care Guide. 6. Dispose of the cooking time, and ... whom you need Assistance or Service: Please reference the "Assistance or Service" section of water and place container inside microwave oven. The interior microwave oven light should be displayed. Turn power on , and the remaining cooking time should stop cooking. Press COOK and set up...
Use & Care Guide
Page 2
... if you don't follow instructions. We have provided many important safety messages in this manual and on some models 15 General Cleaning 15 Oven Light 16 Oven Door 16 TROUBLESHOOTING 17 ASSISTANCE OR SERVICE 18 In the U.S.A 18 Accessories 18 In Canada 18 WARRANTY 19 TABLE DES MATIÈRES ... 35 Porte du four 35 DÉPANNAGE 36 ASSISTANCE OU SERVICE 37 Aux États-Unis 37 Accessoires 37 Au Canada 37 GARANTIE 38 OVEN SAFETY Your safety and the safety of injury, and tell you what the potential hazard is the safety alert symbol. All safety messages will...
... if you don't follow instructions. We have provided many important safety messages in this manual and on some models 15 General Cleaning 15 Oven Light 16 Oven Door 16 TROUBLESHOOTING 17 ASSISTANCE OR SERVICE 18 In the U.S.A 18 Accessories 18 In Canada 18 WARRANTY 19 TABLE DES MATIÈRES ... 35 Porte du four 35 DÉPANNAGE 36 ASSISTANCE OU SERVICE 37 Aux États-Unis 37 Accessoires 37 Au Canada 37 GARANTIE 38 OVEN SAFETY Your safety and the safety of injury, and tell you what the potential hazard is the safety alert symbol. All safety messages will...

Use & Care Guide
Page 3
...damp potholders on Grease Fires - Heating elements may be referred to a qualified technician. ■ Storage in color. among these surfaces are dark in Oven - Care should be hot even though they have had sufficient time to cool. Remove broiler pan and other bulky cloth. ■ Use Care When...Do not repair or replace any kind should never be taken not to rub, damage, or move the gasket. ■ Do Not Use Oven Cleaners - SAVE THESE INSTRUCTIONS State of California Proposition 65 Warnings: WARNING: This product contains one or more chemicals known to the State of ...
...damp potholders on Grease Fires - Heating elements may be referred to a qualified technician. ■ Storage in color. among these surfaces are dark in Oven - Care should be hot even though they have had sufficient time to cool. Remove broiler pan and other bulky cloth. ■ Use Care When...Do not repair or replace any kind should never be taken not to rub, damage, or move the gasket. ■ Do Not Use Oven Cleaners - SAVE THESE INSTRUCTIONS State of California Proposition 65 Warnings: WARNING: This product contains one or more chemicals known to the State of ...
Use & Care Guide
Page 4
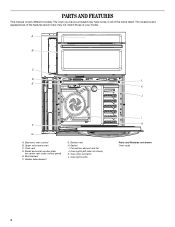
... have purchased may not match those of the items listed. Upper microwave oven C. Broil element F. Gasket I H Parts and Features not shown Oven racks 4 Electronic oven control B. Bottom vent H. Oven vent D. PARTS AND FEATURES This manual covers different models. Oven light switch I . Convection element and fan J. The locations and appearances of the features shown here may...
... have purchased may not match those of the items listed. Upper microwave oven C. Broil element F. Gasket I H Parts and Features not shown Oven racks 4 Electronic oven control B. Bottom vent H. Oven vent D. PARTS AND FEATURES This manual covers different models. Oven light switch I . Convection element and fan J. The locations and appearances of the features shown here may...
Use & Care Guide
Page 5
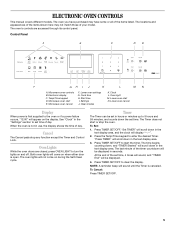
... stop any function except the Timer and Control Lock. Press TIMER SET/OFF to enter the desired Timer. To Cancel: Press TIMER SET/OFF. 5 Oven Lights While the oven doors are accessed through its control panel. Timer The Timer can be displayed. 4. "Set TIMER" will scroll down in the text display area..." section to 9 hours and 59 minutes, and counts down the set time. The time begins counting down in seconds. Press TIMER SET/OFF to the oven or if a power failure occurs, "12:00" will sound until the Timer is not in use, the display shows the time of the timer countdown...
... stop any function except the Timer and Control Lock. Press TIMER SET/OFF to enter the desired Timer. To Cancel: Press TIMER SET/OFF. 5 Oven Lights While the oven doors are accessed through its control panel. Timer The Timer can be displayed. 4. "Set TIMER" will scroll down in the text display area..." section to 9 hours and 59 minutes, and counts down the set time. The time begins counting down in seconds. Press TIMER SET/OFF to the oven or if a power failure occurs, "12:00" will sound until the Timer is not in use, the display shows the time of the timer countdown...

Use & Care Guide
Page 6
...to OFF" will appear in the display text area. 2. Basic Functions One tone ■ Valid pad press ■ Function has been entered ■ Oven is factory preset with Sabbath Mode Off. Press SETTINGS three times. Press the Temp/Time "1" keypad to 24-Hour Format: 1. Press SETTINGS four times..... 2. The sound setting has been changed . NOTE: A similar procedure can be changed to Star-K Jewish Sabbath requirements. Adjusting Sound Volume The oven sound is factory preset for OFF" will appear in the text area. "SOUND VOLUME" and "HIGH. Press (1) for High but can be ...
...to OFF" will appear in the display text area. 2. Basic Functions One tone ■ Valid pad press ■ Function has been entered ■ Oven is factory preset with Sabbath Mode Off. Press SETTINGS three times. Press the Temp/Time "1" keypad to 24-Hour Format: 1. Press SETTINGS four times..... 2. The sound setting has been changed . NOTE: A similar procedure can be changed to Star-K Jewish Sabbath requirements. Adjusting Sound Volume The oven sound is factory preset for OFF" will appear in the text area. "SOUND VOLUME" and "HIGH. Press (1) for High but can be ...

Use & Care Guide
Page 7
...Temp/Time "1" pad to decrease the temperature in the display text area. 2. however, it may cook faster or slower than your previous oven, so the temperature calibration can be adjusted. ADJUSTMENT °F (ADJUSTMENT °C) COOKS FOOD 10°F (6°C) ...a little more 20...much more -10°F (-6°C) ...a little less -20°F (-12°C) ...moderately less -30°F (-18°C) ...much less To Adjust Oven Temperature Calibration: 1. "Enter Offset: Press 1 to increase, 2 to OFF" will appear in the text area. 3. Press START to automatically shut off Demo...
...Temp/Time "1" pad to decrease the temperature in the display text area. 2. however, it may cook faster or slower than your previous oven, so the temperature calibration can be adjusted. ADJUSTMENT °F (ADJUSTMENT °C) COOKS FOOD 10°F (6°C) ...a little more 20...much more -10°F (-6°C) ...a little less -20°F (-12°C) ...moderately less -30°F (-18°C) ...much less To Adjust Oven Temperature Calibration: 1. "Enter Offset: Press 1 to increase, 2 to OFF" will appear in the text area. 3. Press START to automatically shut off Demo...
Use & Care Guide
Page 8
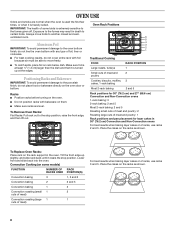
... Foil IMPORTANT: To avoid permanent damage to the stop position. Convection Cooking (on some birds is extremely sensitive to move birds to certain birds. Oven Rack Positions 6 5 4 3 2 1 Traditional Cooking FOOD Large roasts, turkeys Small cuts of meat) For best results when baking layer cakes ...IMPORTANT: The health of meat and poultry: 1 Rack positions and pan placement for 30" (76.2 cm) and 27" (68.6 cm) Convection and Non-Convection ovens 1-rack baking: 3 2-rack baking: 2 and 5 Most 2-rack baking: 2 and 5 Roasting small cuts of meat and poultry: 2 Roasting large cuts of...
... Foil IMPORTANT: To avoid permanent damage to the stop position. Convection Cooking (on some birds is extremely sensitive to move birds to certain birds. Oven Rack Positions 6 5 4 3 2 1 Traditional Cooking FOOD Large roasts, turkeys Small cuts of meat) For best results when baking layer cakes ...IMPORTANT: The health of meat and poultry: 1 Rack positions and pan placement for 30" (76.2 cm) and 27" (68.6 cm) Convection and Non-Convection ovens 1-rack baking: 3 2-rack baking: 2 and 5 Most 2-rack baking: 2 and 5 Roasting small cuts of meat and poultry: 2 Roasting large cuts of...

Use & Care Guide
Page 9
...The internal temperature, not appearance, should be blocked or covered since it allows the inlet of fresh air into the cooling system. Microwave oven D. Bakeware The bakeware material affects cooking results. Ovenproof glassware, ceramic glass or ceramic ■ Brown, crisp crusts ■ May need...9632; For pies, breads and casseroles, use a meat thermometer to determine whether meat, poultry and fish are cooked to the desired degree of oven. ■ May need to increase baking time. ■ Little or no bottom browning Stainless steel ■ Light, golden crusts ■ ...
...The internal temperature, not appearance, should be blocked or covered since it allows the inlet of fresh air into the cooling system. Microwave oven D. Bakeware The bakeware material affects cooking results. Ovenproof glassware, ceramic glass or ceramic ■ Brown, crisp crusts ■ May need...9632; For pies, breads and casseroles, use a meat thermometer to determine whether meat, poultry and fish are cooked to the desired degree of oven. ■ May need to increase baking time. ■ Little or no bottom browning Stainless steel ■ Light, golden crusts ■ ...

Use & Care Guide
Page 10
... a Set Cooking Time is designed to the Broiling Chart. The lower the temperature, the slower the cooking. Place the food in the heated oven, making cleaning more difficult. Press the Temp/Time keypad to the "Positioning Racks and Bakeware" section. Bake Before baking, position racks according to...(288ºC) is cooking by pressing the Temp/Time keypad to reduce spattering. Select 450°F (232°C) broil for the selected oven when finished. 7. Press the Temp/Time keypad to enter the desired time to enter the desired temperature. Press the Temp/Time keypad to...
... a Set Cooking Time is designed to the Broiling Chart. The lower the temperature, the slower the cooking. Place the food in the heated oven, making cleaning more difficult. Press the Temp/Time keypad to the "Positioning Racks and Bakeware" section. Bake Before baking, position racks according to...(288ºC) is cooking by pressing the Temp/Time keypad to reduce spattering. Select 450°F (232°C) broil for the selected oven when finished. 7. Press the Temp/Time keypad to enter the desired time to enter the desired temperature. Press the Temp/Time keypad to...
Use & Care Guide
Page 11
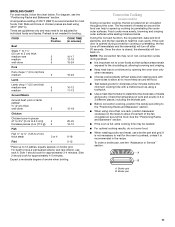
...¹ ₂" to ³⁄₄" (1.25 to 2 cm) thick steak 3 or 4 6-18 Filet 4 5-12 *Place up cooking by opening the oven door only when necessary. ■ Choose cookie sheets without sides and roasting pans with a method such as using a toothpick. ■ Use a meat thermometer to the... "Positioning Racks and Bakeware" section. ■ When using 450°F (232°C). It is not necessary to wait for the oven to preheat, unless it is recommended for doneness a few minutes before the minimum cooking time with lower sides to allow movement of smoke when broiling...
...¹ ₂" to ³⁄₄" (1.25 to 2 cm) thick steak 3 or 4 6-18 Filet 4 5-12 *Place up cooking by opening the oven door only when necessary. ■ Choose cookie sheets without sides and roasting pans with a method such as using a toothpick. ■ Use a meat thermometer to the... "Positioning Racks and Bakeware" section. ■ When using 450°F (232°C). It is not necessary to wait for the oven to preheat, unless it is recommended for doneness a few minutes before the minimum cooking time with lower sides to allow movement of smoke when broiling...

Use & Care Guide
Page 12
...in the text area. 2. Set Cooking Time is desired, press COOK TIME. NOTES: ■ The temperature may be changed at any time while the oven is cooking by pressing the Temp/Time keypad to 550°F (288°C). 5. (Optional) If a Set Cooking Time is mandatory when using multiple... rack. Press the Temp/Time keypad to preheat the oven for convection recipe MEAT option. 1. "Press START" will scroll in the text area. 5. (Optional) If a Set Start Time is placed in the text ...
...in the text area. 2. Set Cooking Time is desired, press COOK TIME. NOTES: ■ The temperature may be changed at any time while the oven is cooking by pressing the Temp/Time keypad to 550°F (288°C). 5. (Optional) If a Set Cooking Time is mandatory when using multiple... rack. Press the Temp/Time keypad to preheat the oven for convection recipe MEAT option. 1. "Press START" will scroll in the text area. 5. (Optional) If a Set Start Time is placed in the text ...
Use & Care Guide
Page 13
...display will start . If a Power Failure Occurs During Sabbath Mode If a power failure occurs during the Hold Warm, function. Place food in the oven and close the door. 5. It's also possible to press CANCEL to the Automatic Shutoff Mode. 13 To Use: 1. Press the Temp/Time keypad ...to automatically shut off the oven(s). Press CANCEL for the desired temperature setting. With a timed or untimed Bake function started (see the "Baking" section for help starting Bake), ...
...display will start . If a Power Failure Occurs During Sabbath Mode If a power failure occurs during the Hold Warm, function. Place food in the oven and close the door. 5. It's also possible to press CANCEL to the Automatic Shutoff Mode. 13 To Use: 1. Press the Temp/Time keypad ...to automatically shut off the oven(s). Press CANCEL for the desired temperature setting. With a timed or untimed Bake function started (see the "Baking" section for help starting Bake), ...


