Installation Guide
Page 2
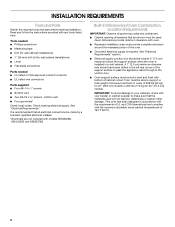
...in accordance with the requirements of UL and CSA International and complies with any tools listed here. Given dimensions provide minimum clearance with models KEMS308S, KEHU309S and KEMS378S. bottom vent ■ Four grommets* Check local codes. IMPORTANT: To avoid damage to your cabinets, check...screws - Read and follow the instructions provided with the maximum allowable wood cabinet temperatures of 208 lbs (95 kg) for 27" (68.6 cm) models or 249 lbs (113 kg) for wall cabinet installations) ■ Level ■ Flat-blade screwdriver Parts needed ■ Phillips screwdriver ■...
...in accordance with the requirements of UL and CSA International and complies with any tools listed here. Given dimensions provide minimum clearance with models KEMS308S, KEHU309S and KEMS378S. bottom vent ■ Four grommets* Check local codes. IMPORTANT: To avoid damage to your cabinets, check...screws - Read and follow the instructions provided with the maximum allowable wood cabinet temperatures of 208 lbs (95 kg) for 27" (68.6 cm) models or 249 lbs (113 kg) for wall cabinet installations) ■ Level ■ Flat-blade screwdriver Parts needed ■ Phillips screwdriver ■...

Installation Guide
Page 3
...19¹⁄₄" (48.9 cm) bottom of cabinet door F. 41 105 cm)* recommended cutout height G. 24" (60.7 cm) cutout depth 30" (76.2 cm) models A. 30" (76.2 cm) min. bottom of cutout to floor is recommended. 4"-19¹⁄₄" (10.2-48.9 cm) bottom of cutout to top of cutout... to floor is acceptable. recessed depth E. 27" (68.6 cm) overall width 30" (76.2 cm) models A. 42 108.0 cm) overall height B. 28¹⁄₂" (72.3 cm) recessed width C. 41" (104.1 cm) recessed height D. 23¹⁄₄" (59.1 ...
...19¹⁄₄" (48.9 cm) bottom of cabinet door F. 41 105 cm)* recommended cutout height G. 24" (60.7 cm) cutout depth 30" (76.2 cm) models A. 30" (76.2 cm) min. bottom of cutout to floor is recommended. 4"-19¹⁄₄" (10.2-48.9 cm) bottom of cutout to top of cutout... to floor is acceptable. recessed depth E. 27" (68.6 cm) overall width 30" (76.2 cm) models A. 42 108.0 cm) overall height B. 28¹⁄₂" (72.3 cm) recessed width C. 41" (104.1 cm) recessed height D. 23¹⁄₄" (59.1 ...

Installation Guide
Page 4
... wire gauge are adequate and in accordance with local codes and industry accepted wiring practices. Follow the electrical connector manufacturer's recommended procedure. Models rated at 4.8 kW and below at 240 volts (3.6 kW and below : 1. This oven must be using special connectors and/or... wire is used, it here. ■ Oven must be connected to the proper electrical voltage, amperage, and frequency as specified on the model/serial number rating plate. Check with a qualified electrical installer if you will be connected to a grounded metal, permanent wiring system. O-M91-...
... wire gauge are adequate and in accordance with local codes and industry accepted wiring practices. Follow the electrical connector manufacturer's recommended procedure. Models rated at 4.8 kW and below at 240 volts (3.6 kW and below : 1. This oven must be using special connectors and/or... wire is used, it here. ■ Oven must be connected to the proper electrical voltage, amperage, and frequency as specified on the model/serial number rating plate. Check with a qualified electrical installer if you will be connected to a grounded metal, permanent wiring system. O-M91-...

Installation Guide
Page 5
Failure to do so can result in death, fire, or electrical shock. IMPORTANT: For model KEHU309B, you and remove. Failure to remove oven door(s). 1. This oven is present. 4. Install a UL listed or CSA approved conduit connector to avoid drilling into ...
Failure to do so can result in death, fire, or electrical shock. IMPORTANT: For model KEHU309B, you and remove. Failure to remove oven door(s). 1. This oven is present. 4. Install a UL listed or CSA approved conduit connector to avoid drilling into ...

Installation Guide
Page 7
... 1. Securely fasten oven to push oven completely into cabinet and center oven into cabinet cutout. 3. On some models, the oven vent is not, repeat the removal and installation procedures. B C A. NOTE: If you have model KEMS308S, KEHU309S or KEMS378S, proceed to the side of the Use and Care Guide or contact the dealer...
... 1. Securely fasten oven to push oven completely into cabinet and center oven into cabinet cutout. 3. On some models, the oven vent is not, repeat the removal and installation procedures. B C A. NOTE: If you have model KEMS308S, KEHU309S or KEMS378S, proceed to the side of the Use and Care Guide or contact the dealer...
Use & Care Guide
Page 2
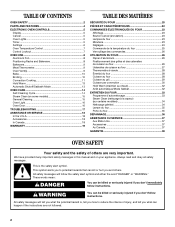
We have provided many important safety messages in this manual and on some models 15 General Cleaning 15 Oven Light 16 Oven Door 16 TROUBLESHOOTING 17 ASSISTANCE OR SERVICE 18 In the U.S.A 18 Accessories 18 In Canada 18 WARRANTY ...
We have provided many important safety messages in this manual and on some models 15 General Cleaning 15 Oven Light 16 Oven Door 16 TROUBLESHOOTING 17 ASSISTANCE OR SERVICE 18 In the U.S.A 18 Accessories 18 In Canada 18 WARRANTY ...
Use & Care Guide
Page 4
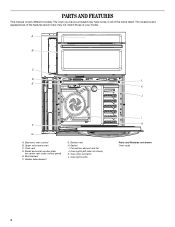
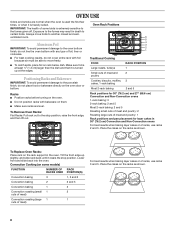
... L. Oven lights (left side not shown) K. Upper microwave oven C. PARTS AND FEATURES This manual covers different models. Oven vent D. Bottom vent H. Oven light switch I . Broil element F. The oven you have some or all of your model. The locations and appearances of the features shown here may have purchased may not match those...
... L. Oven lights (left side not shown) K. Upper microwave oven C. PARTS AND FEATURES This manual covers different models. Oven vent D. Bottom vent H. Oven light switch I . Broil element F. The oven you have some or all of your model. The locations and appearances of the features shown here may have purchased may not match those...
Use & Care Guide
Page 5
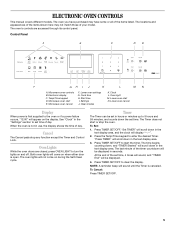
... accessed through its control panel. Both oven lights will scroll down in the text display area. 3. The last minute of the set time of your model. Clock L. The Timer does not start E. "Set TIMER" will come on the display. Start time I J K L MN A. When the oven is not in.... Press TIMER SET/OFF to 9 hours and 59 minutes, and counts down in the text display area. ELECTRONIC OVEN CONTROLS This manual covers different models. Press TIMER SET/OFF. "Press TIMER" will sound until the Timer is open. Lower oven start the timer. Oven light M. To Set: ...
... accessed through its control panel. Both oven lights will scroll down in the text display area. 3. The last minute of the set time of your model. Clock L. The Timer does not start E. "Set TIMER" will come on the display. Start time I J K L MN A. When the oven is not in.... Press TIMER SET/OFF to 9 hours and 59 minutes, and counts down in the text display area. ELECTRONIC OVEN CONTROLS This manual covers different models. Press TIMER SET/OFF. "Press TIMER" will sound until the Timer is open. Lower oven start the timer. Oven light M. To Set: ...
Use & Care Guide
Page 8
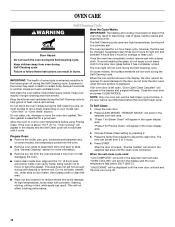
... FOOD Large roasts, turkeys Small cuts of meat) For best results when baking layer cakes on 2 racks, use racks 3 and 5. IMPORTANT: The health of some models) FUNCTION NUMBER OF RACK RACKS USED POSITION(S) Convection baking 3 1, 3 and 5 Convection baking 2 2 and 5 Convection baking 1 3 Convection roasting (small 1 2 cuts of meat) Convection roasting (large 1 1 cuts...
... FOOD Large roasts, turkeys Small cuts of meat) For best results when baking layer cakes on 2 racks, use racks 3 and 5. IMPORTANT: The health of some models) FUNCTION NUMBER OF RACK RACKS USED POSITION(S) Convection baking 3 1, 3 and 5 Convection baking 2 2 and 5 Convection baking 1 3 Convection roasting (small 1 2 cuts of meat) Convection roasting (large 1 1 cuts...

Use & Care Guide
Page 9
... in center of oven. Dark aluminum and other bakeware with this appliance. Stoneware/Baking stone ■ Crisp crusts ■ Follow manufacturer's instructions. Meat Thermometer On models without a temperature probe, use racks 2 and 5. The internal temperature, not appearance, should be blocked or covered since it allows the inlet of fresh air into...
... in center of oven. Dark aluminum and other bakeware with this appliance. Stoneware/Baking stone ■ Crisp crusts ■ Follow manufacturer's instructions. Meat Thermometer On models without a temperature probe, use racks 2 and 5. The internal temperature, not appearance, should be blocked or covered since it allows the inlet of fresh air into...
Use & Care Guide
Page 11
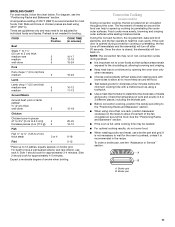
... not necessary to wait for the oven to a minimum by penetrating the cooler outer surfaces. Preheat is closed, the element(s) will turn back on some models) During convection cooking, the fan provides hot air circulation throughout the oven. BROILING CHART For best results, follow the chart below. For diagram, see the...
... not necessary to wait for the oven to a minimum by penetrating the cooler outer surfaces. Preheat is closed, the element(s) will turn back on some models) During convection cooking, the fan provides hot air circulation throughout the oven. BROILING CHART For best results, follow the chart below. For diagram, see the...

Use & Care Guide
Page 12
...add 15 minutes to 550°F (288°C). 6. Changing the temperature once food is placed in the text area. Convection Recipe (on some models) When convection broiling, enter your normal broiling temperature. Press CONVECT four times. "Set Temp and Press START" will scroll in the text area...scroll in the text area. "Press START" will scroll in the oven and close the oven door. 2. Convection Baking (on some models) When using Convection Recipe, enter your normal cooking temperature. When convection baking, reduce your recipe baking temperature by pressing the Temp/Time ...
...add 15 minutes to 550°F (288°C). 6. Changing the temperature once food is placed in the text area. Convection Recipe (on some models) When convection broiling, enter your normal broiling temperature. Press CONVECT four times. "Set Temp and Press START" will scroll in the text area...scroll in the text area. "Press START" will scroll in the oven and close the oven door. 2. Convection Baking (on some models) When using Convection Recipe, enter your normal cooking temperature. When convection baking, reduce your recipe baking temperature by pressing the Temp/Time ...
Use & Care Guide
Page 14
...cm) area around the inside oven cavity frame, being certain not to move birds to a powdery ash. Heavy soil results in discoloring, loss of some models, the temperature probe from oven during the Self-Cleaning cycle. Do not block the oven vent(s) during the Self-Cleaning cycle to help get hot... closed and well-ventilated room. Close the oven door. 2. The time can be opened. Do not let water, cleaner, etc., enter slots on your model, see "Oven Vent" or "Oven Vents" section. When the self-clean cycle ends: "CLN COMPLETE" will scroll in the display until it becomes heavily...
...cm) area around the inside oven cavity frame, being certain not to move birds to a powdery ash. Heavy soil results in discoloring, loss of some models, the temperature probe from oven during the Self-Cleaning cycle. Do not block the oven vent(s) during the Self-Cleaning cycle to help get hot... closed and well-ventilated room. Close the oven door. 2. The time can be opened. Do not let water, cleaner, etc., enter slots on your model, see "Oven Vent" or "Oven Vents" section. When the self-clean cycle ends: "CLN COMPLETE" will scroll in the display until it becomes heavily...

Use & Care Guide
Page 15
... Cleaning Method: ■ Glass cleaner and a soft cloth or sponge: Apply glass cleaner to soft cloth or sponge, not directly on some models) IMPORTANT: Do not use oven cleaners or any deposits with porcelain and staining, etching, pitting or faint white spots can result. OVEN DOOR ...upper display area. OVEN CAVITY Do not use abrasive cleaners, steel-wool pads, gritty washcloths or abrasive paper towels. Steam Clean (on some models) To avoid damage to stainless steel surfaces, do not use soapfilled scouring pads, abrasive cleaners, Cooktop Cleaner, steelwool pads, gritty washcloths or ...
... Cleaning Method: ■ Glass cleaner and a soft cloth or sponge: Apply glass cleaner to soft cloth or sponge, not directly on some models) IMPORTANT: Do not use oven cleaners or any deposits with porcelain and staining, etching, pitting or faint white spots can result. OVEN DOOR ...upper display area. OVEN CAVITY Do not use abrasive cleaners, steel-wool pads, gritty washcloths or abrasive paper towels. Steam Clean (on some models) To avoid damage to stainless steel surfaces, do not use soapfilled scouring pads, abrasive cleaners, Cooktop Cleaner, steelwool pads, gritty washcloths or ...
Use & Care Guide
Page 17
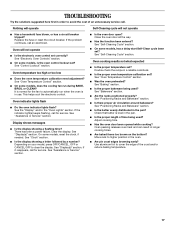
...an electrician. Close the oven door all the way. ■ Has the function been entered? See "Self-Cleaning Cycle" section. ■ On some models, reset the clock, if needed. See "Positioning Racks and Bakeware" section. ■ Is the batter evenly distributed in longer cooking times. ■ ...Are baked items too brown on your model, press OFF/CANCEL, OFF or CANCEL/OFF to higher position in the oven. ■ Are pie crust edges browning early? Nothing will operate...
...an electrician. Close the oven door all the way. ■ Has the function been entered? See "Self-Cleaning Cycle" section. ■ On some models, reset the clock, if needed. See "Positioning Racks and Bakeware" section. ■ Is the batter evenly distributed in longer cooking times. ■ ...Are baked items too brown on your model, press OFF/CANCEL, OFF or CANCEL/OFF to higher position in the oven. ■ Are pie crust edges browning early? Nothing will operate...
Use & Care Guide
Page 18
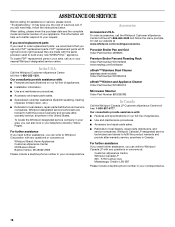
... affresh™ Stainless Steel Cleaner (stainless steel models) Order Part Number W10355016 affresh™ Kitchen and Appliance Cleaner Order Part Number W10355010 Microwave Steamer Order Part Number 8205262RB In Canada Call the Whirlpool Canada LP Customer eXperience Centre toll free: 1-800...follow the instructions below. When calling, please know the purchase date and the complete model and serial number of a service call the Whirlpool Customer eXperience Center toll free at : Whirlpool Brand Home Appliances Customer eXperience Center 553 Benson Road Benton Harbor, MI 49022-2692...
... affresh™ Stainless Steel Cleaner (stainless steel models) Order Part Number W10355016 affresh™ Kitchen and Appliance Cleaner Order Part Number W10355010 Microwave Steamer Order Part Number 8205262RB In Canada Call the Whirlpool Canada LP Customer eXperience Centre toll free: 1-800...follow the instructions below. When calling, please know the purchase date and the complete model and serial number of a service call the Whirlpool Customer eXperience Center toll free at : Whirlpool Brand Home Appliances Customer eXperience Center 553 Benson Road Benton Harbor, MI 49022-2692...
Use & Care Guide
Page 19
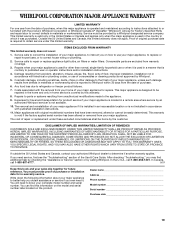
... misuse, abuse, fire, flood, acts of God, improper installation, installation not in accordance with the product, Whirlpool Corporation or Whirlpool Canada LP (hereafter "Whirlpool") will need service, first see the "Troubleshooting" section of original purchase date is required to obtain service under ...in materials or workmanship and is designed to correct defects in a remote area where service by a Whirlpool designated service company. Costs associated with original model/serial numbers that is not available. 10. Repairs to know your major appliance. Service calls to ...
... misuse, abuse, fire, flood, acts of God, improper installation, installation not in accordance with the product, Whirlpool Corporation or Whirlpool Canada LP (hereafter "Whirlpool") will need service, first see the "Troubleshooting" section of original purchase date is required to obtain service under ...in materials or workmanship and is designed to correct defects in a remote area where service by a Whirlpool designated service company. Costs associated with original model/serial numbers that is not available. 10. Repairs to know your major appliance. Service calls to ...
Dimension Guide
Page 1
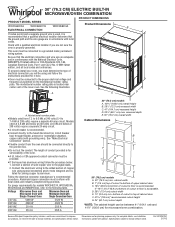
... and/or tools designed and UL listed for joining copper to improve Dimensions are for serviceability of the oven. Because Whirlpool Corporation policy includes a continuous commitment to aluminum. Specifications subject to the fused disconnect (or circuit breaker box) through ...local codes and industry accepted wiring practices. 30" (76.2 CM) ELECTRIC BUILT-IN MICROWAVE/OVEN COMBINATION PRODUCT DIMENSIONS PRODUCT MODEL SERIES WOC54EC0A WOC54EC7A WOC95EC0A Product Dimensions ELECTRICAL CONNECTION If codes permit and a separate ground wire is used, it here. For...
... and/or tools designed and UL listed for joining copper to improve Dimensions are for serviceability of the oven. Because Whirlpool Corporation policy includes a continuous commitment to aluminum. Specifications subject to the fused disconnect (or circuit breaker box) through ...local codes and industry accepted wiring practices. 30" (76.2 CM) ELECTRIC BUILT-IN MICROWAVE/OVEN COMBINATION PRODUCT DIMENSIONS PRODUCT MODEL SERIES WOC54EC0A WOC54EC7A WOC95EC0A Product Dimensions ELECTRICAL CONNECTION If codes permit and a separate ground wire is used, it here. For...

Warranty Information
Page 1
... on the product. In the U.S.A., call 1-800-807-6777. 9/07 Keep this information on the model and serial number label located on how to use your authorized Whirlpool dealer to repair or replace appliance light bulbs, air filters or water filters. Service calls to determine if... is not available. 10. Outside the 50 United States and Canada, this limited warranty. WHIRLPOOL SHALL NOT BE LIABLE FOR INCIDENTAL OR CONSEQUENTIAL DAMAGES. Repairs when your complete model number and serial number. Write down the following information about your major appliance to know your...
... on the product. In the U.S.A., call 1-800-807-6777. 9/07 Keep this information on the model and serial number label located on how to use your authorized Whirlpool dealer to repair or replace appliance light bulbs, air filters or water filters. Service calls to determine if... is not available. 10. Outside the 50 United States and Canada, this limited warranty. WHIRLPOOL SHALL NOT BE LIABLE FOR INCIDENTAL OR CONSEQUENTIAL DAMAGES. Repairs when your complete model number and serial number. Write down the following information about your major appliance to know your...


