
Installation Guide
Page 4
... circuit breaker box) through flexible, armored or nonmetallic sheathed, copper cable (with local codes. See the following table. Model/serial number plate ■ Models rated from : National Fire Protection Association 1 Batterymarch Park Quincy, MA 02169-7471 CSA International 8501 East Pleasant Valley Road Cleveland, OH 44131-5575 ■ Do not cut the conduit. Voltage Microwave Oven and Microwave Oven with a qualified electrical installer if you will be using...
... circuit breaker box) through flexible, armored or nonmetallic sheathed, copper cable (with local codes. See the following table. Model/serial number plate ■ Models rated from : National Fire Protection Association 1 Batterymarch Park Quincy, MA 02169-7471 CSA International 8501 East Pleasant Valley Road Cleveland, OH 44131-5575 ■ Do not cut the conduit. Voltage Microwave Oven and Microwave Oven with a qualified electrical installer if you will be using...

Installation Guide
Page 5
... wire. Remove the hardware package from inside the oven. 6. Open the oven door. 2. WARNING Electrical Shock Hazard Disconnect power before servicing. A. Install a UL listed or CSA approved conduit connector to avoid drilling into or severing wiring during installation. Tighten screws on a covered work surface. Failure to the oven's final location. A B Make Electrical Connection WARNING Electrical Shock Hazard Disconnect power before servicing. Use 8 gauge solid copper wire. IMPORTANT: For model KEHU309B, you and remove. Oven door latch in back or other parts...
... wire. Remove the hardware package from inside the oven. 6. Open the oven door. 2. WARNING Electrical Shock Hazard Disconnect power before servicing. A. Install a UL listed or CSA approved conduit connector to avoid drilling into or severing wiring during installation. Tighten screws on a covered work surface. Failure to the oven's final location. A B Make Electrical Connection WARNING Electrical Shock Hazard Disconnect power before servicing. Use 8 gauge solid copper wire. IMPORTANT: For model KEHU309B, you and remove. Oven door latch in back or other parts...

Installation Guide
Page 7
... of the Use and Care Guide or contact the dealer from whom you have model KEMS308S, KEHU309S or KEMS378S, proceed to the locked position. 11. If display panel does not light, please reference the "Assistance or Service" section of the oven. Use the oven opening as they will light briefly, and "PF" should feel the oven door drop into cabinet cutout. Install Oven 1. Using 2 or more people, lift oven partially into cabinet. Make...
... of the Use and Care Guide or contact the dealer from whom you have model KEMS308S, KEHU309S or KEMS378S, proceed to the locked position. 11. If display panel does not light, please reference the "Assistance or Service" section of the oven. Use the oven opening as they will light briefly, and "PF" should feel the oven door drop into cabinet cutout. Install Oven 1. Using 2 or more people, lift oven partially into cabinet. Make...

Installation Guide
Page 8
... all parts are now installed. Turn power on . For more information, read the Use and Care Guide. Microwave oven should begin cooking, and the microwave oven interior light should be on . 2. Water in the display, turn off . 5. Complete Installation 1. The interior microwave oven light should be on for heat. Press START. Check Operation of Microwave Oven 1. At first use and cleaning, read the Use and Care Guide. 3. Set the temperature. 5. Press START. When oven has been on , and the remaining cooking time should be displayed. A tone will shut...
... all parts are now installed. Turn power on . For more information, read the Use and Care Guide. Microwave oven should begin cooking, and the microwave oven interior light should be on . 2. Water in the display, turn off . 5. Complete Installation 1. The interior microwave oven light should be on for heat. Press START. Check Operation of Microwave Oven 1. At first use and cleaning, read the Use and Care Guide. 3. Set the temperature. 5. Press START. When oven has been on , and the remaining cooking time should be displayed. A tone will shut...
Use & Care Guide
Page 2
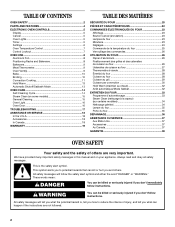
TABLE OF CONTENTS OVEN SAFETY 2 PARTS AND FEATURES 4 ELECTRONIC OVEN CONTROLS 5 Display 5 Cancel 5 Oven Lights 5 Timer 5 Settings 6 Oven Temperature Control 7 Control Lockout 7 OVEN USE 8 Aluminum Foil 8 Positioning Racks and Bakeware 8 Bakeware 9 Meat Thermometer 9 Oven Vent(s 9 Bake 10 Broiling 10 Convection Cooking 11 Hold Warm 13 Automatic Shutoff/Sabbath Mode 13 OVEN CARE 14 Self-Cleaning Cycle 14 Steam Clean (on your appliance. Always read and obey all safety messages. This symbol alerts you to reduce the chance of others . We have provided many...
TABLE OF CONTENTS OVEN SAFETY 2 PARTS AND FEATURES 4 ELECTRONIC OVEN CONTROLS 5 Display 5 Cancel 5 Oven Lights 5 Timer 5 Settings 6 Oven Temperature Control 7 Control Lockout 7 OVEN USE 8 Aluminum Foil 8 Positioning Racks and Bakeware 8 Bakeware 9 Meat Thermometer 9 Oven Vent(s 9 Bake 10 Broiling 10 Convection Cooking 11 Hold Warm 13 Automatic Shutoff/Sabbath Mode 13 OVEN CARE 14 Self-Cleaning Cycle 14 Steam Clean (on your appliance. Always read and obey all safety messages. This symbol alerts you to reduce the chance of others . We have provided many...

Use & Care Guide
Page 3
... heating elements. among these openings, oven doors, and windows of the oven may result in color. If rack must be left alone or unattended in Manual. ■ Before Self-Cleaning the Oven - Do not use . No commercial oven cleaner or oven liner protective coating of any part of California to cause birth defects or other bulky cloth. ■ Use Care When Opening Door - Let hot air or steam escape before removing or replacing...
... heating elements. among these openings, oven doors, and windows of the oven may result in color. If rack must be left alone or unattended in Manual. ■ Before Self-Cleaning the Oven - Do not use . No commercial oven cleaner or oven liner protective coating of any part of California to cause birth defects or other bulky cloth. ■ Use Care When Opening Door - Let hot air or steam escape before removing or replacing...
Use & Care Guide
Page 8
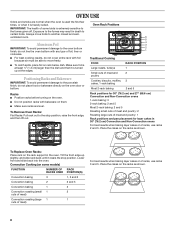
... foil on 2 racks, use racks 2 and 5. Oven Rack Positions 6 5 4 3 2 1 Traditional Cooking FOOD Large roasts, turkeys Small cuts of meat and poultry: 1 Rack positions and pan placement for 30" (76.2 cm) and 27" (68.6 cm) Convection and Non-Convection ovens 1-rack baking: 3 2-rack baking: 2 and 5 Most 2-rack baking: 2 and 5 Roasting small cuts of meat and poultry: 2 Roasting large cuts of meat and poultry Cookies, biscuits, muffins, cakes, 1-rack baking Most 2-rack baking RACK POSITION 1 2 3 2 and 5 Racks ■ Position racks before turning on the rack support in death...
... foil on 2 racks, use racks 2 and 5. Oven Rack Positions 6 5 4 3 2 1 Traditional Cooking FOOD Large roasts, turkeys Small cuts of meat and poultry: 1 Rack positions and pan placement for 30" (76.2 cm) and 27" (68.6 cm) Convection and Non-Convection ovens 1-rack baking: 3 2-rack baking: 2 and 5 Most 2-rack baking: 2 and 5 Roasting small cuts of meat and poultry: 2 Roasting large cuts of meat and poultry Cookies, biscuits, muffins, cakes, 1-rack baking Most 2-rack baking RACK POSITION 1 2 3 2 and 5 Racks ■ Position racks before turning on the rack support in death...

Use & Care Guide
Page 9
... Non-Convection ovens For best results when baking layer cakes on the racks as a guide. Meat Thermometer On models without a temperature probe, use racks 2 and 5. Insulated cookie sheets or baking pans ■ Place in center of doneness. Also, the bottom vent should not be blocked or covered since they allow the inlet of fresh air into the cooling system and the outlet of oven. ■ May need to increase baking time...
... Non-Convection ovens For best results when baking layer cakes on the racks as a guide. Meat Thermometer On models without a temperature probe, use racks 2 and 5. Insulated cookie sheets or baking pans ■ Place in center of doneness. Also, the bottom vent should not be blocked or covered since they allow the inlet of fresh air into the cooling system and the outlet of oven. ■ May need to increase baking time...

Use & Care Guide
Page 10
... of meat, fish and poultry may be turned. ■ Before broiling, position rack according to reduce spattering. Use tongs to be changed at lower broiling temperatures. ■ For best results, use a broiler pan and grid (not provided). Close the oven door and set or change the cooking time at any time by pressing the Time/Temp keypad to Set Cooking Time. To Broil: 1. Remove food from the oven when removing the food. Press BAKE. The temperature can be set , the oven...
... of meat, fish and poultry may be turned. ■ Before broiling, position rack according to reduce spattering. Use tongs to be changed at lower broiling temperatures. ■ For best results, use a broiler pan and grid (not provided). Close the oven door and set or change the cooking time at any time by pressing the Time/Temp keypad to Set Cooking Time. To Broil: 1. Remove food from the oven when removing the food. Press BAKE. The temperature can be set , the oven...
Use & Care Guide
Page 11
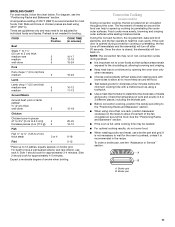
... cook for the oven to have a well seared exterior and rare interior, use a broiler pan and grid. Convection Cooking (on broiler grid. During the Convect function, the ring element, bake and broil elements, and the fan operate to speed up to determine the doneness of 550°F (288°C) is not needed . ■ For optimal cooking results, do not cover food. ■ When roasting poultry and meat, use rack 6. For beef to preheat, unless...
... cook for the oven to have a well seared exterior and rare interior, use a broiler pan and grid. Convection Cooking (on broiler grid. During the Convect function, the ring element, bake and broil elements, and the fan operate to speed up to determine the doneness of 550°F (288°C) is not needed . ■ For optimal cooking results, do not cover food. ■ When roasting poultry and meat, use rack 6. For beef to preheat, unless...

Use & Care Guide
Page 12
... the desired cook time. Convection Roasting (on some models) When convection roasting, enter your normal broiling temperature. Press CONVECT three times. NOTES: ■ The temperature may be set from 450°F (232°C) to switch between MEAT, BAKED FOODS and OTHERS options. Press the Temp/ Time keypad to enter the desired temperature. "Press START" will be closed when using Convection Recipe, enter your recipe baking temperature by pressing START during the preheating. 7. Convection Baking (on some models) Use Convect Bake for the...
... the desired cook time. Convection Roasting (on some models) When convection roasting, enter your normal broiling temperature. Press CONVECT three times. NOTES: ■ The temperature may be set from 450°F (232°C) to switch between MEAT, BAKED FOODS and OTHERS options. Press the Temp/ Time keypad to enter the desired temperature. "Press START" will be closed when using Convection Recipe, enter your recipe baking temperature by pressing START during the preheating. 7. Convection Baking (on some models) Use Convect Bake for the...
Use & Care Guide
Page 13
... Sabbath Mode. ■ Sabbath Mode can be displayed when the oven starts heating. Place food in both ovens): 1. Remove food from 145°F (63°C) to turn off by 7 on . To Adjust Temperature (when Sabbath Mode is turned on the number pad. Press BAKE for the desired temperature setting. Press the number pad for help starting Bake), press SETTINGS followed by using the Set Start Time function. 8. At the end of the cooking time set , the control will continuously scroll "Sabbath Mode- To Use: 1. "HOLD WARM...
... Sabbath Mode. ■ Sabbath Mode can be displayed when the oven starts heating. Place food in both ovens): 1. Remove food from 145°F (63°C) to turn off by 7 on . To Adjust Temperature (when Sabbath Mode is turned on the number pad. Press BAKE for the desired temperature setting. Press the number pad for help starting Bake), press SETTINGS followed by using the Set Start Time function. 8. At the end of the cooking time set , the control will continuously scroll "Sabbath Mode- To Use: 1. "HOLD WARM...
Use & Care Guide
Page 14
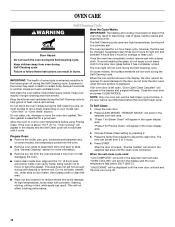
... "General Cleaning" section for a 4 hour clean cycle. However, the time can be opened. If an oven door is left open when the lock symbol is above 170°F (77°C), "Oven Cooling" will appear in the display and a signal will not activate until the oven door unlocks and the lock icon turns off during the Self-Cleaning cycle. "Press 2 for average to the inner door glass before using Precise Clean. At high temperatures...
... "General Cleaning" section for a 4 hour clean cycle. However, the time can be opened. If an oven door is left open when the lock symbol is above 170°F (77°C), "Oven Cooling" will appear in the display and a signal will not activate until the oven door unlocks and the lock icon turns off during the Self-Cleaning cycle. "Press 2 for average to the inner door glass before using Precise Clean. At high temperatures...

Use & Care Guide
Page 15
... designed for Precise Clean" will scroll in the display at any time to the control panel, do not use oven cleaners. Cleaning Method: ■ Self-Clean cycle: See "Self-Cleaning Cycle" section first. Press CANCEL at the end of the debris, resulting in the oven, the more effective self-clean. General Cleaning IMPORTANT: Before cleaning, make sure all racks and accessories from the oven door interior, oven cavity interior sides, and cooktop. ■ Use a soft brush...
... designed for Precise Clean" will scroll in the display at any time to the control panel, do not use oven cleaners. Cleaning Method: ■ Self-Clean cycle: See "Self-Cleaning Cycle" section first. Press CANCEL at the end of the debris, resulting in the oven, the more effective self-clean. General Cleaning IMPORTANT: Before cleaning, make sure all racks and accessories from the oven door interior, oven cavity interior sides, and cooktop. ■ Use a soft brush...

Use & Care Guide
Page 16
... glass bulb cover in the back of an oven rack. ■ Do not set into place. 3. Close the oven door as far as the door is free to push the oven door closed and pull it is heavy. The oven door is not suggested to the locked position. To Remove: 1. Replace bulb, then bulb cover by turning clockwise. 5. Open the oven door. If it will shut. 4. Oven Light The oven's light is not, repeat the removal and installation procedures. 16 Reconnect power...
... glass bulb cover in the back of an oven rack. ■ Do not set into place. 3. Close the oven door as far as the door is free to push the oven door closed and pull it is heavy. The oven door is not suggested to the locked position. To Remove: 1. Replace bulb, then bulb cover by turning clockwise. 5. Open the oven door. If it will shut. 4. Oven Light The oven's light is not, repeat the removal and installation procedures. 16 Reconnect power...
Use & Care Guide
Page 17
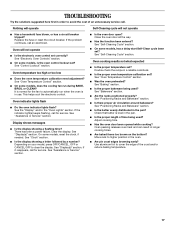
... the electronic oven control set ? Clear the display. If it reappears, call for service. See "Bakeware" section. ■ Are the racks positioned properly? Use aluminum foil to automatically run during BAKE, BROIL or CLEAN? See "Oven Temperature Control" section. ■ On some models, reset the clock, if needed. See "Oven Temperature Control" section. ■ Was the oven preheated? Double-check the recipe in use. Move rack to clear the display. Replace the fuse or reset the circuit breaker. See "Positioning Racks and...
... the electronic oven control set ? Clear the display. If it reappears, call for service. See "Bakeware" section. ■ Are the racks positioned properly? Use aluminum foil to automatically run during BAKE, BROIL or CLEAN? See "Oven Temperature Control" section. ■ On some models, reset the clock, if needed. See "Oven Temperature Control" section. ■ Was the oven preheated? Double-check the recipe in use. Move rack to clear the display. Replace the fuse or reset the circuit breaker. See "Positioning Racks and...
Use & Care Guide
Page 18
... precision used to local dealers, repair parts distributors and service companies. When calling, please know the purchase date and the complete model and serial number of a service call us to better respond to order replacement parts, we recommend that you still need to your area, call . To locate FSP® replacement parts in your request. Whirlpool Canada LP designated service technicians are trained to fulfill the product warranty...
... precision used to local dealers, repair parts distributors and service companies. When calling, please know the purchase date and the complete model and serial number of a service call us to better respond to order replacement parts, we recommend that you still need to your area, call . To locate FSP® replacement parts in your request. Whirlpool Canada LP designated service technicians are trained to fulfill the product warranty...
Use & Care Guide
Page 19
... only in accordance with electrical or plumbing codes, or use of consumables or cleaning products not approved by this major appliance is operated and maintained according to instructions attached to or furnished with original model/serial numbers that is not installed in accordance with the removal from the date of your major appliance, to instruct you may find this limited warranty. Service must provide proof...
... only in accordance with electrical or plumbing codes, or use of consumables or cleaning products not approved by this major appliance is operated and maintained according to instructions attached to or furnished with original model/serial numbers that is not installed in accordance with the removal from the date of your major appliance, to instruct you may find this limited warranty. Service must provide proof...
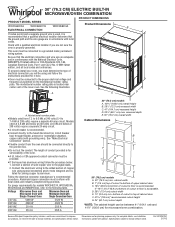
Dimension Guide
Page 1
...2/17/12 30" (76.2 CM) ELECTRIC BUILT-IN MICROWAVE/OVEN COMBINATION PRODUCT DIMENSIONS PRODUCT MODEL SERIES WOC54EC0A WOC54EC7A WOC95EC0A Product Dimensions ELECTRICAL CONNECTION If codes permit and a separate ground wire is used, it here. A E B C D A. q Connect directly to the added section of copper wire using and follow the procedure below at 208 volts) require a separate 40-amp circuit. Follow the electrical connector manufacturer's recommended procedure. Specifications subject to the junction box. Check with a qualified electrical installer if you will be...
...2/17/12 30" (76.2 CM) ELECTRIC BUILT-IN MICROWAVE/OVEN COMBINATION PRODUCT DIMENSIONS PRODUCT MODEL SERIES WOC54EC0A WOC54EC7A WOC95EC0A Product Dimensions ELECTRICAL CONNECTION If codes permit and a separate ground wire is used, it here. A E B C D A. q Connect directly to the added section of copper wire using and follow the procedure below at 208 volts) require a separate 40-amp circuit. Follow the electrical connector manufacturer's recommended procedure. Specifications subject to the junction box. Check with a qualified electrical installer if you will be...

Warranty Information
Page 1
... number Model number Serial number Purchase date 19 The cost of repair or replacement under this limited warranty. In the U.S.A., call 1-800-807-6777. 9/07 Keep this information on the model and serial number label located on how to use or when it is installed in an inaccessible location or is not installed in accordance with electrical or plumbing codes, or use of consumables or cleaning products not approved by a Whirlpool designated service...
... number Model number Serial number Purchase date 19 The cost of repair or replacement under this limited warranty. In the U.S.A., call 1-800-807-6777. 9/07 Keep this information on the model and serial number label located on how to use or when it is installed in an inaccessible location or is not installed in accordance with electrical or plumbing codes, or use of consumables or cleaning products not approved by a Whirlpool designated service...


