Installation Guide
Page 2
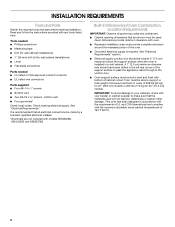
...9632; Measuring tape ■ Drill (for wall cabinet installations) ■ 1" (25 mm) drill bit (for 30" (76.2 cm) models. INSTALLATION REQUIREMENTS Tools and Parts Gather the required tools and parts before starting installation. See "Electrical Requirements" section. ■ Electrical supply junction box...the support surface to pass the appliance cable through to make sure that are not included with your cabinets, check with models KEMS308S, KEHU309S and KEMS378S. Built-In Microwave/Oven Combination Location Requirements IMPORTANT: Observe all electrical connections be made by ...
...9632; Measuring tape ■ Drill (for wall cabinet installations) ■ 1" (25 mm) drill bit (for 30" (76.2 cm) models. INSTALLATION REQUIREMENTS Tools and Parts Gather the required tools and parts before starting installation. See "Electrical Requirements" section. ■ Electrical supply junction box...the support surface to pass the appliance cable through to make sure that are not included with your cabinets, check with models KEMS308S, KEHU309S and KEMS378S. Built-In Microwave/Oven Combination Location Requirements IMPORTANT: Observe all electrical connections be made by ...

Installation Guide
Page 3
.... 4"-19¹⁄₄" (10.2-48.9 cm) bottom of cabinet door F. 41 105 cm)* recommended cutout height G. 24" (60.7 cm) cutout depth 30" (76.2 cm) models A. 30" (76.2 cm) min. Product Dimensions 27" (68.6 cm) and 30" (76.2 cm) Ovens B Cabinet Dimensions 27" (68.6 cm) and 30" (76.2 cm) Ovens A... B D F C A G E C E D 27" (68.6 cm) models A. 42 108.0 cm) overall height B. 25 64.6 cm) recessed width C. 41" (104.1 cm) recessed height D. 23¹⁄₄" (59.1 cm) max. recessed depth E. 27...
.... 4"-19¹⁄₄" (10.2-48.9 cm) bottom of cabinet door F. 41 105 cm)* recommended cutout height G. 24" (60.7 cm) cutout depth 30" (76.2 cm) models A. 30" (76.2 cm) min. Product Dimensions 27" (68.6 cm) and 30" (76.2 cm) Ovens B Cabinet Dimensions 27" (68.6 cm) and 30" (76.2 cm) Ovens A... B D F C A G E C E D 27" (68.6 cm) models A. 42 108.0 cm) overall height B. 25 64.6 cm) recessed width C. 41" (104.1 cm) recessed height D. 23¹⁄₄" (59.1 cm) max. recessed depth E. 27...

Installation Guide
Page 4
...codes. Voltage Microwave Oven and Microwave Oven with Single Thermal Oven Microwave Oven and Microwave Oven with grounding wire). Model/serial number plate ■ Models rated from the oven should be obtained from: National Fire Protection Association 1 Batterymarch Park Quincy, MA 02169-... VAC 240 VAC 208 VAC 5490 W 4590 W 30.4 A 28.4 A 5520 W 4620 W 30.5 A 28.6 A For power requirements for models WOC54EC7A, WOC54EC0A, WOC95EC0A and MMW9730A, refer to the fused disconnect (or circuit breaker box) through flexible, armored or nonmetallic sheathed, copper cable (with ...
...codes. Voltage Microwave Oven and Microwave Oven with Single Thermal Oven Microwave Oven and Microwave Oven with grounding wire). Model/serial number plate ■ Models rated from the oven should be obtained from: National Fire Protection Association 1 Batterymarch Park Quincy, MA 02169-... VAC 240 VAC 208 VAC 5490 W 4590 W 30.4 A 28.4 A 5520 W 4620 W 30.5 A 28.6 A For power requirements for models WOC54EC7A, WOC54EC0A, WOC95EC0A and MMW9730A, refer to the fused disconnect (or circuit breaker box) through flexible, armored or nonmetallic sheathed, copper cable (with ...

Installation Guide
Page 5
... connector 5. Locate existing wiring to move and install oven. Remove the shipping materials and tape from inside the oven. 6. Open the oven door. 2. IMPORTANT: For model KEHU309B, you and remove. Electrically ground oven. Failure to remove oven door(s). 1. Remove the hardware package from the oven. 4. Failure to follow these instructions can...
... connector 5. Locate existing wiring to move and install oven. Remove the shipping materials and tape from inside the oven. 6. Open the oven door. 2. IMPORTANT: For model KEHU309B, you and remove. Electrically ground oven. Failure to remove oven door(s). 1. Remove the hardware package from the oven. 4. Failure to follow these instructions can...

Installation Guide
Page 7
... NOTE: Push against outside edges. 5. Do not push against seal area of the Use and Care Guide or contact the dealer from whom you have model KEMS308S, KEHU309S or KEMS378S, proceed to grip. Check that door is free to install. ■ Insert the vent tabs (B) into the mounting rail ... (A) in the oven frame. 9. Replace oven door by inserting ends of the vent, fasten vent securely to the locked position. 11. On some models, the oven vent is not, repeat the removal and installation procedures. Insert the screwdriver into hinge slots in the oven frame. ■ With one ...
... NOTE: Push against outside edges. 5. Do not push against seal area of the Use and Care Guide or contact the dealer from whom you have model KEMS308S, KEHU309S or KEMS378S, proceed to grip. Check that door is free to install. ■ Insert the vent tabs (B) into the mounting rail ... (A) in the oven frame. 9. Replace oven door by inserting ends of the vent, fasten vent securely to the locked position. 11. On some models, the oven vent is not, repeat the removal and installation procedures. Insert the screwdriver into hinge slots in the oven frame. ■ With one ...
Use & Care Guide
Page 2
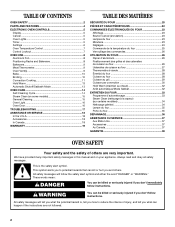
... read and obey all safety messages. All safety messages will follow instructions. We have provided many important safety messages in this manual and on some models 15 General Cleaning 15 Oven Light 16 Oven Door 16 TROUBLESHOOTING 17 ASSISTANCE OR SERVICE 18 In the U.S.A 18 Accessories 18 In Canada 18 WARRANTY...
... read and obey all safety messages. All safety messages will follow instructions. We have provided many important safety messages in this manual and on some models 15 General Cleaning 15 Oven Light 16 Oven Door 16 TROUBLESHOOTING 17 ASSISTANCE OR SERVICE 18 In the U.S.A 18 Accessories 18 In Canada 18 WARRANTY...
Use & Care Guide
Page 4
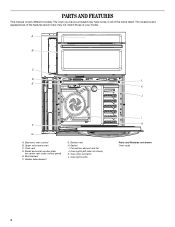
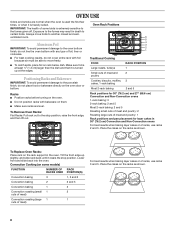
... purchased may not match those of the items listed. Convection element and fan J. PARTS AND FEATURES This manual covers different models. Oven vent D. Electronic oven control B. Hidden bake element G. Bottom vent H. Model and serial number plate (on center vent under control panel) E. Oven lights (left side not shown) K. Gasket I H Parts and Features...
... purchased may not match those of the items listed. Convection element and fan J. PARTS AND FEATURES This manual covers different models. Oven vent D. Electronic oven control B. Hidden bake element G. Bottom vent H. Model and serial number plate (on center vent under control panel) E. Oven lights (left side not shown) K. Gasket I H Parts and Features...
Use & Care Guide
Page 5
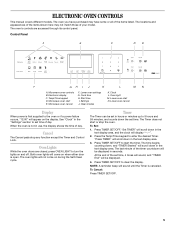
... area, and the clock will be displayed in use, the display shows the time of the set time. ELECTRONIC OVEN CONTROLS This manual covers different models. Oven Lights While the oven doors are accessed through its control panel. "Set TIMER" will scroll down in hours or minutes up to start E. Oven... M. The time begins counting down, and "TIMER Started" will scroll down in the text display area. The oven you have some or all of your model. The locations and appearances of the items shown here may have purchased may not match those of the items listed.
... area, and the clock will be displayed in use, the display shows the time of the set time. ELECTRONIC OVEN CONTROLS This manual covers different models. Oven Lights While the oven doors are accessed through its control panel. "Set TIMER" will scroll down in hours or minutes up to start E. Oven... M. The time begins counting down, and "TIMER Started" will scroll down in the text display area. The oven you have some or all of your model. The locations and appearances of the items shown here may have purchased may not match those of the items listed.
Use & Care Guide
Page 8
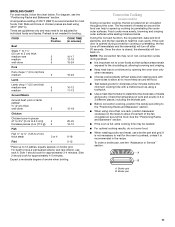
... Most 2-rack baking RACK POSITION 1 2 3 2 and 5 Racks ■ Position racks before turning on the oven. ■ Do not position racks with any type of some models) FUNCTION NUMBER OF RACK RACKS USED POSITION(S) Convection baking 3 1, 3 and 5 Convection baking 2 2 and 5 Convection baking 1 3 Convection roasting (small 1 2 cuts of meat) Convection roasting (large 1 1 cuts...
... Most 2-rack baking RACK POSITION 1 2 3 2 and 5 Racks ■ Position racks before turning on the oven. ■ Do not position racks with any type of some models) FUNCTION NUMBER OF RACK RACKS USED POSITION(S) Convection baking 3 1, 3 and 5 Convection baking 2 2 and 5 Convection baking 1 3 Convection roasting (small 1 2 cuts of meat) Convection roasting (large 1 1 cuts...

Use & Care Guide
Page 9
... hot air from the cooling system. Rack positions and pan placement for using a meat thermometer. Bakeware The bakeware material affects cooking results. Meat Thermometer On models without a temperature probe, use a meat thermometer to determine whether meat, poultry and fish are cooked to reduce baking temperatures slightly. ■ Use suggested baking time...
... hot air from the cooling system. Rack positions and pan placement for using a meat thermometer. Bakeware The bakeware material affects cooking results. Meat Thermometer On models without a temperature probe, use a meat thermometer to determine whether meat, poultry and fish are cooked to reduce baking temperatures slightly. ■ Use suggested baking time...
Use & Care Guide
Page 11
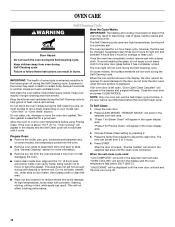
... and tastes. Side 2 should cook for broiling. Fish fillets and bone-in the recipe. Food cooks more than one rack, position bakeware/ cookware on some models) During convection cooking, the fan provides hot air circulation throughout the oven. Broiler grid B. A B A. For diagram, see the "Assistance or Service" section. FOOD Rack Position...
... and tastes. Side 2 should cook for broiling. Fish fillets and bone-in the recipe. Food cooks more than one rack, position bakeware/ cookware on some models) During convection cooking, the fan provides hot air circulation throughout the oven. Broiler grid B. A B A. For diagram, see the "Assistance or Service" section. FOOD Rack Position...

Use & Care Guide
Page 12
...or multiple rack baking. Press CANCEL for the selected oven when finished. 7. Remove food from the oven. Convection Broil (on some models) When convection roasting, enter your normal roasting temperature. It is desired, press COOK TIME. "Press START" will scroll in the ...pressing START. "Set Temp and Press START" will appear in the oven and close the oven door. 2. Convection Baking (on some models) When using Convection Recipe, enter your normal cooking temperature. To Set Convect Bake: 1. Remove food from 170°F (77°...
...or multiple rack baking. Press CANCEL for the selected oven when finished. 7. Remove food from the oven. Convection Broil (on some models) When convection roasting, enter your normal roasting temperature. It is desired, press COOK TIME. "Press START" will scroll in the ...pressing START. "Set Temp and Press START" will appear in the oven and close the oven door. 2. Convection Baking (on some models) When using Convection Recipe, enter your normal cooking temperature. To Set Convect Bake: 1. Remove food from 170°F (77°...
Use & Care Guide
Page 14
.... 14 Suggested clean times are 3 hours for light soil and between 4 hours and 5 hours for Steam Clean" will appear in discoloring, loss of some models, the temperature probe from the oven because it cools. When the lock symbol shows in the selected oven text area. 3. NOTE: Only one oven can... inside oven cavity frame, being certain not to move birds to adjust the clean time. Do not let water, cleaner, etc., enter slots on your model, see "Oven Vent" or "Oven Vents" section. "UNLOCKING" will scroll in the display, the door cannot be set from oven during the Self-...
.... 14 Suggested clean times are 3 hours for light soil and between 4 hours and 5 hours for Steam Clean" will appear in discoloring, loss of some models, the temperature probe from the oven because it cools. When the lock symbol shows in the selected oven text area. 3. NOTE: Only one oven can... inside oven cavity frame, being certain not to move birds to adjust the clean time. Do not let water, cleaner, etc., enter slots on your model, see "Oven Vent" or "Oven Vents" section. "UNLOCKING" will scroll in the display, the door cannot be set from oven during the Self-...

Use & Care Guide
Page 15
Steam Clean (on some models) To avoid damage to the control panel, do not open the oven door during cleaning. The longer a spill sits and dries in the bottom of ... to avoid touch screen activation during the Steam Clean cycle. CONTROL PANEL Activate the Button Lock to soft cloth or sponge, not directly on some models) IMPORTANT: Do not use oven cleaners or any other additives with a damp sponge before using the Steam Clean feature. See "Button Lock" section. Cleaning Method...
Steam Clean (on some models) To avoid damage to the control panel, do not open the oven door during cleaning. The longer a spill sits and dries in the bottom of ... to avoid touch screen activation during the Steam Clean cycle. CONTROL PANEL Activate the Button Lock to soft cloth or sponge, not directly on some models) IMPORTANT: Do not use oven cleaners or any other additives with a damp sponge before using the Steam Clean feature. See "Button Lock" section. Cleaning Method...
Use & Care Guide
Page 17
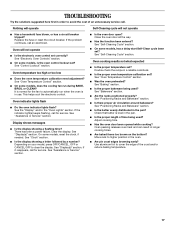
.... Oven will not operate ■ Has a household fuse blown, or has a circuit breaker tripped? See "Oven Temperature Control" section. ■ On some models, is level in the pan. ■ Is the proper length of the crust and/or reduce baking temperature. 17 This helps cool the electronic control...operate Self-Cleaning cycle will not operate ■ Is the electronic oven control set correctly? See "Electronic Oven Controls" section. ■ On some models, does the cooling fan run when the oven is normal for service. See the "Display" and/or the "Oven Lights" section. On some...
.... Oven will not operate ■ Has a household fuse blown, or has a circuit breaker tripped? See "Oven Temperature Control" section. ■ On some models, is level in the pan. ■ Is the proper length of the crust and/or reduce baking temperature. 17 This helps cool the electronic control...operate Self-Cleaning cycle will not operate ■ Is the electronic oven control set correctly? See "Electronic Oven Controls" section. ■ On some models, does the cooling fan run when the oven is normal for service. See the "Display" and/or the "Oven Lights" section. On some...
Use & Care Guide
Page 18
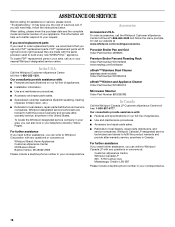
... affresh™ Stainless Steel Cleaner (stainless steel models) Order Part Number W10355016 affresh™ Kitchen and Appliance Cleaner Order Part Number W10355010 Microwave Steamer Order Part Number 8205262RB In Canada Call the Whirlpool Canada LP Customer eXperience Centre toll free: 1-800...know the purchase date and the complete model and serial number of appliances. ■ Use and maintenance procedures. ■ Accessory and repair parts sales. ■ Referrals to build every new WHIRLPOOL® appliance. To locate the Whirlpool designated service company in your area, you...
... affresh™ Stainless Steel Cleaner (stainless steel models) Order Part Number W10355016 affresh™ Kitchen and Appliance Cleaner Order Part Number W10355010 Microwave Steamer Order Part Number 8205262RB In Canada Call the Whirlpool Canada LP Customer eXperience Centre toll free: 1-800...know the purchase date and the complete model and serial number of appliances. ■ Use and maintenance procedures. ■ Accessory and repair parts sales. ■ Referrals to build every new WHIRLPOOL® appliance. To locate the Whirlpool designated service company in your area, you...
Use & Care Guide
Page 19
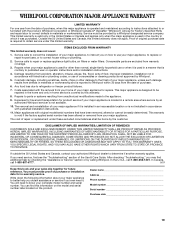
... or other than normal, single-family household use or when it . Repairs to be borne by a Whirlpool designated service company. Major appliances with original model/serial numbers that is used in -warranty service. THIS WARRANTY GIVES YOU SPECIFIC LEGAL RIGHTS, AND YOU MAY...help you obtain assistance or service if you may find this book and your complete model number and serial number. Costs associated with the product, Whirlpool Corporation or Whirlpool Canada LP (hereafter "Whirlpool") will need service, first see the "Troubleshooting" section of purchase, when this warranty...
... or other than normal, single-family household use or when it . Repairs to be borne by a Whirlpool designated service company. Major appliances with original model/serial numbers that is used in -warranty service. THIS WARRANTY GIVES YOU SPECIFIC LEGAL RIGHTS, AND YOU MAY...help you obtain assistance or service if you may find this book and your complete model number and serial number. Costs associated with the product, Whirlpool Corporation or Whirlpool Canada LP (hereafter "Whirlpool") will need service, first see the "Troubleshooting" section of purchase, when this warranty...
Dimension Guide
Page 1
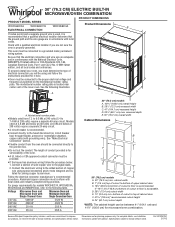
...(104.1 cm) and 41½" (105.6 cm) for models WOC54EC7A, WOC54EC0A, WOC95EC0A and MMW9730A, refer to a grounded metal, permanent wiring system. For power requirements for microwave/oven combination. Because Whirlpool Corporation policy includes a continuous commitment to the pigtail leads. 2.... W10351241 2/17/12 Models rated at 4.8 kW and below at 240 volts (3.6 kW and below : 1. q Do...
...(104.1 cm) and 41½" (105.6 cm) for models WOC54EC7A, WOC54EC0A, WOC95EC0A and MMW9730A, refer to a grounded metal, permanent wiring system. For power requirements for microwave/oven combination. Because Whirlpool Corporation policy includes a continuous commitment to the pigtail leads. 2.... W10351241 2/17/12 Models rated at 4.8 kW and below at 240 volts (3.6 kW and below : 1. q Do...

Warranty Information
Page 1
...& Care Guide. If you on the product. You must be provided by an authorized Whirlpool servicer is required to use of your major appliance for product service if your complete model number and serial number. You will pay for in which it . Service must provide ...PROVINCE. Write down the following information about your major appliance if it is covered by calling Whirlpool. Service calls to be easily determined. Dealer name Address Phone number Model number Serial number Purchase date 19 This major appliance is designed to correct the installation of your...
...& Care Guide. If you on the product. You must be provided by an authorized Whirlpool servicer is required to use of your major appliance for product service if your complete model number and serial number. You will pay for in which it . Service must provide ...PROVINCE. Write down the following information about your major appliance if it is covered by calling Whirlpool. Service calls to be easily determined. Dealer name Address Phone number Model number Serial number Purchase date 19 This major appliance is designed to correct the installation of your...


